[iOS]-NSTimer与循环引用的理解
目录:
- 参考的博客:
- 问题引入
- 循环引用
- 简单的循环引用
- Block中的循环引用强弱共舞
- Delegate中的循环引用
- NSTimer
- 创建NSTimer
- 销毁NSTimer
- invalidate
- fire
- 面试题
- 如何解决NSTimer强持有的问题?
- 中间的代理对象
- 使用NSObject类实现消息转发
- 使用NSProxy类实现消息转发
- 改变timer引用
- 使用Category
- 在合适的地方调用invalidate方法
参考的博客:
[iOS开发]NSTimer与循环引用的理解
NSTimer相关内容日常中时长会用到,且在runLoop中接触过,当时只是简单了解,NSTimer也是很重要的一部分,也是面试中经常会问到的,下面我们就详细总结一下这部分内容和循环引用部分的理解
问题引入
我们围绕这几个问题展开:
- 什么是循环引用?
NSTimer里面为什么要强引用target?- 有什么更好的方式来解决这种循环引用吗?
循环引用
简单的循环引用
简单的循环引用就是:
对象
A持有对象B,同时对象B也持有对象A
我们举个简单例子体现一下循环引用:
@interface FirstPerson : NSObject

@property (nonatomic, strong) SecondPerson *test;

@end
@interface SecondPerson : NSObject

@property (nonatomic, strong) FirstPerson *test;

@end
如果不是循环引用就是单向持有,假设是A持有B,也就是B是A的一个属性,而B不持有A
若对
A发送release消息,发现持有对象B,则向对象B发送release消息,B对象执行dealloc方法,引用计数为0,释放内存,同时A对象引用计数也为0,内存得到正确释放
如果是循环引用
若对
A发送release消息,发现持有B对象,则会向B对象发送release消息,等待b释放内存。B收到release消息后,发现持有A,于是也向A发送release消息,等待A释放内存。此时就会发生A等待B释放内存,B又等待A释放内存,造成了死锁,发生内存泄漏
如果我们使用weak就可以破解这个循环引用
若对A发送
release消息,发现持有B对象,则会向B对象发送release消息,等待B释放内存。B收到release消息后,虽然持有A(weak),但不会等待A释放内存,此时引用计数为0,执行dealloc,释放内存,同时A的引用计数变成了0,执行dealloc,释放内存
Block中的循环引用强弱共舞
如果我们在某个页面的属性中声明了一个block,那么就相当于我们这个页面的self持有了这个block
如果我们在block再持有self,这个时候就会造成循环引用,例子如下:
- (void)touchesBegan:(NSSet<UITouch *> *)touches withEvent:(UIEvent *)event {
    self.blk = ^{
        //5秒后执行
        dispatch_after(dispatch_time(DISPATCH_TIME_NOW, (int64_t)(5 * NSEC_PER_SEC)), dispatch_get_main_queue(), ^{
            NSLog(@"%@", weakSelf);
        });
    };
    self.blk();
    //dismiss当前界面
	[self dismissViewControllerAnimated:YES completion:nil];
}
self对象持有block,block里面又持有self,而且彼此之间都是默认的强引用,这就导致了一个循环引用,这个时候我们一执行后面的dismiss退出当前界面之后就会产生,界面已经销毁了,但是刚才产生的循环引用还在,就导致了内存泄漏
那这个问题要怎么解决呢?
我们可以对self进行weak处理,让block中持有的是weak修饰后的self,就可以避免循环引用,代码如下:
- (void)touchesBegan:(NSSet<UITouch *> *)touches withEvent:(UIEvent *)event {
	//用weak修饰self,然后让block持有这个weak修饰过后的self
    __weak typeof(self) weakSelf = self;
    self.blk = ^{
        //5秒后执行
        dispatch_after(dispatch_time(DISPATCH_TIME_NOW, (int64_t)(5 * NSEC_PER_SEC)), dispatch_get_main_queue(), ^{
            NSLog(@"%@", weakSelf);
        });
    };
    self.blk();
    [self dismissViewControllerAnimated:YES completion:nil];
}
这样就没有什么问题了,由于是block弱引用self,所以已经打破了之前的循环引用,此时如果后面执行dismiss销毁当前视图的话,我们去打印刚才的self的值已经是null了。
但是单独添加一个weak修饰的self是有一些漏洞的,如果在block执行到关于self的那部分之前,我们的self在外部被提前释放掉了的话,那么当执行到block有关self的那块部分时程序就会崩溃。为了解决这个问题,我们就可以在weak修饰完self之后,让block持有再用strong修饰的已经被weak修饰过的self,在block内部让self的引用计数先加1保证self不会意外释放,然后当block中的内容执行完之后出block中代码的作用域的时候刚才加1的引用计数会自动release减1,这样一来,既避免了循环引用,也避免了self意外释放,代码示例如下:
- (void)touchesBegan:(NSSet<UITouch *> *)touches withEvent:(UIEvent *)event {
 	//用weak修饰self
	__weak typeof(self) weakSelf = self;
    self.blk = ^{
    	//用strong修饰被weak修饰过的self
    	__strong typeof(self) strongSelf = weakSelf;
        //5秒后执行
        dispatch_after(dispatch_time(DISPATCH_TIME_NOW, (int64_t)(5 * NSEC_PER_SEC)), dispatch_get_main_queue(), ^{
            NSLog(@"%@", strongSelf);
        });
    };
    self.blk();
    [self dismissViewControllerAnimated:YES completion:nil];
}
Delegate中的循环引用
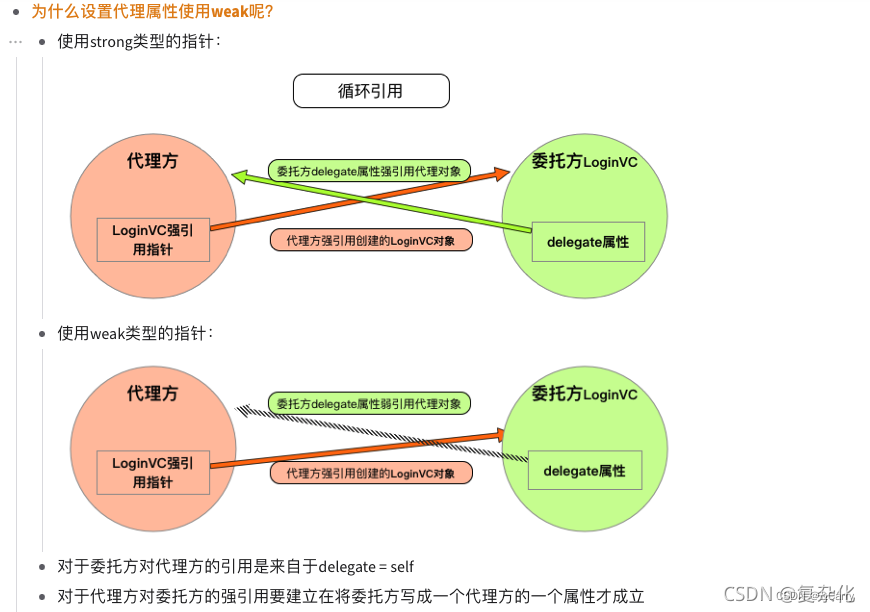
举个简单例子:我们当前界面的self持有一个tableView,然后tableView的delegate又设置为我们的self,假如这之间都是强持有的话就会造成一个循环引用的效果,所以我们的delegate一般都需要用weak来修饰,用来避免循环引用。
NSTimer
之前学习的循环引用部分我们就结束了,下面步入正题NSTimer
创建NSTimer
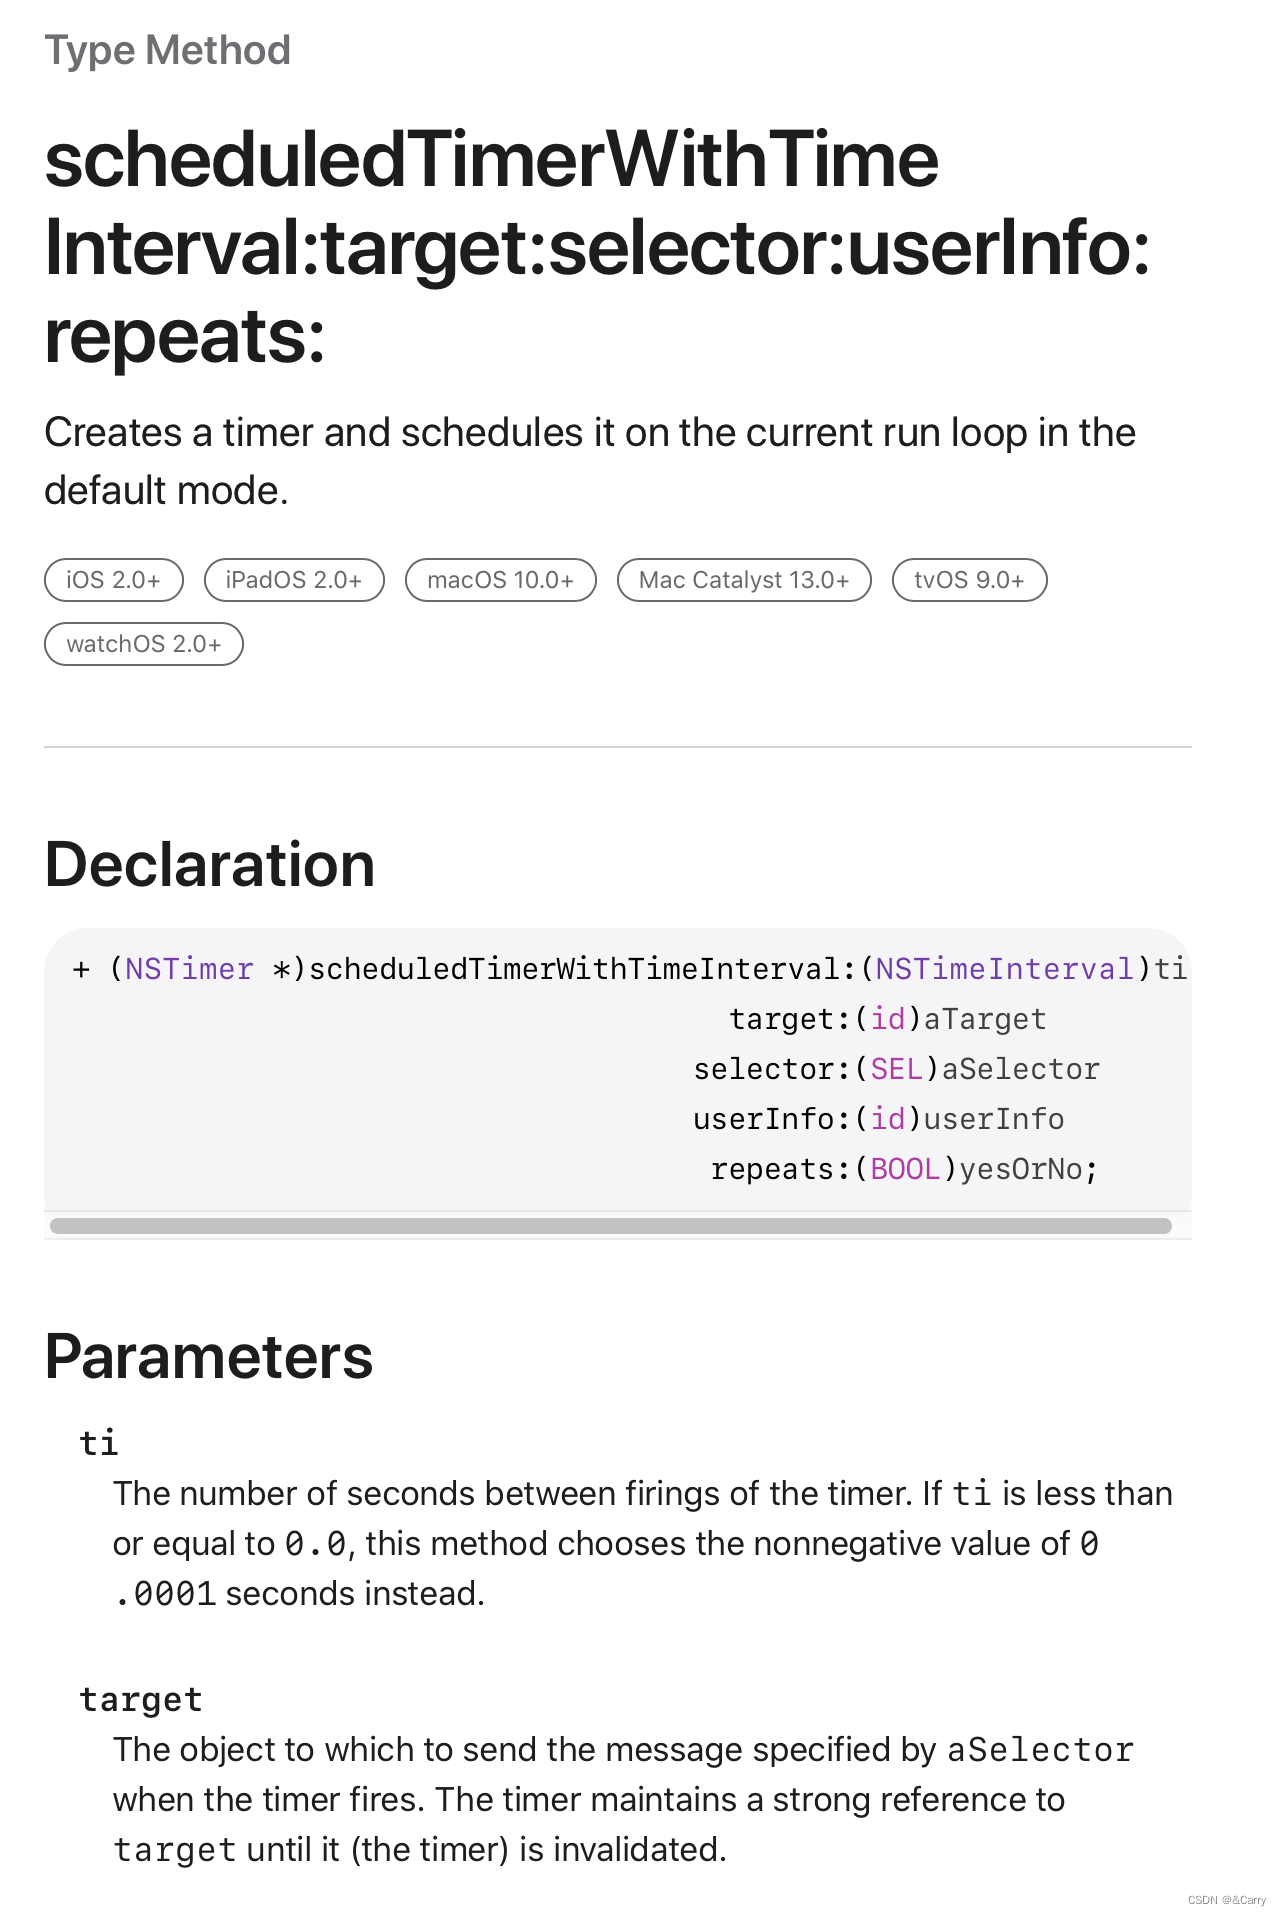
创建NSTimer有三种方法:
常用的一种是:
+ (NSTimer *)scheduledTimerWithTimeInterval:(NSTimeInterval)ti target:(id)target selector:(SEL)aSelector userInfo:(id)userInfo repeats:(BOOL)repeats
不常用的方法是:
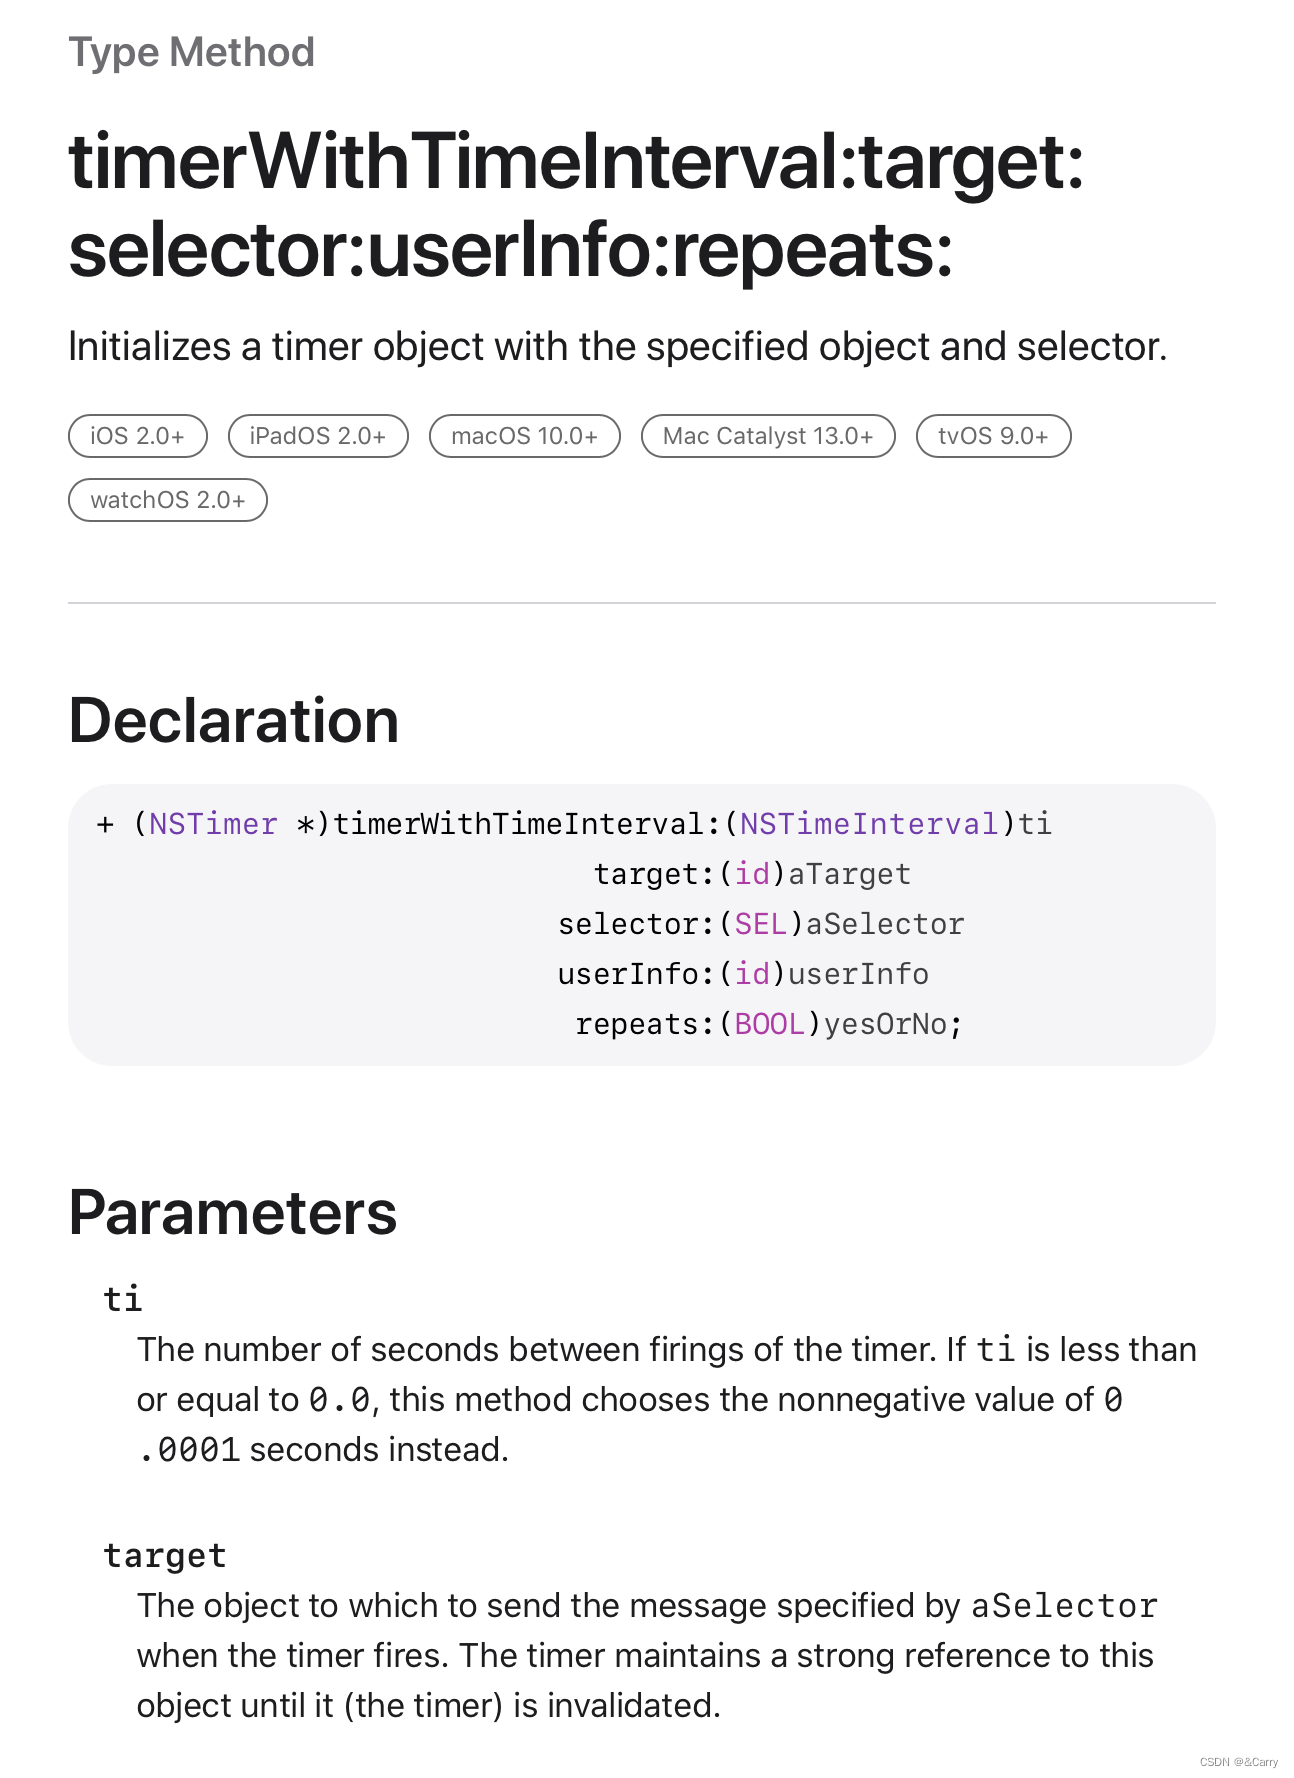
+ (NSTimer *)timerWithTimeInterval:(NSTimeInterval)ti target:(id)target selector:(SEL)aSelector userInfo:(id)userInfo repeats:(BOOL)repeats
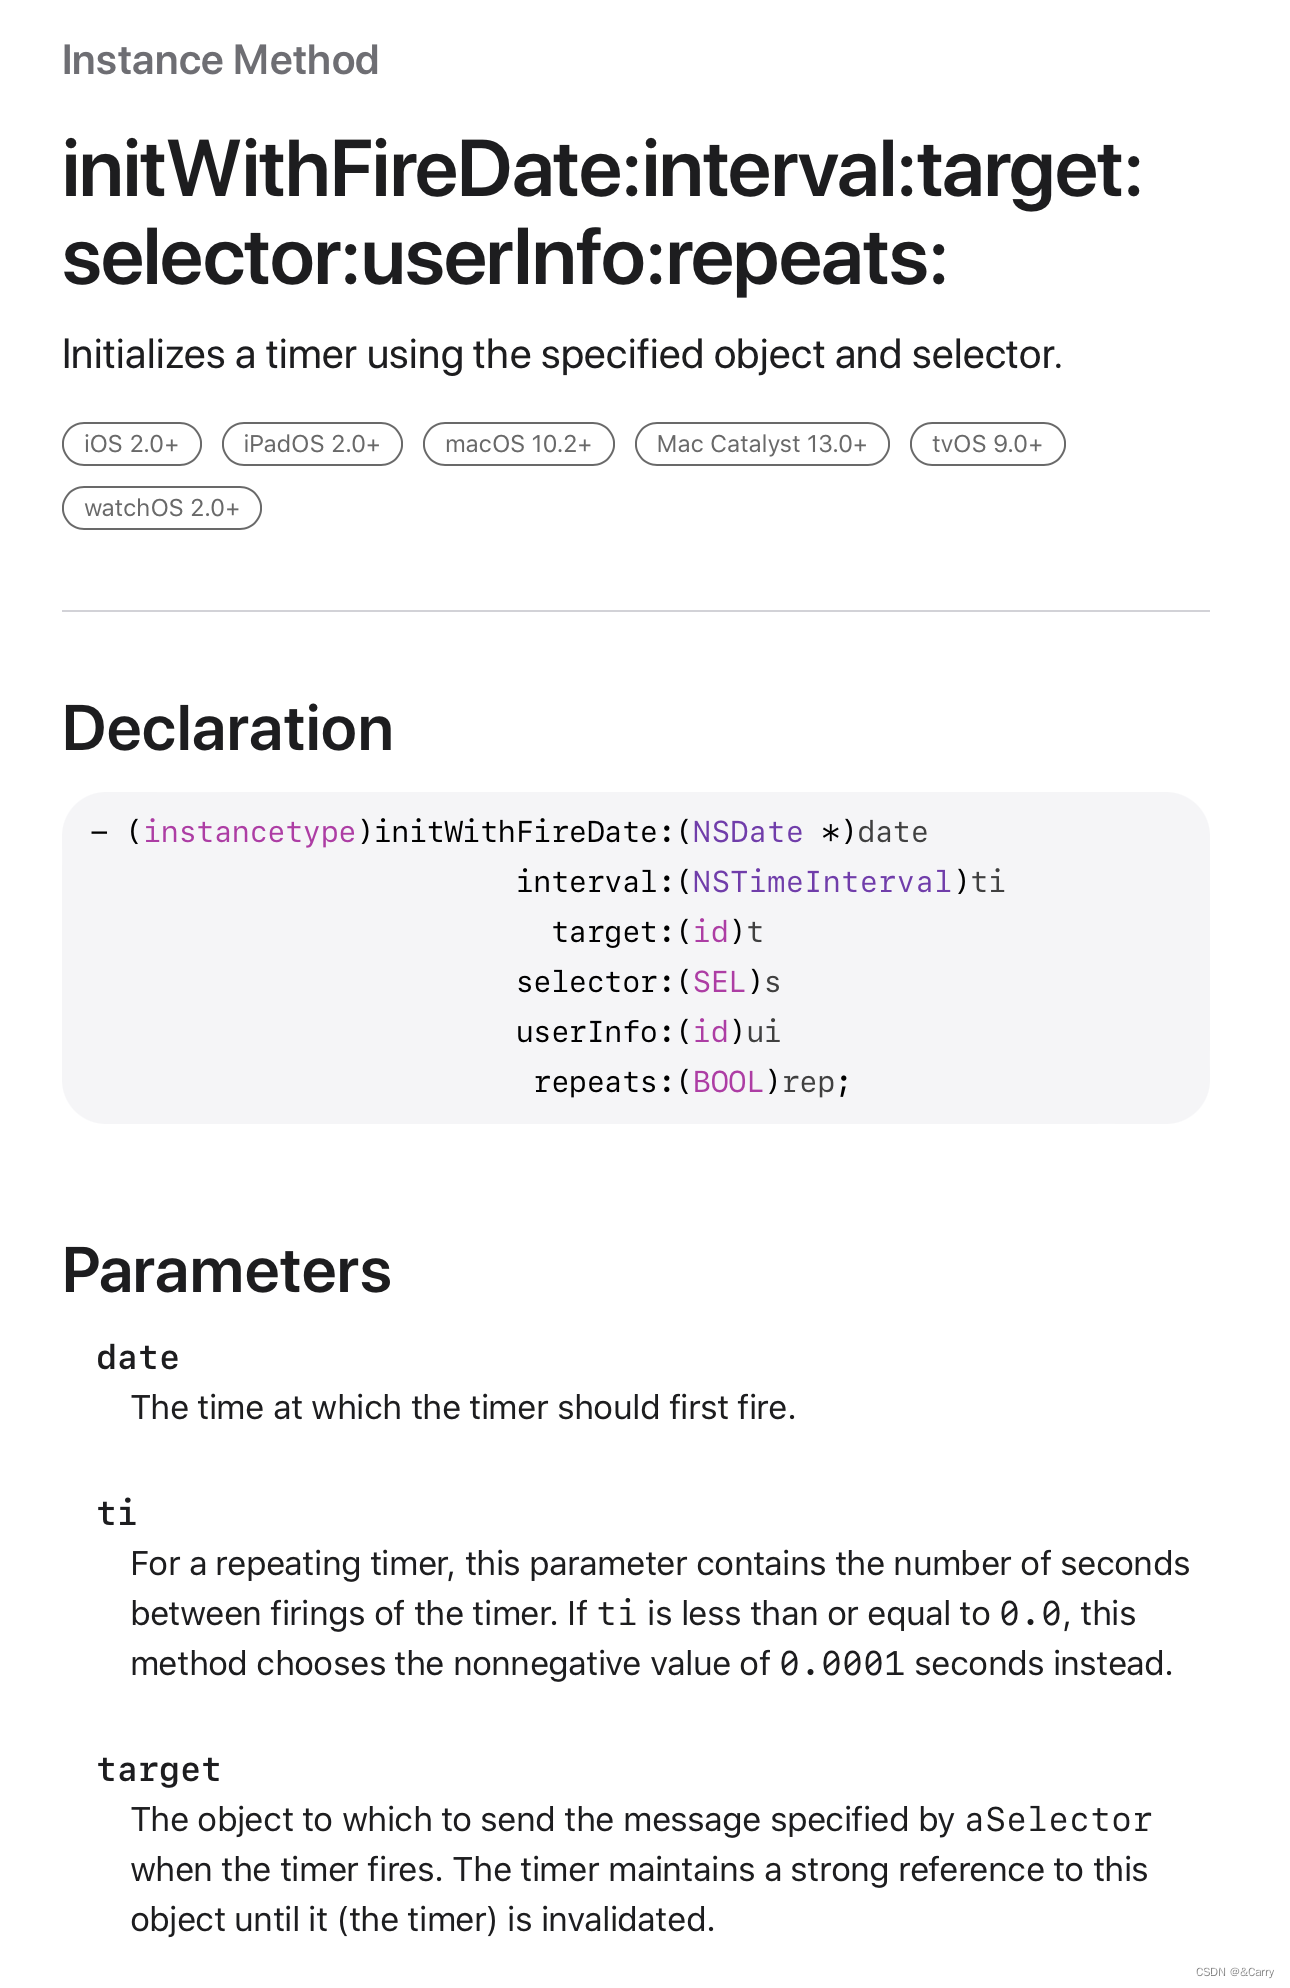
- (instancetype)initWithFireDate:(NSDate *)date interval:(NSTimeInterval)ti target:(id)target selector:(SEL)aSelector userInfo:(id)userInfo repeats:(BOOL)repeats
这几种方法除了创建方式(参数)不同,方法类型不同(类方法,对象方法),还有什么不同?
我们常用的scheduledTimerWithTimeInterval相比与其他两种方法,其不仅仅是创建了NSTimer对象,还把该对象加入到了当前的runloop中
NSTimer只有被加入到runloop中,才会生效,NSTimer才会真正执行
也就是说,如果我们想使用timerWithTimeInterval或initWithFireDate的话,需要使用NSRunloop的以下方法将NSTimer加入到runloop中
- (void)addTimer:(NSTimer *)aTimer forMode:(NSString *)mode
销毁NSTimer
有两个方式:invalidate和fire
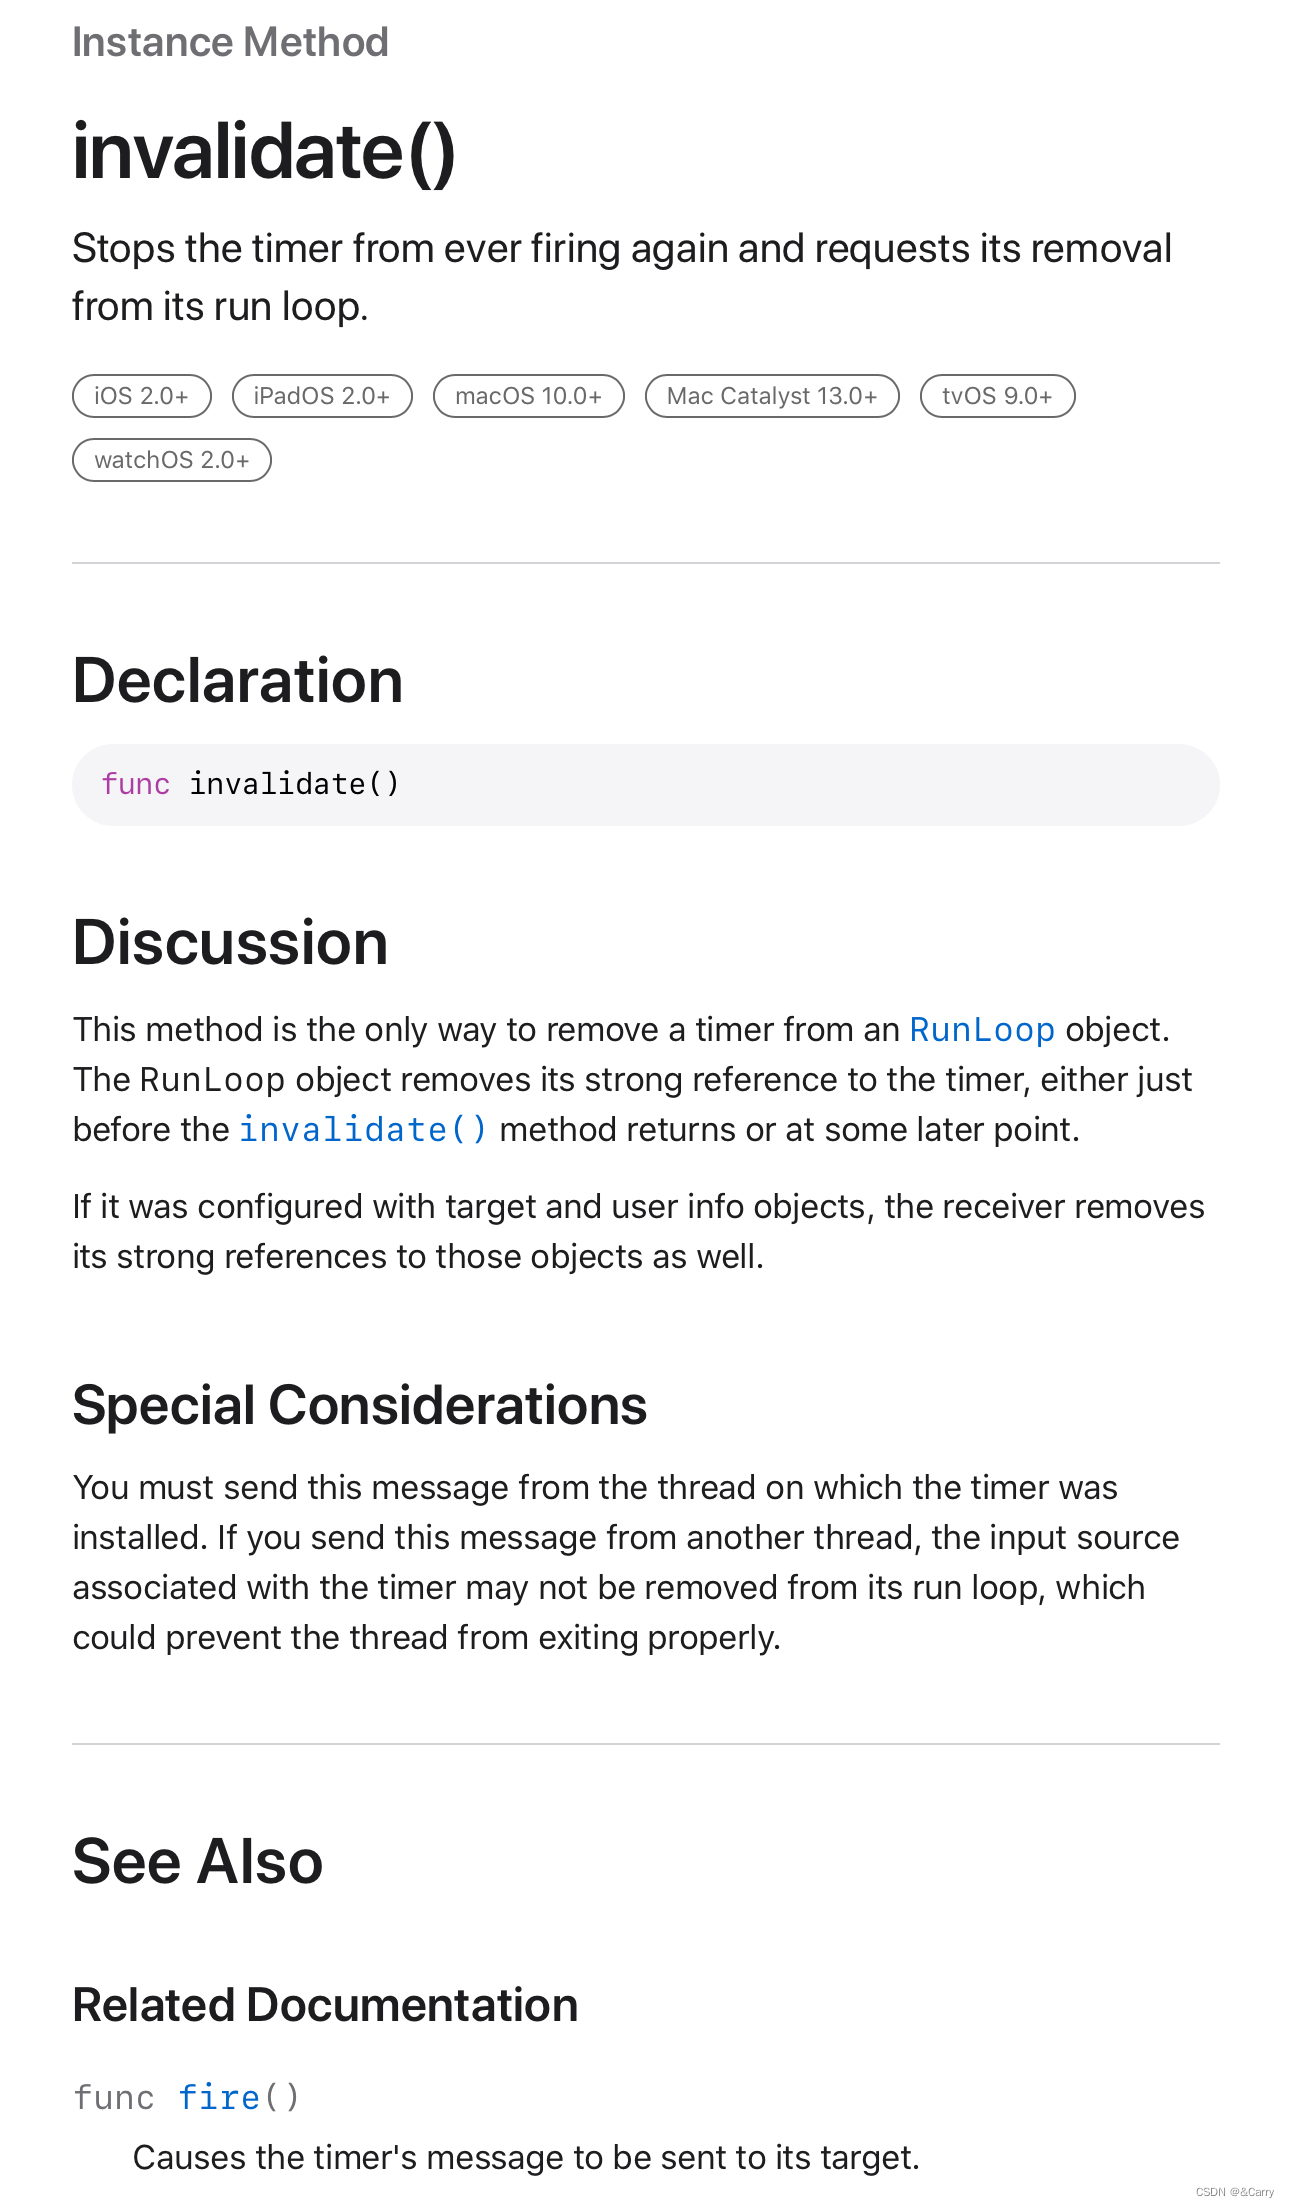
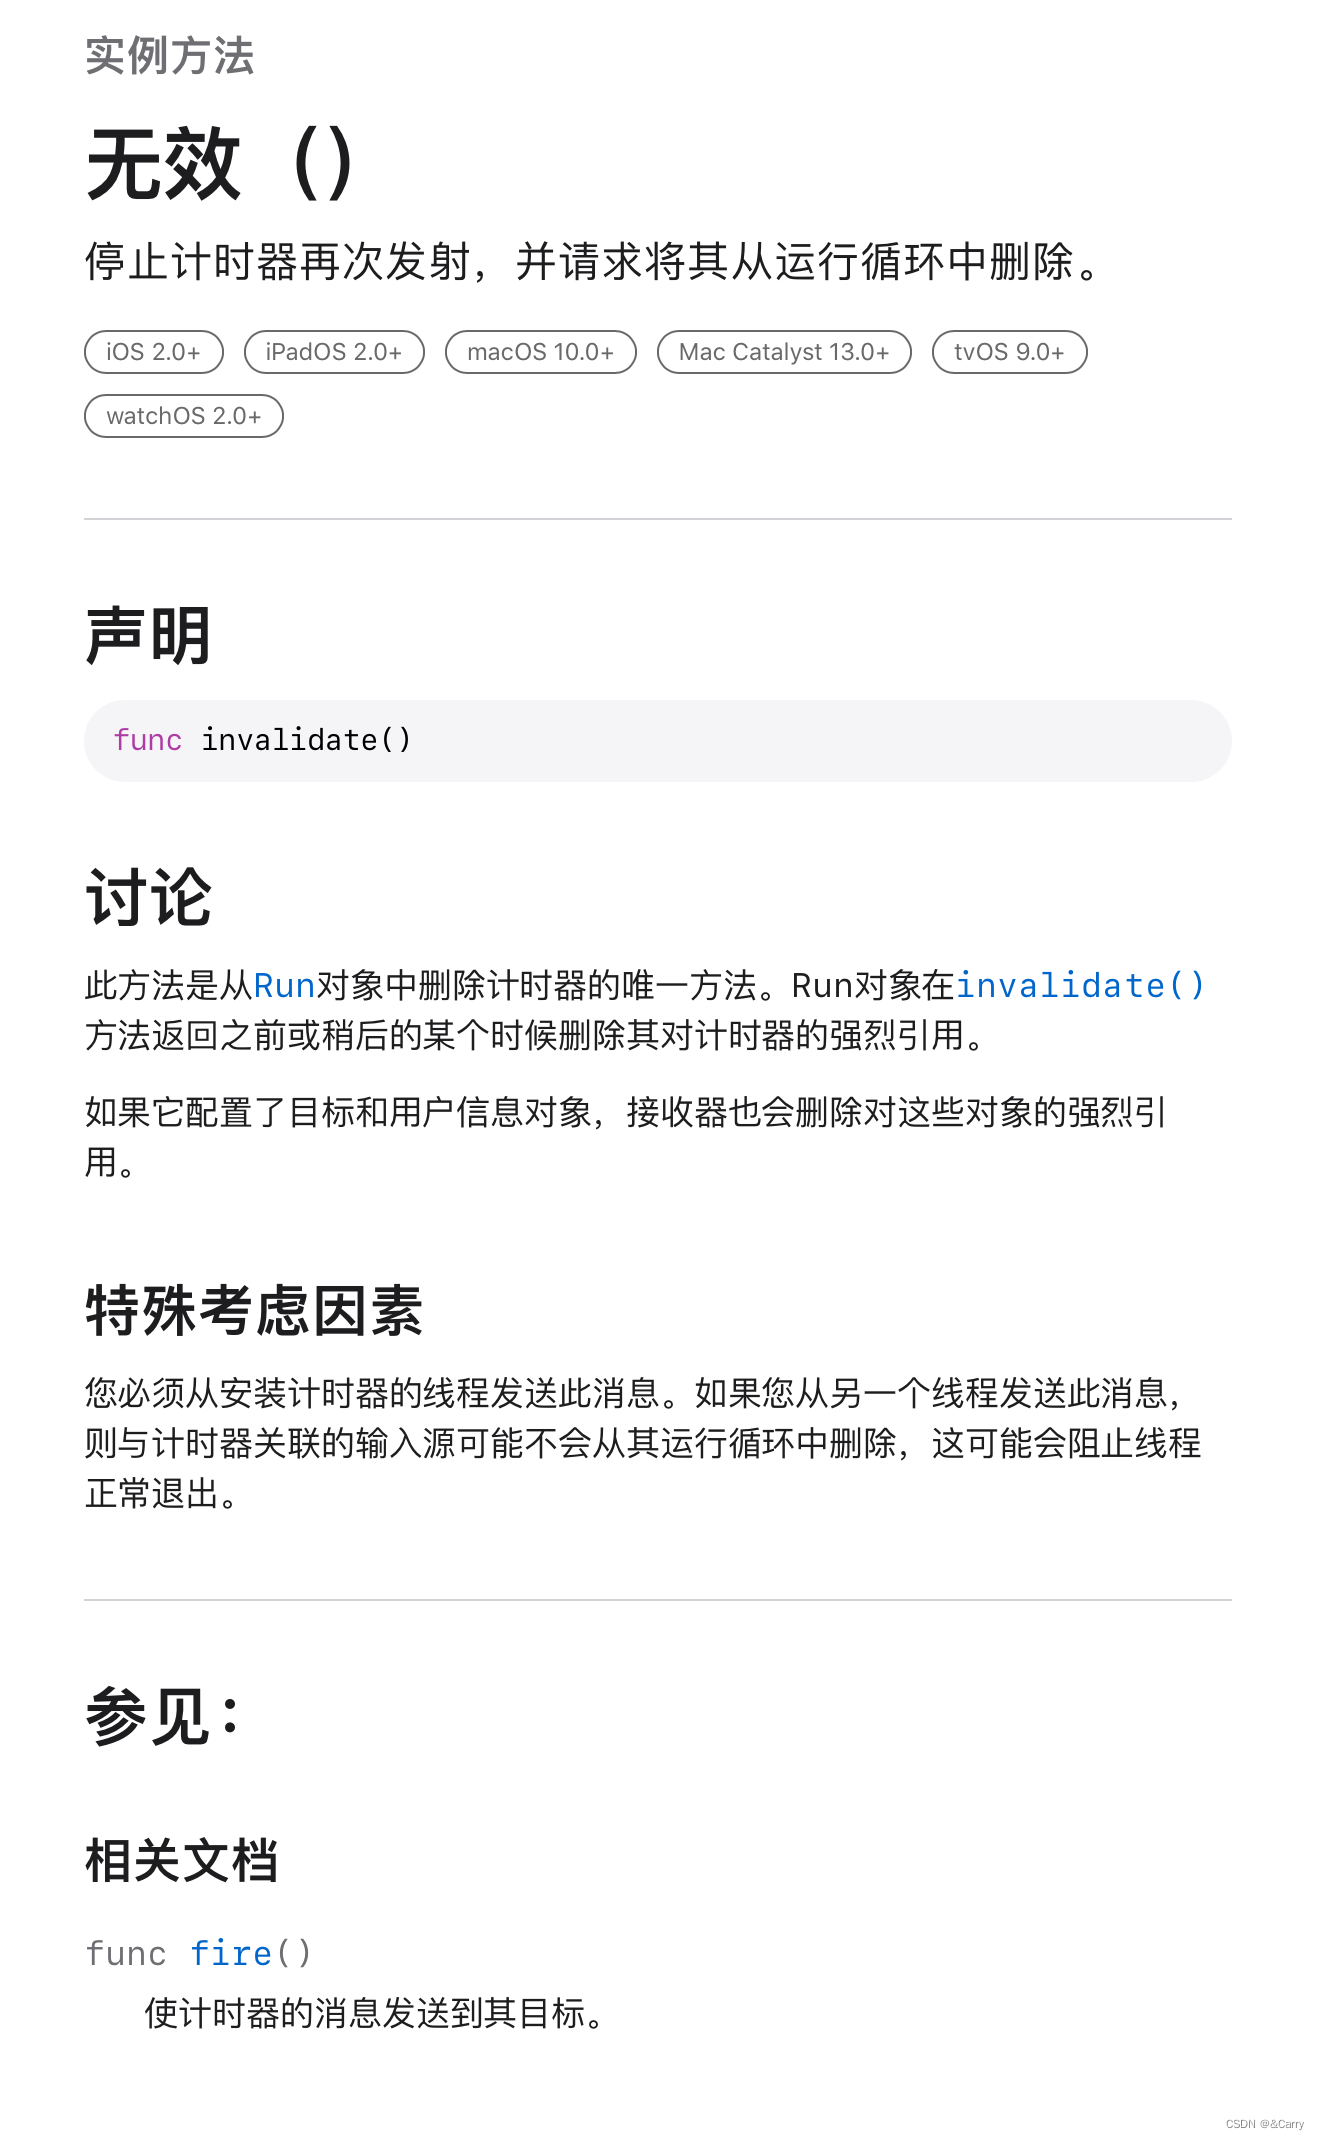
invalidate
ver from ever firing again and requests its removal from its run loop
This method is the only way to remove a timer from an NSRunLoop object
阻止接收器再次触发,并请求将其从
runloop中移除
此方法是从NSRunLoop对象中删除计时器的唯一方法
fire
Causes the receiver’s message to be sent to its target
If the timer is non-repeating, it is automatically invalidated after firing
使接收方的消息发送到其目标
如果计时器不重复,则会在触发后自动失效
总之,如果想要销毁NSTimer,那么一定要使用invalidate方法
那现在就有一个问题了,我们对NSTimer置nil可以让iOS系统帮我买销毁NSTimer吗?
答案是否定的
为什么呢?
我们通过看ARC下的引用计数来探究一下:
- (void)viewDidLoad {
    [super viewDidLoad];
    // Do any additional setup after loading the view.
    NSLog(@"Retain count is %ld", CFGetRetainCount((__bridge CFTypeRef)self));

    _timer = [NSTimer scheduledTimerWithTimeInterval:2 target:self selector:@selector(timerSelector) userInfo:nil repeats:NO];

    NSLog(@"Retain count is %ld", CFGetRetainCount((__bridge CFTypeRef)self));

    [_timer invalidate];

    NSLog(@"Retain count is %ld", CFGetRetainCount((__bridge CFTypeRef)self));

}

- (void) timerSelector {
    NSLog(@"调用了NSTimer!");
}
打印结果如下:

加入了NSTimer之后,引用计数从26变为了27
这个其实是timer对ViewController对象进行了强引用
因为如果要让timer运行的时候执行ViewController下面的timerSelector:,timer就需要知道target,并且保存这个target。以便于在以后执行[target performSelector:];,这里的target就是指ViewController(self)
所以,NSTimer和ViewController是相互之间强引用的,这样子就形成了循环引用的问题。
为了解除循环引用,在 invalidate 这个方法下,timer之前保存的target被设置成了nil,强制断开了循环引用。这点和直接设置timer = nil是差不多的。但是invalidate还做了另外一个动作,就是解除了runLoop对timer的强引用,使得timer成功停止
从官方文档中我们可以看到这一点:
翻译版如下:
- 解除
RunLoop对象对于该定时器的强引用和定时器对其设置的target等的强引用 - 从
RunLoop中移除该定时器
重要的点: 必须在创建定时器的那个线程中调用invalidate方法,否则可能不会从RunLoop中删除与该计时器相关的输入源,从而阻止线程正确退出
所以在创建NSTimer对象的类的dealloc里面去invalidate timer的这个做法是不行的,因为都是相互强引用的,在定时器invalidate前,我们创建NSTimer对象的类的dealloc不可能被执行到。
面试题
NSTimer一定会持有self吗?
从官方文档看三种创建方法:
+ (NSTimer *)scheduledTimerWithTimeInterval:(NSTimeInterval)ti target:(id)target selector:(SEL)aSelector userInfo:(id)userInfo repeats:(BOOL)repeats
其中关键部分target的翻译如下:
计时器触发时将消息发送到对象,该对象由选择器指定。计时器保持对target的强引用,直到它(计时器)失效。
+ (NSTimer *)timerWithTimeInterval:(NSTimeInterval)ti target:(id)target selector:(SEL)aSelector userInfo:(id)userInfo repeats:(BOOL)repeats
其中关键部分target的翻译如下:
计时器触发时将消息发送到对象,该对象由选择器指定。计时器保持对该对象的强引用,直到它(计时器)失效。
- (instancetype)initWithFireDate:(NSDate *)date interval:(NSTimeInterval)ti target:(id)target selector:(SEL)aSelector userInfo:(id)userInfo repeats:(BOOL)repeats
其中关键部分target的翻译如下:
计时器触发时将消息发送到对象,该对象由选择器指定。计时器保持对该对象的强引用,直到它(计时器)失效。
这三种方法关于target的注释无一例外,都是说明定时器会对我们设置的target对象进行强引用。
而且苹果应该也是发现了timer容易造成内存泄漏的问题,所以iOS10以后,这三个方法出了对应新的API,如下:
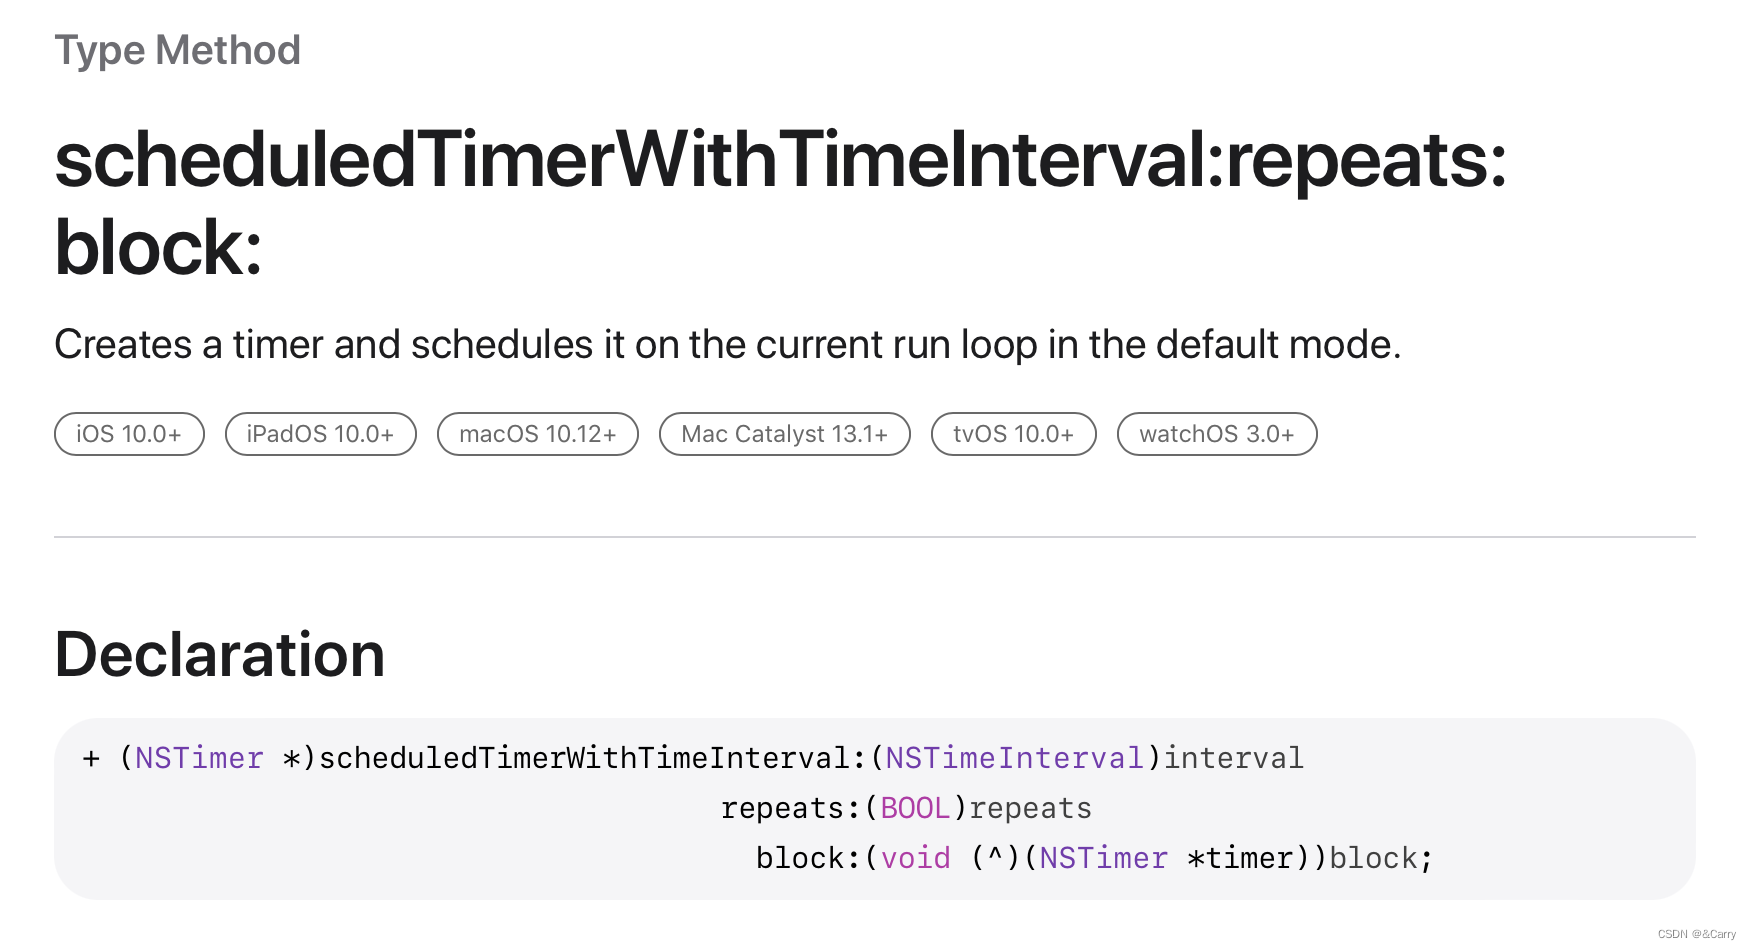

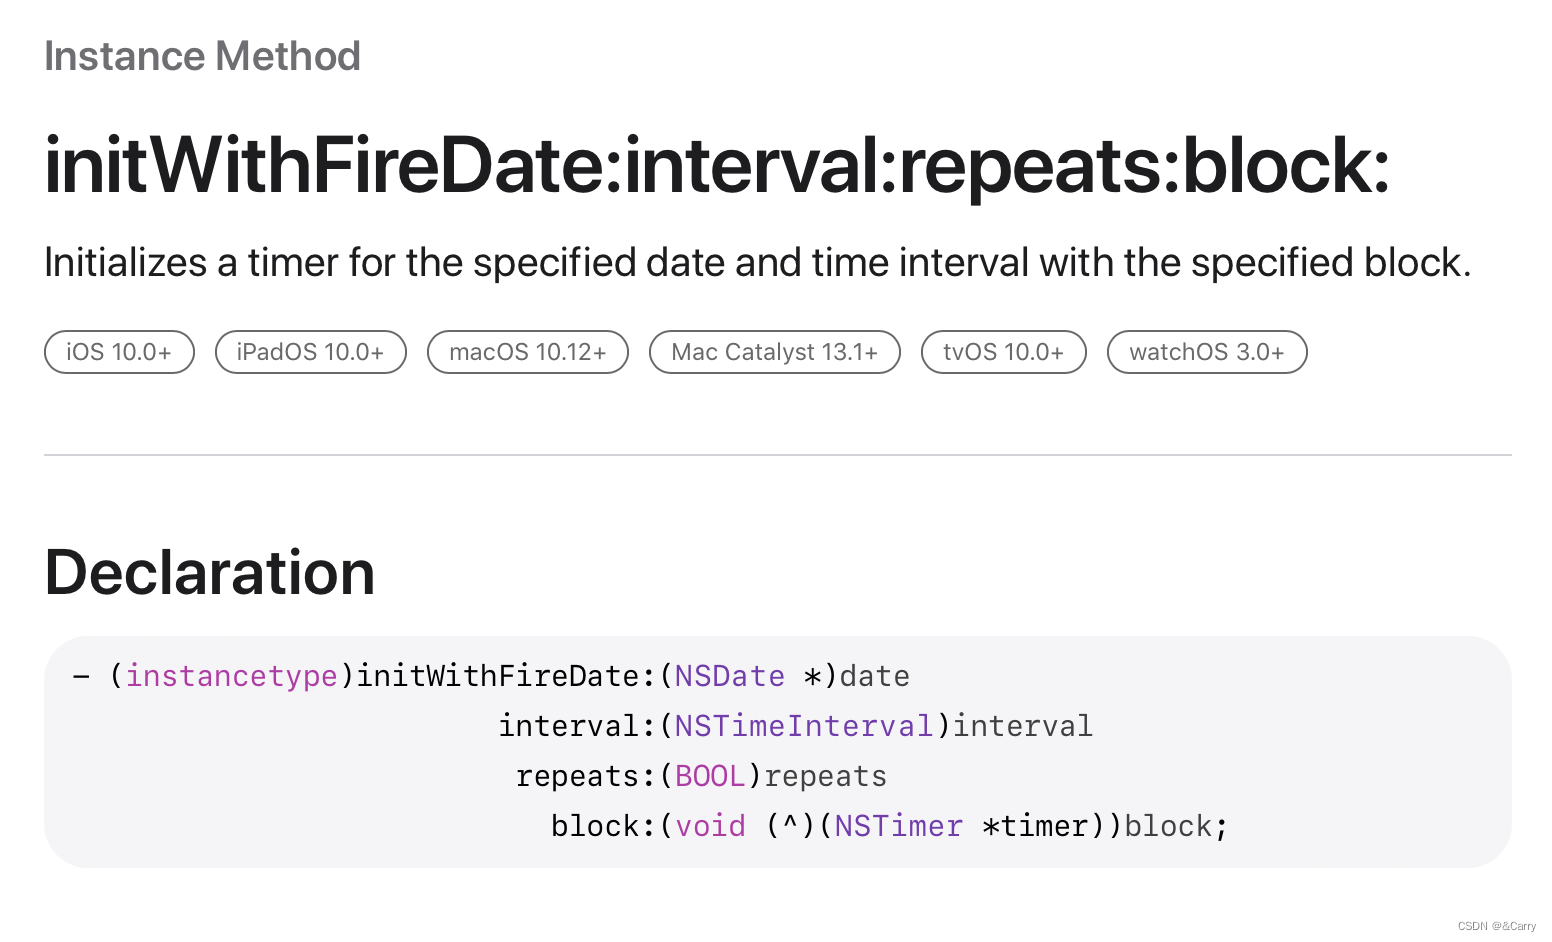
由于这三个API将定时器中我们要执行的任务加到了block中去,且不用设置target,所以就很容易避免循环引用,只需要注意这个block中要用到self的话采用强弱共舞即可。
- 如何解决
NSTimer强持有target的问题?
我们在合适时机手动调用invalidate销毁定时器,或者使用一个代理对象,让timer引用代理对象,代理对象弱引用self,就可以避免循环引用,最合适的就是使用代理对象转发,系统提供的NSProxy(消息转发机制)。我们下面再说 - 那这里
self不持有NSTimer也会出现循环引用吗?
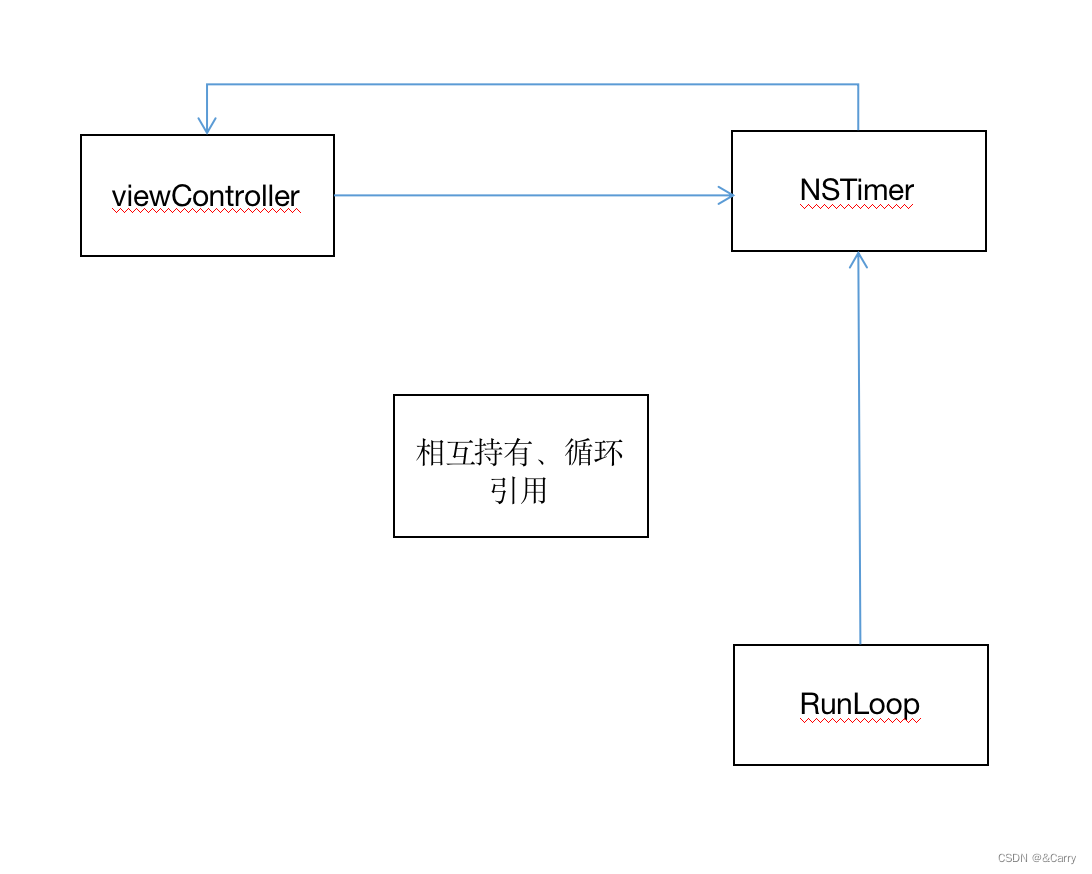
这个有点儿像设套的,说是也许,说不也许,只能说是彼此之间相互引用,导致无法释放,是否可以释放不一定非得取决于循环引用。由于使用NSTimer时是需要添加到RunLoop中的,如果是self不持有,但是NSTimer需要引用target所以必须持有self,这样又会造成一个runloop–>timer–>self这么一个强引用链,导致大家都又释放不了。
两种释放不了的情况如下图所示:
- 那
runloop会持有NSTimer吗
NSTimer只有被加入到runloop中,才会生效,NSTimer才会真正执行,真正执行了RunLoop就会持有NSTimer。
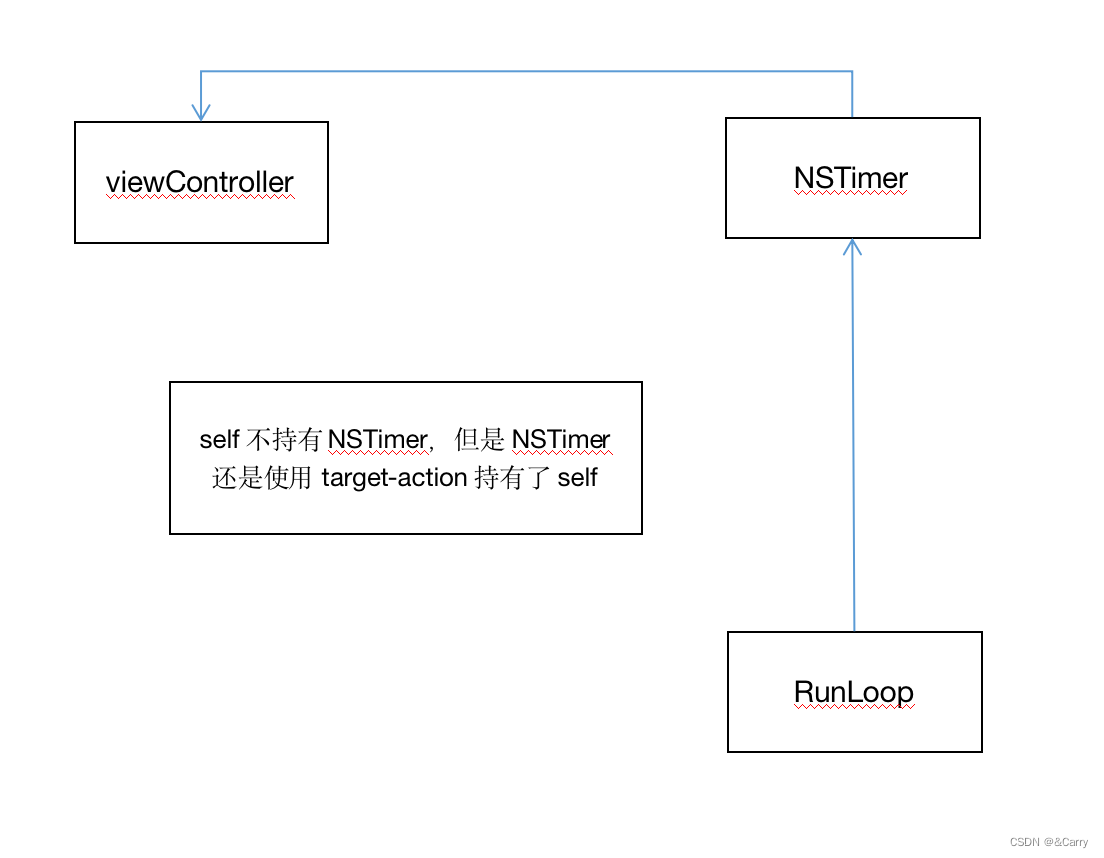
到这里肯定有人疑惑,如果将NSTimer的target弱持有self可以解决这个循环引用问题吗?代码如下:
	// 让 timer 对self 产生弱引用
    __weak typeof(self) weakSelf = self;
    self.timer = [NSTimer scheduledTimerWithTimeInterval:1.0 target:weakSelf selector:@selector(test) userInfo:nil repeats:YES];
答案是不行!
原因就是当我们使用__weak把self转为弱指针的时候,这个只有在Block变脸捕获的时候才生效。所以这里我们应该使用NSTimer的block方法,代码如下:
	// 让 timer 对self 产生弱引用
    __weak typeof(self) weakSelf = self;
    self.timer = [NSTimer scheduledTimerWithTimeInterval:1.0 repeats:YES block:^(NSTimer * _Nonnull timer) {
        [weakSelf test];
    }];
这样就成功了,类似的block版的API我们上方已经介绍过了,一共有三种API。
那么还是疑惑究竟是什么导致的NSTimer弱引用self都无法解决呢?
答案在这里:
其实scheduledTimerWithTimeInterval这个方法会调用initWithFireDate方法,我们去GNUStep源码里面找到NSTimer.m,看看initWithFireDate的实现(此处附上:GNUStep源码下载地址):
- (id) initWithFireDate: (NSDate*)fd
	       interval: (NSTimeInterval)ti
		 target: (id)object
	       selector: (SEL)selector
	       userInfo: (id)info
		repeats: (BOOL)f
{
  if (ti <= 0.0)
    {
      ti = 0.0001;
    }
  if (fd == nil)
    {
      _date = [[NSDate_class allocWithZone: NSDefaultMallocZone()]
        initWithTimeIntervalSinceNow: ti];
    }
  else
    {
      _date = [fd copyWithZone: NSDefaultMallocZone()];
    }
  //下面这行代码是关键原因,不管传入的target是strong修饰还是weak修饰,timer持有的都是target的强引用
  _target = RETAIN(object);
  _selector = selector;
  _info = RETAIN(info);
  if (f == YES)
    {
      _repeats = YES;
      _interval = ti;
    }
  else
    {
      _repeats = NO;
      _interval = 0.0;
    }
  return self;
}
我们可以看到其中关键的:_target = RETAIN(object);,由此可见,不管你传入的target是strong修饰还是weak修饰,timer持有的都是target的强引用,所以传入weakSelf是行不通的。
如何解决NSTimer强持有的问题?
这是上面的第二个面试题
中间的代理对象
使用NSObject类实现消息转发

就是图中所示的这样一个效果
正常使用target-action即将target设置为self,当页面销毁时,不走dealloc方法,造成循环引用:
代码例子如下:
ViewController.h中:
#import <UIKit/UIKit.h>

@interface ViewController : UIViewController

@end


ViewController.m中:
#import "ViewController.h"
#import "SecondController.h"
@interface ViewController ()

@end

@implementation ViewController

- (void)viewDidLoad {
    [super viewDidLoad];
    // Do any additional setup after loading the view.

	UIButton *buttonTest = [UIButton buttonWithType:UIButtonTypeCustom];
    [buttonTest setTitle:@"跳转" forState:UIControlStateNormal];
    [buttonTest setTitleColor:[UIColor blackColor] forState:UIControlStateNormal];
    [buttonTest addTarget:self action:@selector(pressButton) forControlEvents:UIControlEventTouchUpInside];
    buttonTest.frame = CGRectMake(100, 200, 60, 30);
    [self.view addSubview:buttonTest];
}

//当点击跳转按钮时自动跳转进secondController界面
- (void) pressButton {
    SecondController *secondController = [[SecondController alloc] init];
    secondController.modalPresentationStyle = UIModalPresentationFullScreen;
    [self presentViewController:secondController animated:NO completion:nil];
}

@end


//SecondController.h中:
#import <UIKit/UIKit.h>

NS_ASSUME_NONNULL_BEGIN

@interface SecondController : UIViewController

@end

NS_ASSUME_NONNULL_END


//SecondController.m中:
#import "SecondController.h"

@interface SecondController ()
@property (nonatomic, strong) NSTimer *timer;
@end

@implementation SecondController

- (void)viewDidLoad {
    [super viewDidLoad];
    // Do any additional setup after loading the view.

	//打印创建timer前后的self的引用计数
    NSLog(@"Retain count is %ld", CFGetRetainCount((__bridge CFTypeRef)self));

     //创建timer,这个方法会自定将timer添加到RunLoop中去
    _timer = [NSTimer scheduledTimerWithTimeInterval:2 target:self selector:@selector(timerSelector) userInfo:nil repeats:YES];

    NSLog(@"Retain count is %ld", CFGetRetainCount((__bridge CFTypeRef)self));

    NSLog(@"Retain count is %ld", CFGetRetainCount((__bridge CFTypeRef)self));


    self.view.backgroundColor = [UIColor whiteColor];

    //设置一个按钮,点击后dismiss销毁当前视图
    UIButton *buttonTest = [UIButton buttonWithType:UIButtonTypeCustom];
    [buttonTest setTitle:@"返回" forState:UIControlStateNormal];
    [buttonTest setTitleColor:[UIColor blackColor] forState:UIControlStateNormal];
    [buttonTest addTarget:self action:@selector(pressButton) forControlEvents:UIControlEventTouchUpInside];
    buttonTest.frame = CGRectMake(100, 200, 60, 30);
    [self.view addSubview:buttonTest];
}

//按钮的事件函数
- (void) pressButton {
    //销毁当前视图返回到原来的视图
    [self dismissViewControllerAnimated:NO completion:nil];
}

//定时器要执行的函数
- (void)timerSelector {
    NSLog(@"----");
}

//重写dealloc方法做一个标记
- (void) dealloc {
 	//打印标记
    NSLog(@"SecondController dealloc!");
    [_timer invalidate];
}

@end
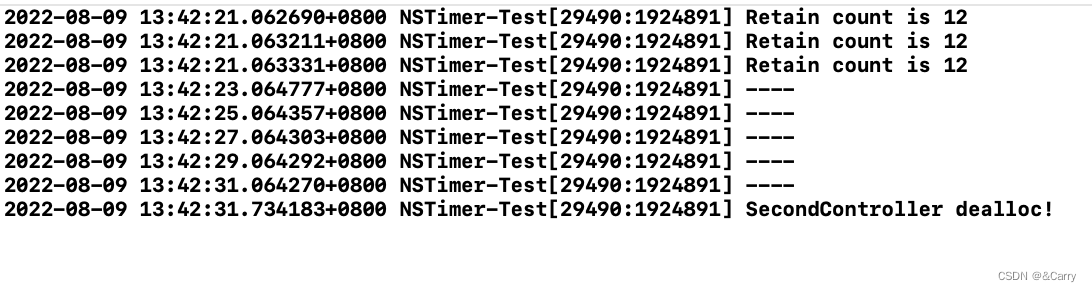
我们执行代码,过一段时间后点击返回按钮后发现并没有调用dealloc方法,视图已经销毁了,但是视图本身self和timer形成了循环引用,导致定时器依然在运作,打印结果如下:

接下来我们创建一个中间类:
TestProxy.h中:
#import <Foundation/Foundation.h>

NS_ASSUME_NONNULL_BEGIN

@interface TestProxy : NSObject

@property (nonatomic, weak) id target;

+ (instancetype) proxyWithTarget:(id)target;

@end

NS_ASSUME_NONNULL_END


TestProxy.m中:
#import "TestProxy.h"

@implementation TestProxy

//实现我们的类方法,创建一个TestProxy类型的对象,然后将传入的参数作为target便于后续的消息转发
+ (instancetype) proxyWithTarget:(id)target {
    TestProxy *proxy = [[TestProxy alloc] init];
    proxy.target = target;
    return proxy;
}

//因为我们的target是新类,而不是self,所以SEL应该也是新类中的SEL,所以我们调用sel方法的时候可以通过第二次拯救,更改timerSelector这条消息的接受者为self.target,(当然我们再实现一次也可以)
- (id)forwardingTargetForSelector:(SEL)aSelector {
    return self.target;
}

@end
有这么一个中间类之后,我们添加timer的target时就可以这样子了:
//只需要调用TestProxy类的类方法时,将参数传成当前界面的self即可
_timer = [NSTimer scheduledTimerWithTimeInterval:1 target:[TestProxy proxyWithTarget:self] selector:@selector(timerSelector) userInfo:nil repeats:YES];
这样子就是利用了消息转发的第二次拯救,实现了将timer的target设置为中间对象,从而避免了timer和self的循环引用。
现在的打印结果如下:
可以看到成功打印dealloc,并且成功销毁了定时器。
使用NSProxy类实现消息转发
这是一个专门用于做消息转发的类,我们需要通过子类的方式来使用它(与第一种方法基本上一样,不过调用时机不同罢了,具体如下:
所以用NSObject也可以,但是用NSproxy会大幅提升性能。
NSProxy的子类需要实现两个方法,即消息转发的第三次拯救的那一对方法:methodSignatureForSelector:和forwardInvocation:,具体应用如下:
TestNSproxy.h中:
#import <Foundation/Foundation.h>

NS_ASSUME_NONNULL_BEGIN

@interface TestNSproxy : NSProxy

@property (nonatomic, weak) id target;

+ (instancetype)proxyWithTarget:(id)target;

@end

NS_ASSUME_NONNULL_END


TestNSproxy.m中:
#import "TestNSproxy.h"

@implementation TestNSproxy

//实现我们的类方法,创建一个TestNSproxy类型的对象,然后将传入的参数作为target便于后续的消息转发
+ (instancetype)proxyWithTarget:(id)target {
    TestNSproxy *proxy = [TestNSproxy alloc];
    proxy.target = target;
    return proxy;
}

//下面实现第三次消息拯救中的那两个方法
- (NSMethodSignature *)methodSignatureForSelector:(SEL)sel {
    return [self.target methodSignatureForSelector:sel];
}

- (void)forwardInvocation:(NSInvocation *)invocation {
    [invocation invokeWithTarget:self.target];
}

@end


作为中间类作为timer的target的时候:
//只需要调用TestProxy类的类方法时,将参数传成当前界面的self即可
_timer = [NSTimer scheduledTimerWithTimeInterval:1 target:[TestNSproxy proxyWithTarget:self] selector:@selector(timerSelector) userInfo:nil repeats:YES];
我们的打印结果如下:

可以看到是成功打印dealloc,并且成功销毁了定时器。
NSProxy类的优点在于直接执行了消息转发机制三次拯救的第三步的调用methodSignatureForSelector:返回方法签名,如果方法签名不为nil,调用forwardInvocation:来执行该方法,会跳过前面的步骤,提高性能
改变timer引用
上面说过我们可以采用block类型的定时器API,结合self强弱共舞的方法来解决循环引用问题,使得定时器可以及时释放。
而且对于CADisplayLink和NSTimer来说,无论外面传递的target是弱指针还是强指针,都会传入一个内存地址,定时器内部都是对这个内存地址产生强引用,所以传递弱指针没有用
所以我们采用不带target参数的block类型的定时器API是非常好的选择,用法如下(上方已经讲过一次了):
	// 让 timer 对self 产生弱引用
    __weak typeof(self) weakSelf = self;
    self.timer = [NSTimer scheduledTimerWithTimeInterval:1.0 repeats:YES block:^(NSTimer * _Nonnull timer) {
        [weakSelf test];
    }];
使用Category
通过 category 把 NSTimer 的 target 设置为 NSTimer 类,让 NSTimer 自身做为target, 把 selector 通过 block 传入给 NSTimer,在 NSTimer 的 category 里面触发 selector 。这样也可以达到 NSTimer 不直接持有 TimerViewController 的目的,实现更优雅 ( 如果是直接支持 iOS 10 以上的系统版本,那可以使用 iOS 10新增的系统级 block 方案 ),代码示例如下:
首先新建一个NSTimer类的分类:BlocksSupportSecond
BlocksSupportSecond.h中:
#import <Foundation/Foundation.h>

NS_ASSUME_NONNULL_BEGIN

@interface NSTimer (BlocksSupportSecond)

//我们重写封装的一个创建定时器的接口
+ (NSTimer *)tay_scheduledTimerWithTimeInterval:(NSTimeInterval)interval repeats:(BOOL)repeats block: (void(^)(void))block;

@end

NS_ASSUME_NONNULL_END


BlocksSupportSecond.m中:
#import "NSTimer+BlocksSupportSecond.h"

@implementation NSTimer (BlocksSupportSecond)

//我们重写封装的一个创建定时器的接口
+ (NSTimer *)tay_scheduledTimerWithTimeInterval:(NSTimeInterval)interval repeats:(BOOL)repeats block:(void(^)(void))block {
    return [self scheduledTimerWithTimeInterval:interval target:self selector:@selector(tay_blockInvoke:) userInfo:[block copy] repeats:repeats];
}

//用新接口创建定时器时最后在block中添加的操作会传到这里来执行
+ (void)tay_blockInvoke:(NSTimer *)timer {
    void (^block)(void) = timer.userInfo;
    if(block) {
        block();
    }
}

@end


SecondController.h中:
#import <UIKit/UIKit.h>

NS_ASSUME_NONNULL_BEGIN

@interface SecondController : UIViewController

@end

NS_ASSUME_NONNULL_END


SecondController.m中:
#import "SecondController.h"
#import "NSTimer+BlocksSupportSecond.h"

@interface SecondController ()
@property (nonatomic, strong) NSTimer *timer;
@end

@implementation SecondController

- (void)viewDidLoad {
    [super viewDidLoad];
    // Do any additional setup after loading the view.
    NSLog(@"Retain count is %ld", CFGetRetainCount((__bridge CFTypeRef)self));

	//用咱们封装的新接口创建定时器,将定时器要执行的操作放到最后的block参数中
    _timer = [NSTimer tay_scheduledTimerWithTimeInterval:2 repeats:YES block:^{
        NSLog(@"----");
    }];

    NSLog(@"Retain count is %ld", CFGetRetainCount((__bridge CFTypeRef)self));

    //[_timer invalidate];

    NSLog(@"Retain count is %ld", CFGetRetainCount((__bridge CFTypeRef)self));


    self.view.backgroundColor = [UIColor whiteColor];

    UIButton *buttonTest = [UIButton buttonWithType:UIButtonTypeCustom];
    [buttonTest setTitle:@"返回" forState:UIControlStateNormal];
    [buttonTest setTitleColor:[UIColor blackColor] forState:UIControlStateNormal];
    [buttonTest addTarget:self action:@selector(pressButton) forControlEvents:UIControlEventTouchUpInside];
    buttonTest.frame = CGRectMake(100, 200, 60, 30);
    [self.view addSubview:buttonTest];
}

//按钮的事件函数
- (void) pressButton {
    [self dismissViewControllerAnimated:NO completion:nil];
}

//重写dealloc方法做一个标记
- (void) dealloc {
     //打印标记
    NSLog(@"SecondController dealloc!");
    [_timer invalidate];
}

@end

ViewController.h和ViewController.m文件中的代码同上方其他例子,此处不再赘述
打印结果如下:

可以看到是成功打印dealloc,并且成功销毁了定时器。
到这里,有人肯定会想到,用子类去新封装这个接口是不是也可以实现分类实现的效果呢? 答案是不能的,因为创建定时器实质上就是调用的- (id) initWithFireDate: (NSDate*)fd interval: (NSTimeInterval)ti target: (id)object selector: (SEL)selector userInfo: (id)info repeats: (BOOL)f;方法,这个方法我们上方有讲过,值得注意的是,这个实例方法的调用者类型必须是严格的NSTimer类型,即使是NSTimer的子类也是不行的,所以我们就没发去子类里面写新接口了,因为写的话需要子类的实例对象调用initWithFireDate:方法,而这个方法的调用者类型必须是严格的NSTimer类型,所以要想写新接口的话,还是得移步分类中。
在合适的地方调用invalidate方法
这个就是一个比较取巧的方法,麻烦之处就是得记得去在合适的地方及时调用invalidate方法