使用 PyTorch 构建自定义 GPT

一、介绍
介绍大模型,首先考虑一下使用 ChatGPT、Bing Chat 或 Bard 。您是否想过拥有自己的 ChatGPT 会是什么样子?想象一下创建自己的 GPT 模型的兴奋程度。这确实是一种难以置信的感觉!

为了开始构建自定义 GPT 的旅程,让我们仔细看看 GPT 的运作方式。
二、了解 GPT
GPT 是Generative Pre-trained Transformer的缩写,是一种充当解码器的 Transformer 模型。它已在 BookCorpus 和 WebText 等广泛数据集上进行了预训练。为了更深入地了解 GPT,有必要探索各种类型的变压器并深入研究纯解码器变压器的运行机制。

三、变形金刚解码
Transformer 是一种深度神经网络架构,专门用于生成类似人类的文本。LLM 模型基于三种类型的变压器架构进行开发,有些模型正在其基础上进行开发。
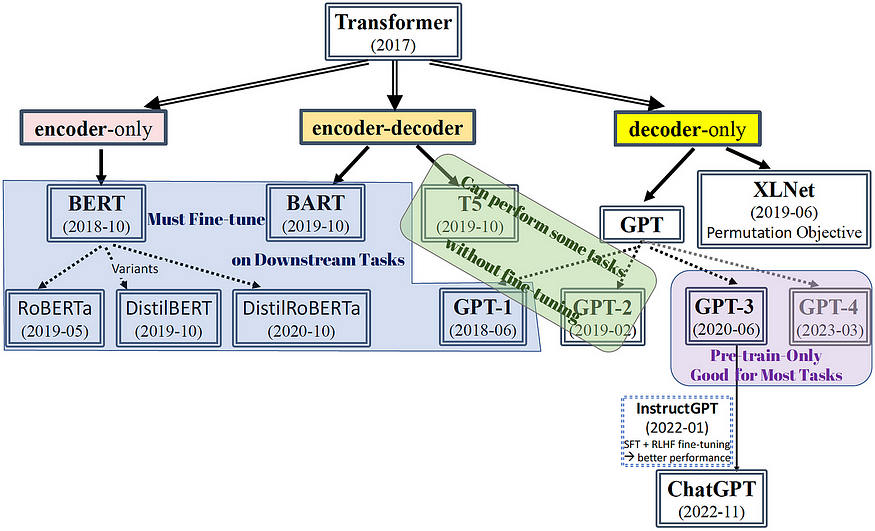
- 仅编码器变压器:仅编码器变压器是变压器架构的一种特殊变体,仅专注于理解和编码输入序列的任务。它们是仅使用 Transformer 模型的编码器部分的神经网络。仅编码器转换器用于各种自然语言处理任务,例如文本分类、命名实体识别和情感分析。仅编码器 Transformer 最突出的例子是BERT(来自 Transformers 的双向编码器表示)。
- 仅解码器变压器:仅解码器变压器是一种仅使用变压器模型的解码器组件的变压器架构。这些模型用于需要解码器组件的任务,例如文本生成、机器翻译和摘要。解码器组件负责从输入序列生成输出序列。仅解码器变压器最突出的例子是GPT(生成预训练变压器)。
- Encoder-Decoder Transformers(Cross-Attention):基于 Transformer 的 Encoder-Decoder 模型是一种神经网络架构,广泛应用于语言翻译、文本摘要等 NLP 任务中。这就是原来的变压器。该架构由两个主要组件组成:编码器和解码器。编码器处理输入序列并生成输入的连续表示,而解码器则根据编码器的表示生成输出序列。基于Transformer的编码器-解码器模型已在T5、Bart、Pegasus、ProphetNet、Marge等许多预训练模型中使用。
四、了解 GPT 架构:变压器块
Transformer 块具有三个目标:准备、丰富和预测。

4.1 准备阶段:
变压器模型的初始输入由一系列单词标记组成,然后将其转换为单词嵌入。这些嵌入通过位置编码来丰富以传达其位置信息。
- 位置编码:在 Transformer 模型中,位置编码用于定义序列中实体的位置,确保每个位置都有不同的表示。变压器本身缺乏对输入序列顺序的固有理解。序列内特定位置 (p)和嵌入空间内维度 (i)的位置编码是通过正弦和余弦函数的组合来实现的。

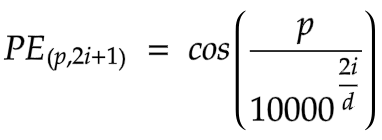
这里,“d”表示词嵌入的维度。这些函数为各个单词位置生成不同的代码。这些代码可以扩展到训练阶段未遇到的序列长度。下一步是将这个新序列输入到变压器块中,其中每个元素都被视为密集向量。
4.2 浓缩阶段:
丰富包括多头注意力、位置前馈神经网络、残差连接和层归一化。
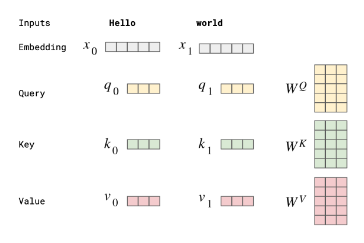
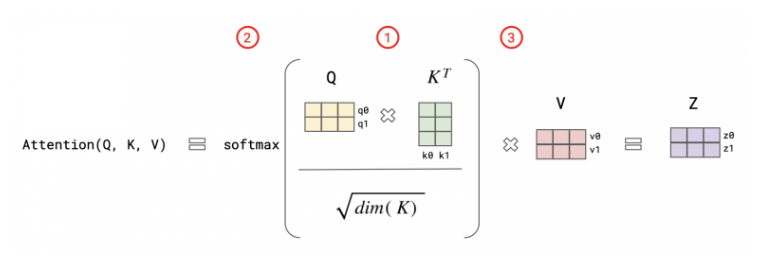
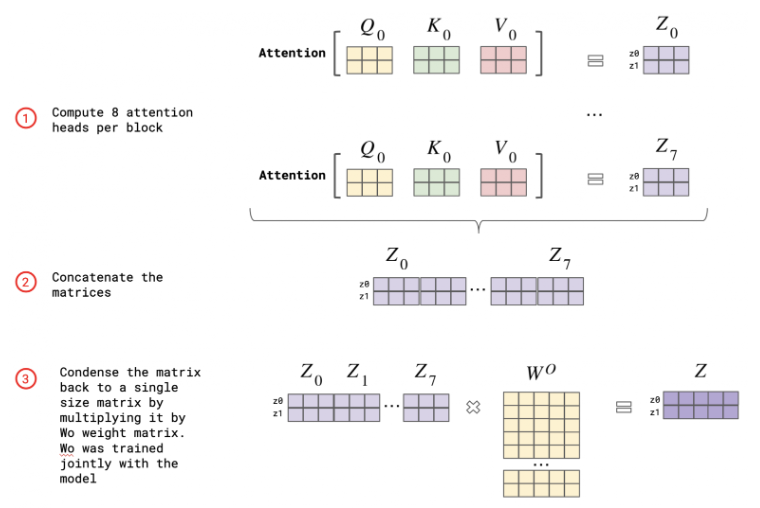
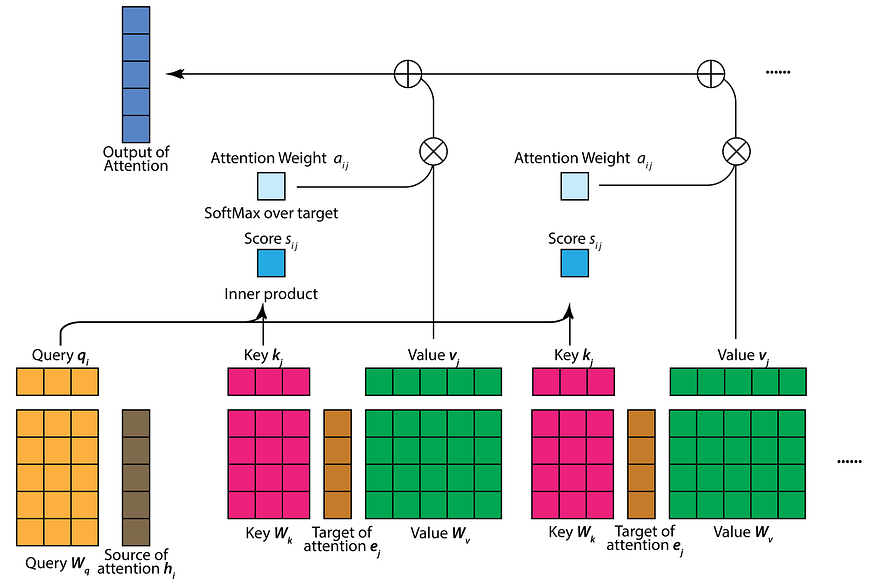
多头注意力:注意力用于评估单词之间的重要性和联系。它通过合并更多上下文和逻辑来增强矢量表示。注意力依赖于三个向量:查询向量、键向量和值向量,它们源自初始层,即词嵌入向量。查询向量对应于当前标记,键向量包含序列中的所有其他标记,并且值向量包含序列中的所有标记。
在自注意力过程中,我们首先计算查询向量和关键向量的缩放积以获得注意力分数。接下来,通过 softmax 函数处理该注意力分数,产生一组范围从0 到 1的注意力权重。然后,每个值向量按其各自的注意力权重进行缩放,最后,它们的总和产生自注意力层的输出。
术语“多头注意力”源自其多(三个)注意力层的组成。
- 早期注意: 在这种情况下,短程依赖涉及相邻标记之间的关系,例如词序、词性和基本句子结构,而不需要逐步方法。
- 中间注意力:它包含输入序列的更广泛的上下文,其中可能包括语义信息、含义、短语之间的关系以及句子中不同单词的角色。
- 后期注意力:它结合较低层以产生有凝聚力且上下文相关的结果,包括高级抽象、话语结构、情感分析和复杂的长期联系
Position-wise Feed-Forward Neural Network:该组件的作用是获取序列中每个元素的注意力阶段收集的信息,并将其转换为更丰富的状态。它促进序列中每个元素的非线性变换,并在后续层中继续构建自身。
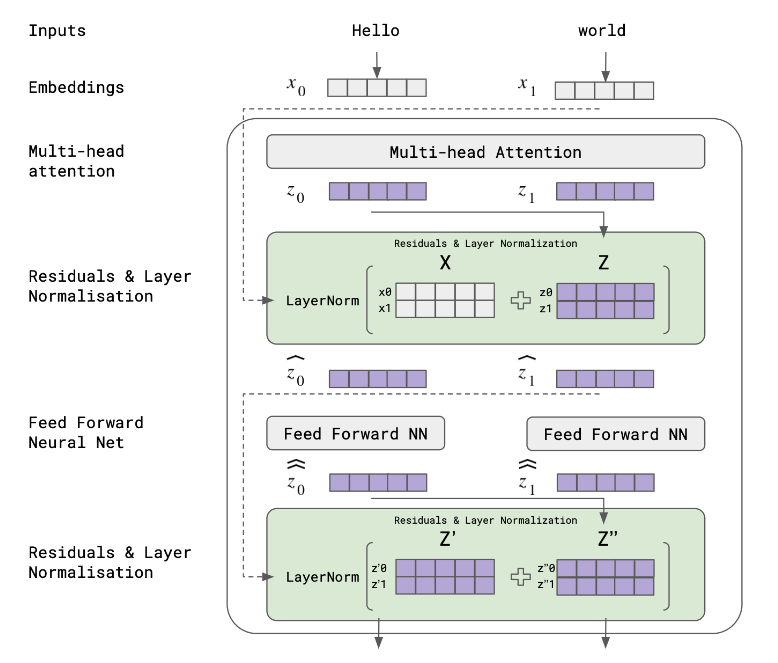
残余连接:残余连接促进信息从较早的层直接流向较晚的层。它们在解决深度神经网络中经常遇到的梯度消失问题方面发挥着至关重要的作用。
层标准化:它不是根据批次标准化输入,而是跨特征执行标准化。这有助于通过确保一致的输入分布来稳定网络的训练,这对于具有不同序列长度的任务至关重要。
4.3 预测阶段:
在这个过程中,线性函数和softmax函数发挥了至关重要的作用。首先,我们有一系列来自最后一个转换器块的上下文感知向量。该序列中的每个向量代表一个输入标记,并受到其与所有其他标记的交互的影响。为了将向量的输出序列投影到维度为N_w的空间(其中N_w是词汇表大小),我们使用线性函数。然后,我们将 softmax 函数应用于这些投影向量,以创建词汇表上的概率分布。这种分布有助于我们预测序列中的下一个标记。
五、变压器中的重要变量
5.1 输入变量
- 词汇量:这是指模型可以识别的唯一标记的数量。
- 嵌入/模型大小:表示词嵌入的维度,也称为隐藏大小。
- 序列/上下文长度:这表示模型一次性可以处理的最大标记数。
5.2 内部变量
- 注意力头计数:在多头注意力中,输入被分为特定数量的注意力头。
- 中间层大小:前馈网络中中间层的大小通常大于嵌入大小。
- 层数:这对应于变压器块的数量。
5.3 训练变量
- 批量大小:它是指在训练期间一次前向传递中一起处理多少个示例。
- 训练的令牌:它表示模型在训练期间遇到的令牌总数,通常比纪元数更频繁地报告。
六、自定义类似 GPT 的模型
使用 Pytorch,我们将构建自定义的类似 GPT 的模型。首先我们将导入所有必需的库。
# Import the necessary libraries
import torch
import torch.nn as nn
import torch.nn.functional as F
import math
import time
import numpy as np
import matplotlib.pyplot as plt
import seaborn as sns
我们将定义 DecoderBlock,它是变压器块的单层。我们将定义解码器块所需的超参数:
- d_model:输入向量的维度。
- num_heads:多头注意力机制中头的数量。
- ff_hidden_layer:前馈隐藏层的维度。
- 辍学率:辍学率。
前向方法需要两个输入
- x:输入张量。
- target_mask:防止对某些位置的关注的掩码。
# Decoder Block
class DecoderBlock(nn.Module):def __init__(self, d_model, num_heads, ff_hidden_layer, dropout):super(DecoderBlock, self).__init__()self.self_attention = nn.MultiheadAttention(d_model, num_heads, dropout=dropout)self.norm1 = nn.LayerNorm(d_model)self.dropout1 = nn.Dropout(dropout)self.linear1 = nn.Linear(d_model, ff_hidden_layer)self.linear2 = nn.Linear(ff_hidden_layer, d_model)self.norm2 = nn.LayerNorm(d_model)self.dropout2 = nn.Dropout(dropout)def forward(self, x,target_mask):attn_output, _ = self.self_attention(x, x, x, attn_mask=target_mask)x = x + self.dropout1(attn_output)x = self.norm1(x)ff_output = self.linear2(F.relu(self.linear1(x)))x = x + self.dropout2(ff_output)x = self.norm2(x)return x
现在,让我们创建 PositionalEncoding 类,它应用唯一的位置编码来为模型提供有关序列中标记的相对或绝对位置的信息。
# Positional Encodingclass PositionalEncoding(nn.Module):def __init__(self, d_model, dropout=0.1, max_len=5000):super(PositionalEncoding, self).__init__()self.dropout = nn.Dropout(p=dropout)pe = torch.zeros(max_len, d_model)position = torch.arange(0, max_len, dtype=torch.float).unsqueeze(1)div_term = torch.exp(torch.arange(0, d_model, 2).float() * (-math.log(10000.0) / d_model))pe[:, 0::2] = torch.sin(position * div_term)pe[:, 1::2] = torch.cos(position * div_term)pe = pe.unsqueeze(0).transpose(0, 1)self.register_buffer("pe", pe)def forward(self, x):x = x + self.pe[:x.size(0), :]return self.dropout(x)我们需要屏蔽解码器的输入,以防止关注未来的位置。
def generate_square_subsequent_mask(sz):"""Generate a mask to prevent attention to future positions."""mask = (torch.triu(torch.ones(sz, sz)) == 1).transpose(0, 1)mask = mask.float().masked_fill(mask == 0, float('-inf')).masked_fill(mask == 1, float(0.0))return maskmask = generate_square_subsequent_mask(sz=5)plt.figure(figsize=(5,5))
sns.heatmap(mask, cmap="crest", cbar=False, square=True)
plt.title("Mask for Transformer Decoder")
plt.show()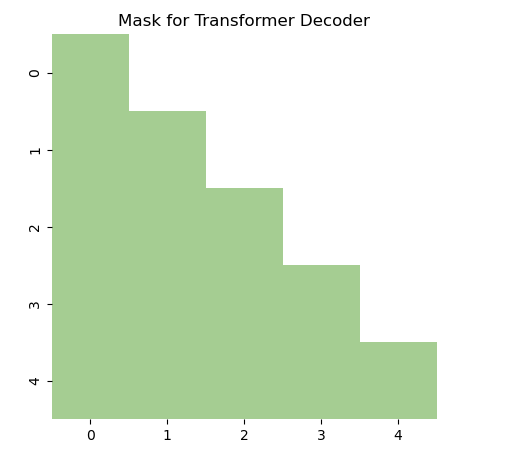
现在,我们来描述完整的 Transformer 解码器,包括初始嵌入层、单独的 Transformer 解码器块以及最终的线性层和 Softmax 层。
在 TransformerDecoder 中,线性层执行线性变换,映射输出维度以匹配词汇表大小。随后,应用softmax 层将输出转换为词汇表上的概率分布。整个过程被封装在转发方法中,该方法指示通过解码器的数据流。
# Transformer Decoderclass TransformerDecoder(nn.Module):def __init__(self, vocab_size, d_model, num_heads, ff_hidden_layer, dropout):super(TransformerDecoder, self).__init__()self.embedding = nn.Embedding(vocab_size, d_model)self.pos_encoder = PositionalEncoding(d_model, dropout)self.transformer_block = DecoderBlock(d_model, num_heads, ff_hidden_layer, dropout)self.linear = nn.Linear(d_model, vocab_size)self.softmax = nn.LogSoftmax(dim=-1)def forward(self, x):x = self.embedding(x)x = self.pos_encoder(x)tgt_mask = generate_square_subsequent_mask(x.size(0))x = self.transformer_block(x,tgt_mask)output = self.linear(x)output = self.softmax(output)return output首先,让我们建立初始解码器。为此,我们首先概述我们的超参数。接下来,我们将构造一个表示批量大小和上下文长度的张量。之后,我们将继续对模型进行前向传播。生成的输出将采用张量的形式。最后,我们将使用“argmax”函数来提取预测的单词索引。
# Define the hyperparameters
vocab_size     = 1000
d_model        = 512
num_heads      = 1
ff_hidden_layer  = 2*d_model
dropout        = 0.1
num_layers     = 10
context_length = 50
batch_size     = 1
# Initialize the model
model = TransformerDecoder(vocab_size, d_model, num_heads, ff_hidden_layer, dropout)# Create a tensor representing batch size and context length
input_tensor = torch.randint(0, vocab_size, (context_length, batch_size))# Forward pass through the model
output = model(input_tensor)print(output.shape)  # To get the predicted word indices, we can use the `argmax` function
predicted_indices = output.argmax(dim=-1)print(predicted_indices.shape)
现在,计算参数。
def count_parameters(model):return sum(p.numel() for p in model.parameters() if p.requires_grad)print(f"The model has {count_parameters(model):,} trainable parameters")为了查看输出,我们会将对数概率转换为 概率,并将输出张量转换为 numpy 数组。
# Convert the log probabilities to probabilities
distribution = torch.exp(output[0, 0, :])# Convert the output tensor to numpy array
distribution = distribution.detach().numpy()# Plot the distribution
plt.figure(figsize=(12, 6))
plt.bar(np.arange(vocab_size), distribution)
plt.xlabel("Word Index")
plt.ylabel("Probability")
plt.title("Output Distribution over Vocabulary")
plt.show()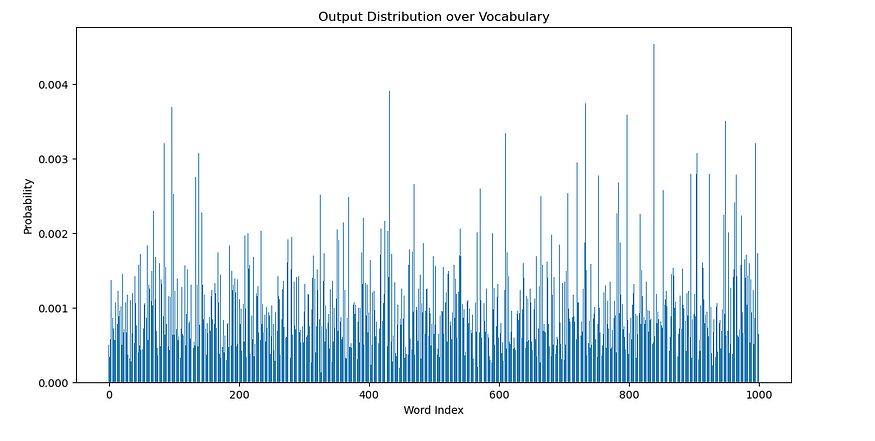
现在制作一个多层解码器,这将以层数作为参数。
class MultiLayerTransformerDecoder(nn.Module):def __init__(self, vocab_size, d_model, num_heads, ff_hidden_layer, dropout, num_layers):super(MultiLayerTransformerDecoder, self).__init__()self.embedding = nn.Embedding(vocab_size, d_model)self.pos_encoder = PositionalEncoding(d_model, dropout)self.transformer_blocks = nn.ModuleList([DecoderBlock(d_model, num_heads, ff_hidden_layer, dropout)for _ in range(num_layers)])self.linear = nn.Linear(d_model, vocab_size)self.softmax = nn.LogSoftmax(dim=-1)def forward(self, x):x = self.embedding(x)x = self.pos_encoder(x)for transformer_block in self.transformer_blocks:target_mask = generate_square_subsequent_mask(x.size(0))x = transformer_block(x,target_mask)output = self.linear(x)output = self.softmax(output)return output遵循相同的过程。
# Define the hyperparameters
vocab_size     = 10000
d_model        = 2048
num_heads      = 2
ff_hidden_layer  = 8*d_model
dropout        = 0.1
num_layers     = 20
context_length = 1000
batch_size     = 1# Create our input to the model to process
input_tensor = torch.randint(0, vocab_size, (context_length, batch_size))# Initialize the model with `num_layer` layers
model = MultiLayerTransformerDecoder(vocab_size, d_model, num_heads, ff_hidden_layer, dropout, num_layers)# Print the number of trainable parameters
print(f"The model has {count_parameters(model):,} trainable parameters")# Let's use the same input_tensor from the previous example
output = model(input_tensor)# Convert the log probabilities to probabilities for the first sequence in the batch and the first position in the sequence
distribution = torch.exp(output[0, 0, :])# Convert the output tensor to numpy array
distribution = distribution.detach().numpy()# Now plot the distribution
plt.figure(figsize=(12, 6))
plt.bar(np.arange(vocab_size), distribution)
plt.xlabel("Word Index")
plt.ylabel("Probability")
plt.title("Output Distribution over Vocabulary")
plt.show()
你可以看到你的模型。
MultiLayerTransformerDecoder((embedding): Embedding(10000, 2048)(pos_encoder): PositionalEncoding((dropout): Dropout(p=0.1, inplace=False))(transformer_blocks): ModuleList((0-19): 20 x DecoderBlock((self_attention): MultiheadAttention((out_proj): NonDynamicallyQuantizableLinear(in_features=2048, out_features=2048, bias=True))(norm1): LayerNorm((2048,), eps=1e-05, elementwise_affine=True)(dropout1): Dropout(p=0.1, inplace=False)(linear1): Linear(in_features=2048, out_features=16384, bias=True)(linear2): Linear(in_features=16384, out_features=2048, bias=True)(norm2): LayerNorm((2048,), eps=1e-05, elementwise_affine=True)(dropout2): Dropout(p=0.1, inplace=False)))(linear): Linear(in_features=2048, out_features=10000, bias=True)(softmax): LogSoftmax(dim=-1)
)
现在,您必须使用任何您想要用自己的仅解码器变压器模型进行实验的数据集,并且您将拥有自己的 GPT。玩得开心!(代码阿克里蒂·乌帕迪亚)
七、结论
创建我们自己的类似 GPT 的模型的过程包括理解架构、在代码中实现它以及使用数据集进行实验和微调。

这次旅程让我们能够释放创造力并探索令人兴奋的自然语言处理世界。
构建自定义 GPT 不仅是一项技术成就,而且还邀请您享受乐趣并探索文本生成的无限可能性。