AR-LDM原理及代码分析
- AR-LDM原理
- AR-LDM代码分析
- pytorch_lightning(pl)的hook流程
- main.py 具体分析
- Train
- Sample
- LightningDataset
- ARLDM
- blip mm encoder
AR-LDM原理
左边是模仿了自回归地从1, 2, ..., j-1来构造 j 时刻的 frame 的过程。
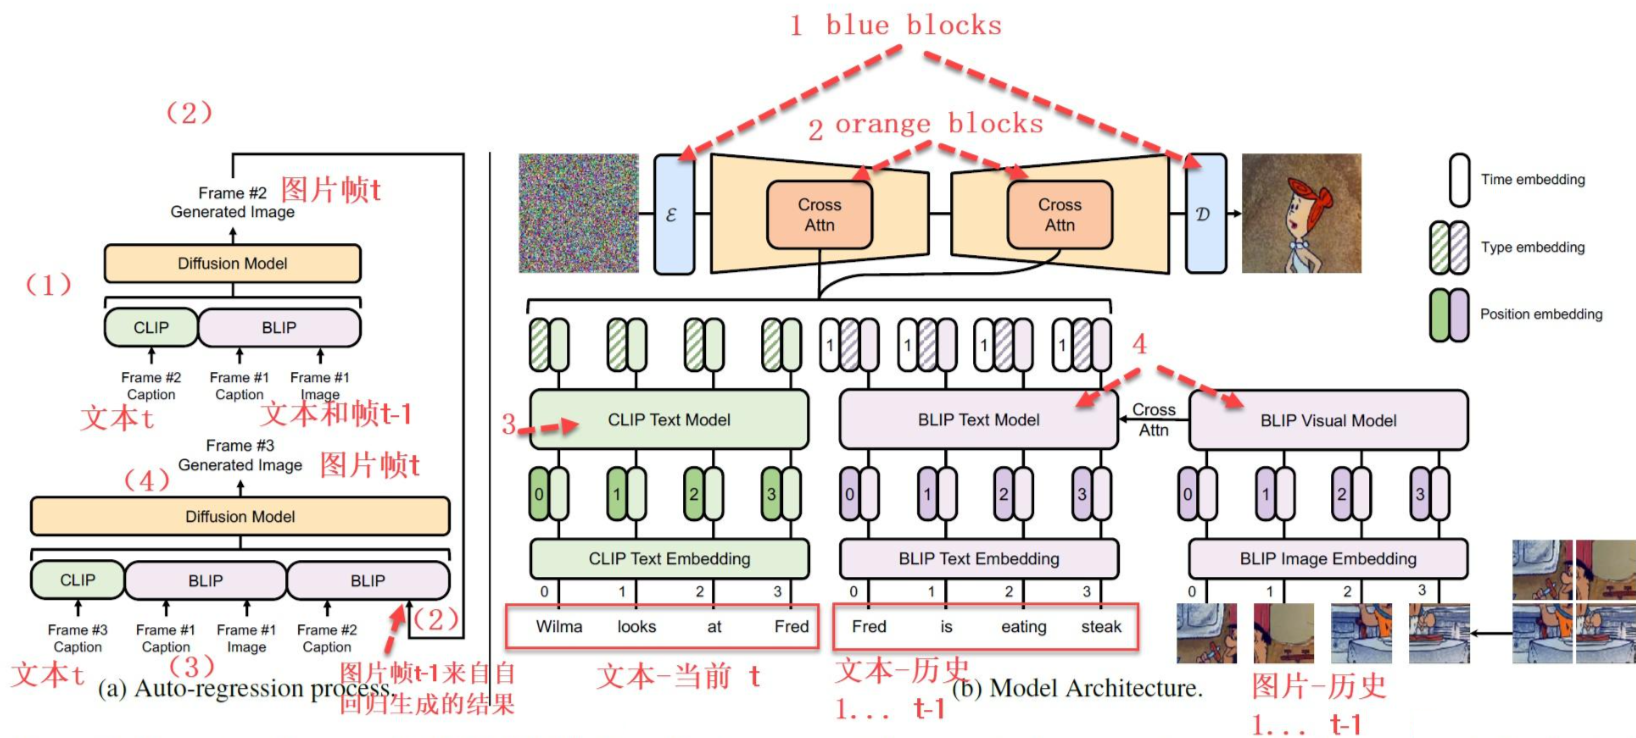
在普通Stable Diffusion的基础上,使用了1, 2, ..., j-1 时刻的文本信息 history text prompt(BLIP编码)、1, 2, ..., j-1 时刻的参考视频帧history frame(BLIP编码)、当前 j 时刻frame的 text prompt(CLIP编码),作为condition φ j \varphi_j φj 来引导第 j 帧的生成。公式表达如下:
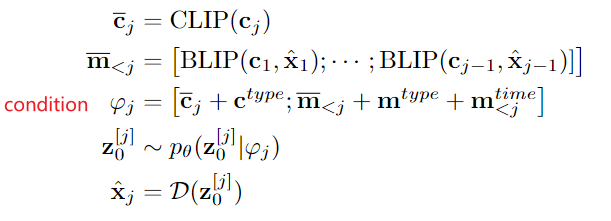
其中,注意 ① c t y p e ∈ R D c^{type}\in R^D ctype∈RD是当前 j 时刻视频帧的 text prompt 的 type embedding、② m t y p e ∈ R D m^{type}\in R^D mtype∈RD是1, 2, ..., j-1 时刻视频帧的 history text prompt 或 history frame 的 type embedding、③ m t i m e ∈ R L × D m^{time}\in R^{L\times D} mtime∈RL×D是1, 2, ..., j-1 时刻视频帧的 history text prompt 或 history frame 的 frame time embedding(表示第几帧)。
另外,为了适应没有见过的新角色,添加一个新token<char>来表示没见过的字符,新token的embedding<char>由相似单词的embedding初始化,如“man”或“woman”,然后在4-5张图像上,微调AR-LDM(除了VAE的参数不变)将其扩展到<char>字符。
AR-LDM代码分析
项目架构
├── README.md
├── requirements.txt
├── utils
│   ├── utils.py
│   └── __init__.py
├── data_script
│   └── flintsones_hdf5.py
│   └── pororo_hdf5.py
│   └── vist_hdf5.py
│   └── vist_img_download.py
├── dataset
│   └── flintsones.py
│   └── pororo.py
│   └── vistdii.py
│   └── vistsis.py
├── models
│   ├── blip_override
│      ├── blip.py
│      ├── med.py
│      ├── med_config.json
│      ├── vit.py
│   └── diffusers_override
│      ├── attention.py
│      ├── unet_2d_blocks.py
│      ├── unet_2d_condition.py
│   └── inception.py
└── main.py
包含模块:Auto-Regressive Models 、Latent Diffusion Models、BLIP(多模态编码器 )、CLIP(文本编码器)
pytorch_lightning(pl)的hook流程
1、三个函数
- 初始化
def __init__(self) - 训练
training_step(self, batch, batch_idx) - 验证
validation_step(self, batch, batch_idx) - 测试
test_step(self, batch, batch_idx)
为了方便我们实现其他的一些功能,因此更为完整的流程是在training_step 、validation_step、test_step 后面都紧跟着其相应的 training_step_end(self,batch_parts)和training_epoch_end(self, training_step_outputs) 函数。
当然,对于验证和测试,都有相应的*_step_end和*_epoch_end函数。因为验证和测试的*_step_end函数是一样的,因此这里只以训练为例。
注意:在新版本的PL中*_step_end和*_epoch_end等hook函数,已经更新为on_*_step_end和on_*_epoch_end !!!
2、示例
-
*_step_end– 即每一个 * 步完成后调用 -
*_epoch_end– 即每一个 * 的epoch 完成之后会自动调用
def training_step(self, batch, batch_idx):x, y = batchy_hat = self.model(x)loss = F.cross_entropy(y_hat, y)pred = ...return {'loss': loss, 'pred': pred}def training_step_end(self, batch_parts):'''当gpus=0 or 1时,这里的batch_parts即为traing_step的返回值(已验证)当gpus>1时,这里的batch_parts为list,list中每个为training_step返回值,list[i]为i号gpu的返回值(这里未验证)'''gpu_0_prediction = batch_parts[0]['pred']gpu_1_prediction = batch_parts[1]['pred']# do something with both outputsreturn (batch_parts[0]['loss'] + batch_parts[1]['loss']) / 2def training_epoch_end(self, training_step_outputs):'''当gpu=0 or 1时,training_step_outputs为list,长度为steps的数量(不包括validation的步数,当你训练时,你会发现返回list<训练时的steps数,这是因为训练时显示的steps数据还包括了validation的,若将limit_val_batches=0.,即关闭validation,则显示的steps会与training_step_outputs的长度相同)。list中的每个值为字典类型,字典中会存有`training_step_end()`返回的键值,键名为`training_step()`函数返回的变量名,另外还有该值是在哪台设备上(哪张GPU上),例如{device='cuda:0'}'''for out in training_step_outputs:# do something with preds
main.py 具体分析
Train
训练主要是重写def training_setp(self, batch, batch_idx)函数,并返回要反向传播的loss即可,其中batch 即为从 train_dataloader 采样的一个batch的数据,batch_idx即为目前batch的索引。
def train(args: DictConfig) -> None:# 实例化dataset和dataloader,并设置为train_modedataloader = LightningDataset(args)dataloader.setup('fit')# 定义AR-LDM模型model = ARLDM(args, steps_per_epoch=dataloader.get_length_of_train_dataloader())# pl的Loggerlogger = TensorBoardLogger(save_dir=os.path.join(args.ckpt_dir, args.run_name), name='log', default_hp_metric=False)# 定义保存模型Checkpoint的callback,自动保存top_0好的权重(即不保存),只保存lastcheckpoint_callback = ModelCheckpoint(dirpath=os.path.join(args.ckpt_dir, args.run_name),save_top_k=0,save_last=True)# 记录学习率的变化的callback, 并绘制到tensorboardlr_monitor = LearningRateMonitor(logging_interval='step')# callback函数的listcallback_list = [lr_monitor, checkpoint_callback]# 定义PL_Trainertrainer = pl.Trainer(accelerator='gpu',devices=args.gpu_ids,max_epochs=args.max_epochs,benchmark=True,logger=logger,log_every_n_steps=1,callbacks=callback_list,strategy=DDPStrategy(find_unused_parameters=False))# 开始训练trainer.fit(model, dataloader, ckpt_path=args.train_model_file)
Sample
在pytoch_lightning框架中,test 在训练过程中是不调用的,也就是说是不相关,在训练过程中只进行training和validation,因此如果需要在训练过中保存validation的一些信息,就要放到validation中。
关于推理,推理是在训练完成之后的,因此这里假设已经训练完成.
首先进行断言assert判断,assert xxx,"error info", xxx正确则往下进行,错误则抛出异常信息"error info"
def sample(args: DictConfig) -> None:assert args.test_model_file is not None, "test_model_file cannot be None"assert args.gpu_ids == 1 or len(args.gpu_ids) == 1, "Only one GPU is supported in test mode"# 实例化dataset和dataloader,并设置为train_modedataloader = LightningDataset(args)dataloader.setup('test')# 定义AR-LDM模型model = ARLDM.load_from_checkpoint(args.test_model_file, args=args, strict=False)# 定义PL_Trainerpredictor = pl.Trainer(accelerator='gpu',devices=args.gpu_ids,max_epochs=-1,benchmark=True)# 开始推理predictions = predictor.predict(model, dataloader)# 保存推理结果imagesimages = [elem for sublist in predictions for elem in sublist[0]]if not os.path.exists(args.sample_output_dir):try:os.mkdir(args.sample_output_dir)except:passfor i, image in enumerate(images):image.save(os.path.join(args.sample_output_dir, '{:04d}.png'.format(i)))# 计算FIDif args.calculate_fid:ori = np.array([elem for sublist in predictions for elem in sublist[1]])gen = np.array([elem for sublist in predictions for elem in sublist[2]])fid = calculate_fid_given_features(ori, gen)print('FID: {}'.format(fid))
LightningDataset
Lightning只需要一个 DataLoader对与训练集/交叉验证集/测试集分割。
数据集有两种实现方法:
(1)直接在Model中实现
直接实现是指在Model中重写def train_dataloader(self)等函数来返回dataloader:
当然,首先要自己先实现Dataset的定义,可以用现有的,例如MNIST等数据集,若用自己的数据集,则需要自己去继承torch.utils.data.dataset.Dataset。
(2)自定义继承DataModule
这种方法是继承pl.LightningDataModule来提供训练、校验、测试的数据。在重载xxx_dataloader()时,返回的data_loader需要使用torch.utils.data.DataLoader
class LightningDataset(pl.LightningDataModule):def __init__(self, args: DictConfig):super(LightningDataset, self).__init__()self.kwargs = {"num_workers": args.num_workers, "persistent_workers": True if args.num_workers > 0 else False,"pin_memory": True}self.args = args
self.args表示任何多个无名参数v,它是一个tuple(数据不可变)self.kwargs表示关键字参数k:v,它是一个dict;- 同时使用
*args和**kwargs时,必须*args参数列要在**kwargs前
def setup(self, stage="fit"):if self.args.dataset == "pororo":import datasets.pororo as dataelif self.args.dataset == 'flintstones':import datasets.flintstones as dataelif self.args.dataset == 'vistsis':import datasets.vistsis as dataelif self.args.dataset == 'vistdii':import datasets.vistdii as dataelse:raise ValueError("Unknown dataset: {}".format(self.args.dataset))if stage == "fit":self.train_data = data.StoryDataset("train", self.args)self.val_data = data.StoryDataset("val", self.args)if stage == "test":self.test_data = data.StoryDataset("test", self.args)
setup():实现数据集Dataset的定义,每张GPU都会执行该函数stage:用于标记是用于什么阶段,训练fit,测试test
def train_dataloader(self):if not hasattr(self, 'trainloader'):self.trainloader = DataLoader(self.train_data, batch_size=self.args.batch_size, shuffle=True, **self.kwargs)return self.trainloaderdef val_dataloader(self):return DataLoader(self.val_data, batch_size=self.args.batch_size, shuffle=False, **self.kwargs)def test_dataloader(self):return DataLoader(self.test_data, batch_size=self.args.batch_size, shuffle=False, **self.kwargs)def predict_dataloader(self):return DataLoader(self.test_data, batch_size=self.args.batch_size, shuffle=False, **self.kwargs)def get_length_of_train_dataloader(self):if not hasattr(self, 'trainloader'):self.trainloader = DataLoader(self.train_data, batch_size=self.args.batch_size, shuffle=True, **self.kwargs)return len(self.trainloader)
-
if not hasattr():用来判断self(对象object)中是否含有名为’trainloader’的属性(属性或者方法) ,没有则利用Dataset重新定义 。 -
shuffle:是洗牌打乱的意思。- 若
shuffle = True,在一个epoch之后,对所有的数据随机打乱,再按照设定好的每个批次的大小划分批次。(先打乱,再取batch) - 若
shuffle = False,每次的输出结果都一样,并且与原文件的数据存储顺序保持一致。数据会按照我们设定的Batch_size大小依次分组,依次排序。
- 若
ARLDM
首先我们需要一个基础的pytorch lightning模型。定义如下,这个基础模型是作为训练其中参数model而存在的。
LightningModule 定义了一个系统而不是一个模型。包括三个核心组件:
- 模型
- 优化器
- Train/Val/Test步骤
(1)数据流伪代码:
outs = []
for batch in data:out = training_step(batch)outs.append(out)
# 执行完1个epoch后执行training_epoch_end
training_epoch_end(outs)
(2)等价Lightning代码:
def training_step(self, batch, batch_idx):prediction = ...return predictiondef training_epoch_end(self, training_step_outputs):for prediction in predictions:# do something with these
具体代码
一个 AR-LDM Pytorch-Lighting 模型在本项目中含有的部件是:
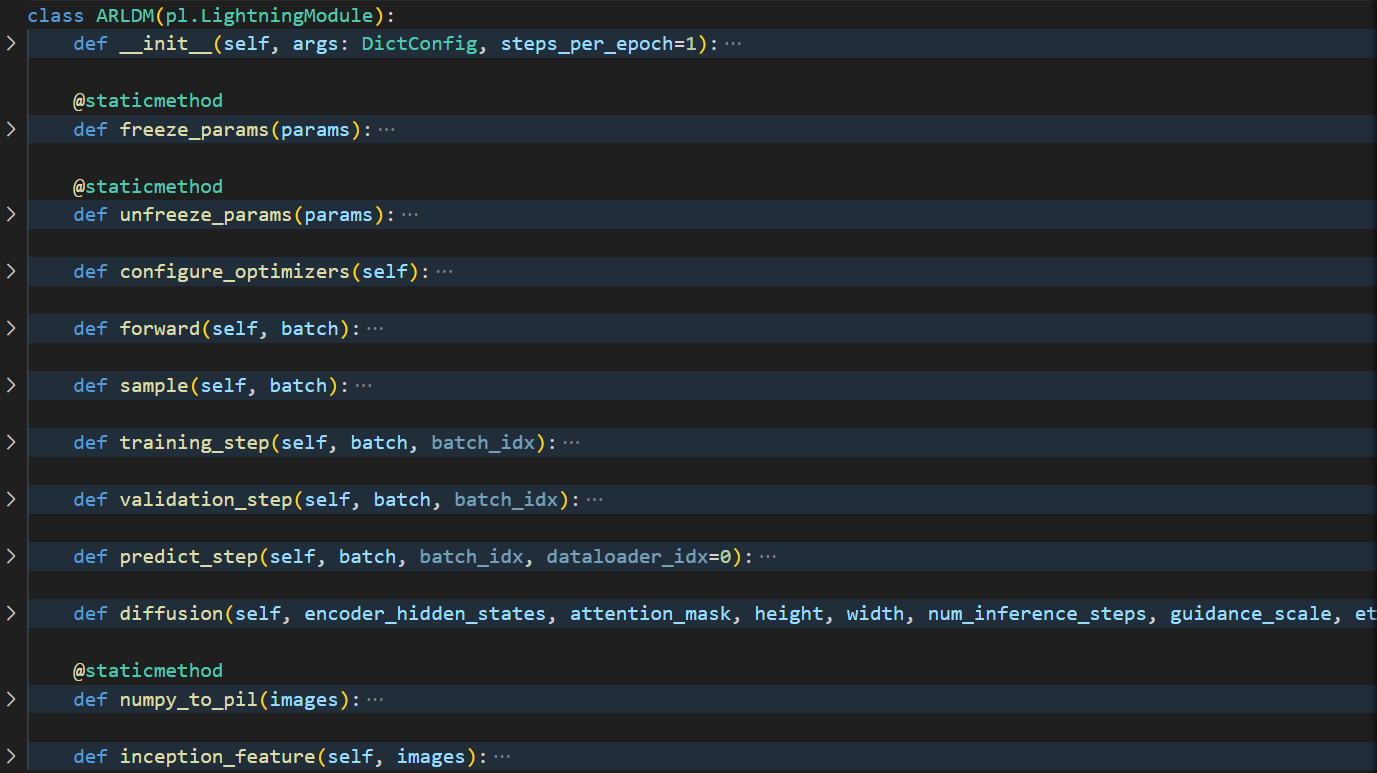
(1)training_step(self, batch, batch_idx)
即:每个batch的处理函数,self(batch)实际上等价于forward(batch)。
def training_step(self, batch, batch_idx):loss = self(batch)self.log('loss/train_loss', loss, on_step=True, on_epoch=False, sync_dist=True, prog_bar=True)return loss
- 参数:
batch (Tensor | (Tensor, …) | [Tensor, …]) – The output of your DataLoader. A tensor, tuple or list.
batch_idx (int) – Integer displaying index of this batch
optimizer_idx (int) – When using multiple optimizers, this argument will also be present.
hiddens (Tensor) – Passed in if truncated_bptt_steps > 0. - 返回值:Any of.
Tensor - The loss tensor
dict - A dictionary. Can include any keys, but must include the key ‘loss’
None - Training will skip to the next batch
e.g. 返回值无论如何也需要有一个loss量。如果是字典,要有这个key=loss。没loss这个batch就被跳过了。
def training_step(self, batch, batch_idx):x, y, z = batchout = self.encoder(x)loss = self.loss(out, x)return loss# Multiple optimizers (e.g.: GANs)
def training_step(self, batch, batch_idx, optimizer_idx):if optimizer_idx == 0:# do training_step with encoderif optimizer_idx == 1:# do training_step with decoder# Truncated back-propagation through time
def training_step(self, batch, batch_idx, hiddens):# hiddens are the hidden states from the previous truncated backprop step...out, hiddens = self.lstm(data, hiddens)...return {'loss': loss, 'hiddens': hiddens}
(2)predict_step(self, batch, batch_idx, dataloader_idx=0):
传入数据batch进行一次推理,直接调用 self.sample(batch)进行采样生成图像;然后判断是否需要计算FID值,如果需要计算Inception_Feature返回。同时返回生成的图像image。
def predict_step(self, batch, batch_idx, dataloader_idx=0):original_images, images = self.sample(batch)if self.args.calculate_fid:original_images = original_images.cpu().numpy().astype('uint8')original_images = [Image.fromarray(im, 'RGB') for im in original_images]ori = self.inception_feature(original_images).cpu().numpy()gen = self.inception_feature(images).cpu().numpy()else:ori = Nonegen = Nonereturn images, ori, gen
(3)configure_optimizers()
进行优化器创建,返回一个优化器,或数个优化器,或两个List(优化器,Scheduler)。本项目使用单优化器:
def configure_optimizers(self):optimizer = torch.optim.AdamW(self.parameters(), lr=self.args.init_lr, weight_decay=1e-4)scheduler = LinearWarmupCosineAnnealingLR(optimizer,warmup_epochs=self.args.warmup_epochs * self.steps_per_epoch,max_epochs=self.args.max_epochs * self.steps_per_epoch)optim_dict = {'optimizer': optimizer,'lr_scheduler': {'scheduler': scheduler, # The LR scheduler instance (required)'interval': 'step', # The unit of the scheduler's step size}}return optim_dict
warmup lr策略就是在网络训练初期用比较小的学习率,线性增长到初始设定的学习率。
在优化过程中选择优化器和学习率调度器,通常只需要一个,但对于GAN之类的可能需要多个optimizer。如:
- 单个优化器:
def configure_optimizers(self):return Adam(self.parameters(), lr=1e-3)
- 多个优化器(比如GAN)
def configure_optimizers(self):generator_opt = Adam(self.model_gen.parameters(), lr=0.01)disriminator_opt = Adam(self.model_disc.parameters(), lr=0.02) return generator_opt, disriminator_opt
- 可以修改frequency键,来控制优化频率:
def configure_optimizers(self):gen_opt = Adam(self.model_gen.parameters(), lr=0.01)dis_opt = Adam(self.model_disc.parameters(), lr=0.02)n_critic = 5 return ({"optimizer": dis_opt, "frequency": n_critic},{"optimizer": gen_opt, "frequency": 1} )
- 多个优化器和多个调度器或学习率字典(比如GAN)
def configure_optimizers(self):generator_opt = Adam(self.model_gen.parameters(), lr=0.01)disriminator_opt = Adam(self.model_disc.parameters(), lr=0.02)discriminator_sched = CosineAnnealing(discriminator_opt, T_max=10)return [generator_opt, disriminator_opt], [discriminator_sched]def configure_optimizers(self):generator_opt = Adam(self.model_gen.parameters(), lr=0.01)disriminator_opt = Adam(self.model_disc.parameters(), lr=0.02)discriminator_sched = CosineAnnealing(discriminator_opt, T_max=10)return {"optimizer": [generator_opt, disriminator_opt], "lr_scheduler": [discriminator_sched]}
对于学习率调度器LR scheduler:可以修改其属性
{"scheduler": lr_scheduler, # 调度器"interval": "epoch", # 调度的单位,epoch或step"frequency": 1, # 调度的频率,多少轮一次 "reduce_on_plateau": False, # ReduceLROnPlateau "monitor": "val_loss", # ReduceLROnPlateau的监控指标 "strict": True # 如果没有monitor,是否中断训练}def configure_optimizers(self):gen_opt = Adam(self.model_gen.parameters(), lr=0.01)dis_opt = Adam(self.model_disc.parameters(), lr=0.02)gen_sched = {"scheduler": ExponentialLR(gen_opt, 0.99), "interval": "step"}dis_sched = CosineAnnealing(discriminator_opt, T_max=10)return [gen_opt, dis_opt], [gen_sched, dis_sched]
(4)freeze_params 和 unfreeze_params:
将param的requires_grad 设置为False
@staticmethoddef freeze_params(params):for param in params:param.requires_grad = False@staticmethoddef unfreeze_params(params):for param in params:param.requires_grad = True
(5)初始化ARLDM __init__
- 读取config参数
- 在self中注册CLIP, BLIP Null token
- 实例化
Type_embeddings layer、Time_embeddings layer、BLIP multi-modal embedding layer、CLIP text embedding layer、CLIP text tokenizer、BLIP text tokenizer、BLIP image processor、VAE,UNet,noise_scheduler; - 为Sample模式创建InceptionV3,方便计算FID指标
- 根据config,为CLIP和BLIP进行resize
position_embeddings和token_embeddings - 冻结 vae, unet, clip, blip 的参数
def __init__(self, args: DictConfig, steps_per_epoch=1):super(ARLDM, self).__init__()self.steps_per_epoch = steps_per_epoch # len(data_loader)"""Configurations"""self.args = argsself.task = args.task # continuationif args.mode == 'sample':# noise scheduler if args.scheduler == "pndm":self.scheduler = PNDMScheduler(beta_start=0.00085, beta_end=0.012, beta_schedule="scaled_linear",skip_prk_steps=True)elif args.scheduler == "ddim":self.scheduler = DDIMScheduler(beta_start=0.00085, beta_end=0.012, beta_schedule="scaled_linear",clip_sample=False, set_alpha_to_one=True)else:raise ValueError("Scheduler not supported")# fid data arguementself.fid_augment = transforms.Compose([transforms.Resize([64, 64]),transforms.ToTensor(),transforms.Normalize((0.5, 0.5, 0.5), (0.5, 0.5, 0.5)),])# InceptionV3 settingblock_idx = InceptionV3.BLOCK_INDEX_BY_DIM[2048]self.inception = InceptionV3([block_idx])"""Modules"""# CLIP text tokenizerself.clip_tokenizer = CLIPTokenizer.from_pretrained('runwayml/stable-diffusion-v1-5', subfolder="tokenizer")# BLIP text tokenizerself.blip_tokenizer = init_tokenizer()# BLIP image processor(arguement)self.blip_image_processor = transforms.Compose([transforms.Resize([224, 224]),transforms.ToTensor(),transforms.Normalize([0.48145466, 0.4578275, 0.40821073], [0.26862954, 0.26130258, 0.27577711])])self.max_length = args.get(args.dataset).max_length# register tensor buffer CLIP, BLIP Null token in selfblip_image_null_token = self.blip_image_processor(Image.fromarray(np.zeros((224, 224, 3), dtype=np.uint8))).unsqueeze(0).float()clip_text_null_token = self.clip_tokenizer([""], padding="max_length", max_length=self.max_length, return_tensors="pt").input_idsblip_text_null_token = self.blip_tokenizer([""], padding="max_length", max_length=self.max_length, return_tensors="pt").input_idsself.register_buffer('clip_text_null_token', clip_text_null_token)self.register_buffer('blip_text_null_token', blip_text_null_token)self.register_buffer('blip_image_null_token', blip_image_null_token)# type_embeddings layerself.modal_type_embeddings = nn.Embedding(2, 768)# time_embeddings layerself.time_embeddings = nn.Embedding(5, 768)# blip multi-modal embedding layerself.mm_encoder = blip_feature_extractor(pretrained='https://storage.googleapis.com/sfr-vision-language-research/BLIP/models/model_large.pth', image_size=224, vit='large')self.mm_encoder.text_encoder.resize_token_embeddings(args.get(args.dataset).blip_embedding_tokens)# clip text embedding layerself.text_encoder = CLIPTextModel.from_pretrained('runwayml/stable-diffusion-v1-5', subfolder="text_encoder")# resize_token_embeddings:根据不同的dataset从config读取不同的clip_embedding_tokensself.text_encoder.resize_token_embeddings(args.get(args.dataset).clip_embedding_tokens)# resize_position_embeddingsold_embeddings = self.text_encoder.text_model.embeddings.position_embeddingnew_embeddings = self.text_encoder._get_resized_embeddings(old_embeddings, self.max_length)self.text_encoder.text_model.embeddings.position_embedding = new_embeddingsself.text_encoder.config.max_position_embeddings = self.max_lengthself.text_encoder.max_position_embeddings = self.max_lengthself.text_encoder.text_model.embeddings.position_ids = torch.arange(self.max_length).expand((1, -1))# vae, unet, noise_scheduler self.vae = AutoencoderKL.from_pretrained('runwayml/stable-diffusion-v1-5', subfolder="vae")self.unet = UNet2DConditionModel.from_pretrained('runwayml/stable-diffusion-v1-5', subfolder="unet")self.noise_scheduler = DDPMScheduler(beta_start=0.00085, beta_end=0.012, beta_schedule="scaled_linear", num_train_timesteps=1000)# Freeze vae, unet, clip, blipself.freeze_params(self.vae.parameters())if args.freeze_resnet:self.freeze_params([p for n, p in self.unet.named_parameters() if "attentions" not in n])if args.freeze_blip and hasattr(self, "mm_encoder"):self.freeze_params(self.mm_encoder.parameters())self.unfreeze_params(self.mm_encoder.text_encoder.embeddings.word_embeddings.parameters())if args.freeze_clip and hasattr(self, "text_encoder"):self.freeze_params(self.text_encoder.parameters())self.unfreeze_params(self.text_encoder.text_model.embeddings.token_embedding.parameters())
(6)forward:train_step使用forward计算每一个step(每一batch数据)的loss。只有训练、验证、测试时候使用。推理时不用(推理时用sample)。
def forward(self, batch):# set clip and blip eval modeif self.args.freeze_clip and hasattr(self, "text_encoder"):self.text_encoder.eval()if self.args.freeze_blip and hasattr(self, "mm_encoder"):self.mm_encoder.eval()"""images = torch.stack([self.augment(im) for im in images[1:]])captions, attention_mask = clip_tokenizer(texts[1:])['input_ids'], clip_tokenizer(texts[1:])['attention_mask']source_images = torch.stack([self.blip_image_processor(im) for im in images])source_caption, source_attention_mask = blip_tokenizer(texts)['input_ids'], blip_tokenizer(texts)['attention_mask']"""# current frame and caption = {images, captions, attention_mask} 范围从1开始# history frames and captions = {source_images, source_caption, source_attention_mask} 范围从0开始images, captions, attention_mask, source_images, source_caption, source_attention_mask = batchB, V, S = captions.shape # (batch_size, caption_len, caption_embedding_dim)# src_V是全部captions的个数(包括第一帧)src_V = V + 1 if self.task == 'continuation' else V# 将输入的张量展平为一维images = torch.flatten(images, 0, 1)captions = torch.flatten(captions, 0, 1)attention_mask = torch.flatten(attention_mask, 0, 1)source_images = torch.flatten(source_images, 0, 1) # (B * V, S, 1)source_caption = torch.flatten(source_caption, 0, 1)source_attention_mask = torch.flatten(source_attention_mask, 0, 1)# attention_mask = 1 代表该位置有单词;attention_mask = 0 代表该位置无单词,被padding# 随机生成一个bool index数组,用于选择一部分caption embedding进行特殊处理classifier_free_idx = np.random.rand(B * V) < 0.1# 使用 clip text_encoder 对 caption 进行编码,得到 caption_embeddingscaption_embeddings = self.text_encoder(captions, attention_mask).last_hidden_state # (B * V, S, D)# 使用 blip multimodal_encoder 对 history images和caption 进行联合编码,得到 source_embeddingssource_embeddings = self.mm_encoder(source_images, source_caption, source_attention_mask,mode='multimodal').reshape(B, src_V * S, -1) # (B, V * S, D)# 对source_embeddings进行tensor的repeat操作,以便与caption_embeddings的形状匹配source_embeddings = source_embeddings.repeat_interleave(V, dim=0) # (B * V, V * S, D)# 对caption_embeddings和source_embeddings进行一系列的加法操作,以引入模态type_embedding和time_embeddingcaption_embeddings[classifier_free_idx] = \self.text_encoder(self.clip_text_null_token).last_hidden_state[0]source_embeddings[classifier_free_idx] = \self.mm_encoder(self.blip_image_null_token, self.blip_text_null_token, attention_mask=None,mode='multimodal')[0].repeat(src_V, 1)caption_embeddings += self.modal_type_embeddings(torch.tensor(0, device=self.device))source_embeddings += self.modal_type_embeddings(torch.tensor(1, device=self.device))source_embeddings += self.time_embeddings(torch.arange(src_V, device=self.device).repeat_interleave(S, dim=0))# 对caption_embeddings和source_embeddings在dim=1上进行拼接# 得到编码器的隐藏状态(encoder_hidden_states)作为CrossAttn的KV送入Unetencoder_hidden_states = torch.cat([caption_embeddings, source_embeddings], dim=1) # 对attention_mask进行拼接和处理,生成一个新的attention_maskattention_mask = torch.cat([attention_mask, source_attention_mask.reshape(B, src_V * S).repeat_interleave(V, dim=0)], dim=1)attention_mask = ~(attention_mask.bool()) # B * V, (src_V + 1) * Sattention_mask[classifier_free_idx] = False# 生成一个方形掩码(square_mask),然后将其与attention_mask的最后一部分进行逻辑或操作。square_mask = torch.triu(torch.ones((V, V), device=self.device)).bool() # B, V, V, Ssquare_mask = square_mask.unsqueeze(0).unsqueeze(-1).expand(B, V, V, S)square_mask = square_mask.reshape(B * V, V * S)attention_mask[:, -V * S:] = torch.logical_or(square_mask, attention_mask[:, -V * S:])# VAE 编码 images 为 latentslatents = self.vae.encode(images).latent_dist.sample()latents = latents * 0.18215# 生成随机噪声并使用 noise_scheduler 对latents添加噪声noise = torch.randn(latents.shape, device=self.device)bsz = latents.shape[0]timesteps = torch.randint(0, self.noise_scheduler.num_train_timesteps, (bsz,), device=self.device).long()noisy_latents = self.noise_scheduler.add_noise(latents, noise, timesteps)# 用UNet计算noisy_latents的噪声(但并未进行去噪)noise_pred = self.unet(noisy_latents, timesteps, encoder_hidden_states, attention_mask).sample# 然后计算噪声预测与真实噪声之间的均方误差损失(MSE Loss)作为最终的损失值。最后返回损失值loss = F.mse_loss(noise_pred, noise, reduction="none").mean([1, 2, 3]).mean()return loss
(7)sample:推理时,调用sample,传入一个batch的数据(original_images, captions, attention_mask, source_images, source_caption, source_attention_mask),返回生成的image。前面和forward几乎一样,不同的是for循环自回归的生成每一帧。
def sample(self, batch):original_images, captions, attention_mask, source_images, source_caption, source_attention_mask = batchB, V, S = captions.shapesrc_V = V + 1 if self.task == 'continuation' else Voriginal_images = torch.flatten(original_images, 0, 1)captions = torch.flatten(captions, 0, 1)attention_mask = torch.flatten(attention_mask, 0, 1)source_images = torch.flatten(source_images, 0, 1)source_caption = torch.flatten(source_caption, 0, 1)source_attention_mask = torch.flatten(source_attention_mask, 0, 1)caption_embeddings = self.text_encoder(captions, attention_mask).last_hidden_state # B * V, S, Dsource_embeddings = self.mm_encoder(source_images, source_caption, source_attention_mask,mode='multimodal').reshape(B, src_V * S, -1)caption_embeddings += self.modal_type_embeddings(torch.tensor(0, device=self.device))source_embeddings += self.modal_type_embeddings(torch.tensor(1, device=self.device))source_embeddings += self.time_embeddings(torch.arange(src_V, device=self.device).repeat_interleave(S, dim=0))source_embeddings = source_embeddings.repeat_interleave(V, dim=0)encoder_hidden_states = torch.cat([caption_embeddings, source_embeddings], dim=1)attention_mask = torch.cat([attention_mask, source_attention_mask.reshape(B, src_V * S).repeat_interleave(V, dim=0)], dim=1)attention_mask = ~(attention_mask.bool()) # B * V, (src_V + 1) * S# B, V, V, Ssquare_mask = torch.triu(torch.ones((V, V), device=self.device)).bool()square_mask = square_mask.unsqueeze(0).unsqueeze(-1).expand(B, V, V, S)square_mask = square_mask.reshape(B * V, V * S)attention_mask[:, -V * S:] = torch.logical_or(square_mask, attention_mask[:, -V * S:])uncond_caption_embeddings = self.text_encoder(self.clip_text_null_token).last_hidden_stateuncond_source_embeddings = self.mm_encoder(self.blip_image_null_token, self.blip_text_null_token,attention_mask=None, mode='multimodal').repeat(1, src_V, 1)uncond_caption_embeddings += self.modal_type_embeddings(torch.tensor(0, device=self.device))uncond_source_embeddings += self.modal_type_embeddings(torch.tensor(1, device=self.device))uncond_source_embeddings += self.time_embeddings(torch.arange(src_V, device=self.device).repeat_interleave(S, dim=0))uncond_embeddings = torch.cat([uncond_caption_embeddings, uncond_source_embeddings], dim=1)uncond_embeddings = uncond_embeddings.expand(B * V, -1, -1)encoder_hidden_states = torch.cat([uncond_embeddings, encoder_hidden_states])uncond_attention_mask = torch.zeros((B * V, (src_V + 1) * S), device=self.device).bool()uncond_attention_mask[:, -V * S:] = square_maskattention_mask = torch.cat([uncond_attention_mask, attention_mask], dim=0)attention_mask = attention_mask.reshape(2, B, V, (src_V + 1) * S)# AutoRagressive Generationimages = list()for i in range(V):# 生成第 i 张image,这个i控制着当前diffusion可以看到的历史: captions[:, :, i]和frames[:, :, i]# encoder_hidden_states包含了{当前caption、历史captions、历史frames},作为corss-attn的KV融入Unetencoder_hidden_states = encoder_hidden_states.reshape(2, B, V, (src_V + 1) * S, -1)# Diffusion Sample(得带T个step生成一张image)new_image = self.diffusion(encoder_hidden_states[:, :, i].reshape(2 * B, (src_V + 1) * S, -1),attention_mask[:, :, i].reshape(2 * B, (src_V + 1) * S),512, 512, self.args.num_inference_steps, self.args.guidance_scale, 0.0)# 后面存入新生成的image,并更新encoder_hidden_states:加入新一帧的image和captionimages += new_imagenew_image = torch.stack([self.blip_image_processor(im) for im in new_image]).to(self.device)new_embedding = self.mm_encoder(new_image, # B,C,H,Wsource_caption.reshape(B, src_V, S)[:, i + src_V - V],source_attention_mask.reshape(B, src_V, S)[:, i + src_V - V],mode='multimodal') # B, S, Dnew_embedding = new_embedding.repeat_interleave(V, dim=0)new_embedding += self.modal_type_embeddings(torch.tensor(1, device=self.device))new_embedding += self.time_embeddings(torch.tensor(i + src_V - V, device=self.device))encoder_hidden_states = encoder_hidden_states[1].reshape(B * V, (src_V + 1) * S, -1)encoder_hidden_states[:, (i + 1 + src_V - V) * S:(i + 2 + src_V - V) * S] = new_embeddingencoder_hidden_states = torch.cat([uncond_embeddings, encoder_hidden_states])return original_images, images
一些注意事项:
- Lightning在需要的时候会调用backward和step。
- 如果使用半精度(precision=16),Lightning会自动处理。
- 如果使用多个优化器,training_step会附加一个参数optimizer_idx。
- 如果使用LBFGS,Lightning将自动处理关闭功能。
- 如果使用多个优化器,则在每个训练步骤中仅针对当前优化器的参数计算梯度。
- 如果需要控制这些优化程序执行或改写默认step的频率,请改写optimizer_step。
- 如果在每n步都调用调度器,或者只想监视自定义指标,则可以在lr_dict中指定。
{     "scheduler": lr_scheduler,"interval": "step",  # or "epoch" "monitor": "val_f1","frequency": n,
}
blip mm encoder
BLIP源码中我们主要关注图像encoder(vit.py)、文本encoder+decoder(med.py)、整体预训练(blip_pretrain.py)这三部分代码。
-
vit.py作为图像的encoder,用来处理图像到embedding的生成。整体结构与vit代码类似。 -
med.py是blip文章的主要模型结构创新点。med代码部分的整体模型结构是在bert模型的基础上做的修改。首先,在BertSelfAttention代码中,加入is_cross_attention部分,用以判断是否进行图片和文本的cross attention,原本的bert中cross attention是和encoder的输出进行的,在med中要修改为图像的encoder结果,对key、value进行赋值。
因此我们叫这个多模态Encoder:Image-grounded Text Encoder (变种 BERT):在标准 BERT 的 text encoder 结构里,在 Bi Self-Att 和 Feed Forward 之间插入 Cross Attention模块,以引入 image 特征;
class BLIP_Base(nn.Module):def __init__(self,med_config='models/blip_override/med_config.json',image_size=224,vit='base',vit_grad_ckpt=False,vit_ckpt_layer=0,):"""Args:med_config (str): path for the mixture of encoder-decoder model's configuration fileimage_size (int): input image sizevit (str): model size of vision transformer"""super().__init__()self.visual_encoder, vision_width = create_vit(vit, image_size, vit_grad_ckpt, vit_ckpt_layer)self.tokenizer = init_tokenizer()med_config = BertConfig.from_json_file(med_config)med_config.encoder_width = vision_widthself.text_encoder = BertModel(config=med_config, add_pooling_layer=False)def forward(self, image, text, attention_mask, mode):assert mode in ['image', 'text', 'multimodal'], "mode parameter must be image, text, or multimodal"if mode == 'image':# return image featuresimage_embeds = self.visual_encoder(image)return image_embedselif mode == 'text':# return text featurestext_output = self.text_encoder(text, attention_mask=attention_mask, return_dict=True, mode='text')return text_output.last_hidden_stateelif mode == 'multimodal': # mm do it!!# return multimodel featuresimage_embeds = self.visual_encoder(image)image_atts = torch.ones(image_embeds.size()[:-1], dtype=torch.long).to(image.device)text[:, 0] = self.tokenizer.enc_token_idoutput = self.text_encoder(text,attention_mask=attention_mask,encoder_hidden_states=image_embeds,encoder_attention_mask=image_atts,return_dict=True,)return output.last_hidden_state