13.Spring 整合 Kafka + 发送系统通知 + 显示系统通知
目录
1.Spring 整合 Kafka
2.发送系统通知
2.1 封装事件对象
2.2 开发事件的生产者和消费者
2.3 触发事件:在评论、点赞、关注后通知编辑
3.显示系统通知
3.1 通知列表
3.1.1 数据访问层
3.1.2 业务层
3.1.3 表现层
3.2 开发通知详情
3.2.1 开发数据访问层
3.1.2 业务层
3.1.3 表现层
3.3 未读消息
1.Spring 整合 Kafka
- 引入依赖:kafka
- 配置 Kafka:配置 server、consumer
- 访问 Kafka:生产者——kafkaTemplate.send(topic, data); 消费者——@KafkaListener(topics = {"test"}) public void handleMessage(ConsumerRecord record) { }
引入依赖 :
<!-- https://mvnrepository.com/artifact/org.springframework.kafka/spring-kafka -->
<dependency><groupId>org.springframework.kafka</groupId><artifactId>spring-kafka</artifactId><version>3.1.0</version>
</dependency>
配置 Kafka:
# KafkaProperties
spring.kafka.bootstrap-servers=localhost:9092
spring.kafka.consumer.group-id=test-consumer-group
spring.kafka.consumer.enable-auto-commit=true
spring.kafka.consumer.auto-commit-interval=3000
测试类:
package com.example.demo;import org.apache.kafka.clients.consumer.ConsumerRecord;
import org.junit.Test;
import org.junit.runner.RunWith;
import org.springframework.beans.factory.annotation.Autowired;
import org.springframework.boot.test.context.SpringBootTest;
import org.springframework.kafka.annotation.KafkaListener;
import org.springframework.kafka.core.KafkaTemplate;
import org.springframework.stereotype.Component;
import org.springframework.test.context.ContextConfiguration;
import org.springframework.test.context.junit4.SpringRunner;@RunWith(SpringRunner.class)
@SpringBootTest
@ContextConfiguration(classes = DemoApplication.class)
public class KafkaTests {@Autowiredprivate KafkaProducer kafkaProducer;@Testpublic void testKafka() {kafkaProducer.sendMessage("test", "你好");kafkaProducer.sendMessage("test", "在吗");try {Thread.sleep(1000 * 10);} catch (InterruptedException e) {e.printStackTrace();}}}//生产者
@Component
class KafkaProducer {@Autowiredprivate KafkaTemplate kafkaTemplate;public void sendMessage(String topic, String content) {kafkaTemplate.send(topic, content);}}//消费者
@Component
class KafkaConsumer {@KafkaListener(topics = {"test"})public void handleMessage(ConsumerRecord record) {System.out.println(record.value());}}
2.发送系统通知
- 触发事件:评论后,发布通知;点赞后,发布通知;关注后,发布通知
- 处理事件:封装事件对象;开发事件的生产者;开发事件的消费者
2.1 封装事件对象
定义一个对象对事件封装 事件触发相关一切信息,在 entity 包下创建 Event 实体类
package com.example.demo.entity;import java.util.HashMap;
import java.util.Map;/*** 发送系统消息实体类*/
public class Event {private String topic;//主题private int userId;private int entityType;//发生在哪个实体类private int entityId;//实体idprivate int entityUserId;//实体作者private Map<String, Object> data = new HashMap<>();//处理其他事件,会有数据进行记录,将额外的数据存到 map 中,具有扩展性public String getTopic() {return topic;}public Event setTopic(String topic) {this.topic = topic;return this;}public int getUserId() {return userId;}public Event setUserId(int userId) {this.userId = userId;return this;}public int getEntityType() {return entityType;}public Event setEntityType(int entityType) {this.entityType = entityType;return this;}public int getEntityId() {return entityId;}public Event setEntityId(int entityId) {this.entityId = entityId;return this;}public int getEntityUserId() {return entityUserId;}public Event setEntityUserId(int entityUserId) {this.entityUserId = entityUserId;return this;}public Map<String, Object> getData() {return data;}public Event setData(String key, Object value) {this.data.put(key, value);return this;}}
2.2 开发事件的生产者和消费者

新建 event 包,创建 EventProducer 类(开发事件的生产者):
- 添加 @Component 注解
- 调用 KafkaTemlate
- 生产者提供处理事件的方法:将事件发布到指定的主题
package com.example.demo.event;import com.alibaba.fastjson.JSONObject;
import com.example.demo.entity.Event;
import org.springframework.beans.factory.annotation.Autowired;
import org.springframework.kafka.core.KafkaTemplate;
import org.springframework.stereotype.Component;/*** 开发事件的生产者*/@Component
public class EventProducer {@Autowiredprivate KafkaTemplate kafkaTemplate;public void fireEvent(Event event) {//将事件发布到指定的主题kafkaTemplate.send(event.getTopic(), JSONObject.toJSONString(event));}
}
创建 EventConsumer 类(开发事件的消费者):
- 添加 @Component 注解
- 如果出现异常需要记录日志,声明日志
- 最终需要往 message 中插入数据,需要注入 MessageService
- 添加方法处理事件消费主题:添加 @KafkaListener(topics = 主题)
- 定义主题常量,在 CommunityConstant 接口类中添加
/*** 主题: 评论*/String TOPIC_COMMENT = "comment";/*** 主题: 点赞*/String TOPIC_LIKE = "like";/*** 主题: 关注*/String TOPIC_FOLLOW = "follow";//后边需要用到,这里先声明/*** 系统用户ID*/int SYSTEM_USER_ID = 1;- 定义消费者方法:添加参数接收相关数据,首先判断数据是否为空,为空记录日志;不为空的话是一个 JSON 字符串,然后将字符串解析成相应的事件,再去判断对象是否为空,为空记录日志
- 不为空(此时内容和格式都正确),发送站内通知:构造 Massage 对象、设置系统用户id(消息的发布者)、设置消息的接收者(entityUserId)、设置会话 id、设置创建当前时间、设置具体内容(内容里面包含对象,对象包含的是页面拼接话语的数据——这件事谁触发的、对哪个实体做操作、点击查看链接到帖子详情页面即需要知道帖子 id)
- 使用 Map 存储具体内容:用户 id、实体类型、实体 id、触发事件还可能又有额外的数据也需要存入 Map 中(以 key、vlaue 形式存储),最终存储到 Massage 对象中(最终存储 JSON 字符串)
- 上述即构造完成 Massage 对象,再进行存储
package com.example.demo.event;import com.alibaba.fastjson.JSONObject;
import com.example.demo.entity.Event;
import com.example.demo.entity.Message;
import com.example.demo.service.MessageService;
import com.example.demo.util.CommunityConstant;
import org.apache.kafka.clients.consumer.ConsumerRecord;
import org.slf4j.Logger;
import org.slf4j.LoggerFactory;
import org.springframework.beans.factory.annotation.Autowired;
import org.springframework.kafka.annotation.KafkaListener;
import org.springframework.stereotype.Component;import java.util.Date;
import java.util.HashMap;
import java.util.Map;@Component
public class EventConsumer implements CommunityConstant {//如果出现异常需要记录日志,声明日志private static final Logger logger = LoggerFactory.getLogger(EventConsumer.class);//最终需要往 message 中插入数据,需要注入 MessageService@Autowiredprivate MessageService messageService;//添加方法处理事件消费主题:添加 @KafkaListener(topics = 主题)@KafkaListener(topics = {TOPIC_COMMENT, TOPIC_LIKE, TOPIC_FOLLOW})//定义消费者方法:添加参数接收相关数据,首先判断数据是否为空,为空记录日志;public void handleCommentMessage(ConsumerRecord record) {if (record == null || record.value() == null) {logger.error("消息的内容为空!");return;}// 不为空的话是一个 JSON 字符串,然后将字符串解析成相应的事件,再去判断对象是否为空,为空记录日志Event event = JSONObject.parseObject(record.value().toString(), Event.class);//再去判断对象是否为空,为空记录日志if (event == null) {logger.error("消息格式错误!");return;}//不为空(此时内容和格式都正确),发送站内通知Message message = new Message();//构造 Massage 对象message.setFromId(SYSTEM_USER_ID);//设置系统用户id(消息的发布者)message.setToId(event.getEntityUserId());//设置消息的接收者(entityUserId)message.setConversationId(event.getTopic());//设置会话 idmessage.setCreateTime(new Date());//设置创建当前时间//设置具体内容(内容里面包含对象,对象包含的是页面拼接话语的数据//这件事谁触发的、对哪个实体做操作、点击查看链接到帖子详情页面即需要知道帖子 id)//使用 Map 存储具体内容:用户 id、实体类型、实体 id、触发事件还可能又有额外的数据也需要存入 Map 中(以 key、vlaue 形式存储)//最终存储到 Massage 对象中(最终存储 JSON 字符串)Map<String, Object> content = new HashMap<>();//使用 Map 存储具体内容content.put("userId", event.getUserId());//用户 id、实体类型content.put("entityType", event.getEntityType());//实体类型content.put("entityId", event.getEntityId());//实体 id//发事件还可能又有额外的数据也需要存入 Map 中(以 key、vlaue 形式存储)if (!event.getData().isEmpty()) {for (Map.Entry<String, Object> entry : event.getData().entrySet()) {content.put(entry.getKey(), entry.getValue());}}//最终存储到 Massage 对象中(最终存储 JSON 字符串)message.setContent(JSONObject.toJSONString(content));//再进行存储messageService.addMessage(message);}
}
2.3 触发事件:在评论、点赞、关注后通知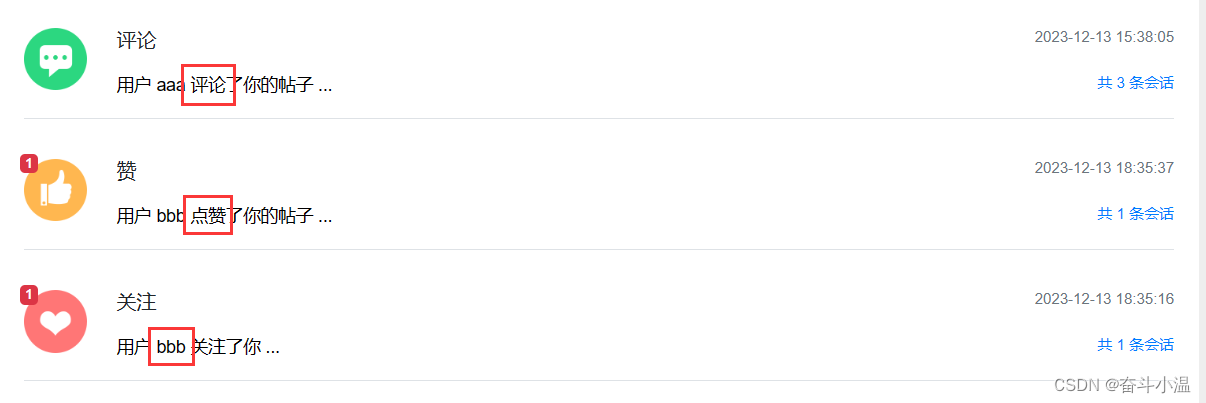
打开 CommentController 类进行修改:
- 处理事件需要注入 EventProducer
- 添加评论之后在进行通知,在 addComment 之后进行通知
- 触发评论事件:构造事件对象(包含事件相关内容——事件主题(实现接口)、事件登录者触发、实体类型、实体 id、点击查看链接(需要帖子 id)),实体作者不可以在这里拼接,因为评论的目标可能是帖子也可能是评论

- 实体作者需要进行判断
- 评论目标是帖子:注入 DiscussPostService,查询帖子 id,补充实体作者
- 评论目标是评论:在 CommentMapper 类中添加选择评论 id 的方法
//选择评论 id
Comment selectCommentById(int id);- 在 resources 资源文件下 mapper 包的 comment-mapper.xml 添加实现方法
<select id="selectCommentById" resultType="Comment">select <include refid="selectFields"></include>from commentwhere id = #{id}</select>- 在 CommentService 类中实现方法:
//调用 选择评论 id 的方法public Comment findCommentById(int id) {return commentMapper.selectCommentById(id);}- 评论目标是评论:这个时候就可以根据评论查询帖子 id,补充实体作者
- 调用 eventProducer 发布消息
打开 LikeController 类进行修改:类似上述操作
点赞在点赞之后进行触发事件:
- 点赞进行通知(likeStatus == 1),取消赞则不需要通知
- 得到帖子 id,需要重构点赞方法:传入帖子 id
- 最后触发事件
public String like(int entityType, int entityId, int entityUserId, int postId) {//获取当前用户User user = hostHolder.getUser();//实现点赞:调用 LikeServicelikeService.like(user.getId(), entityType, entityId, entityUserId);//统计点赞数量、点赞状态返回页面,页面根据返回值做数量和状态显示// 数量long likeCount = likeService.findEntityLikeCount(entityType, entityId);// 状态int likeStatus = likeService.findEntityLikeStatus(user.getId(), entityType, entityId);// 返回的结果(用 Map 封装)Map<String, Object> map = new HashMap<>();map.put("likeCount", likeCount);map.put("likeStatus", likeStatus);// 触发点赞事件//点赞进行通知(likeStatus == 1),取消赞则不需要通知if (likeStatus == 1) {Event event = new Event().setTopic(TOPIC_LIKE).setUserId(hostHolder.getUser().getId()).setEntityType(entityType).setEntityId(entityId).setEntityUserId(entityUserId).setData("postId", postId);//得到帖子 id,需要重构点赞方法:传入帖子 ideventProducer.fireEvent(event);}//返回页面return CommunityUtil.getJSONString(0,null,map);}- 重构点赞方法:传入帖子 id ,需要修改帖子详情页面传入帖子 id(discuss-detail.html):
<a href="javascript:;" th:onclick="|like(this,1,${post.id},${post.userId},${post.id});|" class="text-primary"><a href="javascript:;" th:onclick="|like(this,2,${cvo.comment.id},${cvo.comment.userId},${post.id});|" class="text-primary"><a href="javascript:;" th:onclick="|like(this,2,${rvo.reply.id},${rvo.reply.userId},${post.id});|" class="text-primary">在 discuss.js 中修改 like 方法:
function like(btn, entityType, entityId, entityUserId, postId) {$.post(CONTEXT_PATH + "/like",{"entityType":entityType,"entityId":entityId,"entityUserId":entityUserId,"postId":postId},function(data) {data = $.parseJSON(data);if(data.code == 0) {$(btn).children("i").text(data.likeCount);$(btn).children("b").text(data.likeStatus==1?'已赞':"赞");} else {alert(data.msg);}});
}
打开 FollowController 类进行修改:
- 在关注之后(followService.follow)进行触发事件
//关注请求:当前登陆用户关注某一个实体,传入实体参数并且注入 HostHolder@RequestMapping(path = "/follow", method = RequestMethod.POST)@ResponseBodypublic String follow(int entityType, int entityId) {//首先获取当前用户、然后再去关注,给页面返回结果User user = hostHolder.getUser();followService.follow(user.getId(), entityType, entityId);// 触发关注事件Event event = new Event().setTopic(TOPIC_FOLLOW).setUserId(hostHolder.getUser().getId()).setEntityType(entityType).setEntityId(entityId).setEntityUserId(entityId);eventProducer.fireEvent(event);return CommunityUtil.getJSONString(0, "已关注!");}在 ServiceLogAspect 类中需要稍微进行修改:attributes 是和请求有关的对象,在 ServiceLogAspect 类所有的 Service 都是通过 Controller 进行访问。而刚才我们写了一个 EventConsumer(消费者)并且调用了 Service,不是通过 Controller 调用,这次调用得不到 Request,会出现空指针异常:
package com.example.demo.aspect;import org.aspectj.lang.JoinPoint;
import org.aspectj.lang.annotation.Aspect;
import org.aspectj.lang.annotation.Before;
import org.aspectj.lang.annotation.Pointcut;
import org.slf4j.Logger;
import org.slf4j.LoggerFactory;
import org.springframework.stereotype.Component;
import org.springframework.web.context.request.RequestContextHolder;
import org.springframework.web.context.request.ServletRequestAttributes;import javax.servlet.http.HttpServletRequest;
import java.text.SimpleDateFormat;
import java.util.Date;@Component
@Aspect
public class ServiceLogAspect {//实例化 Loggerprivate static final Logger logger = LoggerFactory.getLogger(ServiceLogAspect.class);//声明切点:所有业务组件都去处理@Pointcut("execution(* com.example.demo.service.*.*(..))")public void pointcut() {}//使用前置通知在业务组件一开始记录日志@Before("pointcut()")public void before(JoinPoint joinPoint) {//记录格式:用户[1.2.3.4],在[xxx],访问了[com.example.demo.service.xxx()].//用户 ip 通过 request 获取,获取 request:RequestContextHolder.getRequestAttributes();ServletRequestAttributes attributes =(ServletRequestAttributes) RequestContextHolder.getRequestAttributes();//消费者调用了if (attributes == null) {return;}HttpServletRequest request = attributes.getRequest();String ip = request.getRemoteHost();//拼接时间:new Date,然后实例化String now = new SimpleDateFormat("yyyy-MM-dd HH:mm:ss").format(new Date());//访问某个类某个方法(类名 + 方法名):给方法添加 JoinPoint 连接点参数,连接点指代程序植入的目标方法String target = joinPoint.getSignature().getDeclaringTypeName() + "." + joinPoint.getSignature().getName();//全部拼接logger.info(String.format("用户[%s],在[%s],访问了[%s].", ip, now, target));}
}
评论:

点赞:

关注:

3.显示系统通知
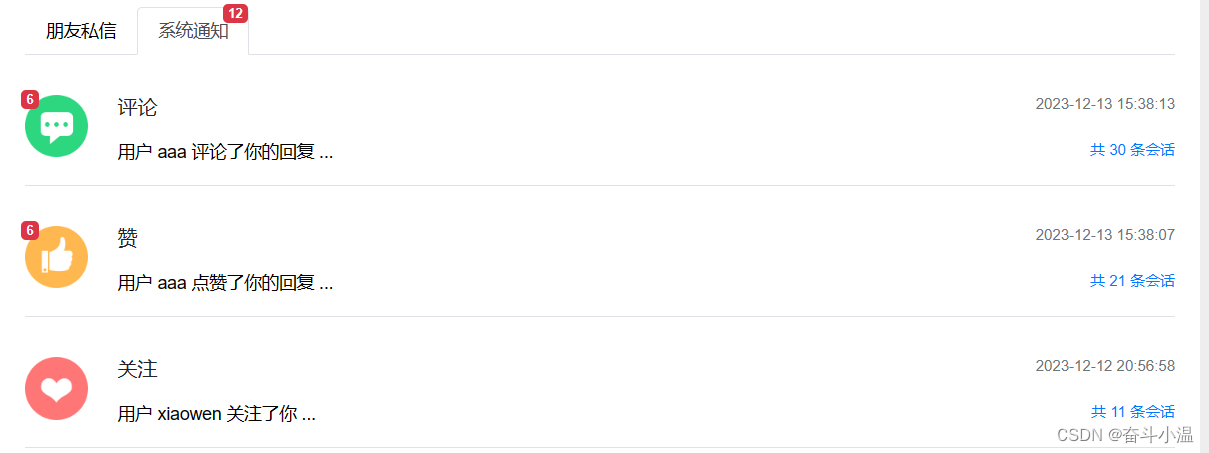
- 通知列表:显示评论、点赞、关注三种类型的通知
- 通知详情:分页显示某一类主题所包含的通知
- 未读消息:在页面头部显示所有的未读消息数量
3.1 通知列表
3.1.1 数据访问层
通知我们当时存放在 Message 表中,因此对 MessageMapper 类增加方法:
- 查询某个主题(评论、点赞、关注)下最新的通知:查询某个用户通知,传入用户 id、并且传入主题
- 查询某个主题所包含的通知数量:返回整数
- 查询未读通知数量
//查询某个主题(评论、点赞、关注)下最新的通知Message selectLatestNotice(int userId, String topic);//查询某个主题所包含的通知数量int selectNoticeCount(int userId, String topic);//查询未读通知数量int selectNoticeUnreadCount(int userId, String topic);方法申明之后再去实现方法,在对应的 message-mapper.xml 中去实现:
- 查询某个主题(评论、点赞、关注)下最新的通知:询最新的 id并且状态(status != 2,代表私信没有被删除);发送通知是由系统通知用户(from_id = 1),避免和普通私信混淆;接收者为用户 id;主题是在 conversation_id 中存储
- 查询某个主题所包含的通知数量:同上(只是查询的是数量,不是最新 id)
- 查询未读通知数量:同上(未读则 status = 0),还需要查询整个通知的未读数量(如果不传入 topic,那么意味着查询的就是整个通知的未读数量)
<!--查询某个主题(评论、点赞、关注)下最新的通知--><select id="selectLatestNotice" resultType="Message">select <include refid="selectFields"></include>from messagewhere id in (select max(id) from messagewhere status != 2and from_id = 1and to_id = #{userId}and conversation_id = #{topic})</select><!--查询某个主题所包含的通知数量--><select id="selectNoticeCount" resultType="int">select count(id) from messagewhere status != 2and from_id = 1and to_id = #{userId}and conversation_id = #{topic}</select><!--查询未读通知数量--><select id="selectNoticeUnreadCount" resultType="int">select count(id) from messagewhere status = 0and from_id = 1and to_id = #{userId}<if test="topic!=null">and conversation_id = #{topic}</if></select>3.1.2 业务层
通知业务层在 MessageService 类中添加方法:
- 查询最新的通知:直接调用 selectLatestNotice
- 查询通知数量:直接调用上述方法即可
- 查询未读数量:直接调用上述方法即可
//查询最新的通知:直接调用 selectLatestNoticepublic Message findLatestNotice(int userId, String topic) {return messageMapper.selectLatestNotice(userId, topic);}//查询通知数量public int findNoticeCount(int userId, String topic) {return messageMapper.selectNoticeCount(userId, topic);}//查询未读数量public int findNoticeUnreadCount(int userId, String topic) {return messageMapper.selectNoticeUnreadCount(userId, topic);}3.1.3 表现层
处理 Controller,处理请求,处理模板
在 MessageController 类中处理请求:新增方法,显示通知列表
- 声明访问路径,查询为 GET 请求,传入 Model,向模板传数据
- 获取当前对象,查询三类通知(评论、点赞、关注)
- 查询评论类通知:实现接口传入常量,查询到数据后,再做一些补充的数据(例如数量、user等),创建 Map 用来聚合数据;如果查询到的数据不为空进一步查询更多数据存放到 Map 中
- 首先在 Map 中存入 message,但是在 message 中 content 是一个字符串,需要还原成对象放入 Map 中就可以方便访问数据

- 还原成对象:使用 HtmlUtils 工具对 html 的标签、字符进行转义得到的 content 就没有转义字符,再转化相应的对象,再存入 Map 中(user、entityType、entityId、postId)
- 还需要查询某一类的数量和未读数量,存放到 Map 中;最后传入模板
- 查询点赞类通知:与上述评论通知大致相同(类型为点赞—— TOPIC_LIKE)
- 查询关注类通知:(类型为关注—— TOPIC_FOLLOW),关注点击跳转链接,跳转到关注的人,而不是跳转到帖子,所以不需要在 Map 中存 帖子 id
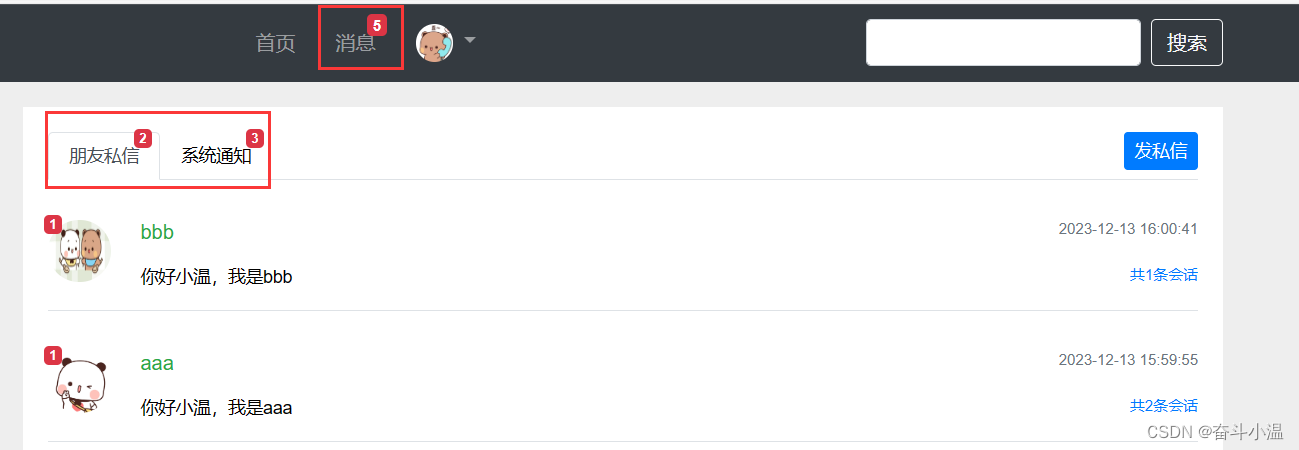
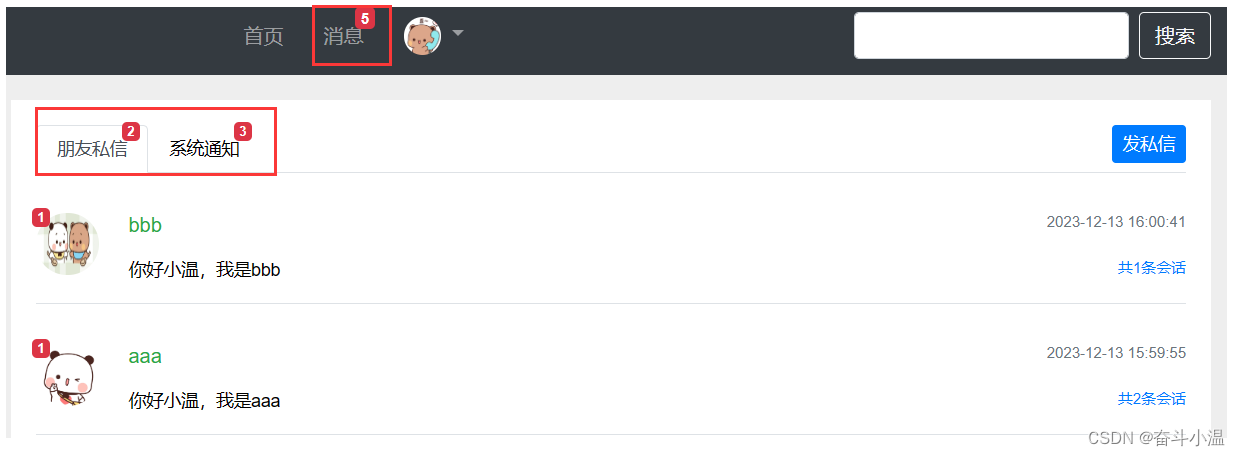
- 显示系统通知的未读数量和朋友私信的未读数量

- 之前编写过查询私信列表的时候,没有开发通知列表,现在我们可以一边显示朋友私信的未读数量,一边显示系统通知的未读数量,在私信列表方法中的查询未读消息数量后添加显示系统通知的未读数量
-
@RequestMapping(path = "/letter/list", method = RequestMethod.GET)public String getLetterList(Model model, Page page) {//设置分页信息(每页显示多少条数据、分页路径、一共多少条数据——查询当前会话的数据、传入 userId,需要获取 User)User user = hostHolder.getUser();page.setLimit(5);page.setPath("/letter/list");page.setRows(messageService.findConversationCount(user.getId()));//查询会话列表得到数据(显示未读数量、每一次会话的未读数量、会话中包含多少条数据)//声明集合,用 Map 封装,将多个数据存入 Map 中List<Message> conversationList = messageService.findConversations(user.getId(), page.getOffset(), page.getLimit());List<Map<String, Object>> conversations = new ArrayList<>();//遍历列表,新建 HashMap 重构数据:存入遍历的每一次数据、存入未读详细数据(用户 id、会话 id)// 、存入多少条数量(会话 id)、显示当前用户相对应的用户头像if (conversationList != null) {for (Message message : conversationList) {Map<String, Object> map = new HashMap<>();map.put("conversation", message);map.put("letterCount", messageService.findLetterCount(message.getConversationId()));map.put("unreadCount", messageService.findLetterUnreadCount(user.getId(), message.getConversationId()));//寻找目标 id:如果当前用户是消息的发起者,目标就是接收人;如果当前对象是消息的接收者,目标就是发起者int targetId = user.getId() == message.getFromId() ? message.getToId() : message.getFromId();//将目标对象存入 HashMap 中(注入 UserService)map.put("target", userService.findUserById(targetId));//将得到的 HashMap 存入集合当中conversations.add(map);}}//最后传入模板中model.addAttribute("conversations", conversations);// 查询未读消息数量(查询整个用户所有的未读消息数量),传入 Model 中显示,返回 Model 路径(/site/letter)int letterUnreadCount = messageService.findLetterUnreadCount(user.getId(), null);model.addAttribute("letterUnreadCount", letterUnreadCount);// 查询系统通知的未读数量int noticeUnreadCount = messageService.findNoticeUnreadCount(user.getId(), null);model.addAttribute("noticeUnreadCount", noticeUnreadCount);return "/site/letter";} } - 最后返回到模板
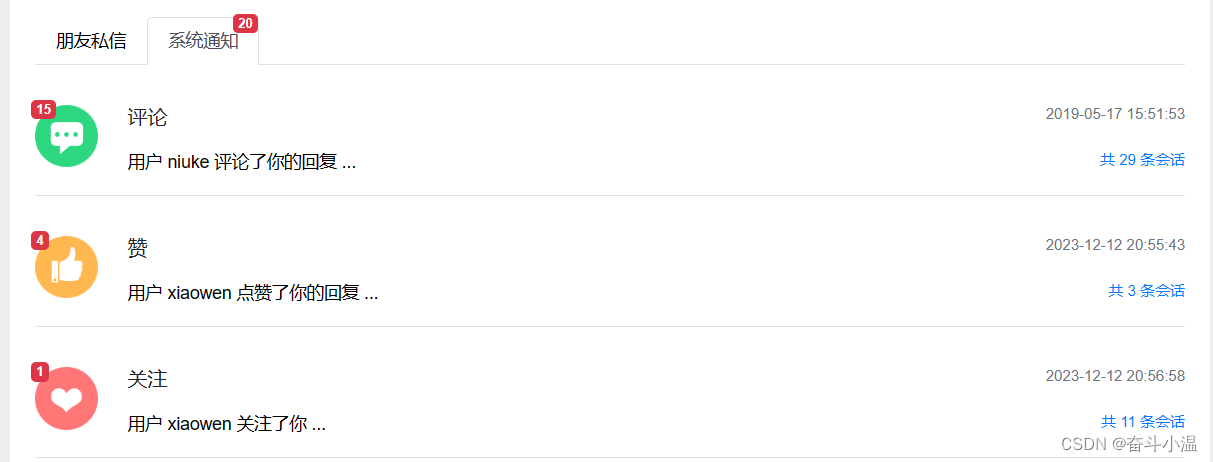
//新增方法,显示通知列表//声明访问路径,查询为 GET 请求,传入 Model,向模板传数据@RequestMapping(path = "/notice/list", method = RequestMethod.GET)public String getNoticeList(Model model) {//获取当前对象,查询三类通知(评论、点赞、关注)User user = hostHolder.getUser();//查询评论类通知//实现接口传入常量,查询到数据后,再做一些补充的数据(例如数量、user等),创建 Map 用来聚合数据;如果查询到的数据不为空进一步查询更多数据存放到 Map 中Message message = messageService.findLatestNotice(user.getId(), TOPIC_COMMENT);Map<String, Object> messageVO = new HashMap<>();//如果在if内,如 message为null,messageVo根本没有存放这个message,所以放外边messageVO.put("message", message);if (message != null) {//但是在 message 中 content 是一个字符串,需要还原成对象放入 Map 中就可以方便访问数据//使用 HtmlUtils 工具对 html 的标签、字符进行转义得到的 content 就没有转义字符String content = HtmlUtils.htmlUnescape(message.getContent());//再转化相应的对象Map<String, Object> data = JSONObject.parseObject(content, HashMap.class);messageVO.put("user", userService.findUserById((Integer) data.get("userId")));messageVO.put("entityType", data.get("entityType"));messageVO.put("entityId", data.get("entityId"));messageVO.put("postId", data.get("postId"));//还需要查询某一类的数量和未读数量,存放到 Map 中;最后传入模板int count = messageService.findNoticeCount(user.getId(), TOPIC_COMMENT);messageVO.put("count", count);int unread = messageService.findNoticeUnreadCount(user.getId(), TOPIC_COMMENT);messageVO.put("unread", unread);}//最后传入模板model.addAttribute("commentNotice", messageVO);//查询点赞类通知message = messageService.findLatestNotice(user.getId(), TOPIC_LIKE);messageVO = new HashMap<>();messageVO.put("message", message);if (message != null) {String content = HtmlUtils.htmlUnescape(message.getContent());Map<String, Object> data = JSONObject.parseObject(content, HashMap.class);messageVO.put("user", userService.findUserById((Integer) data.get("userId")));messageVO.put("entityType", data.get("entityType"));messageVO.put("entityId", data.get("entityId"));messageVO.put("postId", data.get("postId"));int count = messageService.findNoticeCount(user.getId(), TOPIC_LIKE);messageVO.put("count", count);int unread = messageService.findNoticeUnreadCount(user.getId(), TOPIC_LIKE);messageVO.put("unread", unread);}model.addAttribute("likeNotice", messageVO);// 查询关注类通知message = messageService.findLatestNotice(user.getId(), TOPIC_FOLLOW);messageVO = new HashMap<>();messageVO.put("message", message);if (message != null) {String content = HtmlUtils.htmlUnescape(message.getContent());Map<String, Object> data = JSONObject.parseObject(content, HashMap.class);messageVO.put("user", userService.findUserById((Integer) data.get("userId")));messageVO.put("entityType", data.get("entityType"));messageVO.put("entityId", data.get("entityId"));int count = messageService.findNoticeCount(user.getId(), TOPIC_FOLLOW);messageVO.put("count", count);int unread = messageService.findNoticeUnreadCount(user.getId(), TOPIC_FOLLOW);messageVO.put("unread", unread);}model.addAttribute("followNotice", messageVO);//显示系统通知的未读数量和朋友私信的未读数量int letterUnreadCount = messageService.findLetterUnreadCount(user.getId(), null);model.addAttribute("letterUnreadCount", letterUnreadCount);int noticeUnreadCount = messageService.findNoticeUnreadCount(user.getId(), null);model.addAttribute("noticeUnreadCount", noticeUnreadCount);//之前编写过查询私信列表的时候,没有开发通知列表//现在我们可以一边显示朋友私信的未读数量,一边显示系统通知的未读数量,在私信列表方法中的查询未读消息数量后添加显示系统通知的未读数量return "/site/notice";}最后处理模板:letter.html:
<a class="nav-link position-relative" th:href="@{/notice/list}">系统通知<span class="badge badge-danger" th:text="${noticeUnreadCount}" th:if="${noticeUnreadCount!=0}">27</span>
</a>
处理通知模板(notice.html):声明模板
3.2 开发通知详情
3.2.1 开发数据访问层
对 MessageMapper 类增加方法:支持分页
// 查询某个主题所包含的通知列表List<Message> selectNotices(int userId, String topic, int offset, int limit);方法申明之后再去实现方法,在对应的 message-mapper.xml 中去实现:
<!--查询某个主题所包含的通知列表--><select id="selectNotices" resultType="Message">select <include refid="selectFields"></include>from messagewhere status != 2and from_id = 1and to_id = #{userId}and conversation_id = #{topic}order by create_time desclimit #{offset}, #{limit}</select>3.1.2 业务层
通知业务层在 MessageService 类中添加方法:
//查询某个主题所包含的通知列表public List<Message> findNotices(int userId, String topic, int offset, int limit) {return messageMapper.selectNotices(userId, topic, offset, limit);}3.1.3 表现层
在 MessageController 类中处理请求:新增方法,显示通知详情
- 声明访问路径(查询某一类通知,通过路径传入 topic),查询为 GET 请求,传入 Model,向模板传数据
- 方法中参数引入(使用 @PathVariable 得到路径中的 topic,并且支持分页,传入 Model)
- 获取当前用户(查询当前用户的详细信息),对分页进行设置(分页条数、路径、行数)
- 查询某个主题的通知(集合)
- 申明集合 (存入Map,用来存入聚合数据),实例化新的 ArrayList
- 如果这个集合非空,聚合数据
- 遍历集合,为了存聚合数据,实例化 Map,存入通知、内容(content 是一个字符串,进行转义处理,再还原成对象放入 Map)
- 还原成对象:使用 HtmlUtils 工具对 html 的标签、字符进行转义得到的 content 就没有转义字符,再转化相应的对象,再存入 Map 中(user、entityType、entityId、postId)
- 补充通知的作者
- 将 map 存入集合中,最终将数据存入 Model 中
- 还需要设置已读
- 最终返回给模板
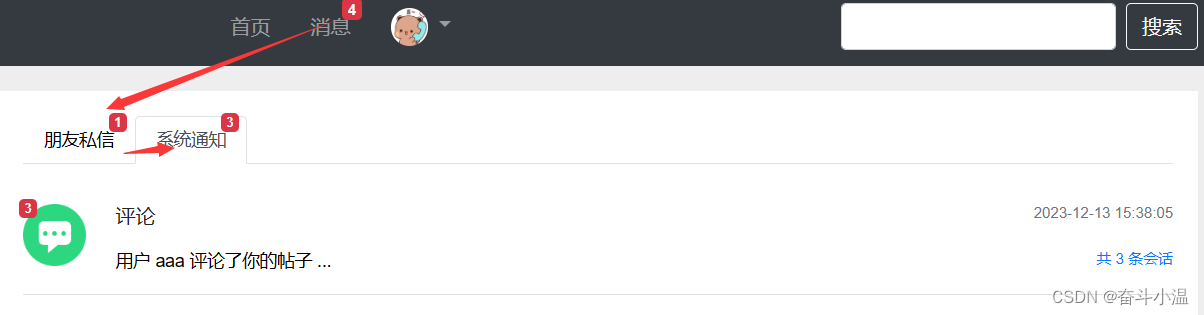
//显示通知详情//声明访问路径(查询某一类通知,通过路径传入 topic),查询为 GET 请求,传入 Model,向模板传数据@RequestMapping(path = "/notice/detail/{topic}", method = RequestMethod.GET)//方法中参数引入(使用 @PathVariable 得到路径中的 topic,并且支持分页,传入 Model)public String getNoticeDetail(@PathVariable("topic") String topic, Page page, Model model) {//获取当前用户(查询当前用户的详细信息),对分页进行设置(分页条数、路径、行数)User user = hostHolder.getUser();page.setLimit(5);page.setPath("/notice/detail/" + topic);page.setRows(messageService.findNoticeCount(user.getId(), topic));//查询某个主题的通知(集合)List<Message> noticeList = messageService.findNotices(user.getId(), topic, page.getOffset(), page.getLimit());//申明集合 (存入Map,用来存入聚合数据),实例化新的 ArrayListList<Map<String, Object>> noticeVoList = new ArrayList<>();//如果这个集合非空,聚合数据if (noticeList != null) {//遍历集合,为了存聚合数据,实例化 Mapfor (Message notice : noticeList) {Map<String, Object> map = new HashMap<>();// 通知map.put("notice", notice);// 内容:content 是一个字符串,进行转义处理,再还原成对象放入 Map)String content = HtmlUtils.htmlUnescape(notice.getContent());Map<String, Object> data = JSONObject.parseObject(content, HashMap.class);map.put("user", userService.findUserById((Integer) data.get("userId")));map.put("entityType", data.get("entityType"));map.put("entityId", data.get("entityId"));map.put("postId", data.get("postId"));// 通知作者map.put("fromUser", userService.findUserById(notice.getFromId()));noticeVoList.add(map);}}model.addAttribute("notices", noticeVoList);// 设置已读List<Integer> ids = getLetterIds(noticeList);if (!ids.isEmpty()) {messageService.readMessage(ids);}return "/site/notice-detail";}处理模板:点击通知列表访问页面、处理详情页面(notice-detail.html)

3.3 未读消息
未读消息 = 朋友私信 + 系统通知(使用拦截器处理)
在 interceptor 包下创建 MessageInterceptor 类(拦截器)
- 添加注解 @Component
- 实现接口 HandlerInterceptor
- 查新当前用户的未读数量,注入 HostHolder,注入 MessageService
- 在 调用 Controller 之后模板之前进行拦截,重写 postHandle 方法
package com.example.demo.controller.interceptor;import com.example.demo.entity.User;
import com.example.demo.service.MessageService;
import com.example.demo.util.HostHolder;
import org.springframework.beans.factory.annotation.Autowired;
import org.springframework.stereotype.Component;
import org.springframework.web.servlet.HandlerInterceptor;
import org.springframework.web.servlet.ModelAndView;import javax.servlet.http.HttpServletRequest;
import javax.servlet.http.HttpServletResponse;/*** 未读消息 = 朋友私信 + 系统通知(使用拦截器处理)*/
@Component
public class MessageInterceptor implements HandlerInterceptor {//查新当前用户的未读数量,注入 HostHolder,注入 MessageService@Autowiredprivate HostHolder hostHolder;@Autowiredprivate MessageService messageService;//在 调用 Controller 之后模板之前进行拦截,重写 postHandle 方法@Overridepublic void postHandle(HttpServletRequest request, HttpServletResponse response, Object handler, ModelAndView modelAndView) throws Exception {User user = hostHolder.getUser();if (user != null && modelAndView != null) {//朋友私信int letterUnreadCount = messageService.findLetterUnreadCount(user.getId(), null);//系统通知int noticeUnreadCount = messageService.findNoticeUnreadCount(user.getId(), null);//综合modelAndView.addObject("allUnreadCount", letterUnreadCount + noticeUnreadCount);}}
}
在 config 中配置拦截器(WebMvcConfig 类):
- 注入拦截器,进行拦截
package com.example.demo.config;
import com.example.demo.controller.interceptor.LoginRequiredInterceptor;
import com.example.demo.controller.interceptor.LoginTicketInterceptor;
import com.example.demo.controller.interceptor.MessageInterceptor;
import org.springframework.beans.factory.annotation.Autowired;
import org.springframework.context.annotation.Configuration;
import org.springframework.web.servlet.config.annotation.InterceptorRegistry;
import org.springframework.web.servlet.config.annotation.WebMvcConfigurer;/*** 拦截器*/@Configuration
public class WebMvcConfig implements WebMvcConfigurer {@Autowiredprivate LoginTicketInterceptor loginTicketInterceptor;//登录状态拦截器@Autowiredprivate LoginRequiredInterceptor loginRequiredInterceptor;//未读消息拦截器@Autowiredprivate MessageInterceptor messageInterceptor;public void addInterceptors(InterceptorRegistry registry) {registry.addInterceptor(loginTicketInterceptor).excludePathPatterns("/**/*.css", "/**/*.js", "/**/*.png", "/**/*.jpg", "/**/*.jpeg");registry.addInterceptor(loginRequiredInterceptor).excludePathPatterns("/**/*.css", "/**/*.js", "/**/*.png", "/**/*.jpg", "/**/*.jpeg");//未读消息拦截器registry.addInterceptor(messageInterceptor).excludePathPatterns("/**/*.css", "/**/*.js", "/**/*.png", "/**/*.jpg", "/**/*.jpeg");}}
在 index.html 进行修改(显示消息位置):
<a class="nav-link position-relative" th:href="@{/letter/list}">消息<span class="badge badge-danger" th:text="${allUnreadCount!=0?allUnreadCount:''}">12</span></a>