【iOS】UICollectionView
文章目录
- 前言
- 一、实现简单九宫格布局
- 二、UICollectionView中的常用方法和属性
- 1.UICollectionViewFlowLayout相关属性
- 2.UICollectionView相关属性
- 三、协议和代理方法:
- 四、九宫格式的布局进行升级
- 五、实现瀑布流布局
- 实现思路
- 实现原理
- 代码
- 调用顺序
- 实现步骤
- 实现效果
- 总结
前言
UICollectionView是iOS6之后引入的一个新的UI控件,它和UITableView有着诸多的相似之处,其中许多代理方法都十分类似。简单来说,UICollectionView是比UITbleView更加强大的一个UI控件,有如下几个方面:
1、支持水平与垂直布局
2、通过layout配置的方式进行布局
3、CollectionView中Item的大小与位置可以自由定义
4、通过layout布局回调的代理方法,可以动态的定制每个item的大小和collection的大体布局属性
5、更加强大一点,完全自定义一套layout布局方案,可以实现意想不到的效果
一、实现简单九宫格布局
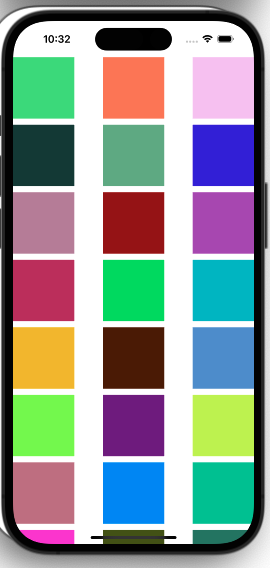
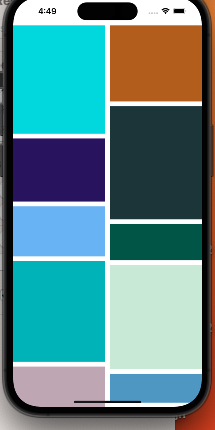
我们先来看一下简单九宫格的实现效果:
实现步骤:
1、创建布局类并为其各个属性赋值
2、将自定义的布局类作为参数传递给UICollectionView的初始化方法- (instancetype)initWithFrame:(CGRect)frame collectionViewLayout:(UICollectionViewLayout *)layout NS_DESIGNATED_INITIALIZER;
3、设置代理,实现协议函数
//创建一个layout布局类
UICollectionViewFlowLayout * layout = [[UICollectionViewFlowLayout alloc]init];
//设置布局方向为垂直流布局
layout.scrollDirection = UICollectionViewScrollDirectionVertical;
//设置每个item的大小为100*100
layout.itemSize = CGSizeMake(100, 100);
//创建collectionView 通过一个布局策略layout来创建
UICollectionView * collect = [[UICollectionView alloc]initWithFrame:self.view.frame collectionViewLayout:layout];
//代理设置
collect.delegate=self;
collect.dataSource=self;
//注册item类型 这里使用系统的类型
[collect registerClass:[UICollectionViewCell class] forCellWithReuseIdentifier:@"cellid"];[self.view addSubview:collect];
这里有一点需要注意,collectionView在完成代理回调前,必须注册一个cell,类似如下:
[collect registerClass:[UICollectionViewCell class] forCellWithReuseIdentifier:@"cellid"];
这便是collectionView与tableView不同的一点,tableView除了注册cell的方法外,还可以通过临时创建来做:
//tableView在从复用池中取cell的时候,有如下两种方法
//使用这种方式如果复用池中无,是可以返回nil的,我们在临时创建即可
- (nullable __kindof UITableViewCell *)dequeueReusableCellWithIdentifier:(NSString *)identifier;
//6.0后使用如下的方法直接从注册的cell类获取创建,如果没有注册 会崩溃
- (__kindof UITableViewCell *)dequeueReusableCellWithIdentifier:(NSString *)identifier forIndexPath:(NSIndexPath *)indexPath NS_AVAILABLE_IOS(6_0);
在UICollectionView中,注册cell是必需的,因为UICollectionView没有默认的cell类型,而是完全依赖于开发者提前注册cell类或nib以供后续使用。
在UITableView中,历史上早期版本的iOS SDK并没有引入注册机制。在那些版本中,你只需在cellForRowAtIndexPath:代理方法中创建或重用cell即可。而且如果你没有注册cell,UITableView会尝试使用默认的UITableViewCell来呈现内容。
所以我们可以知道因为
UITableView引入的版本较早,当时还未引入注册机制,在那时只需在cellForRowAtIndexPath方法中创建或者重用cell即可,而UICollectionView是在iOS
6.0引入的,相对较新。为了支持更灵活的布局和更复杂的cell类型,Apple在引入时就采用了注册机制。
上面的设置完成后我们再实现几个与tableview相同的代理方法
另外有一点细节:
我们在设置布局方式的时候设置了垂直布局:
layout.scrollDirection = UICollectionViewScrollDirectionVertical;
//这个是水平布局
//layout.scrollDirection = UICollectionViewScrollDirectionHorizontal;
这样可以实现当我们的第一行充满后会自动进行第二行的布局
二、UICollectionView中的常用方法和属性
1.UICollectionViewFlowLayout相关属性
(1)初始化cell样式
UICollectionViewFlowLayout *layout = [[UICollectionViewFlowLayout alloc] init];
(2)布局类的方向
layout.scrollDirection = UICollectionViewScrollDirectionVertical;
UICollectionViewScrollDirectionVertical竖向排布
UICollectionViewScrollDirectionHorizontal横向排布
(3)设置item的大小
layout.itemSize = CGSizeMake(120, 100);
(4)设置item的上下间距
layout.minimumLineSpacing = 100;
(5)设置item的左右间距
layout.minimumInteritemSpacing = 10;
(6)设置item的内间距
layout.sectionInset = UIEdgeInsetsMake(5, 5, 5, 5);
2.UICollectionView相关属性
(1)UICollectionView实例化对象和大小
self.collectionView = [[UICollectionView alloc] initWithFrame:self.view.frame collectionViewLayout:layout];
(2)刷新对应的列
[self.collectionView performBatchUpdates:^{[self.collectionView reloadSections:[NSIndexSet indexSetWithIndex:0]];
} completion:nil];
三、协议和代理方法:
(1)遵守的协议:
<UICollectionViewDelegate, UICollectionViewDataSource>
(2)代理方法:
UICollectionViewDelegate协议
该协议用来设置和处理collectionView的功能和一些逻辑,所有的方法都是可选实现。
是否允许某个item的高亮,返回NO,则不能进入高亮状态
(BOOL)collectionView:(UICollectionView *)collectionView shouldHighlightItemAtIndexPath:(NSIndexPath *)indexPath;
当item高亮时触发的方法(void)collectionView:(UICollectionView *)collectionView didHighlightItemAtIndexPath:(NSIndexPath *)indexPath;
结束高亮状态时触发的方法(void)collectionView:(UICollectionView *)collectionView didUnhighlightItemAtIndexPath:(NSIndexPath *)indexPath;
是否可以选中某个item,返回NO,则不能选中(BOOL)collectionView:(UICollectionView *)collectionView shouldSelectItemAtIndexPath:(NSIndexPath *)indexPath;
是否可以取消选中某个item(BOOL)collectionView:(UICollectionView *)collectionView shouldDeselectItemAtIndexPath:(NSIndexPath *)indexPath;
已经选中某个item时触发的方法(void)collectionView:(UICollectionView *)collectionView didSelectItemAtIndexPath:(NSIndexPath *)indexPath;
取消选中某个item时触发的方法(void)collectionView:(UICollectionView *)collectionView didDeselectItemAtIndexPath:(NSIndexPath *)indexPath;
将要加载某个item时调用的方法(void)collectionView:(UICollectionView *)collectionView willDisplayCell:(UICollectionViewCell *)cell forItemAtIndexPath:(NSIndexPath *)indexPath NS_AVAILABLE_IOS(8_0);
将要加载头尾视图时调用的方法(void)collectionView:(UICollectionView *)collectionView willDisplaySupplementaryView:(UICollectionReusableView *)view forElementKind:(NSString *)elementKind atIndexPath:(NSIndexPath *)indexPath NS_AVAILABLE_IOS(8_0);
已经展示某个item时触发的方法(void)collectionView:(UICollectionView *)collectionView didEndDisplayingCell:(UICollectionViewCell *)cell forItemAtIndexPath:(NSIndexPath *)indexPath;
已经展示某个头尾视图时触发的方法(void)collectionView:(UICollectionView *)collectionView didEndDisplayingSupplementaryView:(UICollectionReusableView *)view forElementOfKind:(NSString *)elementKind atIndexPath:(NSIndexPath *)indexPath;
UICollectionView进行重新布局时调用的方法(nonnull UICollectionViewTransitionLayout *)collectionView:(UICollectionView *)collectionView transitionLayoutForOldLayout:(UICollectionViewLayout *)fromLayout newLayout:(UICollectionViewLayout *)toLayout;
UICollectionViewDataSource协议
必须实现的方法:
设置每个分区的item数
(NSInteger)collectionView:(UICollectionView *)collectionView numberOfItemsInSection:(NSInteger)section;
设置返回每个item的属性(UICollectionViewCell *)collectionView:(UICollectionView *)collectionView cellForItemAtIndexPath:(NSIndexPath *)indexPath;
可选实现的方法:
设置分区数,虽然这个方法是可选的,一般我们都会去实现,不去设置它的话,它的默认值为1(NSInteger)numberOfSectionsInCollectionView:(UICollectionView *)collectionView;
对头视图或者尾视图进行设置(UICollectionReusableView *)collectionView:(UICollectionView *)collectionView viewForSupplementaryElementOfKind:(NSString *)kind atIndexPath:(NSIndexPath *)indexPath;
设置某个item是否可以被移动,返回NO则不能移动(BOOL)collectionView:(UICollectionView *)collectionView canMoveItemAtIndexPath:(NSIndexPath *)indexPath NS_AVAILABLE_IOS(9_0);
移动item的时候,会调用这个方法(void)collectionView:(UICollectionView *)collectionView moveItemAtIndexPath:(NSIndexPath *)sourceIndexPath toIndexPath:(NSIndexPath*)destinationIndexPath;
四、九宫格式的布局进行升级
有时候一个简单的九宫格并不能满足我们的需求,有时我们需要item展现不同的大小
//设置每个item的大小,双数的为50*50 单数的为100*100
-(CGSize)collectionView:(UICollectionView *)collectionView layout:(UICollectionViewLayout *)collectionViewLayout sizeForItemAtIndexPath:(NSIndexPath *)indexPath{if (indexPath.row%2!=0) {return CGSizeMake(50, 50);}else{return CGSizeMake(100, 100);}
}
五、实现瀑布流布局
实现思路
UIcollectionView的精髓是UICollectionViewLayout,UICollectionViewLayout决定了我们的UIcollectionView是如何显现在我们的界面上的,为了实现我们的自定义瀑布流式布局,我们需要在子类里重写生成布局的方法,创建我们自己需要的布局
实现原理
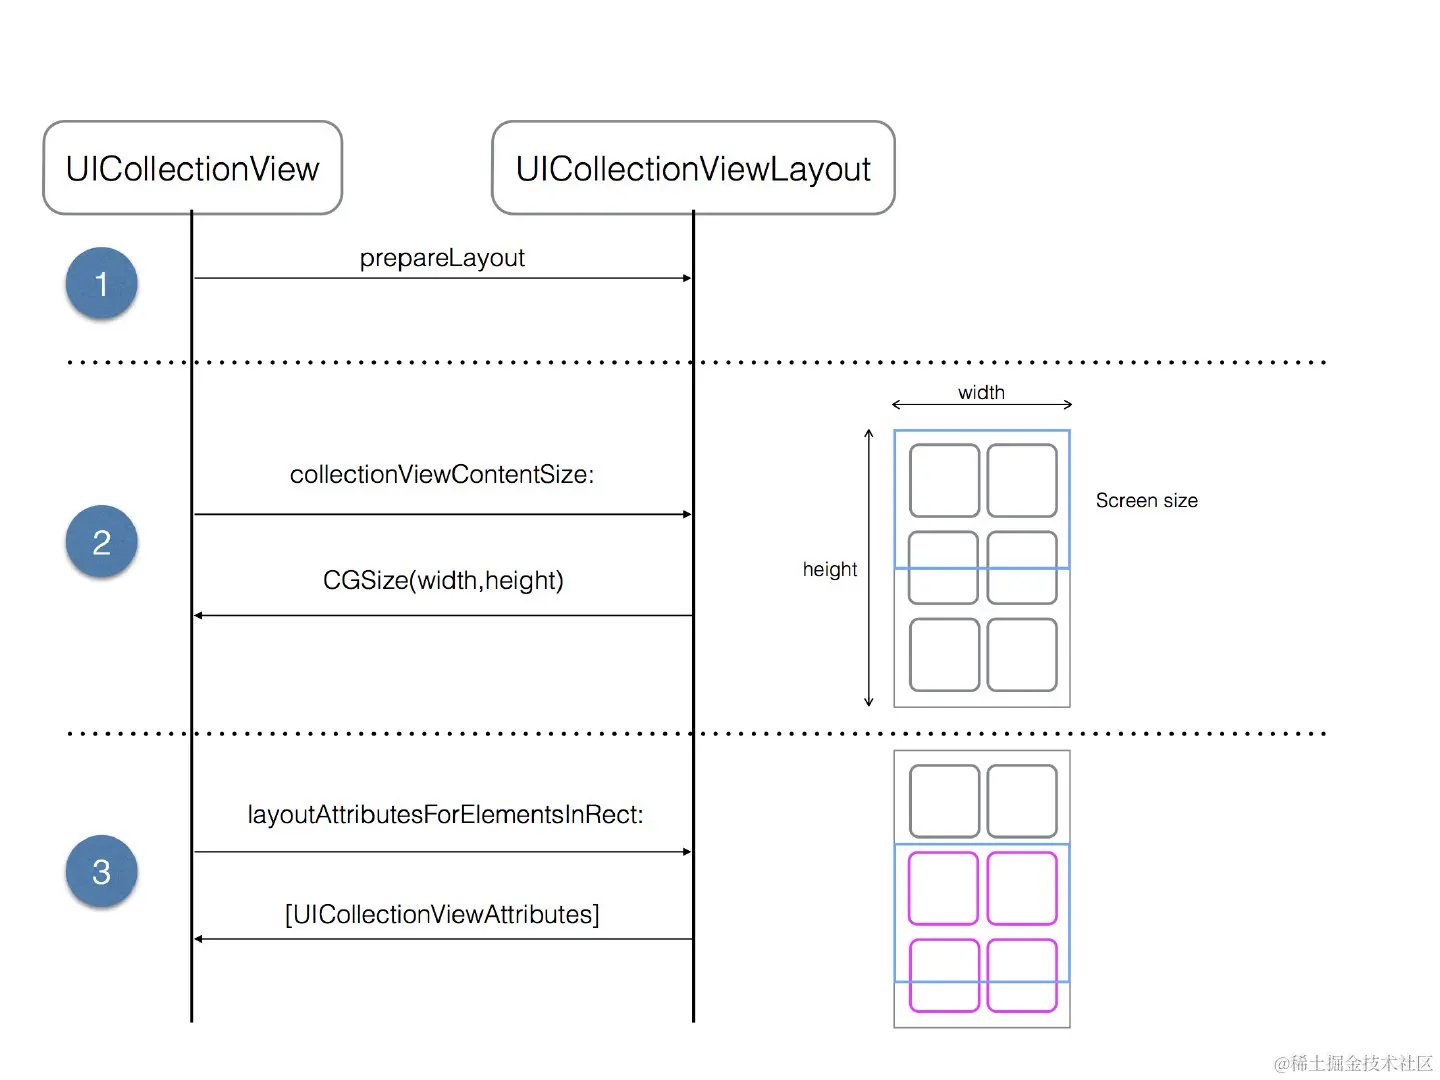
在实现该功能之前,我们先了解一下 UICollectionView 的布局过程,它与布局对象之间的关系是一种协作的关系,当
UICollectionView 需要一些布局信息的时候,它会去调用布局对象的一些函数,这些函数的执行是有一定的次序的,如图所示:
所以我们的创建的继承自UICollectionViewLayout的子类实现以下方法:
- (void)prepareLayout;//进行提前创建布局
- (CGSize)collectionViewContentSize//返回内容画布的大小
- (NSArray<UICollectionViewLayoutAttributes *> *)layoutAttributesForElementsInRect:(CGRect)rect//返回rect中所有元素的布局属性,返回的是一个数组
 - (UICollectionViewLayoutAttributes *)layoutAttributesForItemAtIndexPath:(NSIndexPath *)indexPath
//返回对应的indexPath的位置的cell的布局属性。
重写
- (nullable UICollectionViewLayoutAttributes *)layoutAttributesForSupplementaryViewOfKind:(NSString *)elementKind atIndexPath:(NSIndexPath *)indexPath;方法返回对应indexPath的位置的追加视图的布局属性,如果没有就不用重载
重写- (nullable UICollectionViewLayoutAttributes )layoutAttributesForDecorationViewOfKind:(NSString)elementKind atIndexPath:(NSIndexPath *)indexPath;方法返回对应indexPath的位置的装饰视图的布局属性,如果没有也不需要重载
重写- (BOOL)shouldInvalidateLayoutForBoundsChange:(CGRect)newBounds;当边界发生改变时,是否应该刷新。
由此我们可以知道如果我们想要实现自定义瀑布流,必须需要对以下方法进行重写

其中我们在prepareLayout方法进行布局前的准备,其主要有两个作用:
初始化布局参数: 在 prepareLayout 中,你可以进行一些初始化工作,例如计算和缓存用于布局的参数。这可能包括计算每个单元格的大小、计算行列的数量、初始化用于存储布局属性的数据结构等。
计算并缓存布局属性: 你可以在 prepareLayout 中计算并缓存集合视图中所有单元格的布局属性(UICollectionViewLayoutAttributes)。这样,当集合视图需要显示或进行交互时,可以直接访问缓存的布局属性,而不需要在运行时动态计算。
而- (CGSize)collectionViewContentSize决定了集合视图可以滚动的范围,即集合视图可以在其内容区域内滚动的最大范围。在自定义布局中,你需要根据布局的具体逻辑来计算内容尺寸。这个尺寸通常是在所有的布局属性(UICollectionViewLayoutAttributes)被计算之后确定的,以确保能够容纳所有的元素。
(NSArray<UICollectionViewLayoutAttributes *> *)layoutAttributesForElementsInRect:(CGRect)rect方法则是用于返回在给定矩形区域内的所有视图的布局属性(UICollectionViewLayoutAttributes 实例)数组
代码
下面给出各个函数的代码:
prepareLayout:
//数组的相关设置在这个方法中
//布局前的准备 会调用这个方法
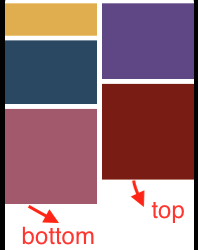
- (void)prepareLayout {[super prepareLayout];self.attributeArray = [NSMutableArray array]; // 使用实例变量,而不是全局变量// 设置为静态的2列// 计算每一个item的宽度CGFloat itemWidth = (self.collectionView.bounds.size.width - self.sectionInset.left - self.sectionInset.right - self.minimumInteritemSpacing) / 2;// 定义数组保存每一列的高度// 这个数组的主要作用是保存每一列的总高度,这个样在布局时,我们可以始终将下一个item放在最短的列下面// prepareLayout 中self.columnHeights = [NSMutableArray arrayWithObjects:@(self.sectionInset.top), @(self.sectionInset.top), nil];// itemCount是外界传进来的item的个数 遍历来设置每一个item的布局for (int i = 0; i < _itemCount; i++) {// 设置每一个item的位置等相关属性NSIndexPath *index = [NSIndexPath indexPathForItem:i inSection:0];// 创建一个布局属性类, 通过indexPath来创建UICollectionViewLayoutAttributes *attris = [UICollectionViewLayoutAttributes layoutAttributesForCellWithIndexPath:index];// 随意一个高度 在60-260之间CGFloat height = arc4random() % 200 + 60;// 哪一行高度小 则放到哪一列下面// 标记最短的列NSInteger shortestColumn = [_columnHeights[0] doubleValue] < [_columnHeights[1] doubleValue] ? 0 : 1;// 将新的item高度加入到短的一列_columnHeights[shortestColumn] = @([_columnHeights[shortestColumn] doubleValue] + height + self.minimumLineSpacing);// 设置item的位置attris.frame = CGRectMake(self.sectionInset.left + (self.minimumInteritemSpacing + itemWidth) * shortestColumn,[_columnHeights[shortestColumn] doubleValue] - height - self.minimumLineSpacing,itemWidth, height);[self.attributeArray addObject:attris];}
这里的sectionInset的top与bottom让笔者理解了一段时间,这里用一张图解释一下:
(NSArray<UICollectionViewLayoutAttributes *> *)layoutAttributesForElementsInRect:(CGRect)rect:
//返回布局数组
- (NSArray<__kindof UICollectionViewLayoutAttributes *> *)layoutAttributesForElementsInRect:(CGRect)rect {return _attributeArray;
}
- (CGSize)collectionViewContentSize:
- (CGSize)collectionViewContentSize {// collectionView的contentSize的高度等于所有列高度中最大的值CGFloat maxColumnHeight = [self.columnHeights[0] doubleValue];for (NSInteger i = 1; i < 2; i++) {CGFloat columnHeight = [self.columnHeights[i] doubleValue];if (maxColumnHeight < columnHeight) {maxColumnHeight = columnHeight;}NSLog(@"%f", maxColumnHeight);}return CGSizeMake(0, maxColumnHeight);
}
(UICollectionViewCell *)collectionView:(UICollectionView *)collectionView cellForItemAtIndexPath:(NSIndexPath *)indexPath:
//返回每个item
- (UICollectionViewCell *)collectionView:(UICollectionView *)collectionView cellForItemAtIndexPath:(NSIndexPath *)indexPath {UICollectionViewCell *cell = [collectionView dequeueReusableCellWithReuseIdentifier:@"cell" forIndexPath:indexPath];cell.backgroundColor = [UIColor colorWithRed:arc4random() % 255 / 255.0 green:arc4random() % 255 / 255.0 blue:arc4random() % 250 / 250.0 alpha:1];return cell;}
调用顺序
对于UICollectionView,函数调用顺序为
prepareLayout:
调用时机: 在布局发生变化之前,比如初始化时、调用 reloadData、invalidateLayout 等方法时。
作用: 进行一些布局的准备工作。collectionViewContentSize:
调用时机: 在需要计算集合视图内容尺寸时,比如初始化时、布局发生变化时。
作用: 返回整个集合视图内容的尺寸。layoutAttributesForElementsInRect::
调用时机: 在需要显示或更新某个区域内的视图时,比如滚动时、布局发生变化时。
作用: 返回给定矩形区域内所有视图的布局属性。(UICollectionViewCell *)collectionView:(UICollectionView *)collectionView cellForItemAtIndexPath:(NSIndexPath *)indexPath
调用时机:创建item时调用
作用:创建和配置单元格
其中prepareLayout方法只会调用一次,之后在往下滑动UICollectionView时会不断重复调用其他三种方法
相较于仅能纵向单列数据展示的tableView,UICollectionView允许我们进行更加自由且灵活的布局,而轻松实现这种效果则归功于我们的自定义的UICollectionViewFlowLayout类,我们可以通过重写此类中的一些方法来实现我们单元格的多样布局。
实现步骤
由此我们得出自定义布局的实现步骤:
- 创建自定义布局类
UICollectionViewFlowLayout - 重写布局方法,确定布局数组
_attributeArray(重要) - 注册自定义布局类
MyCustomFlowLayout *customLayout = [[MyCustomFlowLayout alloc] init]; [self.collectionView setCollectionViewLayout:customLayout]; - 创建cell
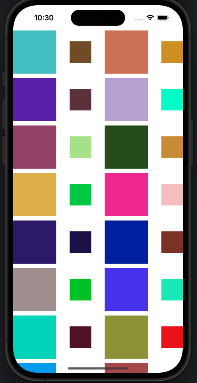
实现效果
总结
通过学习UICollectionView,笔者认为最重要的便是知道我们的UICollectionView是如何去创建我们的单元格的:
通过使用默认或是自定义的流布局UICollectionViewLayout来实现我们的灵活布局,这便需要我们先去实现我们的布局属性数组,确定如何布局后程序会去创建我们的cell,然后将cell逐个填入我们的布局数组中=
笔者在这里仅仅浅薄地学习了UICollectionView,如有不足请不吝指出,而对于UICollectionView的核心,笔者认为其为确定布局