Android 输入系统介绍
文章目录
- 一、目的
- 二、环境
- 三、相关概念
- 3.1 输入设备
- 3.2 UEVENT机制
- 3.3 JNI
- 3.4 EPOLL机制
- 3.5 INotify
- 四、详细设计
- 4.1 结构图
- 4.2 代码结构
- 4.3 InputManagerService模块
- 4.3.1 IMS服务入口
- 4.3.2 IMS初始化
- 4.3.3 IMS启动
- 4.3.4 IMS消息监听
- 4.4 NativeInputManager模块
- 4.4.1 nativeInit初始化
- 4.4.2 nativeStart启动
- 4.5 Inputflinger模块
- 4.6.2 EventHub获取事件队列
- 4.6.3 Input事件加工
- 4.6.4 事件发布
- 4.7 Inputdispatcher模块
- 4.7.1 Input事件上报
- 4.7.2 启动InputDispatcher线程
- 4.8 WindowManagerService模块
- 4.8.2 WindowManagerService.addWindow()
- 4.8.3 WindowInputEventReceiver
- 五、Input设备节点介绍
- 5.1 常见触摸事件类型
- 5.2 getevent
- 5.3 sendevent
- 六、参考资料
一、目的
最近接触到了一个问题:耳机插入事件的由来,走读了下IMS输入系统服务的源码。同时,IMS输入系统服务在Android的开发过程中,也经常出现,有必要了解下相关原理。
- 学习下IMS输入系统的源码设计,了解该模块承担的业务职责,熟悉Android结构
- 了解Android屏幕点击事件、物理按键事件的分发规则
二、环境
- 版本:Android 11
- 平台:高通 QCM2290
三、相关概念
3.1 输入设备
常见的输入设备有鼠标、键盘、触摸屏等,用户通过输入设备与系统进行交互。
3.2 UEVENT机制
“uevent” 是 Linux 系统中的一种事件通知机制,用于向用户空间发送有关内核和设备状态变化的通知。这种机制通常用于设备驱动程序、热插拔事件以及设备状态变化等场景,以便用户空间应用程序能够在这些事件发生时做出相应的响应。
3.3 JNI
JNI,全称Java Native Interface,是Java编程语言的一种编程框架,用于实现Java代码与其他编程语言(如C、C++)进行交互的接口。JNI允许Java程序调用原生代码(native code),即由其他编程语言编写的代码,并且允许原生代码调用Java代码。通过JNI,Java程序可以访问底层系统功能、使用硬件设备、调用第三方库等。
3.4 EPOLL机制
监听多个描述符的可读/可写状态。等待返回时携带了可读的描述符
3.5 INotify
Linux 内核所提供的一种文件系统变化通知机制。可以监控文件系统的变化,如文件新建、删除、读写等
四、详细设计
通过屏幕的触摸事件,来分析IMS系统,相关如下
4.1 结构图

4.2 代码结构
| 层级 | 模块 | 描述 | 源码 | 编译产物 |
|---|---|---|---|---|
| Framework | InputManagerService | xxx | frameworks/base/services/core/java/ | out/target/product/qssi/system/framework/services.jar |
| Native | NativeInputManager | xxx | frameworks/base/services/core/jni/ | out/target/product/qssi/system/lib64/libandroid_servers.so |
| Native | Inputflinger | xxx | frameworks/native/services/inputflinger/ | out/target/product/qssi/system/lib64/libinputflinger.so |
| Native | Inputreader | xxx | frameworks/native/services/inputflinger/reader | out/target/product/qssi/system/lib64/libinputreader.so |
| Native | Inputdispatcher | xxx | frameworks/native/services/inputflinger/dispatcher/ | (静态库)out/soong/.intermediates/frameworks/native/services/inputflinger/dispatcher/libinputdispatcher/android_arm64_armv8-a_static/libinputdispatcher.a |
| Native | NativeInputEventReceiver | xxx | frameworks/base/core/jni/ | out/target/product/qssi/system/lib64/libandroid_runtime |
| Native | InputChannel | xxx | frameworks/native/libs/input/ | out/target/product/qssi/system/lib64/libinput.so |
4.3 InputManagerService模块
InputManagerService是Android框架层一个非核心服务,主要是提供一个IMS输入系统启动的入口,同时对应用层提供业务相关接口。
4.3.1 IMS服务入口
Android设备开机后,会启动system_server进程,InputManagerService服务(以下简称IMS)在该进程被唤起。
@frameworks\base\services\java\com\android\server\SystemServer.java
private void startOtherServices(@NonNull TimingsTraceAndSlog t) {...t.traceBegin("StartInputManagerService");inputManager = new InputManagerService(context);//新建IMS实例t.traceEnd();...t.traceBegin("StartInputManager");inputManager.setWindowManagerCallbacks(wm.getInputManagerCallback());//设置窗体事件监听inputManager.start();//启动IMS服务t.traceEnd();...
}
4.3.2 IMS初始化
此处做一些IMS相关的初始化操作,会调用nativeInit方法,获取一个NativeInputManager对象,类似于一个句柄。
@frameworks\base\services\core\java\com\android\server\input\InputManagerService.java
private static native long nativeInit(InputManagerService service,Context context, MessageQueue messageQueue);
public InputManagerService(Context context) {...mStaticAssociations = loadStaticInputPortAssociations();mUseDevInputEventForAudioJack =context.getResources().getBoolean(R.bool.config_useDevInputEventForAudioJack);Slog.i(TAG, "Initializing input manager, mUseDevInputEventForAudioJack="+ mUseDevInputEventForAudioJack);mPtr = nativeInit(this, mContext, mHandler.getLooper().getQueue());...
}
4.3.3 IMS启动
InputManagerService通过start方法启动,会调用nativeStart方法,该方法为Native方法
@frameworks\base\services\core\java\com\android\server\input\InputManagerService.java
private static native void nativeStart(long ptr);
public void start() {Slog.i(TAG, "Starting input manager");nativeStart(mPtr);// Add ourself to the Watchdog monitors.Watchdog.getInstance().addMonitor(this);...
}
4.3.4 IMS消息监听
该方法为Native的回调方法,用于上报IMS事件,如耳机插入事件等。
@frameworks\base\services\core\java\com\android\server\input\InputManagerService.java
// Native callback.
private void notifySwitch(long whenNanos, int switchValues, int switchMask) {...if ((switchMask & SW_LID_BIT) != 0) {final boolean lidOpen = ((switchValues & SW_LID_BIT) == 0);mWindowManagerCallbacks.notifyLidSwitchChanged(whenNanos, lidOpen);}if ((switchMask & SW_CAMERA_LENS_COVER_BIT) != 0) {final boolean lensCovered = ((switchValues & SW_CAMERA_LENS_COVER_BIT) != 0);mWindowManagerCallbacks.notifyCameraLensCoverSwitchChanged(whenNanos, lensCovered);}if (mUseDevInputEventForAudioJack && (switchMask & SW_JACK_BITS) != 0) {mWiredAccessoryCallbacks.notifyWiredAccessoryChanged(whenNanos, switchValues,switchMask);}...
}
4.4 NativeInputManager模块
该模块为JNI模块,主要处理Java方法与c++方法映射关系,即IMS服务与InputFlinger模块的通信桥梁。
4.4.1 nativeInit初始化
(1)新建一个NativeInputManager对象,并将该对象返回给java层
@\frameworks\base\services\core\jni\com_android_server_input_InputManagerService.cpp
static jlong nativeInit(JNIEnv* env, jclass /* clazz */,jobject serviceObj, jobject contextObj, jobject messageQueueObj) {sp<MessageQueue> messageQueue = android_os_MessageQueue_getMessageQueue(env, messageQueueObj);...NativeInputManager* im = new NativeInputManager(contextObj, serviceObj,messageQueue->getLooper());im->incStrong(0);return reinterpret_cast<jlong>(im);
}
(2)创建InputManager管理类,主要用于管理Input事件分发、事件读取行为
@\frameworks\base\services\core\jni\com_android_server_input_InputManagerService.cpp
NativeInputManager::NativeInputManager(jobject contextObj,jobject serviceObj, const sp<Looper>& looper) :mLooper(looper), mInteractive(true) {JNIEnv* env = jniEnv();...mInputManager = new InputManager(this, this);defaultServiceManager()->addService(String16("inputflinger"),mInputManager, false);
}
4.4.2 nativeStart启动
获取上一个阶段创建NativeInputManager对象,并引用start启动该模块
@\frameworks\base\services\core\jni\com_android_server_input_InputManagerService.cpp
static void nativeStart(JNIEnv* env, jclass /* clazz */, jlong ptr) {NativeInputManager* im = reinterpret_cast<NativeInputManager*>(ptr);status_t result = im->getInputManager()->start();if (result) {jniThrowRuntimeException(env, "Input manager could not be started.");}
}
4.5 Inputflinger模块
input事件的管理类,数据传递类,也是输入系统native层核心的模块。
ps: 根据字典里的定义,flinger是指出轨的人。在SurfaceFlinger的例子中,它把可视数据扔给surface AudioFlinger把音频数据扔给适当的接收者。它们只是“可爱”的词… 😃

result = mReader->start();//启动事件读取服务
if (result) {ALOGE("Could not start InputReader due to error %d.", result);mDispatcher->stop();return result;
}return OK;
}
## 4.6 Inputreader模块
        事件读取服务,读取驱动上报事件### 4.6.1 启动InputReader线程
(1)创建一个InputThread线程
```c
@frameworks\native\services\inputflinger\reader\InputReader.cpp
status_t InputReader::start() {if (mThread) {return ALREADY_EXISTS;}mThread = std::make_unique<InputThread>("InputReader", [this]() { loopOnce(); }, [this]() { mEventHub->wake(); });return OK;
}
(2)InputThread线程的loop循环队列(线程和loop的关系)
@frameworks\native\services\inputflinger\reader\InputReader.cpp
void InputReader::loopOnce() {int32_t oldGeneration;int32_t timeoutMillis;bool inputDevicesChanged = false;std::vector<InputDeviceInfo> inputDevices;...size_t count = mEventHub->getEvents(timeoutMillis, mEventBuffer, EVENT_BUFFER_SIZE);//step 1. 通过EventHub抽取事件列表{ // acquire lock...if (count) {processEventsLocked(mEventBuffer, count);// step 2. 对事件进行加工处理}...} // release lock...mQueuedListener->flush();//step 3. 事件发布
}
4.6.2 EventHub获取事件队列
EventHub:事件集线器,它将全部的输入事件通过一个接口getEvents(),将从多个输入设备节点中读取的事件交给InputReader,是输入系统最底层的一个组件。
(1)EventHub的构造函数
它通过INotify与Epoll机制建立起了对设备节点增删事件以及可读状态的监听。同时,EventHub创建了一个名为wakeFds的匿名管道,因为InputReader在运行getEvents()时会因无事件而导致其线程堵塞在epoll_wait()的调用里,然而有时希望能够立马唤醒InputReader线程使其处理一些请求。
@frameworks\native\services\inputflinger\reader\EventHub.cpp
static const char* DEVICE_PATH = "/dev/input";
EventHub::EventHub(void): mBuiltInKeyboardId(NO_BUILT_IN_KEYBOARD),mNextDeviceId(1),mControllerNumbers(),mOpeningDevices(nullptr),mClosingDevices(nullptr),mNeedToSendFinishedDeviceScan(false),mNeedToReopenDevices(false),mNeedToScanDevices(true),mPendingEventCount(0),mPendingEventIndex(0),mPendingINotify(false) {ensureProcessCanBlockSuspend();mEpollFd = epoll_create1(EPOLL_CLOEXEC);//创建一个epoll对象,用来监听设备节点是否有事件LOG_ALWAYS_FATAL_IF(mEpollFd < 0, "Could not create epoll instance: %s", strerror(errno));mINotifyFd = inotify_init();//创建一个inotify对象,用来监听设备节点的增删事件mInputWd = inotify_add_watch(mINotifyFd, DEVICE_PATH, IN_DELETE | IN_CREATE);...struct epoll_event eventItem = {};eventItem.events = EPOLLIN | EPOLLWAKEUP;eventItem.data.fd = mINotifyFd;int result = epoll_ctl(mEpollFd, EPOLL_CTL_ADD, mINotifyFd, &eventItem);//将mINotifyFd注册进epoll对象中LOG_ALWAYS_FATAL_IF(result != 0, "Could not add INotify to epoll instance.  errno=%d", errno);int wakeFds[2];result = pipe(wakeFds);//创建一个匿名管道,用于唤醒EventHub,避免无事件引起阻塞LOG_ALWAYS_FATAL_IF(result != 0, "Could not create wake pipe.  errno=%d", errno);mWakeReadPipeFd = wakeFds[0];mWakeWritePipeFd = wakeFds[1];...eventItem.data.fd = mWakeReadPipeFd;result = epoll_ctl(mEpollFd, EPOLL_CTL_ADD, mWakeReadPipeFd, &eventItem);//将管道读取端加入epoll对象中LOG_ALWAYS_FATAL_IF(result != 0, "Could not add wake read pipe to epoll instance.  errno=%d",errno);
}
mEpollFd监听如下几个事件:设备节点的增加、删除、修改;匿名管道,避免无事件阻塞
(2)RawEvent结构体
mEventBuffer用于描述原始输入事件,其类型为RawEvent,相关结构体如下:
@frameworks\native\services\inputflinger\reader\include\EventHub.h
/** A raw event as retrieved from the EventHub.*/
struct RawEvent {nsecs_t when;//事件时间戳int32_t deviceId;//产生事件的设备IDint32_t type;//事件类型int32_t code;//事件编码int32_t value;//事件值
};
(3)EventHub->getEvents事件,
getEvents()是事件处理的核心方法,其通过EPOLL机制和INOTIFY,从多个设备节点读取事件。
@frameworks\native\services\inputflinger\reader\EventHub.cpp
size_t EventHub::getEvents(int timeoutMillis, RawEvent* buffer, size_t bufferSize) {...for (;;) {...if (mNeedToScanDevices) {//Step 1.扫描设备mNeedToScanDevices = false;scanDevicesLocked();mNeedToSendFinishedDeviceScan = true;}...// Grab the next input event.bool deviceChanged = false;while (mPendingEventIndex < mPendingEventCount) { //Step 2.处理未被InputReader取走的输入事件与设备事件const struct epoll_event& eventItem = mPendingEventItems[mPendingEventIndex++];...// This must be an input eventif (eventItem.events & EPOLLIN) {int32_t readSize =read(device->fd, readBuffer, sizeof(struct input_event) * capacity);//Step 3.读取底层上报事件if (readSize == 0 || (readSize < 0 && errno == ENODEV)) {...} else {int32_t deviceId = device->id == mBuiltInKeyboardId ? 0 : device->id;size_t count = size_t(readSize) / sizeof(struct input_event);for (size_t i = 0; i < count; i++) {//构建需要上报的事件struct input_event& iev = readBuffer[i];event->when = processEventTimestamp(iev);event->deviceId = deviceId;event->type = iev.type;event->code = iev.code;event->value = iev.value;event += 1;//将event指针移动到下一个可用于填充事件的RawEvent对象capacity -= 1;}...}} ...}...mLock.unlock(); // release lock before pollint pollResult = epoll_wait(mEpollFd, mPendingEventItems, EPOLL_MAX_EVENTS, timeoutMillis);//Step 4.阻塞,等待事件各种类型消息mLock.lock(); // reacquire lock after poll...}// All done, return the number of events we read.return event - buffer;
}
Step 1. 扫描设备,会获取input/dev/下的所有设备,并将各个设备注册到epoll线程池里,监听各个设备的消息状态;
Step 2. 处理未被InputReader取走的输入事件与设备事件,一般情况下有事件上报时,epoll_wait会读取到mPendingEventItems值,即mPendingEventCount值,即会进入该流程;
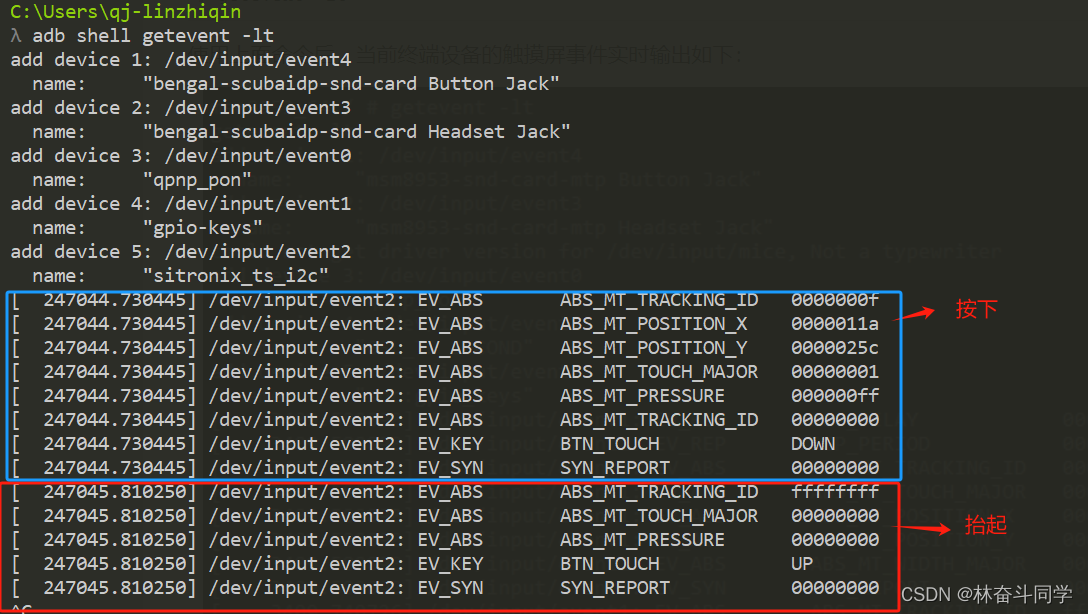
Step 3. 读取底层上报事件,根据上报的fd设备,读取对应的设备节点。即可以获取到上报的事件内容。如下为屏幕点击对应的上报事件:

Step 4. 通过epoll机制,阻塞当前进程,等待设备节点变更,事件上报。
4.6.3 Input事件加工
主要是将底层RawEvent事件,进一步加工,将Event事件注入到mArgsQueue队列的过程。
(1)Input事件加工
@frameworks\native\services\inputflinger\reader\InputReader.cpp
void InputReader::processEventsLocked(const RawEvent* rawEvents, size_t count) {for (const RawEvent* rawEvent = rawEvents; count;) {int32_t type = rawEvent->type;size_t batchSize = 1;if (type < EventHubInterface::FIRST_SYNTHETIC_EVENT) {...processEventsForDeviceLocked(deviceId, rawEvent, batchSize);//输入事件} else {switch (rawEvent->type) {case EventHubInterface::DEVICE_ADDED://设备增加addDeviceLocked(rawEvent->when, rawEvent->deviceId);break;case EventHubInterface::DEVICE_REMOVED://设备移除removeDeviceLocked(rawEvent->when, rawEvent->deviceId);break;case EventHubInterface::FINISHED_DEVICE_SCAN://设备扫描结束handleConfigurationChangedLocked(rawEvent->when);break;default:ALOG_ASSERT(false); // can't happenbreak;}}count -= batchSize;rawEvent += batchSize;}}
(2)Input事件推送
该流程业务代码比较冗长,做了层层封装,如下为方法调用栈:
InputReader.processEventsLocked() -> InputReader.processEventsForDeviceLocked() -> InputDevice.process() -> MultiTouchInputMapper.process() -> TouchInputMapper.process()->TouchInputMapper.sync() -> TouchInputMapper.processRawTouches() -> TouchInputMapper.cookAndDispatch() -> TouchInputMapper.dispatchTouches() -> TouchInputMapper.dispatchMotion() -> QueuedInputListener -> notifyMotion()
最终可以看到事件最终会传递到mArgsQueue容器内。
@frameworks\native\services\inputflinger\InputListener.cpp
std::vector<NotifyArgs*> mArgsQueue;
void QueuedInputListener::notifyMotion(const NotifyMotionArgs* args) {traceEvent(__func__, args->id);mArgsQueue.push_back(new NotifyMotionArgs(*args));
}
4.6.4 事件发布
(1)当事件加工完成后,会引用flush()方法,将事件发布出去
@frameworks\native\services\inputflinger\InputListener.cpp
void QueuedInputListener::flush() {size_t count = mArgsQueue.size();for (size_t i = 0; i < count; i++) {NotifyArgs* args = mArgsQueue[i];args->notify(mInnerListener);//事件发布delete args;}mArgsQueue.clear();
}
(2)由上一节可知,屏幕点击事件对应的args为NotifyMotionArgs
@frameworks\native\services\inputflinger\InputListener.cpp
void NotifyMotionArgs::notify(const sp<InputListenerInterface>& listener) const {listener->notifyMotion(this);
}
(3)大家可以自己去追溯下源码,该listener接口的实现类是InputDispatcher。至此,事件将进入下一阶段——事件分发。
@frameworks\native\services\inputflinger\dispatcher\InputDispatcher.cpp
void InputDispatcher::notifyMotion(const NotifyMotionArgs* args) {...
}
4.7 Inputdispatcher模块
事件分发服务,将底层读到的事件,分发到上层
4.7.1 Input事件上报
至此,我们知道InputDispatch会启动一个阻塞线程,等待底层事件上报;而通过InputReader的分析,我们知道底层事件响应,最终会通知InputDispatch模块的notifyMotion()方法
@frameworks\native\services\inputflinger\dispatcher\InputDispatcher.cpp
void InputDispatcher::notifyMotion(const NotifyMotionArgs* args) {...{ // acquire lockmLock.lock();...// Just enqueue a new motion event.MotionEntry* newEntry =new MotionEntry(args->id, args->eventTime, args->deviceId, args->source,args->displayId, policyFlags, args->action, args->actionButton,args->flags, args->metaState, args->buttonState,args->classification, args->edgeFlags, args->xPrecision,args->yPrecision, args->xCursorPosition, args->yCursorPosition,args->downTime, args->pointerCount, args->pointerProperties,args->pointerCoords, 0, 0);needWake = enqueueInboundEventLocked(newEntry);//构建新的MotionEvent事件mLock.unlock();} // release lockif (needWake) {mLooper->wake();//唤醒InputDispatch线程,进行分发}
}
4.7.2 启动InputDispatcher线程
(1)创建一个InputDispatcher线程
@frameworks\native\services\inputflinger\dispatcher\InputDispatcher.cpp
status_t InputDispatcher::start() {if (mThread) {return ALREADY_EXISTS;}mThread = std::make_unique<InputThread>("InputDispatcher", [this]() { dispatchOnce(); }, [this]() { mLooper->wake(); });return OK;
}
(2)InputThread线程的loop队列
@frameworks\native\services\inputflinger\dispatcher\InputDispatcher.cpp
void InputDispatcher::dispatchOnce() {nsecs_t nextWakeupTime = LONG_LONG_MAX;{ // acquire lockstd::scoped_lock _l(mLock);mDispatcherIsAlive.notify_all();// Run a dispatch loop if there are no pending commands.// The dispatch loop might enqueue commands to run afterwards.if (!haveCommandsLocked()) {dispatchOnceInnerLocked(&nextWakeupTime);//事件分发}...} // release lock// Wait for callback or timeout or wake.  (make sure we round up, not down)nsecs_t currentTime = now();int timeoutMillis = toMillisecondTimeoutDelay(currentTime, nextWakeupTime);mLooper->pollOnce(timeoutMillis);//堵塞,等待唤醒
}
(3)事件分发过程
事件的分发过程也比较冗长,此处不具体分析过程,其业务堆栈如下,即事件分发最终会下发到publishMotionEvent。
InputDispatcher.dispatchOnceInnerLocked() -> InputDispatcher.dispatchMotionLocked() -> InputDispatcher.dispatchEventLocked() -> InputDispatcher.prepareDispatchCycleLocked() -> InputDispatcher.enqueueDispatchEntriesLocked() -> InputDispatcher.startDispatchCycleLocked() -> InputPublisher.publishMotionEvent()
@frameworks\native\libs\input\InputTransport.cpp
status_t InputPublisher::publishMotionEvent(uint32_t seq, int32_t eventId, int32_t deviceId, int32_t source, int32_t displayId,std::array<uint8_t, 32> hmac, int32_t action, int32_t actionButton, int32_t flags,int32_t edgeFlags, int32_t metaState, int32_t buttonState,MotionClassification classification, float xScale, float yScale, float xOffset,float yOffset, float xPrecision, float yPrecision, float xCursorPosition,float yCursorPosition, nsecs_t downTime, nsecs_t eventTime, uint32_t pointerCount,const PointerProperties* pointerProperties, const PointerCoords* pointerCoords) {...InputMessage msg;msg.header.type = InputMessage::Type::MOTION;msg.body.motion.seq = seq;msg.body.motion.eventId = eventId;...return mChannel->sendMessage(&msg);
}
4.8 WindowManagerService模块

(2)ViewRootImpl.setView()
@frameworks\base\core\java\android\view\ViewRootImpl.java
public void setView(View view, WindowManager.LayoutParams attrs, View panelParentView,int userId) {synchronized (this) {if (mView == null) {...InputChannel inputChannel = null;if ((mWindowAttributes.inputFeatures& WindowManager.LayoutParams.INPUT_FEATURE_NO_INPUT_CHANNEL) == 0) {inputChannel = new InputChannel();//创建inputChannel对象}try {...res = mWindowSession.addToDisplayAsUser(mWindow, mSeq, mWindowAttributes,getHostVisibility(), mDisplay.getDisplayId(), userId, mTmpFrame,mAttachInfo.mContentInsets, mAttachInfo.mStableInsets,mAttachInfo.mDisplayCutout, inputChannel,mTempInsets, mTempControls);//通过session跨进程调用WMS的addWindow方法给inputChannel赋值setFrame(mTmpFrame);}...if (inputChannel != null) {if (mInputQueueCallback != null) {mInputQueue = new InputQueue();mInputQueueCallback.onInputQueueCreated(mInputQueue);}mInputEventReceiver = new WindowInputEventReceiver(inputChannel,Looper.myLooper());//创建mInputEventReceiver对象,用于App侧接收Input事件}...}}}
4.8.2 WindowManagerService.addWindow()
(1)openInputChannel():生成一对inputChannel,并返回一个对象给App端。
Session.addToDisplayAsUser() -> WindowManagerService.addWindow() -> EmbeddedWindow.openInputChannel()
@frameworks\base\services\core\java\com\android\server\wm\EmbeddedWindowController.java
InputChannel openInputChannel() {final String name = getName();final InputChannel[] inputChannels = InputChannel.openInputChannelPair(name);//InputChannel底层通过一对socket进行通信mInputChannel = inputChannels[0];final InputChannel clientChannel = inputChannels[1];mWmService.mInputManager.registerInputChannel(mInputChannel);//将一个inputChannel对象注册到Input的Native端...return clientChannel;//返回一个inputChannel对象给App端
}
(2)openInputChannelPair():创建一对通过socket通信的inputChannel对象。
InputChannel.openInputChannelPair() -> InputChannel.nativeOpenInputChannelPair() -> android_view_InputChannel.android_view_InputChannel_nativeOpenInputChannelPair() -> InputTransport.openInputChannelPair()
@frameworks\native\libs\input\InputTransport.cpp
status_t InputChannel::openInputChannelPair(const std::string& name,sp<InputChannel>& outServerChannel, sp<InputChannel>& outClientChannel) {int sockets[2];if (socketpair(AF_UNIX, SOCK_SEQPACKET, 0, sockets)) {status_t result = -errno;ALOGE("channel '%s' ~ Could not create socket pair.  errno=%d",name.c_str(), errno);outServerChannel.clear();outClientChannel.clear();return result;}int bufferSize = SOCKET_BUFFER_SIZE;setsockopt(sockets[0], SOL_SOCKET, SO_SNDBUF, &bufferSize, sizeof(bufferSize));setsockopt(sockets[0], SOL_SOCKET, SO_RCVBUF, &bufferSize, sizeof(bufferSize));setsockopt(sockets[1], SOL_SOCKET, SO_SNDBUF, &bufferSize, sizeof(bufferSize));setsockopt(sockets[1], SOL_SOCKET, SO_RCVBUF, &bufferSize, sizeof(bufferSize));sp<IBinder> token = new BBinder();std::string serverChannelName = name + " (server)";android::base::unique_fd serverFd(sockets[0]);outServerChannel = InputChannel::create(serverChannelName, std::move(serverFd), token);//server端std::string clientChannelName = name + " (client)";android::base::unique_fd clientFd(sockets[1]);outClientChannel = InputChannel::create(clientChannelName, std::move(clientFd), token);//client端return OK;
}
4.8.3 WindowInputEventReceiver
app进程和system_server进程通过socket通信,底层捕获的事件最终通过inputChannel模块来实现,再由app端的WindowInputEventReceiver去接收,最后把事件分发到目标View上。
(1)WindowInputEventReceiver构造函数
注册一个事件接收器,WindowInputEventReceiver的父类是InputEventReceiver
@frameworks\base\core\jni\android_view_InputEventReceiver.cpp
public InputEventReceiver(InputChannel inputChannel, Looper looper) {...mInputChannel = inputChannel;mMessageQueue = looper.getQueue();mReceiverPtr = nativeInit(new WeakReference<InputEventReceiver>(this),inputChannel, mMessageQueue);//初始化操作mCloseGuard.open("dispose");
}// Called from native code.
@SuppressWarnings("unused")
@UnsupportedAppUsage
private void dispatchInputEvent(int seq, InputEvent event) {//native层事件回调方法mSeqMap.put(event.getSequenceNumber(), seq);onInputEvent(event);//事件分发到各个目标View上
}
(2)nativeInit
由上可知,在添加窗口时,WMS会针对于每个窗口设置一对InputChannel对象,分为client端和server端,其中server端在system_server进程,client端在app进程。我们需要去监听client端,以期能够捕获server端的事件消息。
@frameworks\base\core\jni\android_view_InputEventReceiver.cpp
static jlong nativeInit(JNIEnv* env, jclass clazz, jobject receiverWeak,jobject inputChannelObj, jobject messageQueueObj) {...sp<NativeInputEventReceiver> receiver = new NativeInputEventReceiver(env,receiverWeak, inputChannel, messageQueue);status_t status = receiver->initialize();//初始化...receiver->incStrong(gInputEventReceiverClassInfo.clazz); // retain a reference for the objectreturn reinterpret_cast<jlong>(receiver.get());
}status_t NativeInputEventReceiver::initialize() {setFdEvents(ALOOPER_EVENT_INPUT);return OK;
}void NativeInputEventReceiver::setFdEvents(int events) {if (mFdEvents != events) {mFdEvents = events;int fd = mInputConsumer.getChannel()->getFd();//此fd为WMS创建的InputChannel的client端if (events) {mMessageQueue->getLooper()->addFd(fd, 0, events, this, nullptr);//注册监听} else {mMessageQueue->getLooper()->removeFd(fd);//移除监听}}
}
(3)handleEvent
当server端写入事件时,client端的looper就能被唤醒,会调用handleEvent函数(当fd可读时,会调用LooperCallback的handleEvent,而NativeInputEventReceiver继承自LooperCallback,所以这里会调用NativeInputEventReceiver的handleEvent函数,线程和looper的关系此处不展开)
@frameworks\base\core\jni\android_view_InputEventReceiver.cpp
int NativeInputEventReceiver::handleEvent(int receiveFd, int events, void* data) {...if (events & ALOOPER_EVENT_INPUT) {JNIEnv* env = AndroidRuntime::getJNIEnv();status_t status = consumeEvents(env, false /*consumeBatches*/, -1, nullptr);//处理事件mMessageQueue->raiseAndClearException(env, "handleReceiveCallback");return status == OK || status == NO_MEMORY ? 1 : 0;}...return 1;
}status_t NativeInputEventReceiver::consumeEvents(JNIEnv* env,bool consumeBatches, nsecs_t frameTime, bool* outConsumedBatch) {...for (;;) {...if (!skipCallbacks) {...if (inputEventObj) {env->CallVoidMethod(receiverObj.get(),gInputEventReceiverClassInfo.dispatchInputEvent, seq, inputEventObj);//事件消息回调java层if (env->ExceptionCheck()) {ALOGE("Exception dispatching input event.");skipCallbacks = true;}env->DeleteLocalRef(inputEventObj);}}...}
}
五、Input设备节点介绍
5.1 常见触摸事件类型
| 事件类型 | 事件名称 | 事件编码 | 事件定义 |
|---|---|---|---|
| EV_SYN | 同步事件 | 0004 or 0005 | 代表一个事件开始(不必要) |
| EV_SYN | 同步事件 | SYN_REPORT | 代表一个事件结束(必要的) |
| EV_ABS | 绝对坐标的事件 | ABS_MT_SLOT | 本质代表着不同的手指,他的value代表手指id |
| EV_ABS | 绝对坐标的事件 | ABS_MT_TRACKING_ID | 类协议特有的,每个slot会和一个ID相对应,一个非负数表示一次接触,ffffffff表示一次接触结束,即手指抬起。无论在接触的类型相对应的slot发生改变,驱动都应该通过改变这个值来使这个slot失效,并且下一次触摸的ID值会是这次的值加1 |
| EV_ABS | 绝对坐标的事件 | ABS_MT_POSITION_X | 相对于屏幕中心的x坐标 |
| EV_ABS | 绝对坐标的事件 | ABS_MT_POSITION_Y | 相对于屏幕中心的y坐标 |
| EV_ABS | 绝对坐标的事件 | ABS_MT_TOUCH_MAJOR | 接触部分的长轴长度,相当于椭圆的长轴 |
| EV_ABS | 绝对坐标的事件 | ABS_MT_TOUCH_MINOR | 接触部分的短轴长度,相当于椭圆的短轴 |
| EV_ABS | 绝对坐标的事件 | ABS_MT_PRESSURE | 代表按下压力,有的设备不一定有 |
| EV_KEY | 按键事件 | BTN_TOUCH | 触碰按键,其值是DOWN或者UP |
| EV_KEY | 按键事件 | BTN_TOOL_FINGER | 按键的是finger,其值是DOWN或者UP |
5.2 getevent
adb shell getevent -lt
5.3 sendevent
模拟按压音量键+
//通过getevent指令,获取音量按键+的事件码
bengal:/ # getevent
add device 1: /dev/input/event4name:     "bengal-scubaidp-snd-card Button Jack"
add device 2: /dev/input/event3name:     "bengal-scubaidp-snd-card Headset Jack"
add device 3: /dev/input/event0name:     "qpnp_pon"
add device 4: /dev/input/event1name:     "gpio-keys"
add device 5: /dev/input/event2name:     "sitronix_ts_i2c"
/dev/input/event1: 0001 0073 00000001
/dev/input/event1: 0000 0000 00000000
/dev/input/event1: 0001 0073 00000000
/dev/input/event1: 0000 0000 00000000//通过sendevent模拟音量键+的事件
130|bengal:/ # sendevent /dev/input/event1 1 115 1
bengal:/ # sendevent /dev/input/event1 0 0 0
bengal:/ # sendevent /dev/input/event1 1 115 0
bengal:/ # sendevent /dev/input/event1 0 0 0
bengal:/ #
ps:getevent获取到的事件码为16进制,sendevent输入的值为10进制,需要注意下!!!
六、参考资料
https://liuwangshu.blog.csdn.net/article/details/84883156
https://liuwangshu.blog.csdn.net/article/details/86771746
https://www.cnblogs.com/brucemengbm/p/7072395.html
事件分发介绍:
https://www.cnblogs.com/fanglongxiang/p/14091511.html
InputChannel介绍:
https://blog.csdn.net/ztisen/article/details/130188132
GetEvent指令介绍:
https://blog.csdn.net/Gary1_Liu/article/details/124675608