【目标跟踪】跨相机如何匹配像素
文章目录
- 前言
- 一、计算思路
- 二、代码
- 三、结果
前言
- 本本篇博客介绍一种非常简单粗暴的方法,做到跨相机像素匹配。
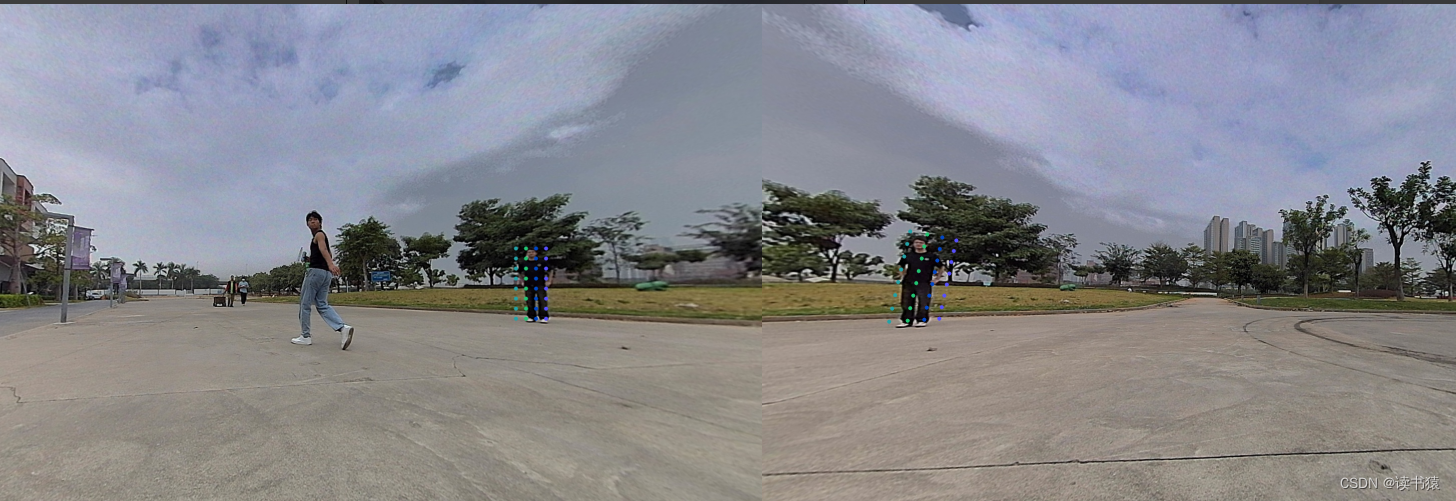
- 已知各相机内外参,计算共视区域像素投影(不需要计算图像特征)。废话不多说,直接来,见下图。
同一时刻相机A与相机B的图
相机A
相机B
问:相机 A 检测出目标1 box位置,如何计算得出目标1在相机 B 中像素的位置?

一、计算思路
- 取相机 A 目标1中一个像素点 (Ua, Va)
- 计算改点在相机A中的相机坐标系坐标 (Xa,Ya,Za)
- 相机 A 坐标转化到相机 B 下的相机坐标 (Xb,Yb,Zb)
- (Xb,Yb,Zb) 转化到像素坐标 (Ub,Vb)
第2点与第3点中像素坐标转化到相机坐标。

其中Zcamera 可以近似求出。看过之前博客的朋友应该可以明白,具体计算方式,代码会全部给出。
第3点就是一个三维坐标系旋转平移变化。

二、代码
import yaml
import numpy as np
import cv2def read_yaml(path):with open(path, 'r', encoding='utf-8') as f:result = yaml.load(f.read(), Loader=yaml.FullLoader)return resultdef get_r_t_mtx(path, f_r_b_l):sensor_list = ["front_center", "right_center", "back_center", "left_center"]yaml_result = read_yaml(path)  # 读取yaml配置文件hres_pitch = yaml_result[sensor_list[f_r_b_l]]["pitch"]res_h = yaml_result[sensor_list[f_r_b_l]]["height"]res_r = np.array(yaml_result[sensor_list[f_r_b_l]]["rotation"]).reshape(3, 3)res_t = np.array(yaml_result[sensor_list[f_r_b_l]]["translation"]).reshape(3, 1)res_mtx = np.array(yaml_result[sensor_list[f_r_b_l]]["K"]).reshape(3, 3)return res_pitch, res_h, res_mtx, res_r, res_t# 近似计算相机坐标系 Zcamera
def get_camera_z(children, pixe_y):pitch, h, K, *_ = childrensigma = np.arctan((pixe_y - K[1][2]) / K[1][1])z = h * np.cos(sigma) / np.sin(sigma + pitch)  # 深度return zdef get_sensor_pixe(children, parent, x, y, distance):r, t = get_two_camera_r_t(children, parent)children_pitch, children_h, children_mtx, *c = childrenparent_pitch, parent_h, parent_mtx, *p = parentdistance_init = distancex = (x - children_mtx[0][2]) / children_mtx[0][0]y = (y - children_mtx[1][2]) / children_mtx[1][1]coor = np.array([x, y, 1]).reshape(3, 1) * distance_initres_coor = r @ coor + t  # 车体坐标系res_x = (res_coor[0] / res_coor[2]) * parent_mtx[0][0] + parent_mtx[0][2]res_y = (res_coor[1] / res_coor[2]) * parent_mtx[1][1] + parent_mtx[1][2]return res_x, res_ydef show_img(img):cv2.namedWindow("show")cv2.imshow("show", img)cv2.waitKey(0)def get_two_camera_r_t(children, parent):*children, children_mtx, children_r, children_t = children*parent, parent_mtx, parent_r, parent_t = parentres_r = np.array(parent_r).T @ np.array(children_r)res_t = np.array(parent_r).T @ (np.array(children_t) - np.array(parent_t)).reshape(3, 1)return res_r, res_tdef get_uv(point, param):*p, mtx, r, t = paramcoor_camera = r.T @ (np.array(point).reshape(3, 1) - t)coor_pixe = mtx @ coor_camera * (1 / coor_camera[2])return coor_pixe[0][0], coor_pixe[1][0]if __name__ == '__main__':front_img = cv2.imread("front_img.jpg")left_img = cv2.imread("left_img.jpg")img = np.concatenate((left_img, front_img), axis=1)  # 横向拼接front_param = get_r_t_mtx("./sensor_param.yaml", 0)left_param = get_r_t_mtx("./sensor_param.yaml", 3)color = np.random.randint(0, 255, (3000, 3))  # 随机颜色car_coor = [5.41, 6.5, 1.3]camera1 = np.ravel(get_uv(car_coor, left_param))camera2 = np.ravel(get_uv(car_coor, front_param))print(camera1, camera2)cv2.circle(img, (int(camera1[0]), int(camera1[1])), 1, color[0].tolist(), 2)cv2.circle(img, (int(camera2[0]) + 1920, int(camera2[1])), 1, color[1].tolist(), 2)cv2.line(img, (int(camera1[0]), int(camera1[1])), (int(camera2[0] + 1920), int(camera2[1])), color[0].tolist(), 2)show_img(img)# print(get_two_camera_r_t(front_param, left_param))# print(front_to_left_r.reshape(-1), "\n", front_to_left_t)# distance = get_camera_z(left_param, 640)# x1, y1 = 1429, 488# x2, y2 = 1509, 637# for x in range(x1, x2, 20):#     for y in range(y1, y2, 20):#         res_x, res_y = get_sensor_pixe(left_param, front_param, x, y, distance)#         cv2.circle(img, (int(x), int(y)), 1, color[x].tolist(), 5)#         cv2.circle(img, (int(res_x) + 1920, int(res_y)), 1, color[x].tolist(), 5)# cv2.line(img, (int(x) , int(y)), (int(res_x)+ 1920, int(res_y)), color[x].tolist(), 2)# distance = get_camera_z(front_param, 649)# x1, y1 = 271, 469# x2, y2 = 353, 649# for x in range(x1, x2, 20):#     for y in range(y1, y2, 20):#         res_x, res_y = get_sensor_pixe(front_param, left_param, x, y, distance)#         cv2.circle(img, (int(x) + 1920, int(y)), 1, color[x].tolist(), 2)#         cv2.circle(img, (int(res_x), int(res_y)), 1, color[x].tolist(), 2)# cv2.line(img, (int(x) + 1920, int(y)), (int(res_x), int(res_y)), color[x].tolist(), 2)# show_img(img)
三、结果