[pytorch入门] 6. 神经网络
基本介绍
- torch.nn:
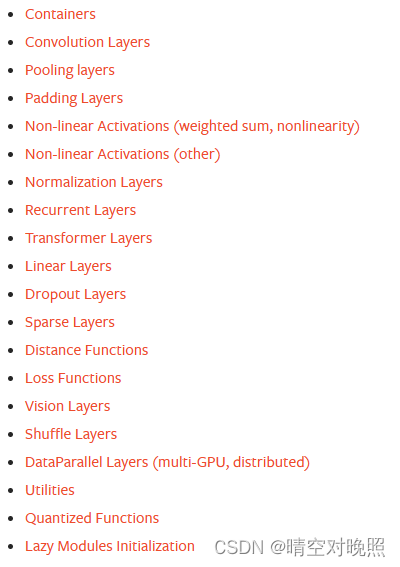
- Containers:基本骨架
- Convolution Layers: 卷积层
- Pooling layers:池化层
- Non-linear Activations (weighted sum, nonlinearity):非线性激活
- Normalization Layers:正则化层
Containers类
介绍
containers相对重要的一个类,主要给神经网络定义了一些骨架、一些结构,后面那些类都是要向骨架中填充的东西
里面有6个模块,其中module模块是里面最重要的一个模块
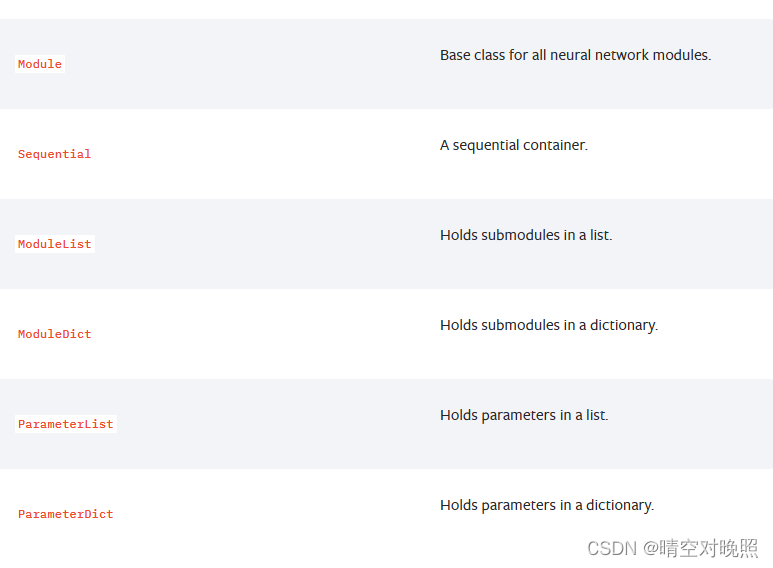
一般自己定义类,然后继承nn.module
里面一定要写的两个函数:__init__()和forward函数(前向传播)
from torch import nn
import torch
class Test(nn.Module):def __init__(self):super().__init__()def forward(self,input):output = input+1return outputtest = Test()
# print(test.forward(1))
x = torch.tensor(1)
print(test(x))
Sequential 序列
将网络序列放到sequential里面,这样就可以调用一个模块连续使用自己定义的网络
这样会让代码更加简洁易懂
model = nn.Sequential(nn.Conv2d(1,20,5),nn.ReLU(),nn.Conv2d(20,64,5),nn.ReLU())# Using Sequential with OrderedDict. This is functionally the
# same as the above code
model = nn.Sequential(OrderedDict([('conv1', nn.Conv2d(1,20,5)),('relu1', nn.ReLU()),('conv2', nn.Conv2d(20,64,5)),('relu2', nn.ReLU())]))
在下节实战中进行实例演示
Convolution 卷积
基础理解
import torch
import torch.nn.functional as Finput = torch.tensor([[1,2,0,3,1],[0,1,2,3,1],[1,2,1,0,0],[5,2,3,1,1],[2,1,0,1,1]])
kernel = torch.tensor([[1,2,1],[0,1,0],[2,1,0]])# output = torch.nn.Conv2d(input)
# print(input.shape)
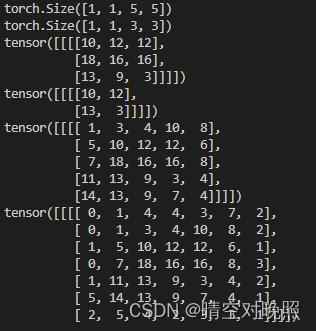
# print(kernel.shape) # 目前不符合Con2d的尺寸要求,需要进行尺寸变换input = torch.reshape(input, (1,1,5,5)) # 1个通道,1个样本,5行5列
kernel = torch.reshape(kernel, (1,1,3,3)) # 1个通道,1个样本,3行3列print(input.shape)
print(kernel.shape)# 之后进行卷积操作
output1 = F.conv2d(input, kernel, stride=1, padding=0) # stride步长,padding在输入图像的四周进行填充
print(output1)output2 = F.conv2d(input, kernel, stride=2) # stride步长,padding填充
print(output2)output3 = F.conv2d(input, kernel, stride=1, padding=1) # stride步长,padding在输入图像的四周进行填充
print(output3) # 会发现比padding=0时大了一圈,因为padding=1时,会在输入图像的四周填充一圈0output4 = F.conv2d(input, kernel, stride=1, padding=2) # stride步长,padding在输入图像的四周进行填充
print(output4) # 会发现比padding=1时大了一圈,因为padding=2时,会在输入图像的四周填充两圈0
参数概念
def torch.nn.Conv2d(in_channels, out_channels, kernel_size,stride=1, padding=0, dilation=1, groups=1, bias=True, padding_mode='zeros', device=None, dtype=None)# in_channels:int,输入通道
# out_channels :int,输出通道
# kernel_size :int或元祖,卷积核的大小
# stride:int or tuple, optional。横向纵向的步径大小 默认为1
# padding (int, tuple or str, optional) 是否需要在输入图像的边缘进行填充,默认为0 不填充
# padding_mode (str, optional) – 'zeros', 'reflect', 'replicate' or 'circular' 控制如何填充,Default: 'zeros'即全部填充为0
# dilation (int or tuple, optional) – Spacing between kernel elements. Default: 1 卷积核之间的距离,一般为空洞卷积,不常用
# groups (int, optional) – Number of blocked connections from input channels to output channels. Default: 1
# bias (bool, optional) – If True, adds a learnable bias to the output. Default: True
实际上不需要自己写卷积核,他是会自己在输入图像中采样获得,只需要定义卷积核大小即可
使用
import torch
import torchvision
from torch.utils.data import DataLoader
from torch import nn
from torch.utils.tensorboard import SummaryWriterdataset = torchvision.datasets.CIFAR10("./dataset",train = False, transform=torchvision.transforms.ToTensor(),download=True)dataloader = DataLoader(dataset, batch_size=64, shuffle=True)# 搭建简单神经网络
class Test(nn.Module):def __init__(self):super(Test,self).__init__()self.conv1 = nn.Conv2d(in_channels=3,out_channels=6,kernel_size=3,stride=1,padding=0)def forward(self,x):x = self.conv1(x)return xnet = Test()writer = SummaryWriter('logs')
step = 0
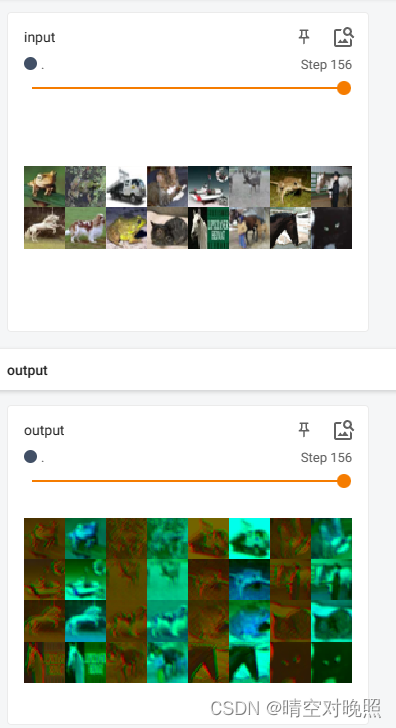
for data in dataloader: # 一次性取出一个batch_size的数据,daaloader的使用见前面文章imgs, targets = dataoutput = net(imgs)print(imgs.shape)print(output.shape)# print(output)print('-------')writer.add_images("input", imgs, step)# 但是这里output的shape是[64,6,30,30],6个通道没办法显示# 因此需要对output进行处理,使其变成[64,3,30,30]# 比较简单的方案是6个通道直接切开,变成两个bitch,每个bitch有3个通道(不是很严谨)# 当不知道batch_size的大小时,可以使用-1来代替,他会根据后面的数据直接计算output = torch.reshape(output,(-1,3,30,30))writer.add_images("output", output, step)step = step+1
辨析:nn 与 nn.functional
上面卷积操作的两个代码中,一个用的torch.nn.functional中的conv2d,一个用的torch.nn中的conv2d
nn 与 nn.functional有很多相同的函数,同时也有很多差异
相同点
- 实际功能相同,即nn.Conv2d和nn.functional.conv2d 都是进行卷积,nn.Dropout 和nn.functional.dropout都是进行dropout等
- 运行效率近乎相同
不同点
- nn.functional.xxx是函数接口,而nn.XXX是nn.functional.xxx的
类封装,并且nn.xxx都集成于同一个祖先nn.Module。这一点导致了nn.XXX除了具有nn.functional.xxx的功能之外,内部附带了nn.Module相关的属性和方法,例如train(), eval(),load_state_dict, state_dict 等。 - 两者的调用方式不同
-
nn.xxx需要先实例化并传入参数,然后以函数调用的方式调用实例化的对象并传入输入数据
input = img conv = nn.Conv2d(in_channels=3, out_channels=64, kernel_size=3, padding=1) # 实例化 out = conv(input) # 以函数调用的方式调用实例化的对象并传入输入数据 -
nn.functional.xxx同时传入输入数据和weight、bias等其他参数
weight = torch.rand(64,3,3,3)
bias = torch.rand(64)
out = nn.functional.conv2d(inputs, weight, bias, padding=1) # 调用函数的同时传入数据与参数
-
- nn.Xxx继承于nn.Module, 能够很好的与nn.Sequential结合使用, 而nn.functional.xxx无法与nn.Sequential结合使用。
fm_layer = nn.Sequential(nn.Conv2d(3, 64, kernel_size=3, padding=1),nn.BatchNorm2d(num_features=64),nn.ReLU(),nn.MaxPool2d(kernel_size=2),nn.Dropout(0.2) - nn.xxx不需要自己定义和管理weight,而functional.xxx需要自己定义weight,每次调用的时候都需要手动传入weight,不利于代码复用
- 使用nn.xxx定义一个CNN
class CNN(nn.Module):def __init__(self):super(CNN, self).__init__()self.cnn1 = nn.Conv2d(in_channels=1, out_channels=16, kernel_size=5,padding=0)self.relu1 = nn.ReLU()self.maxpool1 = nn.MaxPool2d(kernel_size=2)self.cnn2 = nn.Conv2d(in_channels=16, out_channels=32, kernel_size=5, padding=0)self.relu2 = nn.ReLU()self.maxpool2 = nn.MaxPool2d(kernel_size=2)self.linear1 = nn.Linear(4 * 4 * 32, 10)def forward(self, x):x = x.view(x.size(0), -1)out = self.maxpool1(self.relu1(self.cnn1(x)))out = self.maxpool2(self.relu2(self.cnn2(out)))out = self.linear1(out.view(x.size(0), -1))return out - 用nn.function.xxx的写法
class CNN(nn.Module):def __init__(self):super(CNN, self).__init__()self.cnn1_weight = nn.Parameter(torch.rand(16, 1, 5, 5))self.bias1_weight = nn.Parameter(torch.rand(16))self.cnn2_weight = nn.Parameter(torch.rand(32, 16, 5, 5))self.bias2_weight = nn.Parameter(torch.rand(32))self.linear1_weight = nn.Parameter(torch.rand(4 * 4 * 32, 10))self.bias3_weight = nn.Parameter(torch.rand(10))def forward(self, x):x = x.view(x.size(0), -1)out = F.conv2d(x, self.cnn1_weight, self.bias1_weight)out = F.relu(out)out = F.max_pool2d(out)out = F.conv2d(x, self.cnn2_weight, self.bias2_weight)out = F.relu(out)out = F.max_pool2d(out)out = F.linear(x, self.linear1_weight, self.bias3_weight)return out
- 使用nn.xxx定义一个CNN
选择
根据问题的复杂度和个人风格喜好决定
一般在能使用nn.xxx的情况下尽量使用,因为这样更能显示出网络间的层次关系,也更加纯粹
在nn.xxx不能满足功能需求时可以使用nn.functional.xxx,因为nn.functional.xxx更接近底层,更灵活
- pytorch官方推荐:具有学习参数的(例如,conv2d, linear, batch_norm)采用nn.Xxx方式,没有学习参数的(例如,maxpool, loss func, activation func)等根据个人选择使用nn.functional.xxx或者nn.Xxx方式。
最大池化
介绍
池化的目的是保存主要内容的同时减少数据大小
用的比较多的为MaxPool2d,取kernel覆盖范围中最大的值输出
def MaxPool2d(kernel_size, stride=None, padding=0, dilation=1, return_indices=Flse,ceil_mode=False)
- kernel_size:采样窗口大小
- stride:步幅,注意这里默认值不一样了,卷积层为1,这里为kernel_size的大小
- padding:填充值
- dilation:kernel中每个格子中间是否存在间隔,一般不对其进行设置,有间隔时也称为空洞卷积
- ceil_mode:设置为True时使用ceil模式,设置为False时使用floor模式
- ceil模式:kernel覆盖不足时(边界越界时),保留获取的数值
- floor模式:kernel覆盖不足时,不保留获取的数值
使用方法
import torch
from torch import nn
input = torch.tensor([[1,2,0,3,1],[0,1,2,3,1],[1,2,1,0,0],[5,2,3,1,1],[2,1,0,1,1]],#   dtype=torch.float32  # 如果报错时,可以尝试加上这一行)input = torch.reshape(input,(1,1,5,5)) # 使之满足输入要求class Test(nn.Module):def __init__(self):super(Test,self).__init__()self.maxpool = nn.MaxPool2d(kernel_size=3,padding=0,ceil_mode=False)def forward(self,input):output = self.maxpool(input)return outputnet = Test()
output = net(input)
print(output)
实例
import torch
from torch import nn
import torchvision
from torch.utils.data import DataLoader
from torch.utils.tensorboard import SummaryWriterdataset = torchvision.datasets.CIFAR10('./dataset',train=False,transform=torchvision.transforms.ToTensor())
dataloader = DataLoader(dataset, batch_size=4)class Test(nn.Module):def __init__(self):super(Test,self).__init__()self.maxpool = nn.MaxPool2d(kernel_size=3,padding=0,ceil_mode=False)def forward(self,input):output = self.maxpool(input)return outputnet = Test()
writer = SummaryWriter('logs')
step = 0for data in dataloader:imgs, targets = datawriter.add_images('input',imgs, step)output = net(imgs)   # 池化不会改变channel的数量,因此不需要reshapewriter.add_images('output',output, step)step = step+1
writer.close()
非线性激活
官方文档有很多非线性函数,这里举几个例子
ReLU
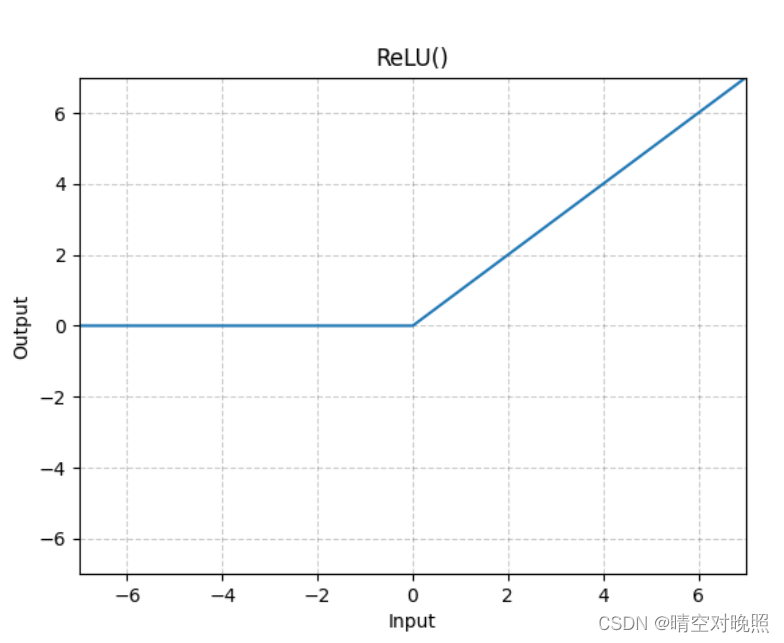
ReLU有一个参数inplace:用于指明是否修改原值
- inplace=True:没有返回值,直接修改原值
- inplace=False:不修改原值,有结果作为返回值返回
from torch import nn
import torchclass Test(nn.Module):def __init__(self):super(Test, self).__init__()self.relu1 = nn.ReLU(inplace=False)def forward(self, input):output = self.relu1(input)return outputnet = Test()input = torch.tensor([[1,2,0,-3,1],[0,1,-2,3,1],[1,2,1,0,0],[-5,2,3,1,1],[-2,1,0,1,1]])output = net(input)
print(output)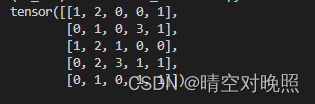
Sigmod
ReLU对图像的处理不明显,这里用sigmod举例

from torch import nn
import torch
from torch.utils.tensorboard import SummaryWriter
import torchvision
from torch.utils.data import DataLoaderdataset = torchvision.datasets.CIFAR10('./dataset',train=False,transform=torchvision.transforms.ToTensor())
dataloader = DataLoader(dataset=dataset, batch_size=64)class Test(nn.Module):def __init__(self):super(Test, self).__init__()self.sigmoid1 = nn.Sigmoid()def forward(self, input):output = self.sigmoid1(input)return outputnet = Test()
writer = SummaryWriter('logs')
step=0
for data in dataloader:imgs, targets = datawriter.add_images('input',imgs,step)output = net(imgs)writer.add_images('output',output,step)step = step+1
writer.close()
Linear Layers:线性层
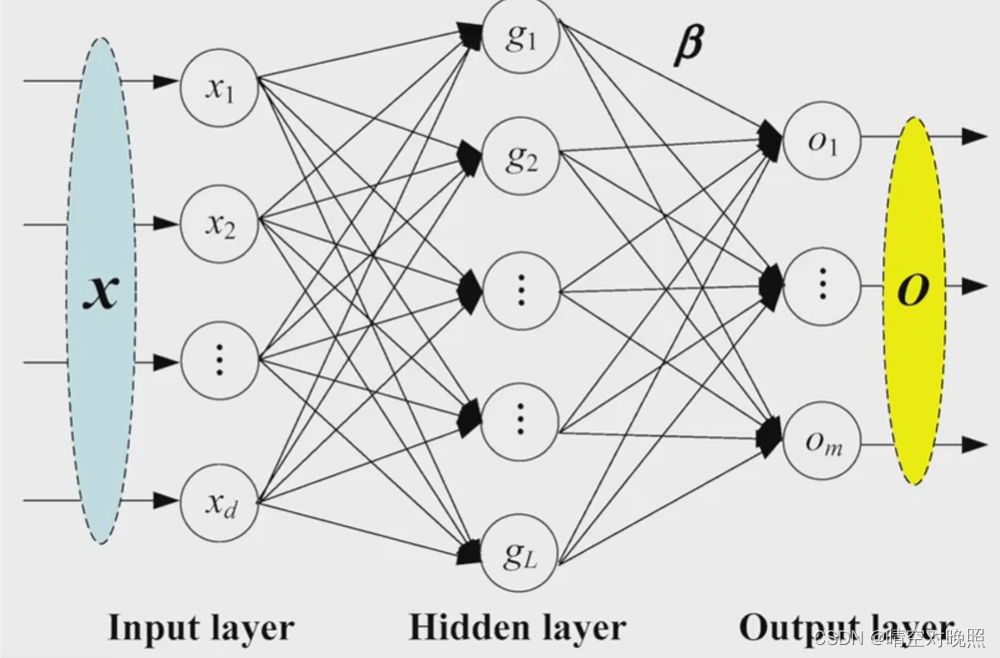
比较常见的这种图实际上就是由线性层一个一个搭建出来的
def torch.nn.Linear(in_features, out_features, bias=True, device=None, dtype=None
参数中的in_features指的就是上面输入层数据的个数(即d),out_features即为输出层个数(前半部分的输出层为中间的隐藏层),bias=True时,计算会加上偏置b
# 例:将图片(如5*5)展开成一行(如1*25),经过线性层转换为x个import torchvision
import torch
from torch import nn
from torch.utils.data import DataLoaderdatasets = torchvision.datasets.CIFAR10("./dataset",train=False,transform=torchvision.transforms.ToTensor(),download=True)
dataloader = DataLoader(datasets, batch_size=64)class Test(nn.Module):def __init__(self):super(Test, self).__init__()self.liner1 = nn.Linear(196608,10)def forward(self, input):output = self.liner1(input)return outputnet = Test()for data in dataloader:imgs, targets = dataprint("原始大小:",imgs.shape) # output = torch.reshape(imgs,(1,1,1,-1)) # 将imgs展开成一行 输出效果见第一张图# 这里也可以直接用torch.flatten(imgs)来展开output = torch.flatten(imgs)  # 输出效果见第二张图print("转化为一维", output.shape)  # 先用这个来看一下展开后的大小,这是决定了线性层的输入大小# breakoutput2 = net(output)print("线性层转化后", output2.shape)break
使用reshape:

使用torch.flatten:

其它层
Normalization 正则化层: 采用正则化的话会提高神经网络的训练速度
Recurrent Layers:一些特定的网络结构,含有RNN、LSTM等
Transformer Layers:已经写好的特定结构,与上面类似
Dropout Layers:也是在特定网络中才需要
Distance Functions:计算两个层之间的误差
Loss Functions:计算loss