本教程的目的之一是创建一个可以嵌入到任何应用程序中的通用插件。
为此,我们将初始化两个嵌套的cargo项目。
cargo 设置
主要的二进制应用程序:
cargo init --bin . --name minesweeper-tutorial
和板插件:
cargo init --lib board_plugin
你的目录应该是这样的:
├── Cargo.toml
├── board_plugin
│   ├── Cargo.toml
│   └── src
│       └── lib.rs
└── src└── main.rs
板插件配置
Cargo.toml
将以下元素添加到board_plugin/Cargo.toml文件中:
[features]
default = []
debug = ["colored", "bevy-inspector-egui"][dependencies]
# Engine
bevy = "0.6"# Serialization
serde = "1.0"# Random
rand = "0.8"# Console Debug
colored = { version = "2.0", optional = true }
# Hierarchy inspector debug
bevy-inspector-egui = { version = "0.8", optional = true }- bevy 是主要的引擎依赖项
- 彩色 colored 彩色 将用于在调试模式下在控制台中打印电路板
- bevy-inspector-egui 这样我们就可以获得组件的检查器兼容性。
本教程末尾的检查器 GUI:
我们通过调试功能门激活调试箱debug。
库文件
删除生成的代码并创建插件struct
// board_plugin/src/lib.rs
pub struct BoardPlugin;
应用程序配置
Cargo.toml
将以下元素添加到主src/Cargo.toml文件中:
[features]
default = []
debug = ["board_plugin/debug", "bevy-inspector-egui"][dependencies]
bevy = "0.6"
board_plugin = { path = "board_plugin" }# Hierarchy inspector debug
bevy-inspector-egui = { version = "0.8", optional = true }[workspace]
members = ["board_plugin"
]
我们使用我们的 lib 作为依赖项并将其添加到我们的workspace.
主程序.rs
将以下内容添加到src/main.rs文件中:
use bevy::prelude::*;#[cfg(feature = "debug")]
use bevy_inspector_egui::WorldInspectorPlugin;fn main() {let mut app = App::new();// Window setupapp.insert_resource(WindowDescriptor {title: "Mine Sweeper!".to_string(),width: 700.,height: 800.,..Default::default()})// Bevy default plugins.add_plugins(DefaultPlugins);#[cfg(feature = "debug")]// Debug hierarchy inspectorapp.add_plugin(WorldInspectorPlugin::new());// Startup system (cameras)app.add_startup_system(camera_setup);// Run the appapp.run();
}fn camera_setup(mut commands: Commands) {// 2D orthographic cameracommands.spawn_bundle(OrthographicCameraBundle::new_2d());
}
让我们来分解一下:
- bevy
App是我们所有游戏逻辑的构建者,允许注册系统、资源和插件 -
bevy
Plugin是应用程序构建逻辑的容器,是一种向应用程序添加系统 和资源的模块化方式。例如,将注册显示 GUI 检查器所需的
WorldInspectorPlugin每个系统和资源。 -
Bevy
DefaultPlugins是一个基本插件的集合,提供基本的引擎功能,如输入处理、窗口、转换、渲染......
我们添加一项资源 WindowDescriptor 来自定义我们的窗口。
添加资源有何作用?它们只是数据!
资源确实只是数据,没有逻辑。注册 DefaultPlugins系统负责使用资源作为配置来绘制窗口WindowDescriptor。
该资源是可选的,因为如果您不设置任何内容,系统只会使用默认值。
我们将使用我们的BoardPlugin.
启动系统
我们还注册了一个启动系统:camera_setup
经典系统每帧运行,并具有可选的运行标准,例如Stages或FixedTimeSteps。启动系统
仅在启动时运行一次。
我们这样注册系统:
app.add_system(my_function)fn camera_setup(mut commands: Commands) {// 2D orthographic camera// 2D正射相机commands.spawn_bundle(OrthographicCameraBundle::new_2d());
}该Commands参数是每个需要世界编辑的系统的主要 ECS 工具,它允许生成和删除实体、向实体添加组件、插入和删除资源等。
那么每个系统都只有一个参数吗?
完全不是,并且Commands参数是可选的。系统可以有任意数量的参数,但只能是有效的ECS参数,例如:
- 我们刚才看到的Commands(Commands)
- 封装在Res<>或ResMut<>中的资源(可以是资产、窗口或任何插入的资源)
- 组件查询(
Query<>) - 事件项目(
EventReader<>和EventWriter<>) - 等等。
Bevy 将自动为您处理一切,并为您的系统提供正确的参数。
系统“生成一个组件包”,这是什么意思?
我们在简介中解释说,在我们的游戏世界中,存在带有附加组件的实体。
要生成实体并添加组件,我们可以这样做:
fn my_system(mut commands: Commands) {// This spawns an entity and returns a builder// 这会生成一个实体,并返回一个构建器let entity = commands.spawn();// We can add components to the entity// 我们可以向实体添加组件entity.insert(MyComponent {}).insert(MyOtherComponent {});
}我们就可以这样做:
fn my_system(mut commands: Commands) {let entity = commands.spawn();entity.insert_bundle(MyComponentBundle::new());
}fn my_system(mut commands: Commands) {// This spawns an entity with all components in the bundle// 这会生成一个带有组件包中所有组件的实体commands.spawn_bundle(MyComponentBundle::new());
}运行
您现在可以运行该应用程序
cargo run: 给你一个空窗口cargo run --features debug 调试UI:
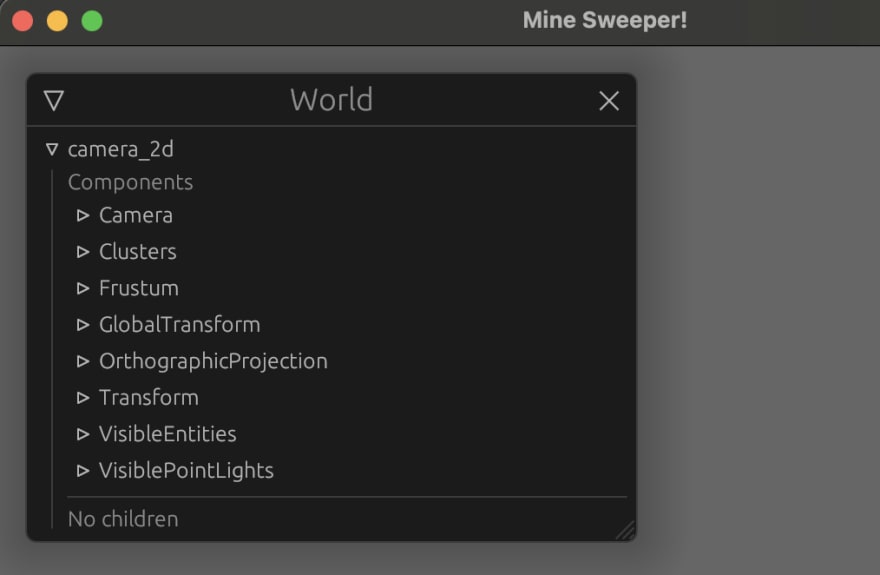
显示调试检查器,我们可以看到 2D 相机实体以及通过捆绑包插入的组件。
3Bevy Minesweeper:平铺地图生成
让我们生成扫雷基础图块地图并设置我们的插件。
在board_plugin中创建一个包含coordinates.rs文件的components模块,和一个包含tile.rs和tilemap.rs文件的resources模块:
<span style="color:var(--syntax-text-color)"><span style="color:var(--syntax-text-color)"><code>├── Cargo.toml
└── src├── components│   ├── coordinates.rs│   └── mod.rs├── lib.rs└── resources├── mod.rs├── tile.rs└── tile_map.rs
</code></span></span>
组件
为了管理图块和坐标,我们将制作第一个组件Coordinates:
// coordinates.rs
use std::fmt::{self, Display, Formatter};
use std::ops::{Add, Sub};
use bevy::prelude::Component;#[cfg_attr(feature = "debug", derive(bevy_inspector_egui::Inspectable))]
#[derive(Debug, Default, Copy, Clone, Ord, PartialOrd, Eq, PartialEq, Hash, Component)]
pub struct Coordinates {pub x: u16,pub y: u16,
}// We want to be able to make coordinates sums..
// 我们希望能够进行坐标的求和...
impl Add for Coordinates {type Output = Self;fn add(self, rhs: Self) -> Self::Output {Self {x: self.x + rhs.x,y: self.y + rhs.y,}}
}// ..and subtractions
// ..和减法
impl Sub for Coordinates {type Output = Self;fn sub(self, rhs: Self) -> Self::Output {Self {x: self.x.saturating_sub(rhs.x),y: self.y.saturating_sub(rhs.y),}}
}impl Display for Coordinates {fn fmt(&self, f: &mut Formatter<'_>) -> fmt::Result {write!(f, "({}, {})", self.x, self.y)}
}该Coordinate结构包含代表板的两个轴的无符号数值。
我们添加Display实现作为良好实践,并添加Add和Sub实现以允许数字运算。
请注意使用saturating_sub以避免减法结果为负时出现恐慌(panic)。
我们通过特征门debug添加派生Inspectable。这个特性(trait)将使我们的组件在检查器 GUI 中正确显示。
为什么要在这里做一个组件呢?
我们还不会将Coordinates用作组件,但我们会在以后的步骤中使用。这说明了一个重要方面:如果派生了Component,任何东西都可以成为组件。
我们还添加了一系列派生属性,这些属性将来会很有用。
资源
图块
让我们声明我们的图块:
// tile.rs
#[cfg(feature = "debug")]
use colored::Colorize;/// Enum describing a Minesweeper tile
/// 枚举描述一个扫雷游戏的图块
#[derive(Debug, Copy, Clone, Eq, PartialEq)]
pub enum Tile {/// Is a bomb/// 是一个炸弹Bomb,/// Is a bomb neighbor/// 是一个炸弹的邻居BombNeighbor(u8),/// Empty tile/// 空图块Empty,
}impl Tile {/// Is the tile a bomb?/// 图块是炸弹吗?pub const fn is_bomb(&self) -> bool {matches!(self, Self::Bomb)}#[cfg(feature = "debug")]pub fn console_output(&self) -> String {format!("{}",match self {Tile::Bomb => "*".bright_red(),Tile::BombNeighbor(v) => match v {1 => "1".cyan(),2 => "2".green(),3 => "3".yellow(),_ => v.to_string().red(),},Tile::Empty => " ".normal(),})}
}我们使用枚举来避免复杂的结构体,并添加了console_output方法,这个方法使用了我们可选的colorize包。。
为什么这不是一个组件?
我们可以将Tile其用作组件,但正如我们将在未来的步骤中看到的,我们需要最大的灵活性,这意味着:
- 炸弹图块将有一个特定的组件
- 炸弹邻居图块也将有一个特定的组件
查询( Query<>) 只能过滤组件存在或不存在(我们称之为查询工件),因此直接使用我们的Tile结构将
不允许我们的系统使用直接针对炸弹图块的查询,因为所有图块都会被查询。
图块地图
让我们制作图块地图生成器:
空地图
// tile_map.rs
use crate::resources::tile::Tile;
use std::ops::{Deref, DerefMut};/// Base tile map
/// 基础瓦片地图
#[derive(Debug, Clone)]
pub struct TileMap {bomb_count: u16,height: u16,width: u16,map: Vec<Vec<Tile>>,
}impl TileMap {/// Generates an empty map/// 生成一个空地图pub fn empty(width: u16, height: u16) -> Self {let map = (0..height).into_iter().map(|_| (0..width).into_iter().map(|_| Tile::Empty).collect()).collect();Self {bomb_count: 0,height,width,map,}}#[cfg(feature = "debug")]pub fn console_output(&self) -> String {let mut buffer = format!("Map ({}, {}) with {} bombs:\n",// "地图 ({}, {}),包含 {} 个炸弹:\n",self.width, self.height, self.bomb_count);let line: String = (0..=(self.width + 1)).into_iter().map(|_| '-').collect();buffer = format!("{}{}\n", buffer, line);for line in self.iter().rev() {buffer = format!("{}|", buffer);for tile in line.iter() {buffer = format!("{}{}", buffer, tile.console_output());}buffer = format!("{}|\n", buffer);}format!("{}{}", buffer, line)}// Getter for `width`// `width`的获取器pub fn width(&self) -> u16 {self.width}// Getter for `height`// `height`的获取器pub fn height(&self) -> u16 {self.height}// Getter for `bomb_count`// `bomb_count`的获取器pub fn bomb_count(&self) -> u16 {self.bomb_count}
}impl Deref for TileMap {type Target = Vec<Vec<Tile>>;fn deref(&self) -> &Self::Target {&self.map}
}impl DerefMut for TileMap {fn deref_mut(&mut self) -> &mut Self::Target {&mut self.map}
}width并height设置尺寸和图块数量bomb_count设置地雷数量map 是一个双层二维图块数组
为什么使用 Vec<> 而不是切片?
我尝试做一些事情,比如[[Tile; WIDTH]; HEIGHT]来利用rust 1.52 的generic consts(泛型常量)的功能,但我发现它变得非常混乱。
如果您找到一种干净的方法来做到这一点,我很乐意接受一个拉取请求!
现在我们有:
- 一个
empty方法 ,来构建Tile::Empty图块地图 一个 console_output 方法在控制台打印图块地图- 一个 Deref 和 DerefMut 实现指向我们的二维向量
炸弹和邻居
让我们声明一个 2D 增量坐标数组:
// tile_map.rs
/// Delta coordinates for all 8 square neighbors
/// 所有 8 个方块邻居的增量坐标
const SQUARE_COORDINATES: [(i8, i8); 8] = [// Bottom left  // 左下(-1, -1),// Bottom  // 下(0, -1),// Bottom right      // 右下(1, -1),// Left  // 左(-1, 0),// Right   // 右(1, 0),// Top Left    // 左上(-1, 1),// Top    // 上(0, 1),// Top right  // 右上(1, 1),
];
这些元组定义了任何图块周围的正方形中 8 个图块的增量坐标:
*--------*-------*-------*
| -1, 1  | 0, 1  | 1, 1  |
|--------|-------|-------|
| -1, 0  | tile  | 1, 0  |
|--------|-------|-------|
| -1, -1 | 0, -1 | 1, -1 |
*--------*-------*-------*
我们可以通过添加一个方法来检索相邻图块来利用它:
// tile_map.rs
use crate::components::Coordinates;pub fn safe_square_at(&self, coordinates: Coordinates) -> impl Iterator<Item = Coordinates> {SQUARE_COORDINATES.iter().copied().map(move |tuple| coordinates + tuple)}Coordinates+(i8, i8)我们需要在coordinates.rs中添加以下内容: // coordinates.rs
impl Add<(i8, i8)> for Coordinates {type Output = Self;fn add(self, (x, y): (i8, i8)) -> Self::Output {let x = ((self.x as i16) + x as i16) as u16;let y = ((self.y as i16) + y as i16) as u16;Self { x, y }}
}现在我们可以检索周围的图块,我们将使用它来计算坐标周围的炸弹数量,以填充我们的炸弹邻居图块:
// tile_map.rspub fn is_bomb_at(&self, coordinates: Coordinates) -> bool {if coordinates.x >= self.width || coordinates.y >= self.height {return false;};self.map[coordinates.y as usize][coordinates.x as usize].is_bomb()
}pub fn bomb_count_at(&self, coordinates: Coordinates) -> u8 {if self.is_bomb_at(coordinates) {return 0;}let res = self.safe_square_at(coordinates).filter(|coord| self.is_bomb_at(*coord)).count();res as u8
}
让我们放置炸弹和邻居!
// tile_map.rs
use rand::{thread_rng, Rng};/// Places bombs and bomb neighbor tiles
/// 放置炸弹和炸弹邻居图块
pub fn set_bombs(&mut self, bomb_count: u16) {self.bomb_count = bomb_count;let mut remaining_bombs = bomb_count;let mut rng = thread_rng();// Place bombs// 放置炸弹while remaining_bombs > 0 {let (x, y) = (rng.gen_range(0..self.width) as usize,rng.gen_range(0..self.height) as usize,);if let Tile::Empty = self[y][x] {self[y][x] = Tile::Bomb;remaining_bombs -= 1;}}// Place bomb neighbors// 放置炸弹邻居for y in 0..self.height {for x in 0..self.width {let coords = Coordinates { x, y };if self.is_bomb_at(coords) {continue;}let num = self.bomb_count_at(coords);if num == 0 {continue;}let tile = &mut self[y as usize][x as usize];*tile = Tile::BombNeighbor(num);}}
}
太好了,让我们连接模块中的所有内容:
// board_plugin/resources/mod.rspub(crate) mod tile;
pub(crate) mod tile_map;
// board_plugin/components/mod.rs
pub use coordinates::Coordinates;mod coordinates;插件
我们有了图块地图,让我们在插件中测试它:
// lib.rs
pub mod components;
pub mod resources;use bevy::log;
use bevy::prelude::*;
use resources::tile_map::TileMap;pub struct BoardPlugin;impl Plugin for BoardPlugin {fn build(&self, app: &mut App) {app.add_startup_system(Self::create_board);log::info!("Loaded Board Plugin");}
}impl BoardPlugin {/// System to generate the complete board/// 生成完整棋盘的系统pub fn create_board() {let mut tile_map = TileMap::empty(20, 20);tile_map.set_bombs(40);#[cfg(feature = "debug")]log::info!("{}", tile_map.console_output());}
}这里发生的事情应该看起来很熟悉,我们实现了Plugin. 然后我们注册一个简单的启动系统来生成新的图块地图并打印它。BoardPluginApp
我们需要将我们的插件注册到我们的main.rs
// main.rs
use board_plugin::BoardPlugin;// ..
.add_plugin(BoardPlugin)让我们运行该应用程序:cargo run --features debug
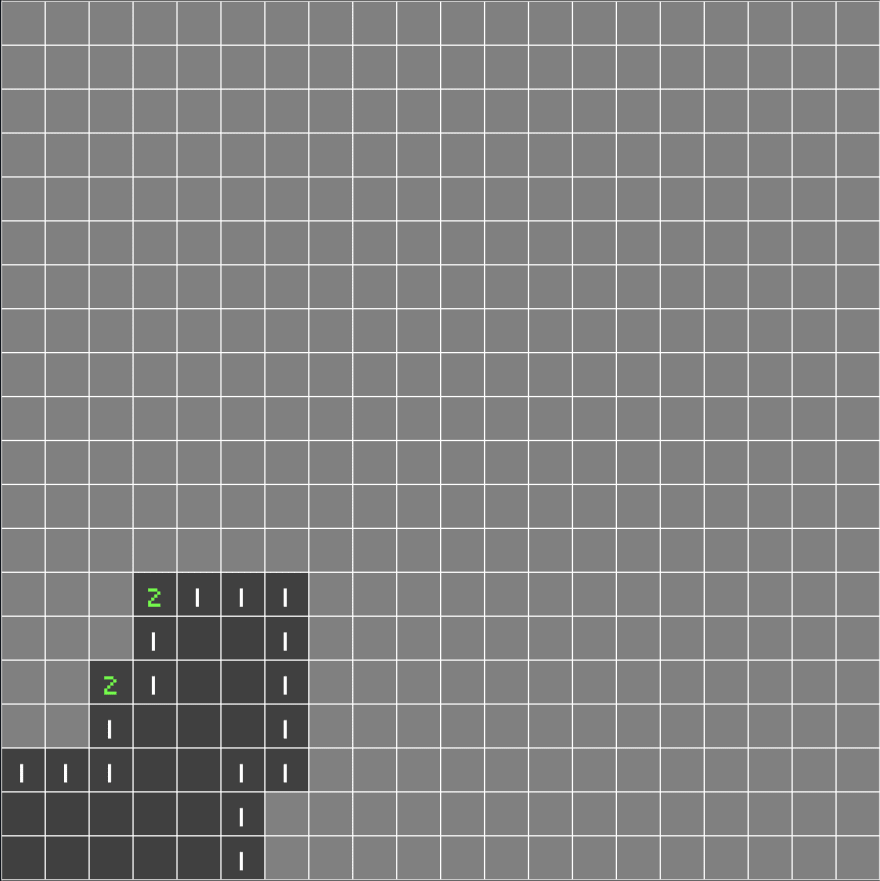
现在我们在控制台中打印了图块地图:
2022-02-21T09:24:05.748340Z  INFO board_plugin: Loaded Board Plugin
2022-02-21T09:24:05.917041Z  INFO board_plugin: Map (20, 20) with 40 bombs:
----------------------
|      111  1*1      |
|      1*211111 111  |
|111   223*1    1*1  |
|1*1   1*211   1221  |
|111   111     1*1   |
|121211    111 111   |
|*2*2*1    1*211     |
|121211  11212*21    |
|111     1*1 13*31   |
|1*1     111  2**21  |
|222         1234*2  |
|2*2         1*23*211|
|2*2         123*222*|
|111     1221 1*211*2|
|   111  1**1 111 111|
|   1*1  1221   1221 |
| 11322111   1111**1 |
| 1*3*11*1  12*11221 |
|123*21222  1*21 111 |
|1*211 1*1  111  1*1 |
----------------------
4 Bevy 扫雷:董事会
我们已经有了图块地图,但屏幕上仍然没有任何内容,让我们创建一些图块!
主板选项
为了实现我们制作完全模块化插件的目标,我们必须首先提供生成选项。我们现在将创建一个很好的配置资源,就像我们在第 1 部分
中看到的 bevy WindowDescriptor 一样。
在我们的插件中创建一个模块board_options
├── Cargo.toml
└── src├── components│   ├── coordinates.rs│   └── mod.rs├── lib.rs└── resources├── board_options.rs├── mod.rs├── tile.rs└── tile_map.rs
并将其添加到mod.rs文件中:
// ..
pub use board_options::*;mod board_options;
我们想要以下选项:
- 所有图块地图的选项(宽度、高度和炸弹数量)
- 平铺精灵之间的自定义填充间距
- 自定义图块尺寸或窗口自适应尺寸
- 自定义棋盘世界位置或窗口居中并可选偏移
- 可选的安全无遮盖起始区
好多啊 !
是的,但是越多越好!我们开工吧:
// board_options.rs
use bevy::prelude::Vec3;
use serde::{Deserialize, Serialize};/// Tile size options
/// 图块大小选项
#[derive(Debug, Clone, Serialize, Deserialize)]
pub enum TileSize {/// Fixed tile size/// 固定图块大小Fixed(f32),/// Window adaptative tile size/// 窗口自适应图块大小Adaptive { min: f32, max: f32 },
}/// Board position customization options
/// 棋盘位置自定义选项
#[derive(Debug, Clone, Serialize, Deserialize)]
pub enum BoardPosition {/// Centered board/// 居中的棋盘Centered { offset: Vec3 },/// Custom position/// 自定义位置Custom(Vec3),
}/// Board generation options. Must be used as a resource
/// 棋盘生成选项。必须作为资源使用
// We use serde to allow saving option presets and loading them at runtime
// 我们使用 serde 来支持保存选项预设并在运行时加载它们
#[derive(Debug, Clone, Serialize, Deserialize)]
pub struct BoardOptions {/// Tile map size/// 图块地图大小pub map_size: (u16, u16),/// bomb count/// 炸弹数量pub bomb_count: u16,/// Board world position/// 棋盘世界位置pub position: BoardPosition,/// Tile world size/// 图块世界大小pub tile_size: TileSize,/// Padding between tiles/// 图块间填充pub tile_padding: f32,/// Does the board generate a safe place to start/// 棋盘是否生成一个安全的起始地方pub safe_start: bool,
}这看起来很复杂,但如果我们实现良好的Default实现,我们的选项将非常易于使用
// board_options.rsimpl Default for TileSize {fn default() -> Self {Self::Adaptive {min: 10.0,max: 50.0,}}
}impl Default for BoardPosition {fn default() -> Self {Self::Centered {offset: Default::default(),}}
}impl Default for BoardOptions {fn default() -> Self {Self {map_size: (15, 15),bomb_count: 30,position: Default::default(),tile_size: Default::default(),tile_padding: 0.,safe_start: false,}}
}// main.rs
+ use board_plugin::resources::BoardOptions;fn main() {let mut app = App::new();// Window setup// 窗口设置app.insert_resource(WindowDescriptor {title: "Mine Sweeper!".to_string(),width: 700.,height: 800.,..Default::default()})// Bevy default plugins// Bevy 默认插件.add_plugins(DefaultPlugins);#[cfg(feature = "debug")]// Debug hierarchy inspector// 调试层次结构检视器app.add_plugin(WorldInspectorPlugin::new());
+ // Board plugin options// 棋盘插件选项
+ app.insert_resource(BoardOptions {
+ map_size: (20, 20),
+ bomb_count: 40,
+ tile_padding: 3.0,
+ ..Default::default()
+ }).add_plugin(BoardPlugin)// Startup system (cameras)// 启动系统(摄像机).add_startup_system(camera_setup);// Run the app// 运行应用程序app.run();
}棋盘生成
现在我们有了生成选项资源,让我们在插件中使用它来构建我们的第一个棋盘。
让我们编辑create_board启动系统:
参数和瓦片地图
// lib.rs
use resources::BoardOptions;// ..
pub fn create_board(mut commands: Commands,board_options: Option<Res<BoardOptions>>,window: Res<WindowDescriptor>,) {}Commands因为我们将生成实体和组件Option<Res<BoardOption>>是我们新一代的选项资源,但可选!Res<WindowDescriptor>是我们在main.rs中设置的窗口配置资源
/!\在编写本教程时,我意识到由于WindowDescriptor资源是可选的,如果没有设置窗口配置,我们的系统将会出现恐慌。
更好的做法是像我们的 BoardOptions 那样将其用在 Option<> 中,或者直接访问 Windows 资源。
由于我们的生成选项是可选的,如果未设置,我们需要使用Default实现:
// ..
let options = match board_options {None => BoardOptions::default(), // If no options is set we use the default one// 如果没有设置选项,我们使用默认的Some(o) => o.clone(),
};
我们现在可以生成瓦片地图了:
// ..
// Tilemap generation
// 图块地图生成
let mut tile_map = TileMap::empty(options.map_size.0, options.map_size.1);
tile_map.set_bombs(options.bomb_count);
#[cfg(feature = "debug")]
// Tilemap debugging
// 图块地图调试
log::info!("{}", tile_map.console_output());
图块尺寸
我们为图块大小添加了选项,并且使图块大小根据窗口确定。如果选择了该选项,我们必须在窗口和图块地图尺寸之间计算瓦片大小。
在 BoardPlugin 中添加以下方法:
// lib.rs
/// Computes a tile size that matches the window according to the tile map size
/// 根据图块地图大小计算与窗口相匹配的图块大小
fn adaptative_tile_size(window: Res<WindowDescriptor>,(min, max): (f32, f32), // Tile size constraints(width, height): (u16, u16), // Tile map dimensions
) -> f32 {let max_width = window.width / width as f32;let max_heigth = window.height / height as f32;max_width.min(max_heigth).clamp(min, max)
}让我们在create_board系统中使用它:
// lib.rs
use resources::TileSize;// ..
// We define the size of our tiles in world space
// 我们定义了图块在世界空间中的大小
let tile_size = match options.tile_size {TileSize::Fixed(v) => v,TileSize::Adaptive { min, max } => Self::adaptative_tile_size(window,(min, max),(tile_map.width(), tile_map.height()),),
}
棋盘创建
我们现在可以计算棋盘世界大小和世界位置world_position了
// lib.rs
use resources::BoardPosition;// ..
// We deduce the size of the complete board
// 我们推算出完整棋盘的大小
let board_size = Vec2::new(tile_map.width() as f32 * tile_size,tile_map.height() as f32 * tile_size,
);
log::info!("board size: {}", board_size);
// We define the board anchor position (bottom left)
// 我们定义棋盘的锚点位置(左下角)
let board_position = match options.position {BoardPosition::Centered { offset } => {Vec3::new(-(board_size.x / 2.), -(board_size.y / 2.), 0.) + offset}BoardPosition::Custom(p) => p,
};
这是一个奇怪的计算
我在这里选择将棋盘锚定固定在左下角而不是中心,以便将所有图块子项放置
在正相对位置。
坐标:
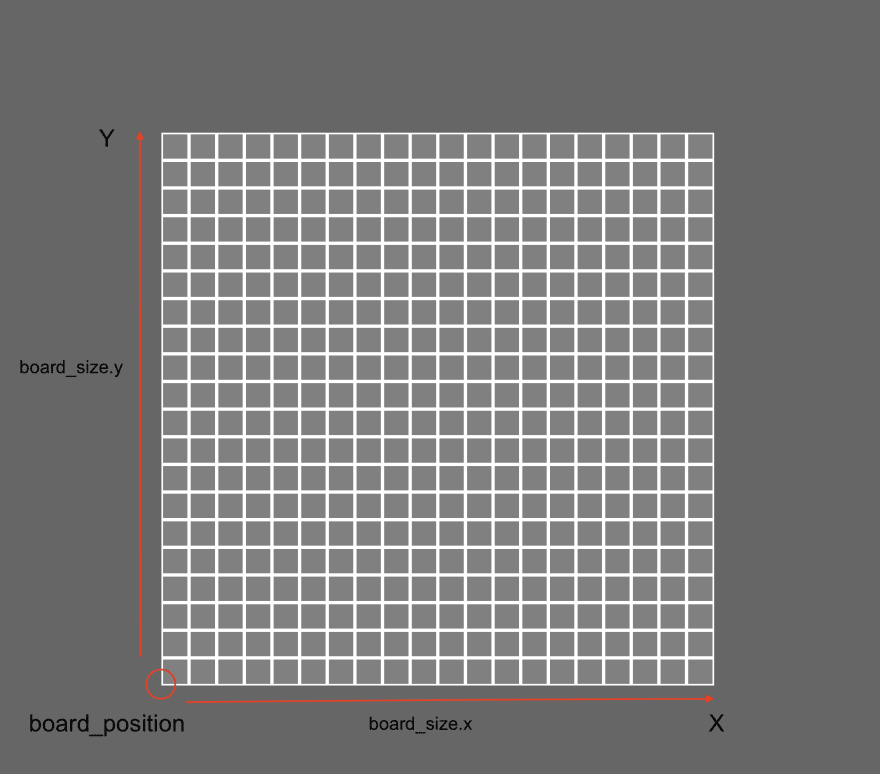
实际的棋盘对象将位于可见棋盘的左下角
我们现在可以创建我们的棋盘:
// lib.rs
// ..
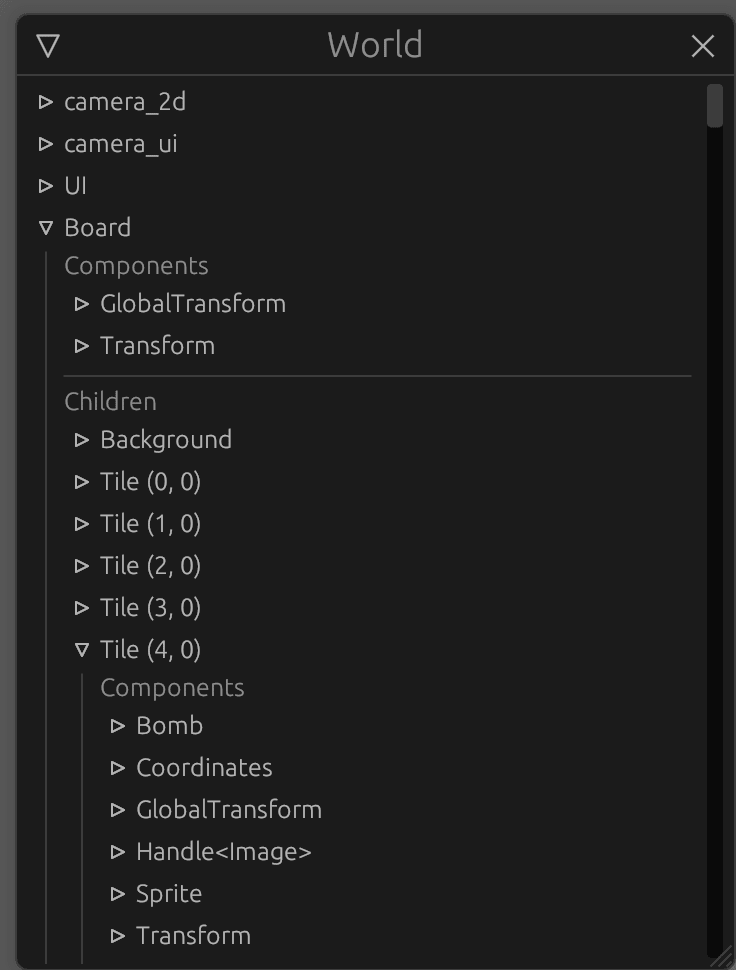
commands.spawn().insert(Name::new("Board")).insert(Transform::from_translation(board_position)).insert(GlobalTransform::default());如果我们运行该应用程序,我们现在有一个包含三个组件的空棋盘:
Name(将由检查器 GUI 使用)Transform,描述其局部平移、缩放和旋转GlobalTransform描述与 Transform 相同的值,但是全局的
请注意,我们必须创建两者Transform, GlobalTransform。但我们从未设置全局的。
如果缺少一个,整个层次结构将不会按预期运行。
让我们创建 Board 背景:将以下内容添加到代码spawn中
// lib.rs
// ...with_children(|parent| {// We spawn the board background sprite at the center of the board, since the sprite pivot is centered// 我们在棋盘中心生成棋盘背景精灵,因为精灵的轴心是居中的parent.spawn_bundle(SpriteBundle {sprite: Sprite {color: Color::WHITE,custom_size: Some(board_size),..Default::default()},transform: Transform::from_xyz(board_size.x / 2., board_size.y / 2., 0.),..Default::default()}).insert(Name::new("Background"));});
那么这里发生了什么:
首先我们使用with_children,为我们提供了一个类似于Commands的构建器,生成我们的 Board 子对象 。
然后我们生成了一个新的带有 SpriteBundle 的 "Background" 实体(注意所有内置的 Component Bundles 已经包含 Transform 和 GlobalTransform 组件):
- sprite:我们创建了一个基本的矩形,大小为我们的棋盘,并且颜色为白色。
- transform:精灵的锚点是居中的,由于我们把棋盘放在了左下角,我们希望将这个背景放在棋盘中心。
背景坐标:
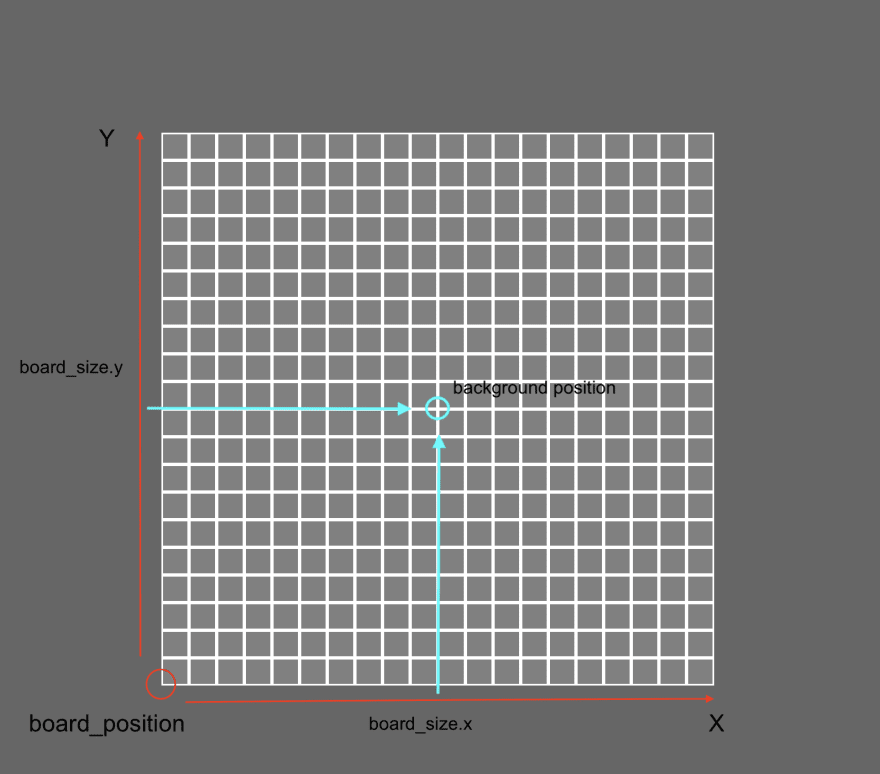
背景位于中心
让我们生成图块吧!
// lib.rs
use components::Coordinates;// ...with_children(|parent| {// ..// Tiles 图块for (y, line) in tile_map.iter().enumerate() {for (x, tile) in line.iter().enumerate() {parent.spawn_bundle(SpriteBundle {sprite: Sprite {color: Color::GRAY,custom_size: Some(Vec2::splat(tile_size - options.tile_padding as f32,)),..Default::default()},transform: Transform::from_xyz((x as f32 * tile_size) + (tile_size / 2.),(y as f32 * tile_size) + (tile_size / 2.),1.,),..Default::default()}).insert(Name::new(format!("Tile ({}, {})", x, y)))// We add the `Coordinates` component to our tile entity// 我们为图块实体添加了 `Coordinates` 组件.insert(Coordinates {x: x as u16,y: y as u16,});}}}我们遍历图块地图并使用SpriteBundle再次为每个图块生成一个新实体。我们还为每个图块添加一个Coordinates组件。
请注意,我们输入Transform1 的z值为1,图块比背景更靠近相机,因此打印在背景之上。
让我们使用debug功能运行我们的应用程序
cargo run --features debug
检视器 GUI
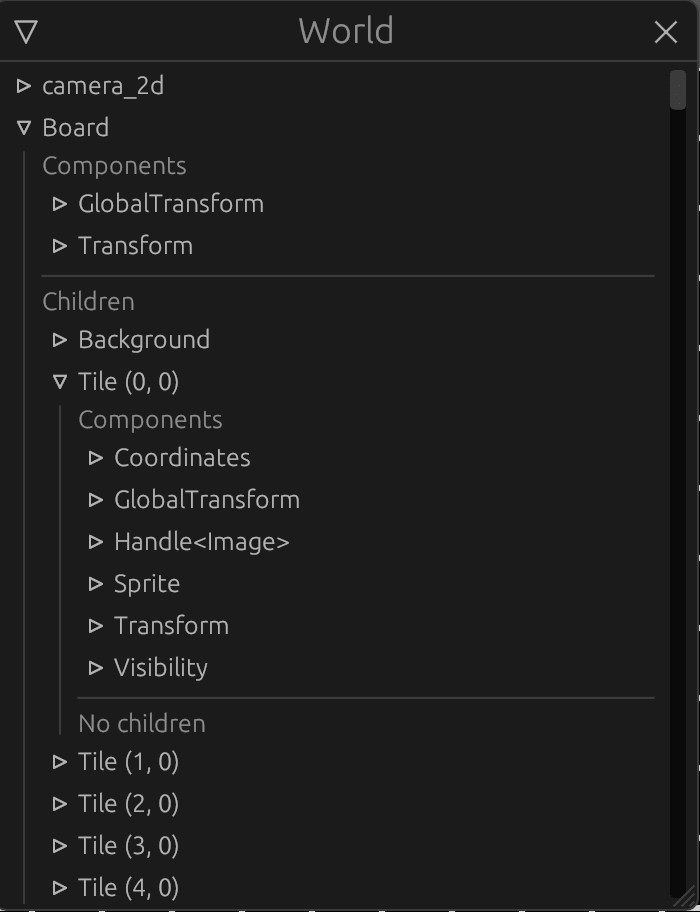
我们的棋盘已生成,我们可以观察 Transform 和 GlobalTransform 之间的差异。
- 我们的棋盘实体
Transform和GlobalTransform是相同的,因为该实体没有父对象 - 我们的图块
Transform位移是相对于它们的父级(棋盘实体)而言的,从而在组件中给出真实的位移GlobalTransform。
5Bevy 扫雷:图块和组件
资产
让我们完成我们的棋盘,为此我们需要资产:
- 炸弹png纹理
- 一种字体
(您可以使用教程存储库中的资源)
将您的资产放置在assets项目根目录的文件夹中
<span style="color:var(--syntax-text-color)"><span style="color:var(--syntax-text-color)"><code>├── Cargo.lock
├── Cargo.toml
├── assets
│   ├── fonts
│   │   └── my_font.ttf
│   └── sprites
│       ├── bomb.png
├── board_plugin
│   ├── Cargo.toml
│   └── src
│       ├── components
│       ├── lib.rs
│       └── resources
├── src
│   └── main.rs
</code></span></span>让我们将这些资产加载到我们的create_board启动系统中。
为此,我们需要向系统添加一个参数:
pub fn create_board(mut commands: Commands,board_options: Option<Res<BoardOptions>>,window: Res<WindowDescriptor>,asset_server: Res<AssetServer>, // The AssetServer resource// AssetServer 资源) {该AssetServer资源允许从assets文件夹加载文件。
现在,我们可以在函数的开头加载资源并检索句柄:
// lib.rs
// ..let font = asset_server.load("fonts/pixeled.ttf");let bomb_image = asset_server.load("sprites/bomb.png");
// ..
组件声明
我们的图块地图知道哪个图块是炸弹、炸弹邻居或空的,但 ECS 不知道。
让我们在 board_plugin 的组件中声明我们将附加到瓦片实体的组件,与我们的 Coordinates 组件一起:
board_plugin/src/components/bomb.rsboard_plugin/src/components/bomb_neighbor.rsboard_plugin/src/components/uncover.rs
// board_plugin/src/components/mod.rs
pub use bomb::Bomb;
pub use bomb_neighbor::BombNeighbor;
pub use uncover::Uncover;mod bomb;
mod bomb_neighbor;
mod uncover;
炸弹
该组件会将图块识别为炸弹
// bomb.rs
use bevy::prelude::Component;/// Bomb component
/// 炸弹组件
#[cfg_attr(feature = "debug", derive(bevy_inspector_egui::Inspectable))]
#[derive(Debug, Copy, Clone, Ord, PartialOrd, Eq, PartialEq, Hash, Component)]
pub struct Bomb;
炸弹邻居
该组件将识别一个方块为炸弹邻居
use bevy::prelude::Component;/// Bomb neighbor component
/// 炸弹邻居组件
#[cfg_attr(feature = "debug", derive(bevy_inspector_egui::Inspectable))]
#[derive(Debug, Copy, Clone, Ord, PartialOrd, Eq, PartialEq, Hash, Component)]
pub struct BombNeighbor {/// Number of neighbor bombs/// 邻近炸弹的数量pub count: u8,
}
揭开
该组件将识别要揭开的图块,我们将在第 6 部分中使用它
use bevy::prelude::Component;/// Uncover component, indicates a covered tile that should be uncovered
/// Uncover 组件,表明一个应该被揭露的被覆盖的瓦片
#[cfg_attr(feature = "debug", derive(bevy_inspector_egui::Inspectable))]
#[derive(Debug, Copy, Clone, Ord, PartialOrd, Eq, PartialEq, Hash, Component)]
pub struct Uncover;
让我们在插件中注册调试检查器的组件:
// lib.rs
#[cfg(feature = "debug")]
use bevy_inspector_egui::RegisterInspectable;
use components::*;impl Plugin for BoardPlugin {fn build(&self, app: &mut App) {// ..#[cfg(feature = "debug")]{// registering custom component to be able to edit it in inspector// 注册自定义组件以便能够在检查器中编辑它app.register_inspectable::<Coordinates>();app.register_inspectable::<BombNeighbor>();app.register_inspectable::<Bomb>();app.register_inspectable::<Uncover>();}}
}
组件使用
让我们为BoardPlugin创建一个函数,来为我们的炸弹计数器创建一个:Text2DBundle
/// Generates the bomb counter text 2D Bundle for a given value
/// 生成给定值的炸弹计数器文本 2D Bundle
fn bomb_count_text_bundle(count: u8, font: Handle<Font>, size: f32) -> Text2dBundle {// We retrieve the text and the correct color// 我们检索文本和正确的颜色let (text, color) = (count.to_string(),match count {1 => Color::WHITE,2 => Color::GREEN,3 => Color::YELLOW,4 => Color::ORANGE,_ => Color::PURPLE,},);// We generate a text bundle// 我们生成一个文本 bundleText2dBundle {text: Text {sections: vec![TextSection {value: text,style: TextStyle {color,font,font_size: size,},}],alignment: TextAlignment {vertical: VerticalAlign::Center,horizontal: HorizontalAlign::Center,},},transform: Transform::from_xyz(0., 0., 1.),..Default::default()}
}
它接受参数:
count:要打印的相邻炸弹数量fontHandle:我们字体的资产size:文字大小
颜色是完全任意的。
再次,我们将Transform(平移)的z值设置为1,以便将文本打印在图块的顶部。
现在我们可以将图块生成循环移至一个独立的函数中:
// lib.rs
fn spawn_tiles(parent: &mut ChildBuilder,tile_map: &TileMap,size: f32,padding: f32,color: Color,bomb_image: Handle<Image>,font: Handle<Font>,) {// Tiles 图块for (y, line) in tile_map.iter().enumerate() {for (x, tile) in line.iter().enumerate() {let coordinates = Coordinates {x: x as u16,y: y as u16,};let mut cmd = parent.spawn();cmd.insert_bundle(SpriteBundle {sprite: Sprite {color,custom_size: Some(Vec2::splat(size - padding)),..Default::default()},transform: Transform::from_xyz((x as f32 * size) + (size / 2.),(y as f32 * size) + (size / 2.),1.,),..Default::default()}).insert(Name::new(format!("Tile ({}, {})", x, y))).insert(coordinates);}}}- 请注意,我们现在为实体构建器使用
cmd临时值*
我们现在可以在 create_board 启动系统中调用它,在生成背景后的 with_children 块中:
// lib.rs
// ..Self::spawn_tiles(parent,&tile_map,tile_size,options.tile_padding,Color::GRAY,bomb_image,font,);
然后我们完成我们的 spawn_tiles 函数,添加我们的炸弹精灵和计数器文本进入双循环里面:
// lib.rs
use resources::tile::Tile;// ..match tile {// If the tile is a bomb we add the matching component and a sprite child// 如果图块是炸弹,我们添加匹配的组件和一个精灵子对象Tile::Bomb => {cmd.insert(Bomb);cmd.with_children(|parent| {parent.spawn_bundle(SpriteBundle {sprite: Sprite {custom_size: Some(Vec2::splat(size - padding)),..Default::default()},transform: Transform::from_xyz(0., 0., 1.),texture: bomb_image.clone(),..Default::default()});});}// If the tile is a bomb neighbour we add the matching component and a text child// 如果图块是炸弹邻居,我们添加匹配的组件和一个文本子对象Tile::BombNeighbor(v) => {cmd.insert(BombNeighbor { count: *v });cmd.with_children(|parent| {parent.spawn_bundle(Self::bomb_count_text_bundle(*v,font.clone(),size - padding,));});}Tile::Empty => (),}
// ..到目前为止,所有图块都具有相同的组件,例如Coordinates,Transform、Sprite等。
但现在有些图块具有:
- 一个
Bomb组件和一个带有炸弹精灵的子实体 - 一个
BombNeighbor组件和一个带有计数器文本的子实体
我们给炸弹精灵添加了纹理,其他的呢?
默认情况下,如果SpriteBundle没有指定texture,则使用白色方形纹理。在第 9 部分中,我们将更详细地了解它。
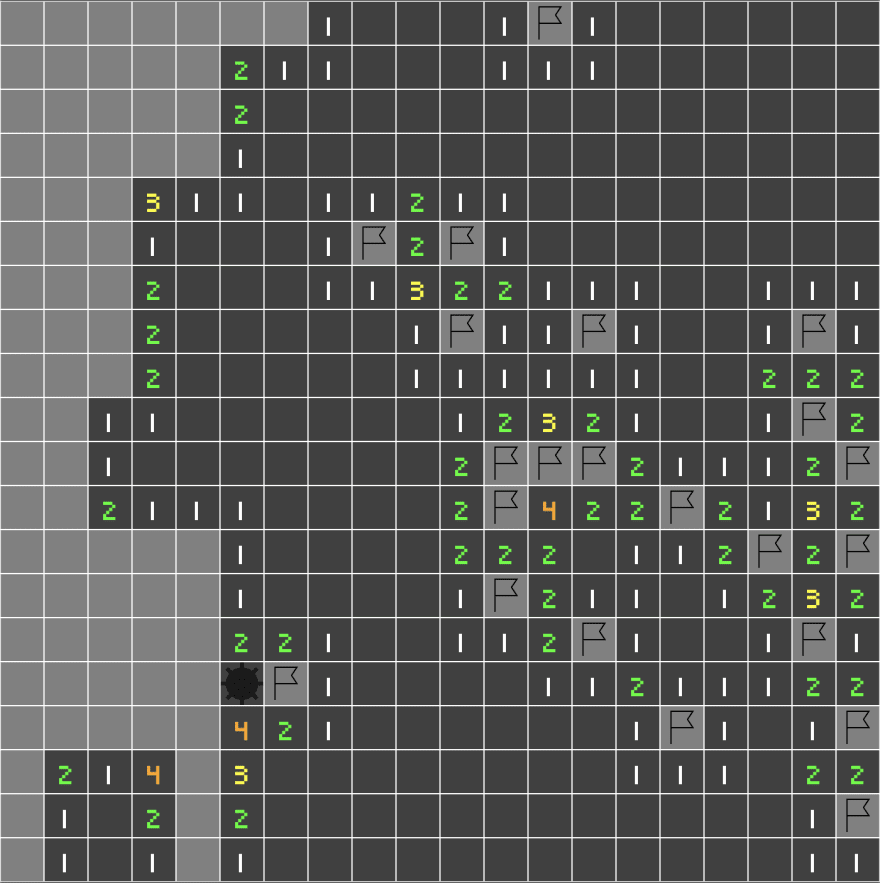
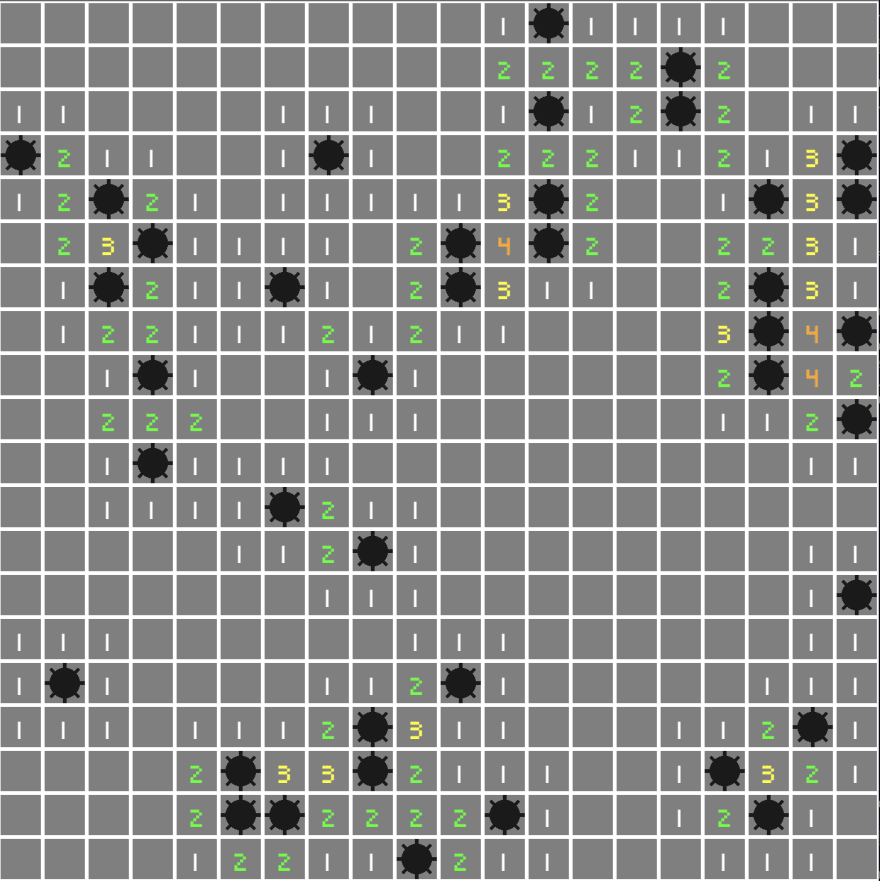
让我们运行我们的应用程序,并获得漂亮的棋盘:
6 Bevy 扫雷:输入管理
我们有一个漂亮的面板,但我们无法与它交互,让我们处理一些输入!
界限
为了检测主板内的鼠标输入,我们将使用名为 的常见游戏开发类型Bounds。奇怪的是,bevy 中缺少它,因此我们将为我们的插件编写一个简单版本board_plugin/src/bounds.rs
// bounds.rs
use bevy::prelude::Vec2;#[derive(Debug, Copy, Clone)]
pub struct Bounds2 {pub position: Vec2,pub size: Vec2,
}impl Bounds2 {pub fn in_bounds(&self, coords: Vec2) -> bool {coords.x >= self.position.x&& coords.y >= self.position.y&& coords.x <= self.position.x + self.size.x&& coords.y <= self.position.y + self.size.y}
}
该结构定义了一个 2D 矩形,可以检查坐标是否包含在其范围内。
将文件连接到board_plugin/src/lib.rs:
// lib.rs
mod bounds;
董事会资源
我们在启动系统中生成的瓦片地图create_board在系统启动后就会丢失,我们需要将其放入资源中以使其持续存在。
我们还需要存储我们的板Bounds以进行输入检测。
让我们board.rs在resources文件夹中创建一个:
// mod.rs
// ..
pub use board_options::*;mod board;
// board.rs
use crate::bounds::Bounds2;
use crate::{Coordinates, TileMap};
use bevy::prelude::*;#[derive(Debug)]
pub struct Board {pub tile_map: TileMap,pub bounds: Bounds2,pub tile_size: f32,
}impl Board {/// Translates a mouse position to board coordinatespub fn mouse_position(&self, window: &Window, position: Vec2) -> Option<Coordinates> {// Window to world spacelet window_size = Vec2::new(window.width(), window.height());let position = position - window_size / 2.;// Bounds checkif !self.bounds.in_bounds(position) {return None;}// World space to board spacelet coordinates = position - self.bounds.position;Some(Coordinates {x: (coordinates.x / self.tile_size) as u16,y: (coordinates.y / self.tile_size) as u16,})}
}我们的Board资源存储 a TileMap、棋盘Bounds和 a tile_size,其中 a 是各个方形瓷砖的大小。
我们提供了一种将鼠标位置转换为我们自己的坐标系的方法。这种计算看起来很奇怪,因为与我们的实体世界空间的原点
位于屏幕中心(基于相机位置)不同,窗口空间原点位于左下角。
因此,我们必须转换鼠标位置,使其与我们的世界空间相匹配,检查边界,然后将坐标转换为图块坐标。
create_board现在我们定义了我们的资源,我们需要在启动系统的末尾注册它
// lib.rs
use bounds::Bounds2;
use resources::Board;
use bevy::math::Vec3Swizzles;// ..// We add the main resource of the game, the boardcommands.insert_resource(Board {tile_map,bounds: Bounds2 {position: board_position.xy(),size: board_size,},tile_size,});
// ..现在可Board用于任何系统。
输入系统
我们现在可以创建或第一个常规系统,它将检查每一帧是否有鼠标单击事件。
让我们systems使用文件在板插件中创建一个模块input.rs。
小层次结构回顾:
├── Cargo.lock
├── Cargo.toml
├── assets
├── board_plugin
│    ├── Cargo.toml
│    └── src
│         ├── bounds.rs
│         ├── components
│         │    ├── bomb.rs
│         │    ├── bomb_neighbor.rs
│         │    ├── coordinates.rs
│         │    ├── mod.rs
│         │    ├── uncover.rs
│         ├── lib.rs
│         ├── resources
│         │    ├── board.rs
│         │    ├── board_options.rs
│         │    ├── mod.rs
│         │    ├── tile.rs
│         │    └── tile_map.rs
│         └── systems
│              ├── input.rs
│              └── mod.rs
├── src
│    └── main.rs
不要忘记连接systems模块lib.rs:
mod systems;和input模块systems/mod.rs:
pub mod input;让我们定义我们的输入系统!
// input.rs
use crate::Board;
use bevy::input::{mouse::MouseButtonInput, ElementState};
use bevy::log;
use bevy::prelude::*;pub fn input_handling(windows: Res<Windows>,board: Res<Board>,mut button_evr: EventReader<MouseButtonInput>,
) {let window = windows.get_primary().unwrap();for event in button_evr.iter() {if let ElementState::Pressed = event.state {let position = window.cursor_position();if let Some(pos) = position {log::trace!("Mouse button pressed: {:?} at {}", event.button, pos);let tile_coordinates = board.mouse_position(window, pos);if let Some(coordinates) = tile_coordinates {match event.button {MouseButton::Left => {log::info!("Trying to uncover tile on {}", coordinates);// TODO: generate an event}MouseButton::Right => {log::info!("Trying to mark tile on {}", coordinates);// TODO: generate an event}_ => (),}}}}}
}这个函数是我们的输入系统,它需要三个参数:
- 一种
Windows资源 - 我们自己的
Board资源 MouseButtonInput事件读取器
我们迭代事件读取器来检索每个事件,仅保留Pressed事件。
我们检索鼠标位置并使用我们的Board将鼠标位置转换为图块坐标
,然后根据鼠标按钮记录操作(发现或标记)。
那么如果我们按下其他按钮我们仍然会执行转换吗?
是的,我们可以先检查按钮以进行一些优化,但这会使教程中的代码不太清晰。
我们现在可以在我们的方法中注册我们的系统BoardPlugin::build():
// lib.rs
// ..
//    app.add_startup_system(Self::create_board).add_system(systems::input::input_handling);
// ..
运行应用程序,您现在可以使用窗口上的左键和右键单击按钮,并注意:
- 如果您单击棋盘,它会记录坐标和操作
- 如果您单击板外或使用其他按钮,则不会发生任何情况
7Bevy 扫雷:发现瓷砖