VueRouter路由与Vuex状态管理
前言
随着前端技术的快速发展和前后端分离架构的普及,单页面应用(SPA)已成为现代Web开发的主流。在SPA中,前端路由和状态管理扮演着至关重要的角色。Vue3作为当前流行的前端框架之一,提供了强大的路由(Vue Router)和状态管理(Vuex、Pinia等)解决方案。本章节将深入探讨Vue3中的路由与状态管理,涵盖路由的基本概念、实现原理、搭建与配置、动态与编程式路由、命名路由与视图、路由守卫等关键内容,以及Vuex和Pinia等状态管理库的基本使用、异步处理、计算属性和辅助函数的应用,还包括Vuex-persist数据持久化、模块分割和多状态管理等高级话题。此外,还将探讨在组合式API中如何使用Router和Vuex,并通过一个综合案例来加深理解。
一、路由的基本搭建与嵌套路由模
1、vue路由的搭建
路由在vue中属于第三方插件,需要下载安装后进行使用。
npm i -D vue-router
安装好后,需要对路由进行配置,并且与Vue进行结合,让路由插件生效。在
/src/router/index.js创建配置文件。
import Home  from "@/views/Home.vue";
import Test from "@/views/Test.vue";
import { createRouter,createWebHistory } from "vue-router";const routes=[{path: '/',component:Home},{path: '/test',component: Test}
]// 创建路由实例
const router=createRouter({history:createWebHistory(),routes
})export default router
在
src/main.js使用router。
import { createApp } from 'vue'
import App from './App.vue'
import router from "./router";createApp(App).use(router).mount('#app')
在
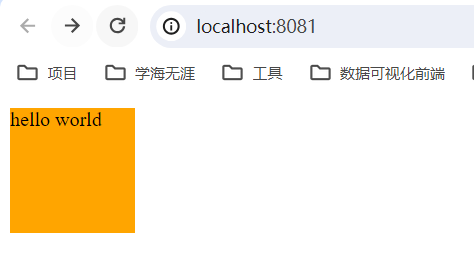
src/views下创建Home页面,定义路由组件。
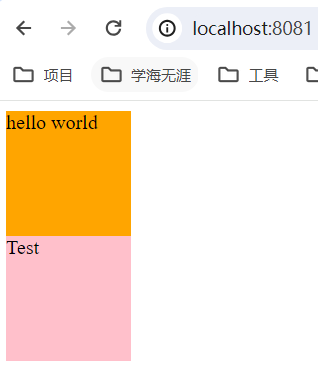
<template><div class="wrapper">hello world</div>
</template><script>
export default {name: 'HomeView',
}
</script>
<style scoped>
.wrapper {width: 100px;height: 100px;background: orange;
}
</style>
在
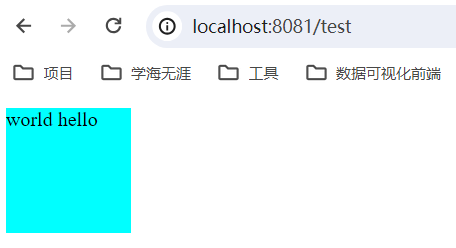
src/views下创建Test页面,定义路由组件。
<template><div class="wrapper">world hello</div>
</template><script>
export default {name: 'TestView',
}
</script>
<style scoped>
.wrapper {width: 100px;height: 100px;background: aqua;
}
</style>
/src/App.vue
<template><div><router-view></router-view></div>
</template><script>
export default {name: 'App'
}
</script>
<style>
</style>
本地开发环境运行项目,通过url切换查看路由页面
npm run serve
切换url
2、路由跳转
修改
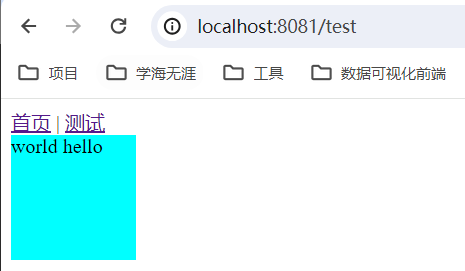
App.vue
<template><div><router-link to="/">首页</router-link> |<router-link to="/test">测试</router-link><router-view></router-view></div>
</template>
<script>
export default {name: 'App'
}
</script>
<style>
</style>
3、嵌套路由模式(二级路由)
在
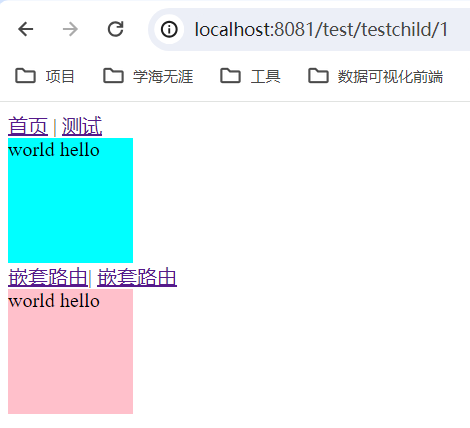
src/views下创建TestChild页面,定义路由组件。
<template><div class="wrapper">这里是test的嵌套路由</div>
</template>
<script>
export default {name: 'TestChild',
}
</script>
<style scoped>
.wrapper {width: 100px;height: 100px;background: pink;
}
</style>
在
src/router下配置test嵌套路由。
import Home  from "@/views/Home.vue";
import Test from "@/views/Test.vue";
import TestChild from "@/views/TestChild.vue";
import { createRouter,createWebHistory } from "vue-router";
const routes=[{path: '/',component:Home},{path: '/test',component: Test,children:[{path:'testchild',component: TestChild}]}
]
const router=createRouter({history:createWebHistory(),routes
})
export default router
在
test.vue中使用嵌套路由
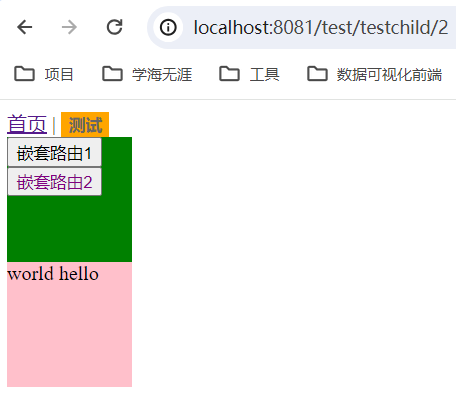
<template><div class="wrapper">world hello</div> <router-link to="/test/testchild">嵌套路由</router-link><div><router-view></router-view></div>
</template>
<script>
export default {name: 'TestView',
}
</script>
<style scoped>
.wrapper {width: 100px;height: 100px;background: aqua;
}
</style>

二、动态路由模式与编程式路由模式
1、动态路由模式
所谓的动态路由其实就是不同的URL可以对应同一个页面,这种动态路由一般URL还是有规律可循的,所以非常适合做类似于详情页的功能。
通常采用path: 'xxx/:id'的方式来实现动态路由。
- 动态路由
TestChilddemo
在
/src/router配置TestChild动态路由
import Home  from "@/views/Home.vue";
import Test from "@/views/Test.vue";
import TestChild from "@/views/TestChild.vue";
import { createRouter,createWebHistory } from "vue-router";
const routes=[{path: '/',component:Home},{path: '/test',component: Test,children:[{path:'testchild/:id',component: TestChild}]}
]
const router=createRouter({history:createWebHistory(),routes
})
export default router
修改
Test.vue
<template><div class="wrapper">world hello</div> <router-link to="/test/testchild/1">嵌套路由</router-link>|<router-link to="/test/testchild/2">嵌套路由</router-link><div><router-view></router-view></div>
</template>
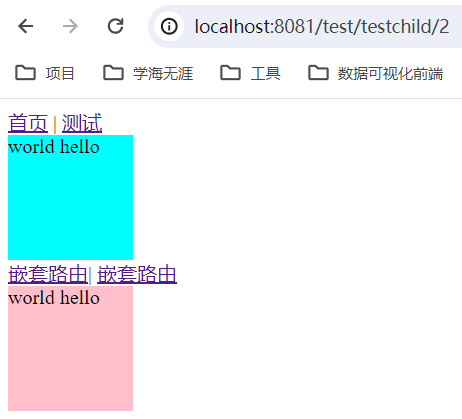
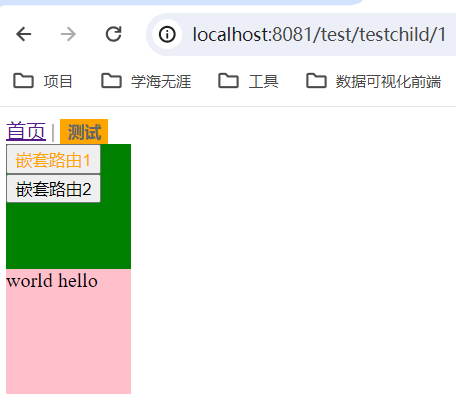
- 获取动态id值
在
TestChild.vue的template中获取动态路由id
{{$route.params.id}}
2、编程式路由(插槽方式)
前面介绍过如何在页面中对路由进行切换,可以采用声明式写法
<router-link>来完成,但是往往这种方式不够灵活,首先不能更灵活的控制结构和样式,其次不能自动进行路由的跳转,必须点击操作才行。那么编程式路由就会在JavaScript中通过逻辑的方式进行路由跳转。
1)、作用域插槽
| 属性 | 作用 |
|---|---|
| href | 这是 <router-link> 组件解析后的目标 URL,可以用它来在 JavaScript 中进行编程式导航 |
| route | 包含了当前路由信息的对象,可以通过它访问路由的路径、参数、查询等。 |
| isActive | 表示<router-link>是否指向当前活跃的路由,to 属性所指定的路由与当前路由匹配(包括子路由) |
| isExactActive | 表示<router-link>是否精确匹配当前活跃的路由(路径),与to属性所指路由完全一致(不包括子路由) |
| navigate | 通常与路由跳转相关,this.$router.push() 或 this.$router.replace() 这样的方法也能实现路由的跳转。 |
2)、 @click.prevent、this.$router.push(href)、this.$router.replace(),
@click监听 DOM 元素的点击事件,.prevent修饰符会调用事件对象的 preventDefault() 方法
preventDefault() 方法阻止元素的默认事件行为,从而确保确保不会有其他潜在的默认行为被意外触发
this.$router.push()会向浏览器的历史记录中添加一个新的记录,因此当用户点击后退按钮时,
他们会返回到使用 push() 方法跳转之前的页面。
this.$router.replace()用于跳转到指定的 URL,但它不会向浏览器的历史记录(history stack)中添加新的记录。
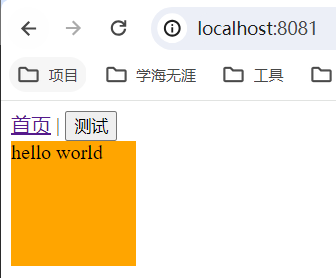
3)、demo案例,
修改
App.vue,使用href, isExactActive ,isActive,href,通过this.$router.push(href)实现路由跳转
<template><div><router-link to="/">首页</router-link> |<router-link to="/test" v-slot="{ href, isActive }"><button :class="{ active: isActive }" @click.prevent="navigateTo(href)">测试</button></router-link><router-view></router-view></div>
</template>
<script>
export default {name: 'App',methods: {navigateTo(href) {this.$router.push(href);}}
}
</script>
<style scoped>
.active {color: #666;background: orange;border: none;/* 活跃的样式 */font-weight: bold;
}
</style>
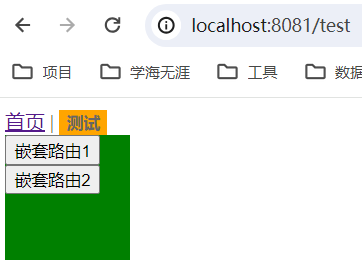
修改
Test.vue,使用navigate与this.$router.push(href)
<template><div class="wrapper"><router-link to="/test/testchild/1" v-slot="{ href, isExactActive }"><button :class="{ 'exact-active1': isExactActive }" @click.prevent="navigateTo(href)">嵌套路由1</button></router-link><router-link to="/test/testchild/2" custom v-slot="{navigate, isExactActive }"><button  @click="navigate" :class="{ 'exact-active2': isExactActive }">嵌套路由2</button></router-link></div><router-view></router-view>
</template>
<script>
export default {name: 'TestView',methods: {navigateTo(href) {this.$router.push(href);}}
}
</script>
<style scoped>
.wrapper {width: 100px;height: 100px;background: green;
}
.exact-active1 {color: orange;
}
.exact-active2 {color: purple;
}
</style>
三、命名路由与命名视图与路由元信息
1、普通命名路由
在路由跳转中,除了path 之外,你还可以为任何路由提供 name 的形式进行路由跳转。
- 没有硬编码的 URL
- params 的自动编码/解码
- 防止你在 url 中出现打字错误
- 绕过路径排序(如显示一个)
修改
src/router,使用name:'test'
import Home  from "@/views/Home.vue";
import Test from "@/views/Test.vue";
import { createRouter,createWebHistory } from "vue-router";
const routes=[{path: '/',component:Home},{path: '/test',component: Test,name:'test'}
]
const router=createRouter({history:createWebHistory(),routes
})
export default router
修改
App.vue,:to="{name:'test'}"
<template><div><router-link to="/">首页</router-link> |<router-link :to="{name:'test'}">测试</router-link><router-view></router-view></div>
</template>
<script>
export default {name: 'App'
}
</script>
<style scoped>
</style>
2、命名路由(携带动态路由id)
修改
src/router里的test路由path
{path: '/test/:id',component: Test,name:'test'
}
修改
App.vue,通过params指定路由idparams:{id:123}
<template><div><router-link to="/">首页</router-link> |<router-link :to="{name:'test',params:{id:123} }">测试</router-link><router-view></router-view></div>
</template>
<script>
export default {name: 'App'
}
</script>
<style scoped>
</style>
3、同级展示多个视图
修改
src/router,使用components将Home和Test放在一起
import Home  from "@/views/Home.vue";
import Test from "@/views/Test.vue";
import { createRouter,createWebHistory } from "vue-router";
const routes=[{path: '/',components: {default: Home,test: Test,},}
]
const router=createRouter({history:createWebHistory(),routes
})
export default router
修改
App.vue,使用router-view渲染视图
<template><div><router-view></router-view><router-view name="test"></router-view></div>
</template>
<script>
export default {name: 'App'
}
</script>
<style scoped>
</style>
修改
Test.vue
<template><div class="wrapper">Test</div>
</template>
<script>
export default {name: 'TestView',
}
</script>
<style scoped>
.wrapper {width: 100px;height: 100px;background: pink;
}
</style>
4、meta属性接受附加信息
修改
src/router,给test路由加上meta属性
import Home  from "@/views/Home.vue";
import Test from "@/views/Test.vue";
import { createRouter,createWebHistory } from "vue-router";
const routes=[{path: '/',component:Home,name: 'home',},{path: '/test',component: Test,name:'test',meta:{auth:true}}
]
const router=createRouter({history:createWebHistory(),routes
})
export default router
在
test.vue中获取打印meta
mounted(){console.log(this.$route.meta.auth,'auth')
}
四、 路由传递参数的多种方式
- query方式(显示) -> $route.query
- params方式(显、隐式) -> $route.params
但是vue-router 从4.1.4版本开始 不再支持params 隐式传参,该传参方式之前一直是不推荐的,因为一旦刷新页面参数就获取不到了。
query:直接在 URL 中作为查询字符串(?id=value)显示
params 是通过路径中的动态段来传递的,而不是查询字符串
query、params传参
修改
src/router
import Home  from "@/views/Home.vue";
import Test from "@/views/Test.vue";
import TestChild1 from "@/views/TestChild1.vue";
import TestChild2 from "@/views/TestChild2.vue";
import { createRouter,createWebHistory } from "vue-router";
const routes=[{path: '/',component:Home,name: 'home',},{path: '/test',component: Test,name:'test',children: [{path: 'testchild1',component: TestChild1,name: 'test1'},{path: 'testchild2/:id',component: TestChild2,name: 'test2'}]}
]
const router=createRouter({history:createWebHistory(),routes
})
export default router
修改
Test.vue
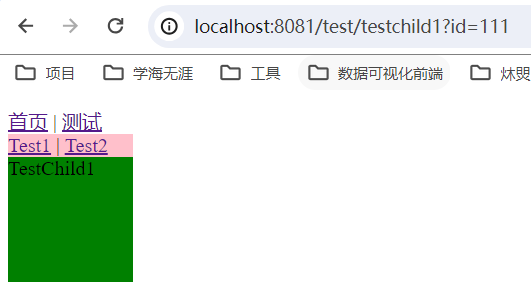
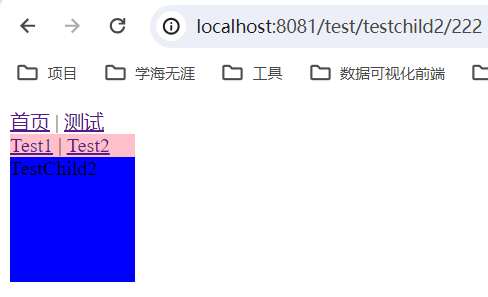
<template><div class="wrapper"><router-link :to="{name:'test1', query: { id: 111 } }">Test1</router-link> |<router-link :to="{name:'test2', params: { id: 222 } }">Test2</router-link> <router-view></router-view></div>
</template>
<script>
export default {name: 'TestView'
}
</script>
<style scoped>
.wrapper {width: 100px;height: 100px;background: pink;
}
</style>
新建
src/views/TestChild1.vue
<template><div class="wrapper">TestChild1</div>
</template>
<script>
export default {name: 'TestChild1',mounted(){console.log(this.$route.query,'query')}
}
</script>
<style scoped>
.wrapper {width: 100px;height: 100px;background: green;
}
</style>
新建
src/views/TestChild2.vue
<template><div class="wrapper">TestChild2</div>
</template>
<script>
export default {name: 'TestChild2',mounted() {console.log(this.$route.params, 'params')}
}
</script>
<style scoped>
.wrapper {width: 100px;height: 100px;background: blue;
}
</style>
五、route对象与router对象
1、route对象是获取路由信息 -> $route.params
| route对象对应属性 | 功能 | 作用 |
|---|---|---|
| fullPath | 完整路径 | 包含了查询参数和 hash 的完整解析后的 URL |
| hash | URL hash 值 | 当前的 URL hash 值 (带 #) |
| href | 解析后的目标 URL | 解析完成后的 URL,等同于 window.location.href |
| matched | 匹配的路由记录数组 | 包含了当前匹配的路由的所有嵌套路径片段的路由记录(数组) |
| meta | 路由元信息 | 包含在路由定义中可以自定义的任意字段,常用于路由元数据的存储 |
| name | 当前路由的名字 | 当前路由的名称(如果有的话) |
| params | 动态段值 | 一个 key/value 对象,包含了动态片段和全匹配片段的键值对 |
| path | 路径 | 字符串,对应当前路由的路径,总是解析为绝对路径,如 “/test” |
| query | 查询参数 | 一个 key/value 对象,包含了 URL 查询参数(没有 ?) |
2、router对象是调用路由方法 -> $router.push()
| router对象对应属性 | 功能 | 作用 |
|---|---|---|
| addRoute | 动态添加路由 | 允许你在运行时向路由映射添加新的路由规则 |
| afterEach | 全局后置守卫 | 在所有路由跳转完成以后调用,不接受任何参数 |
| back | 后退 | 模拟点击浏览器后退按钮,相当于 window.history.back() |
| beforeEach | 全局前置守卫 | 在路由跳转前调用,常用于登录验证、页面加载前的数据处理等 |
| beforeResolve | 全局解析守卫 | 在路由被解析之后调用,但在组件被渲染之前 |
| currentRoute | 当前路由对象 | 一个可以观察的对象,表示当前激活的路由的状态信息 |
| forward | 前进 | 模拟点击浏览器前进按钮,相当于 window.history.forward() |
| getRoutes | 获取路由配置 | 获取路由映射中定义的路由记录数组 |
| go | 前进或后退 | 控制历史记录中前进或后退的步数,相当于 window.history.go(n) |
| hasRoute | 检查路由是否存在 | |
| push | 编程式导航 | 导航到不同的URL,此方法会向 history 栈添加一个新的记录,所以,当用户点击浏览器后退按钮时,则回到之前的 URL |
| removeRoute | 动态删除路由 | 允许你在运行时从路由映射中删除特定的路由规则 |
3、路由守卫详解及应用场景
vue-router 提供的导航守卫主要用来通过跳转或取消的方式守卫导航,守卫主要的作用就是在进入到指定路由前做一个拦截,看一下我们是否具备权限,如果有权限就直接进入,如果没权限就跳转到其他页面。
路由守卫分类一般可以分为三种路由守卫使用的方式:
- 全局环境的守卫
- 路由独享的守卫
- 组件内的守卫
全局环境的守卫,其中
to表示需要进入到哪个路由,from表示从哪个路由离开的,那么next表示跳转到指定的页面。
router.beforeEach((to, from, next)=>{if(to.meta.auth){next('/');}else{next();}
})
路由独享的守卫,只给某一个指定的路由添加守卫
const routes = [{name: 'bar',component: Bar,beforeEnter(to, from, next){if(to.meta.auth){next('/');}else{next();}}}
];
组件内的守卫,可以通过在
.vue文件中进行路由守卫的设置,代码如下:
<script>export default {name: 'FooView',beforeRouteEnter(to, from, next){if(to.meta.auth){next('/');}else{next();}}}
</script>
六、Vuex共享状态
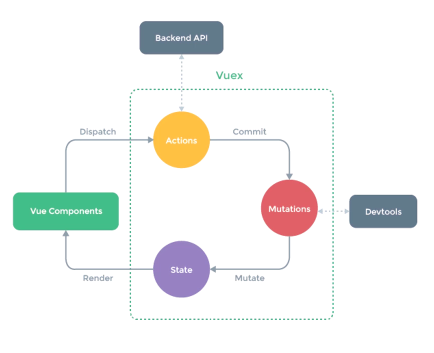
1、Vuex五大核心模块
| 模块名称 | 描述 | 功能与特性 |
|---|---|---|
| state | 状态管理 | 用来存放应用的状态(数据,类似于Vue组件中的data属性,是响应式的,当状态改变时,视图会自动更新 |
| getters | 计算属性 | 可以获取state中的状态并进行计算后返回,类似于Vue组件中的computed属性, 可以用于对状态进行复杂处理,返回处理后的结果 |
| mutations | 同步状态更新 | 唯一可以修改state的方法,必须是同步函数,用于处理同步事务, 提交时,可以使用commit方法 |
| actions | 异步操作 | 可以包含任意异步操作,通过提交mutations来改变state,可以包含任意异步操作,如API请求, 提交时,可以使用dispatch方法 |
| modules | 模块化开发 | 将单一状态树分割成多个模块,每个模块拥有自己的state、mutations、actions、getters, 使得代码更加清晰,便于维护, 可以使用modules属性将多个模块合并成一个单一的Vuex store |
- 安装
vuex
npm i -D vuex
2、使用state模块,状态管理
用来存放应用的状态(数据,类似于Vue组件中的data属性,是响应式的,当状态改变时,视图会自动更新
常见的state属性状态管理对象
| 属性名 | 类型 | 初始值 | 描述 |
|---|---|---|---|
| count | number | 0 | 计数器的当前值,用于示例 |
| userInfo | Object | { name: ‘’, email: ‘’ } | 用户信息对象,包含姓名和电子邮件 |
| isLoggedIn | boolean | 0 | 表示用户是否已登录的标志 |
| cartItems | Array | [] | 购物车中的商品列表 |
| selectedCategory | string | all | 当前选中的商品分类(例如:‘all’, ‘electronics’, 'books’等) |
- 新建
src/store/index.js
import { createStore } from "vuex";
const store=createStore({state:{count:0}
});
export default store
- 在
src/main.js中引入store
import { createApp } from 'vue'
import App from './App.vue'
import router from "./router"
import store from "./store"
createApp(App).use(router).use(store).mount('#app')
- 在
.vue文件中使用store,如Home.vue
<template><div>{{ $store.state.count }}</div>
</template>
<script>
export default {name: 'HomeView'
}
</script>
<style scoped>
</style>
3、使用getters模块,计算属性
可以获取state中的状态并进行计算后返回,类似于Vue组件中的computed属性, 可以用于对状态进行复杂处理,返回处理后的结果
- 修改
src/store/index.js
import { createStore } from "vuex";
const store=createStore({state: {users: [{ id: 1, name: 'A', isActive: true },{ id: 2, name: 'B', isActive: false },{ id: 3, name: 'C', isActive: true },]},getters: {activeUsersCount: state => {return state.users.filter(user => user.isActive).length;}}
});
export default store
- 修改
Home.vue
<template><div class="wrapper"><p>活跃用户数量: {{ activeUsersCount }}</p><!-- <p>活跃用户数量: {{ $store.getters.activeUsersCount }}</p> --></div>
</template>
<script>
export default {name: 'HomeView',computed: {activeUsersCount() {return this.$store.getters.activeUsersCount;}}
}
</script>
<style scoped>
.wrapper {width: 100px;height: 100px;background: orange;
}
</style>
- 修改
Test.vue,注释count使用
//{{ $store.state.countModule.count }}
4、使用mutations模块,同步状态更新
唯一可以修改state的方法,必须是同步函数,用于处理同步事务, 提交时,可以使用commit方法
- 修改
src/store/index.js
import { createStore } from "vuex";
const store=createStore({state:{count:0},mutations: {plus(state){state.count++}}
});
export default store
- 修改
Home.vue
<template><div class="wrapper">{{ $store.state.count }}<button @click="handleClick">点击</button></div>
</template>
<script>
export default {name: 'HomeView',methods:{handleClick(){// this.$store.state.count++this.$store.commit('plus')}}
}
</script>
<style scoped>
.wrapper {width: 100px;height: 100px;background: orange;
}
</style>
- 修改
Test.vue
<template><div class="wrapper">{{ $store.state.count }}</div>
</template>
<script>
export default {name: 'TestView'
}
</script>
<style scoped>
.wrapper {width: 100px;height: 100px;background: pink;
}
</style>
5、使用actions模块,异步操作
异步操作|可以包含任意异步操作,通过提交mutations来改变state,可以包含任意异步操作,如API请求, 提交时,可以使用dispatch方法
- 修改
src/store/index.js
import { createStore } from "vuex";
const store=createStore({state:{count:0},mutations: {plus(state, payload){state.count++console.log(payload,'mutations-payload')}},actions: {update(context,payload){setTimeout(()=>{console.log(payload,'actions-payload')context.commit('plus', payload)})}}
});
export default store
- 修改
Home.vue
<template><div class="wrapper">{{ $store.state.count }}<button @click="handleClick">点击</button></div>
</template>
<script>
export default {name: 'HomeView',methods:{handleClick(){const num=999this.$store.dispatch('update',num)}}
}
</script>
<style scoped>
.wrapper {width: 100px;height: 100px;background: orange;
}
</style>
6、使用modules模块,模块化开发
将单一状态树分割成多个模块,每个模块拥有自己的state、mutations、actions、getters, 使得代码更加清晰,便于维护, 可以使用modules属性将多个模块合并成一个单一的Vuex store
- 新建
src/store/modules/index.js
const state = {count: 0
}
const getters={}
const actions={}
const mutations={plus(state) {state.count++}
}
export default {namespaced:true,state,getters,actions,mutations
}
- 修改
src/store/index.js,使用modules:{countModule }加载单个countModule模块
import { createStore } from "vuex"
import countModule from "./modules/index"
const store = new createStore({state: {},getters :{},mutations: {},actions: { },modules:{countModule}
})
export default store
- 修改
Home.vue,还是通过this.$store.commit('plus')或者this.$store.commit('countMoudlues/plus')调用mutations模块里的plus方法
<template><div class="wrapper">{{ $store.state.countModule.count }}<button @click="handleClick">点击</button></div>
</template>
<script>
export default {name: 'HomeView',methods: {handleClick() {this.$store.commit('countMoudlues/plus')}}
}
</script>
<style scoped>
.wrapper {width: 100px;height: 100px;background: orange;
}
</style>
- 修改
Test.vue,通过{{ $store.state.countModule.count }}获取count
<template><div class="wrapper">{{ $store.state.countModule.count }}</div>
</template>
<script>
export default {name: 'TestView'
}
</script>
<style scoped>
.wrapper {width: 100px;height: 100px;background: pink;
}
</style>
7、vuex的辅助函数
Vuex 提供了一些辅助函数(helper functions)来帮助我们更方便地在 Vue 组件中使用 Vuex 的状态(state)、getters、mutations 和 actions。这些辅助函数通常在结合 Vue 的 mapState、mapGetters、mapMutations 和 mapActions 一起使用时非常有用。
- 修改
home.vue,@click="plus()"中plus可以传递参数
<template><div class="wrapper">{{ count }}<button @click="plus()">点击</button></div>
</template>
<script>
import { mapState, mapMutations } from 'vuex'
export default {name: 'HomeView',methods: {...mapMutations('countModule', ['plus'])}, computed: {// 使用对象展开运算符将 `mapState` 的结果混入 computed 对象中// ...mapState(['count'])//如果是使用的countModule模块,则使用...mapState('countModule', ['count'])}
}
</script>
<style scoped>
.wrapper {width: 100px;height: 100px;background: orange;
}
</style>
8、Vuex-presist对数据进行持久化处理
Vuex-presist文档
将Vuex的状态持久化到本地存储(如localStorage或sessionStorage),以便在页面刷新或重新加载时能够恢复状态。这对于需要长期存储的数据(如用户信息、令牌等)特别有用。
- 安装插件,使用上一节的
mutations的模块案例扩展使用Vuex-presist
npm i -D vuex-persist
- 修改
src/store/index.js
import { createStore } from "vuex"
import VuexPersistence from 'vuex-persist'
const vuexLocal = new VuexPersistence({//默认存储window下的localStoragestorage: window.localStorage,// 单一存储对象,一般会存储,state中的user和token属性// reducer: (state)=>({count:state.count})
})
const store = new createStore({state: {count: 0},mutations: {plus(state) {state.count++}},actions: { },plugins: [vuexLocal.plugin]
})
export default store
- 修改
Home.vue
<template><div class="wrapper">{{ $store.state.count }}<button @click="handleClick">点击</button></div>
</template>
<script>
export default {name: 'HomeView',methods: {handleClick() {// this.$store.state.count++this.$store.commit('plus')}}
}
</script>
<style scoped>
.wrapper {width: 100px;height: 100px;background: orange;
}
</style>
七、使用组合式api获取router。router,vuex对象
在 Vue 3 中,随着 Composition API 的引入,我们使用新的逻辑组合和重用来编写我们的 Vue 组件。
import { useRoute,useRouter,useStore } from 'vue-router';
export default {setup() {const route = useRoute();const router = useRouter();const store = useStore();console.log(route,'route)console.log(router,'router)console.log(store,'store)}
};
的localStoragestorage: window.localStorage,// 单一存储对象,一般会存储,state中的user和token属性// reducer: (state)=>({count:state.count})
})
const store = new createStore({state: {count: 0},mutations: {plus(state) {state.count++}},actions: { },plugins: [vuexLocal.plugin]
})
export default store
- 修改
Home.vue
<template><div class="wrapper">{{ $store.state.count }}<button @click="handleClick">点击</button></div>
</template>
<script>
export default {name: 'HomeView',methods: {handleClick() {// this.$store.state.count++this.$store.commit('plus')}}
}
</script>
<style scoped>
.wrapper {width: 100px;height: 100px;background: orange;
}
</style>
七、使用组合式api获取router。router,vuex对象
在 Vue 3 中,随着 Composition API 的引入,我们使用新的逻辑组合和重用来编写我们的 Vue 组件。
import { useRoute,useRouter,useStore } from 'vue-router';
export default {setup() {const route = useRoute();const router = useRouter();const store = useStore();console.log(route,'route)console.log(router,'router)console.log(store,'store)}
};