09-03 周二 ansible部署与使用指南
| 时间 | 版本 | 修改人 | 描述 |
|---|---|---|---|
| 2024年9月3日10:08:58 | V0.1 | 宋全恒 | 新建文档, |
| 2024年9月4日13:57:25 | v0.2 | 宋全恒 | 调整结构,添加ansible-playbook和ansible-inventory |
简介
首先要找一个跳板机,来确保所有的机器都可以访问。然后我们围绕ansible来搭建环境,方便一键执行所有的命令,主要的任务是将这10个节点均挂载NAS服务器,添加我们的harbor服务器,
ansible介绍
ansible/ansible at v2.17.3是一个自动化的管理工具,可以管理多个节点,实现诸如命令执行,自动挂载,文件拷贝等命令。非常的方便管理集群的场景。
常用的模块如下所示:
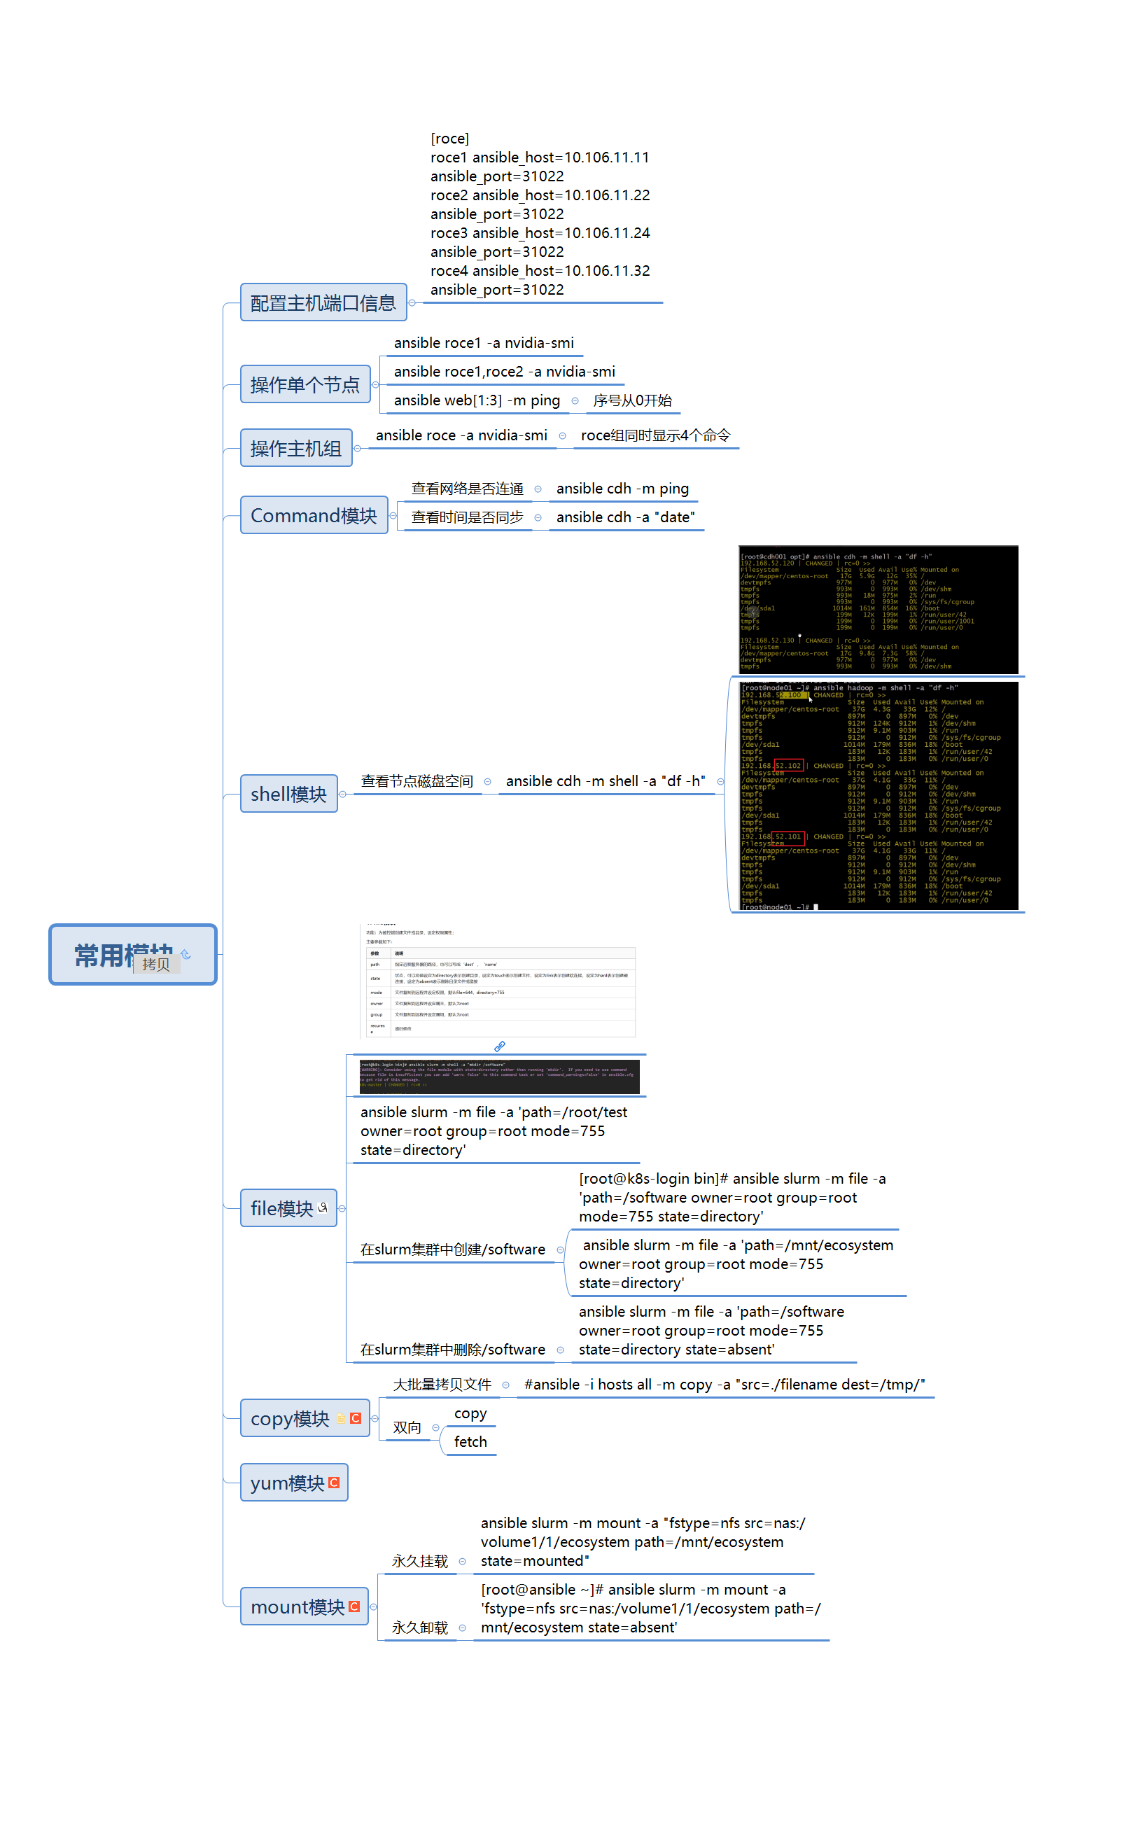
ansible提供了大量的模块Ansible 提供了大量的模块来完成各种自动化任务。
- command 在目标主机上执行任意命令。
- shell 在目标主机上执行 shell 命令
- copy 将本地文件复制到目标主机。
- ansible -m copy -a “src= dest=”
- template 从模板文件生成文件。模板文件使用 Jinja2 模板语言。
- file 管理文件和目录的属性,如权限、所有者等。
- user 管理用户账户。
- ansible -m user -a “name= state=”
- group 管理用户组。
- ansible -m group -a “name= state=”
- service
- ansible -m service -a “name= state=”
- apt 管理 Debian 和 Ubuntu 系统上的包。
- ansible -m apt -a “name= state=”
- yum 管理 Red Hat 和 CentOS 系统上的包
- ansible -m yum -a “name= state=”
- docker_container 管理 Docker 容器。
- ansible -m docker_container -a “name=<container_name> image= state=”
- docker_image 管理 Docker 镜像。
- ansible -m docker_image -a “name=<image_name> state=”
- git 管理 Git 仓库。
- ansible -m git -a “repo=<repo_url> dest=”
- cron 管理定时任务
- ansible -m cron -a "name= minute= hour= job=
- lineinfile
- ansible -m lineinfile -a “path= line=
state=”
- ansible -m lineinfile -a “path= line=
这些模块涵盖了 Ansible 自动化操作的广泛需求,包括文件管理、服务管理、包管理、用户和组管理等。通过使用这些模块,你可以实现灵活的自动化操作,从而提高系统管理的效率。
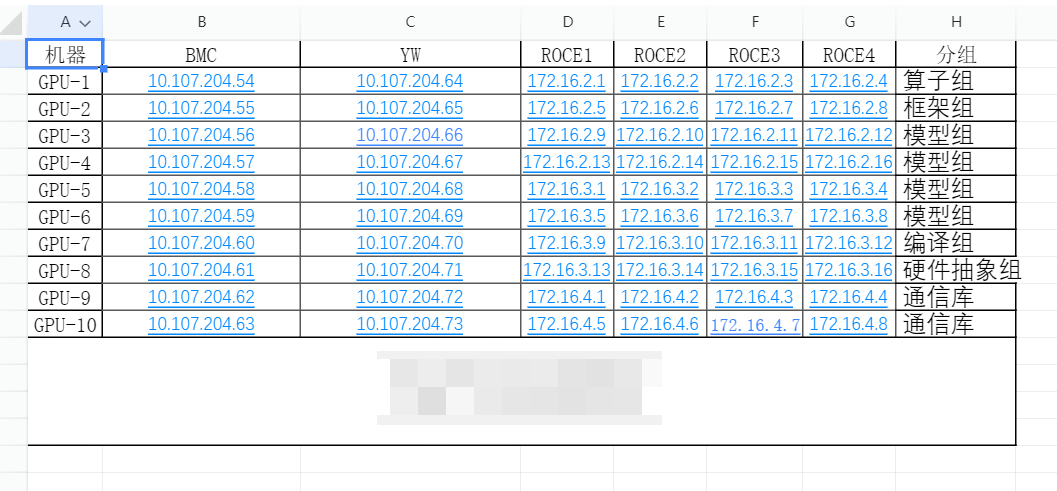
10GPU信息
批量执行
for ip in $(seq 64 73); do ssh root@10.107.204.$ip "systemctl restart docker"; done
结果
经过设置,在42服务器上使用yuzailiang用户创建了conda虚拟环境,ansible,激活该环境,可实现对于GPU节点的批量操作
部署步骤
创建conda环境,安装ansible
(ansible) yuzailiang@ubuntu:~$ cat update_harbor.yml
---
- name: Update Docker daemon configuration and ensure valid JSONhosts: gpusbecome: yestasks:- name: Install Python if not installedansible.builtin.package:name: python3state: present- name: Ensure /etc/docker/daemon.json existsansible.builtin.file:path: /etc/docker/daemon.jsonstate: touch- name: Read existing daemon.jsonansible.builtin.slurp:path: /etc/docker/daemon.jsonregister: daemon_json_content- name: Decode JSONansible.builtin.set_fact:daemon_json: "{{ daemon_json_content['content'] | b64decode | from_json }}"- name: Ensure insecure-registries contains the new registryansible.builtin.set_fact:updated_daemon_json: >-{{daemon_json | combine({'insecure-registries': (daemon_json['insecure-registries'] | default([])) + ['10.200.88.53']})}}- name: Write updated daemon.jsonansible.builtin.copy:dest: /etc/docker/daemon.jsoncontent: "{{ updated_daemon_json | to_nice_json }}"backup: yesmode: '0644'- name: Validate JSON syntaxansible.builtin.command:cmd: 'python3 -m json.tool /etc/docker/daemon.json'register: validation_resultfailed_when: validation_result.rc != 0ignore_errors: yes- name: Print validation resultansible.builtin.debug:msg: "JSON validation result: {{ validation_result.stdout }}"- name: Restart Docker serviceansible.builtin.service:name: dockerstate: restarted- name: Log in to Docker registryansible.builtin.command:cmd: docker login 10.200.88.53 --username dros_admin --password 'Dros@zjgxn&07101604'ignore_errors: yes
配置ansible
新建inventory节点清单
[operator]
10.107.204.64[framework]
10.107.204.65[model]
10.107.204.66
10.107.204.67
10.107.204.68
10.107.204.69[compile]
10.107.204.70[abstract]
10.107.204.71[communication]
10.107.204.72
10.107.204.73# New group that includes all the groups
[gpus:children]
operator
framework
model
compile
abstract
communication
我们可以进一步的为这些IP起别名,方便我们操作
(ansible) yuzailiang@ubuntu:~$ sudo vim /etc/ansible/hosts 10.107.204.65[model]
10.107.204.66
10.107.204.67
10.107.204.68
10.107.204.69[compile]
10.107.204.70[hardware]
10.107.204.71[communication]
10.107.204.72
10.107.204.73# New group that includes all the groups
[gpus:children]
operator
framework
model
compile
hardware
communication# Aliases for all nodes
[gpus]
gpu1 ansible_host=10.107.204.64
gpu2 ansible_host=10.107.204.65
gpu3 ansible_host=10.107.204.66
gpu4 ansible_host=10.107.204.67
gpu5 ansible_host=10.107.204.68
gpu6 ansible_host=10.107.204.69
gpu7 ansible_host=10.107.204.70
gpu8 ansible_host=10.107.204.71
gpu9 ansible_host=10.107.204.72
gpu10 ansible_host=10.107.204.73
拷贝公钥,免密配置
(ansible) yuzailiang@ubuntu:~/Shell$ bash copy_pub.sh
正在将公钥复制到 root@10.107.204.64...
/usr/bin/ssh-copy-id: INFO: Source of key(s) to be installed: "/home/yuzailiang/.ssh/id_rsa.pub"
/usr/bin/ssh-copy-id: INFO: attempting to log in with the new key(s), to filter out any that are already installed
/usr/bin/ssh-copy-id: INFO: 1 key(s) remain to be installed -- if you are prompted now it is to install the new keysNumber of key(s) added: 1Now try logging into the machine, with:   "ssh -o 'StrictHostKeyChecking=no' 'root@10.107.204.64'"
and check to make sure that only the key(s) you wanted were added.成功将公钥复制到 10.107.204.64
正在将公钥复制到 root@10.107.204.65...
/usr/bin/ssh-copy-id: INFO: Source of key(s) to be installed: "/home/yuzailiang/.ssh/id_rsa.pub"
/usr/bin/ssh-copy-id: INFO: attempting to log in with the new key(s), to filter out any that are already installed
/usr/bin/ssh-copy-id: INFO: 1 key(s) remain to be installed -- if you are prompted now it is to install the new keysNumber of key(s) added: 1Now try logging into the machine, with:   "ssh -o 'StrictHostKeyChecking=no' 'root@10.107.204.65'"
and check to make sure that only the key(s) you wanted were added.成功将公钥复制到 10.107.204.65
正在将公钥复制到 root@10.107.204.66...
/usr/bin/ssh-copy-id: INFO: Source of key(s) to be installed: "/home/yuzailiang/.ssh/id_rsa.pub"
/usr/bin/ssh-copy-id: INFO: attempting to log in with the new key(s), to filter out any that are already installed/usr/bin/ssh-copy-id: WARNING: All keys were skipped because they already exist on the remote system.(if you think this is a mistake, you may want to use -f option)成功将公钥复制到 10.107.204.66
正在将公钥复制到 root@10.107.204.67...
/usr/bin/ssh-copy-id: INFO: Source of key(s) to be installed: "/home/yuzailiang/.ssh/id_rsa.pub"
/usr/bin/ssh-copy-id: INFO: attempting to log in with the new key(s), to filter out any that are already installed
/usr/bin/ssh-copy-id: INFO: 1 key(s) remain to be installed -- if you are prompted now it is to install the new keysNumber of key(s) added: 1Now try logging into the machine, with:   "ssh -o 'StrictHostKeyChecking=no' 'root@10.107.204.67'"
and check to make sure that only the key(s) you wanted were added.成功将公钥复制到 10.107.204.67
正在将公钥复制到 root@10.107.204.68...
/usr/bin/ssh-copy-id: INFO: Source of key(s) to be installed: "/home/yuzailiang/.ssh/id_rsa.pub"
/usr/bin/ssh-copy-id: INFO: attempting to log in with the new key(s), to filter out any that are already installed
/usr/bin/ssh-copy-id: INFO: 1 key(s) remain to be installed -- if you are prompted now it is to install the new keysNumber of key(s) added: 1Now try logging into the machine, with:   "ssh -o 'StrictHostKeyChecking=no' 'root@10.107.204.68'"
and check to make sure that only the key(s) you wanted were added.成功将公钥复制到 10.107.204.68
正在将公钥复制到 root@10.107.204.69...
/usr/bin/ssh-copy-id: INFO: Source of key(s) to be installed: "/home/yuzailiang/.ssh/id_rsa.pub"
/usr/bin/ssh-copy-id: INFO: attempting to log in with the new key(s), to filter out any that are already installed
/usr/bin/ssh-copy-id: INFO: 1 key(s) remain to be installed -- if you are prompted now it is to install the new keysNumber of key(s) added: 1Now try logging into the machine, with:   "ssh -o 'StrictHostKeyChecking=no' 'root@10.107.204.69'"
and check to make sure that only the key(s) you wanted were added.成功将公钥复制到 10.107.204.69
正在将公钥复制到 root@10.107.204.70...
/usr/bin/ssh-copy-id: INFO: Source of key(s) to be installed: "/home/yuzailiang/.ssh/id_rsa.pub"
/usr/bin/ssh-copy-id: INFO: attempting to log in with the new key(s), to filter out any that are already installed
/usr/bin/ssh-copy-id: INFO: 1 key(s) remain to be installed -- if you are prompted now it is to install the new keysNumber of key(s) added: 1Now try logging into the machine, with:   "ssh -o 'StrictHostKeyChecking=no' 'root@10.107.204.70'"
and check to make sure that only the key(s) you wanted were added.成功将公钥复制到 10.107.204.70
正在将公钥复制到 root@10.107.204.71...
/usr/bin/ssh-copy-id: INFO: Source of key(s) to be installed: "/home/yuzailiang/.ssh/id_rsa.pub"
进一步的,可以优化这个脚本,方便复用
(ansible) yuzailiang@ubuntu:~/Shell$ cat copy_pub.sh
#!/bin/bash# 参数检查
if [ $# -ne 3 ]; thenecho "使用方法: $0 <基础IP> <起始IP> <终止IP>"echo "示例: $0 10.107.204 72 73"exit 1
fi# 获取参数
BASE_IP="$1."
START_IP=$2
END_IP=$3# SSH用户
USER="root"# SSH密码
PASSWORD="qsgctys@05980"# 公钥路径
PUB_KEY_PATH="$HOME/.ssh/id_rsa.pub"# 检查sshpass是否安装
if ! command -v sshpass &> /dev/null; thenecho "sshpass未安装,请先安装它。"exit 1
fi# 检查公钥是否存在
if [ ! -f "$PUB_KEY_PATH" ]; thenecho "SSH公钥未找到,请生成公钥或指定正确的路径。"exit 1
fi# 循环遍历IP范围并复制公钥
for i in $(seq $START_IP $END_IP); doFULL_IP="$BASE_IP$i"echo "正在将公钥复制到 $USER@$FULL_IP..."# 使用sshpass传递密码并复制公钥sshpass -p "$PASSWORD" ssh-copy-id -i "$PUB_KEY_PATH" -o StrictHostKeyChecking=no "$USER@$FULL_IP"if [ $? -eq 0 ]; thenecho "成功将公钥复制到 $FULL_IP"elseecho "无法连接到 $FULL_IP,跳过..."fi
doneecho "所有操作完成。"
配置远端用户/etc/ansible/ansible.cfg
由于在本机的用户为yuzailiang,而远端操作机器的用户为root,因此我们需要关联私钥和用户。配置
(ansible) yuzailiang@ubuntu:~/Shell$ sudo cat /etc/ansible/ansible.cfg
[defaults]
remote_user = root
private_key_file = ~/.ssh/id_rsa
interpreter_python = auto 最后interpreter_python = auto是为了抑制警告。
因此,在使用ansible环境时,需要使用42服务器,使用yuzailiang用户登录,激活环境ansible,然后就能愉快的操作这些节点组了。
使用ansible
使用playbook编辑hosts
新建play-bok剧本文件
(ansible) yuzailiang@ubuntu:~$ cat update_hosts.yml
---
- name: Ensure /etc/hosts contains NAS entryhosts: gpus # 指定目标组名become: yes # 提升权限以编辑 /etc/hoststasks:- name: Check if /etc/hosts contains NAS entryansible.builtin.lineinfile:path: /etc/hostsline: "10.15.35.70 NAS"state: presentbackup: yes # 可选,备份文件tags: hosts(ansible) yuzailiang@ubuntu:~$ ansible-playbook update_hosts.yml -l modelPLAY [Ensure /etc/hosts contains NAS entry] **********************************************************************************************************************************************************************TASK [Gathering Facts] *******************************************************************************************************************************************************************************************
[WARNING]: Platform linux on host 10.107.204.67 is using the discovered Python interpreter at /usr/bin/python3.8, but future installation of another Python interpreter could change the meaning of that path.
See https://docs.ansible.com/ansible-core/2.17/reference_appendices/interpreter_discovery.html for more information.
ok: [10.107.204.67]
[WARNING]: Platform linux on host 10.107.204.69 is using the discovered Python interpreter at /usr/bin/python3.8, but future installation of another Python interpreter could change the meaning of that path.
See https://docs.ansible.com/ansible-core/2.17/reference_appendices/interpreter_discovery.html for more information.
ok: [10.107.204.69]
[WARNING]: Platform linux on host 10.107.204.68 is using the discovered Python interpreter at /usr/bin/python3.8, but future installation of another Python interpreter could change the meaning of that path.
See https://docs.ansible.com/ansible-core/2.17/reference_appendices/interpreter_discovery.html for more information.
ok: [10.107.204.68]
[WARNING]: Platform linux on host 10.107.204.66 is using the discovered Python interpreter at /usr/bin/python3.8, but future installation of another Python interpreter could change the meaning of that path.
See https://docs.ansible.com/ansible-core/2.17/reference_appendices/interpreter_discovery.html for more information.
ok: [10.107.204.66]TASK [Check if /etc/hosts contains NAS entry] ********************************************************************************************************************************************************************
changed: [10.107.204.67]
changed: [10.107.204.66]
changed: [10.107.204.68]
changed: [10.107.204.69]PLAY RECAP *******************************************************************************************************************************************************************************************************
10.107.204.66 : ok=2 changed=1 unreachable=0 failed=0 skipped=0 rescued=0 ignored=0
10.107.204.67 : ok=2 changed=1 unreachable=0 failed=0 skipped=0 rescued=0 ignored=0
10.107.204.68 : ok=2 changed=1 unreachable=0 failed=0 skipped=0 rescued=0 ignored=0
10.107.204.69 : ok=2 changed=1 unreachable=0 failed=0 skipped=0 rescued=0 ignored=0 挂载NAS
新建剧本ensure_mounts.yml
(ansible) yuzailiang@ubuntu:~$ cat ensure_mounts.yml
---
- name: Ensure directories and mounts are configuredhosts: all  # 或者指定特定的组,如 'gpus'become: yes  # 提升权限以创建目录、编辑 /etc/fstab 和执行挂载操作tasks:- name: Ensure directories existansible.builtin.file:path: "{{ item }}"state: directorymode: '0755'loop:- /mnt/nas_v1- /mnt/nas_v2- /mnt/self-define- name: Ensure fstab contains necessary entriesansible.builtin.lineinfile:path: /etc/fstabline: "{{ item }}"state: presentbackup: yes  # 可选,备份文件loop:- "nas:/volume1/1 /mnt/nas_v1 nfs defaults 0 0"- "nas:/volume1/1/self-define /mnt/self-define nfs defaults 0 0"- "nas:/volume2/2 /mnt/nas_v2 nfs defaults 0 0"- name: Ensure all filesystems are mountedansible.builtin.mount:path: "{{ item.path }}"src: "{{ item.src }}"fstype: "{{ item.fstype }}"opts: "{{ item.opts }}"state: mountedloop:- { path: "/mnt/nas_v1", src: "nas:/volume1/1", fstype: "nfs", opts: "defaults" }- { path: "/mnt/self-define", src: "nas:/volume1/1/self-define", fstype: "nfs", opts: "defaults" }- { path: "/mnt/nas_v2", src: "nas:/volume2/2", fstype: "nfs", opts: "defaults" }
执行命令
执行上述剧本,创建目录,更新/etc/fstab 并且执行挂载
(ansible) yuzailiang@ubuntu:~$ ansible-playbook ensure_mounts.yml -l gpusPLAY [Ensure directories and mounts are configured] **************************************************************************************************************************************************************TASK [Gathering Facts] *******************************************************************************************************************************************************************************************
[WARNING]: Platform linux on host 10.107.204.67 is using the discovered Python interpreter at /usr/bin/python3.8, but future installation of another Python interpreter could change the meaning of that path.
See https://docs.ansible.com/ansible-core/2.17/reference_appendices/interpreter_discovery.html for more information.
ok: [10.107.204.67]
[WARNING]: Platform linux on host 10.107.204.68 is using the discovered Python interpreter at /usr/bin/python3.8, but future installation of another Python interpreter could change the meaning of that path.
See https://docs.ansible.com/ansible-core/2.17/reference_appendices/interpreter_discovery.html for more information.
ok: [10.107.204.68]
[WARNING]: Platform linux on host 10.107.204.64 is using the discovered Python interpreter at /usr/bin/python3.8, but future installation of another Python interpreter could change the meaning of that path.
See https://docs.ansible.com/ansible-core/2.17/reference_appendices/interpreter_discovery.html for more information.
ok: [10.107.204.64]
[WARNING]: Platform linux on host 10.107.204.65 is using the discovered Python interpreter at /usr/bin/python3.8, but future installation of another Python interpreter could change the meaning of that path.
See https://docs.ansible.com/ansible-core/2.17/reference_appendices/interpreter_discovery.html for more information.
ok: [10.107.204.65]
[WARNING]: Platform linux on host 10.107.204.66 is using the discovered Python interpreter at /usr/bin/python3.8, but future installation of another Python interpreter could change the meaning of that path.
See https://docs.ansible.com/ansible-core/2.17/reference_appendices/interpreter_discovery.html for more information.
ok: [10.107.204.66]
[WARNING]: Platform linux on host 10.107.204.69 is using the discovered Python interpreter at /usr/bin/python3.8, but future installation of another Python interpreter could change the meaning of that path.
See https://docs.ansible.com/ansible-core/2.17/reference_appendices/interpreter_discovery.html for more information.
ok: [10.107.204.69]
[WARNING]: Platform linux on host 10.107.204.72 is using the discovered Python interpreter at /usr/bin/python3.8, but future installation of another Python interpreter could change the meaning of that path.
See https://docs.ansible.com/ansible-core/2.17/reference_appendices/interpreter_discovery.html for more information.
ok: [10.107.204.72]
[WARNING]: Platform linux on host 10.107.204.70 is using the discovered Python interpreter at /usr/bin/python3.8, but future installation of another Python interpreter could change the meaning of that path.
See https://docs.ansible.com/ansible-core/2.17/reference_appendices/interpreter_discovery.html for more information.
ok: [10.107.204.70]
[WARNING]: Platform linux on host 10.107.204.73 is using the discovered Python interpreter at /usr/bin/python3.8, but future installation of another Python interpreter could change the meaning of that path.
See https://docs.ansible.com/ansible-core/2.17/reference_appendices/interpreter_discovery.html for more information.
ok: [10.107.204.73]
fatal: [10.107.204.71]: UNREACHABLE! => {"changed": false, "msg": "Failed to connect to the host via ssh: ssh: connect to host 10.107.204.71 port 22: Connection timed out", "unreachable": true}TASK [Ensure directories exist] **********************************************************************************************************************************************************************************
ok: [10.107.204.68] => (item=/mnt/nas_v1)
ok: [10.107.204.65] => (item=/mnt/nas_v1)
changed: [10.107.204.66] => (item=/mnt/nas_v1)
ok: [10.107.204.64] => (item=/mnt/nas_v1)
ok: [10.107.204.67] => (item=/mnt/nas_v1)
ok: [10.107.204.68] => (item=/mnt/nas_v2)
ok: [10.107.204.65] => (item=/mnt/nas_v2)
changed: [10.107.204.66] => (item=/mnt/nas_v2)
ok: [10.107.204.67] => (item=/mnt/nas_v2)
ok: [10.107.204.64] => (item=/mnt/nas_v2)
ok: [10.107.204.68] => (item=/mnt/self-define)
ok: [10.107.204.65] => (item=/mnt/self-define)
ok: [10.107.204.64] => (item=/mnt/self-define)
ok: [10.107.204.67] => (item=/mnt/self-define)
ok: [10.107.204.66] => (item=/mnt/self-define)
ok: [10.107.204.69] => (item=/mnt/nas_v1)
ok: [10.107.204.70] => (item=/mnt/nas_v1)
ok: [10.107.204.73] => (item=/mnt/nas_v1)
ok: [10.107.204.72] => (item=/mnt/nas_v1)
ok: [10.107.204.69] => (item=/mnt/nas_v2)
ok: [10.107.204.70] => (item=/mnt/nas_v2)
ok: [10.107.204.72] => (item=/mnt/nas_v2)
ok: [10.107.204.73] => (item=/mnt/nas_v2)
ok: [10.107.204.69] => (item=/mnt/self-define)
ok: [10.107.204.70] => (item=/mnt/self-define)
ok: [10.107.204.72] => (item=/mnt/self-define)
ok: [10.107.204.73] => (item=/mnt/self-define)TASK [Ensure fstab contains necessary entries] *******************************************************************************************************************************************************************
ok: [10.107.204.64] => (item=nas:/volume1/1 /mnt/nas_v1 nfs defaults 0 0)
ok: [10.107.204.67] => (item=nas:/volume1/1 /mnt/nas_v1 nfs defaults 0 0)
ok: [10.107.204.68] => (item=nas:/volume1/1 /mnt/nas_v1 nfs defaults 0 0)
ok: [10.107.204.66] => (item=nas:/volume1/1 /mnt/nas_v1 nfs defaults 0 0)
ok: [10.107.204.65] => (item=nas:/volume1/1 /mnt/nas_v1 nfs defaults 0 0)
ok: [10.107.204.64] => (item=nas:/volume1/1/self-define /mnt/self-define nfs defaults 0 0)
ok: [10.107.204.67] => (item=nas:/volume1/1/self-define /mnt/self-define nfs defaults 0 0)
ok: [10.107.204.66] => (item=nas:/volume1/1/self-define /mnt/self-define nfs defaults 0 0)
ok: [10.107.204.65] => (item=nas:/volume1/1/self-define /mnt/self-define nfs defaults 0 0)
ok: [10.107.204.68] => (item=nas:/volume1/1/self-define /mnt/self-define nfs defaults 0 0)
ok: [10.107.204.64] => (item=nas:/volume2/2 /mnt/nas_v2 nfs defaults 0 0)
ok: [10.107.204.67] => (item=nas:/volume2/2 /mnt/nas_v2 nfs defaults 0 0)
ok: [10.107.204.65] => (item=nas:/volume2/2 /mnt/nas_v2 nfs defaults 0 0)
ok: [10.107.204.66] => (item=nas:/volume2/2 /mnt/nas_v2 nfs defaults 0 0)
ok: [10.107.204.68] => (item=nas:/volume2/2 /mnt/nas_v2 nfs defaults 0 0)
ok: [10.107.204.69] => (item=nas:/volume1/1 /mnt/nas_v1 nfs defaults 0 0)
ok: [10.107.204.70] => (item=nas:/volume1/1 /mnt/nas_v1 nfs defaults 0 0)
ok: [10.107.204.73] => (item=nas:/volume1/1 /mnt/nas_v1 nfs defaults 0 0)
ok: [10.107.204.72] => (item=nas:/volume1/1 /mnt/nas_v1 nfs defaults 0 0)
ok: [10.107.204.69] => (item=nas:/volume1/1/self-define /mnt/self-define nfs defaults 0 0)
ok: [10.107.204.70] => (item=nas:/volume1/1/self-define /mnt/self-define nfs defaults 0 0)
ok: [10.107.204.72] => (item=nas:/volume1/1/self-define /mnt/self-define nfs defaults 0 0)
ok: [10.107.204.73] => (item=nas:/volume1/1/self-define /mnt/self-define nfs defaults 0 0)
ok: [10.107.204.69] => (item=nas:/volume2/2 /mnt/nas_v2 nfs defaults 0 0)
ok: [10.107.204.70] => (item=nas:/volume2/2 /mnt/nas_v2 nfs defaults 0 0)
ok: [10.107.204.72] => (item=nas:/volume2/2 /mnt/nas_v2 nfs defaults 0 0)
ok: [10.107.204.73] => (item=nas:/volume2/2 /mnt/nas_v2 nfs defaults 0 0)TASK [Ensure all filesystems are mounted] ************************************************************************************************************************************************************************
ok: [10.107.204.66] => (item={'path': '/mnt/nas_v1', 'src': 'nas:/volume1/1', 'fstype': 'nfs', 'opts': 'defaults'})
changed: [10.107.204.65] => (item={'path': '/mnt/nas_v1', 'src': 'nas:/volume1/1', 'fstype': 'nfs', 'opts': 'defaults'})
ok: [10.107.204.66] => (item={'path': '/mnt/self-define', 'src': 'nas:/volume1/1/self-define', 'fstype': 'nfs', 'opts': 'defaults'})
changed: [10.107.204.67] => (item={'path': '/mnt/nas_v1', 'src': 'nas:/volume1/1', 'fstype': 'nfs', 'opts': 'defaults'})
changed: [10.107.204.64] => (item={'path': '/mnt/nas_v1', 'src': 'nas:/volume1/1', 'fstype': 'nfs', 'opts': 'defaults'})
changed: [10.107.204.68] => (item={'path': '/mnt/nas_v1', 'src': 'nas:/volume1/1', 'fstype': 'nfs', 'opts': 'defaults'})
ok: [10.107.204.66] => (item={'path': '/mnt/nas_v2', 'src': 'nas:/volume2/2', 'fstype': 'nfs', 'opts': 'defaults'})
changed: [10.107.204.65] => (item={'path': '/mnt/self-define', 'src': 'nas:/volume1/1/self-define', 'fstype': 'nfs', 'opts': 'defaults'})
changed: [10.107.204.67] => (item={'path': '/mnt/self-define', 'src': 'nas:/volume1/1/self-define', 'fstype': 'nfs', 'opts': 'defaults'})
changed: [10.107.204.64] => (item={'path': '/mnt/self-define', 'src': 'nas:/volume1/1/self-define', 'fstype': 'nfs', 'opts': 'defaults'})
changed: [10.107.204.68] => (item={'path': '/mnt/self-define', 'src': 'nas:/volume1/1/self-define', 'fstype': 'nfs', 'opts': 'defaults'})
changed: [10.107.204.65] => (item={'path': '/mnt/nas_v2', 'src': 'nas:/volume2/2', 'fstype': 'nfs', 'opts': 'defaults'})
changed: [10.107.204.67] => (item={'path': '/mnt/nas_v2', 'src': 'nas:/volume2/2', 'fstype': 'nfs', 'opts': 'defaults'})
changed: [10.107.204.64] => (item={'path': '/mnt/nas_v2', 'src': 'nas:/volume2/2', 'fstype': 'nfs', 'opts': 'defaults'})
changed: [10.107.204.69] => (item={'path': '/mnt/nas_v1', 'src': 'nas:/volume1/1', 'fstype': 'nfs', 'opts': 'defaults'})
changed: [10.107.204.68] => (item={'path': '/mnt/nas_v2', 'src': 'nas:/volume2/2', 'fstype': 'nfs', 'opts': 'defaults'})
changed: [10.107.204.69] => (item={'path': '/mnt/self-define', 'src': 'nas:/volume1/1/self-define', 'fstype': 'nfs', 'opts': 'defaults'})
changed: [10.107.204.70] => (item={'path': '/mnt/nas_v1', 'src': 'nas:/volume1/1', 'fstype': 'nfs', 'opts': 'defaults'})
changed: [10.107.204.72] => (item={'path': '/mnt/nas_v1', 'src': 'nas:/volume1/1', 'fstype': 'nfs', 'opts': 'defaults'})
changed: [10.107.204.73] => (item={'path': '/mnt/nas_v1', 'src': 'nas:/volume1/1', 'fstype': 'nfs', 'opts': 'defaults'})
changed: [10.107.204.69] => (item={'path': '/mnt/nas_v2', 'src': 'nas:/volume2/2', 'fstype': 'nfs', 'opts': 'defaults'})
changed: [10.107.204.70] => (item={'path': '/mnt/self-define', 'src': 'nas:/volume1/1/self-define', 'fstype': 'nfs', 'opts': 'defaults'})
changed: [10.107.204.72] => (item={'path': '/mnt/self-define', 'src': 'nas:/volume1/1/self-define', 'fstype': 'nfs', 'opts': 'defaults'})
changed: [10.107.204.73] => (item={'path': '/mnt/self-define', 'src': 'nas:/volume1/1/self-define', 'fstype': 'nfs', 'opts': 'defaults'})
changed: [10.107.204.70] => (item={'path': '/mnt/nas_v2', 'src': 'nas:/volume2/2', 'fstype': 'nfs', 'opts': 'defaults'})
changed: [10.107.204.72] => (item={'path': '/mnt/nas_v2', 'src': 'nas:/volume2/2', 'fstype': 'nfs', 'opts': 'defaults'})
changed: [10.107.204.73] => (item={'path': '/mnt/nas_v2', 'src': 'nas:/volume2/2', 'fstype': 'nfs', 'opts': 'defaults'})PLAY RECAP *******************************************************************************************************************************************************************************************************
10.107.204.64              : ok=4    changed=1    unreachable=0    failed=0    skipped=0    rescued=0    ignored=0
10.107.204.65              : ok=4    changed=1    unreachable=0    failed=0    skipped=0    rescued=0    ignored=0
10.107.204.66              : ok=4    changed=1    unreachable=0    failed=0    skipped=0    rescued=0    ignored=0
10.107.204.67              : ok=4    changed=1    unreachable=0    failed=0    skipped=0    rescued=0    ignored=0
10.107.204.68              : ok=4    changed=1    unreachable=0    failed=0    skipped=0    rescued=0    ignored=0
10.107.204.69              : ok=4    changed=1    unreachable=0    failed=0    skipped=0    rescued=0    ignored=0
10.107.204.70              : ok=4    changed=1    unreachable=0    failed=0    skipped=0    rescued=0    ignored=0
10.107.204.71              : ok=0    changed=0    unreachable=1    failed=0    skipped=0    rescued=0    ignored=0
10.107.204.72              : ok=4    changed=1    unreachable=0    failed=0    skipped=0    rescued=0    ignored=0
10.107.204.73              : ok=4    changed=1    unreachable=0    failed=0    skipped=0    rescued=0    ignored=0
harbor处理
如果在某些节点上的 /etc/docker/daemon.json 文件中已经包含了 "insecure-registries" 配置项,并且你希望添加新的仓库地址而不删除现有的项,你需要确保更新操作不会覆盖现有的配置。Ansible 的 blockinfile 模块可以帮助你添加新的配置,同时保留文件中已存在的其他内容。
新建playbook
---
- name: Update Docker daemon configuration and login to repository if neededhosts: gpusbecome: yestasks:- name: Install python3ansible.builtin.package:name: python3state: present- name: Ensure /etc/docker/daemon.json existsansible.builtin.file:path: /etc/docker/daemon.jsonstate: touch- name: Add new registry to /etc/docker/daemon.jsonansible.builtin.blockinfile:path: /etc/docker/daemon.jsonblock: |{"insecure-registries": ["10.200.88.53"]}marker: "# {mark} ANSIBLE MANAGED BLOCK"create: yesbackup: yesmode: '0644'validate: 'python3 -m json.tool %s > /dev/null'- name: Restart Docker serviceansible.builtin.service:name: dockerstate: restarted- name: Check if Docker is already logged inansible.builtin.command:cmd: docker info | grep "Username:"register: docker_login_statusignore_errors: yes- name: Log in to Docker registry if not already logged inansible.builtin.command:cmd: docker login 10.200.88.53 --username dros_admin --password 'Dros@zjgxn&07101604'when: docker_login_status.rc != 0ignore_errors: yes
playbook解析
上述命令解析如下
确保 Python 已安装:
- 确保在节点上安装了 Python3,因为
json.tool需要 Python3 支持。
确保 /etc/docker/daemon.json 存在:
- 确保该文件存在,即使它是空文件。
读取现有的 daemon.json:
- 使用
slurp模块读取现有的 JSON 文件内容。
解码 JSON:
- 将读取到的 base64 编码的内容解码并转换为 JSON 对象。
确保包含新仓库地址:
- 更新 JSON 对象,确保
insecure-registries中包含新的仓库地址。
写入更新后的 daemon.json:
- 将更新后的 JSON 写入到
/etc/docker/daemon.json,并进行备份。
验证 JSON 语法:
- 验证 JSON 文件的语法正确性。
重启 Docker 服务:
- 确保 Docker 服务使用新的配置重新启动。
直接登录 Docker 注册表:
- 尝试登录 Docker 注册表,如果登录失败不会中断 Playbook 的执行。
执行命令
(ansible) yuzailiang@ubuntu:~$ ansible-playbook update_harbor.ymlTASK [Restart Docker service] ************************************************************************************************************************************************************************************
changed: [10.107.204.65]
changed: [10.107.204.66]
changed: [10.107.204.64]
changed: [10.107.204.68]
changed: [10.107.204.67]
changed: [10.107.204.72]
changed: [10.107.204.69]
changed: [10.107.204.70]
changed: [10.107.204.73]TASK [Log in to Docker registry] *********************************************************************************************************************************************************************************
changed: [10.107.204.64]
changed: [10.107.204.67]
changed: [10.107.204.66]
changed: [10.107.204.65]
changed: [10.107.204.68]
changed: [10.107.204.69]
changed: [10.107.204.72]
changed: [10.107.204.70]
changed: [10.107.204.73]PLAY RECAP *******************************************************************************************************************************************************************************************************
10.107.204.64              : ok=11   changed=5    unreachable=0    failed=0    skipped=0    rescued=0    ignored=0
10.107.204.65              : ok=11   changed=5    unreachable=0    failed=0    skipped=0    rescued=0    ignored=0
10.107.204.66              : ok=11   changed=5    unreachable=0    failed=0    skipped=0    rescued=0    ignored=0
10.107.204.67              : ok=11   changed=5    unreachable=0    failed=0    skipped=0    rescued=0    ignored=0
10.107.204.68              : ok=11   changed=5    unreachable=0    failed=0    skipped=0    rescued=0    ignored=0
10.107.204.69              : ok=11   changed=5    unreachable=0    failed=0    skipped=0    rescued=0    ignored=0
10.107.204.70              : ok=11   changed=5    unreachable=0    failed=0    skipped=0    rescued=0    ignored=0
10.107.204.71              : ok=0    changed=0    unreachable=1    failed=0    skipped=0    rescued=0    ignored=0
10.107.204.72              : ok=11   changed=5    unreachable=0    failed=0    skipped=0    rescued=0    ignored=0
10.107.204.73              : ok=11   changed=5    unreachable=0    failed=0    skipped=0    rescued=0    ignored=0
文件管理
文件拷贝
将文件sdocker.sh拷贝到model组所有节点,并修改权限为0755
(ansible) yuzailiang@ubuntu:~/Shell$ ansible model -m copy -a "src=./sdocker.sh dest=/usr/bin/sdocker.sh mode=0755" --become
文件删除
删除model组中所有节点的sdocker.sh
(ansible) yuzailiang@ubuntu:~/Shell$ ansible model -m file -a "path=/usr/bin/sdocker.sh state=absent" --become
文件重命名
重命名model组中的docker为odocker
(ansible) yuzailiang@ubuntu:~/Shell$ ansible model -m command -a "mv /usr/bin/docker /usr/bin/odocker" --become
[WARNING]: Platform linux on host 10.107.204.67 is using the discovered Python interpreter at /usr/bin/python3.8, but future installation of another Python interpreter could change the
meaning of that path. See https://docs.ansible.com/ansible-core/2.17/reference_appendices/interpreter_discovery.html for more information.
10.107.204.67 | CHANGED | rc=0 >>[WARNING]: Platform linux on host 10.107.204.68 is using the discovered Python interpreter at /usr/bin/python3.8, but future installation of another Python interpreter could change the
meaning of that path. See https://docs.ansible.com/ansible-core/2.17/reference_appendices/interpreter_discovery.html for more information.
10.107.204.68 | CHANGED | rc=0 >>[WARNING]: Platform linux on host 10.107.204.69 is using the discovered Python interpreter at /usr/bin/python3.8, but future installation of another Python interpreter could change the
meaning of that path. See https://docs.ansible.com/ansible-core/2.17/reference_appendices/interpreter_discovery.html for more information.
10.107.204.69 | CHANGED | rc=0 >>[WARNING]: Platform linux on host 10.107.204.66 is using the discovered Python interpreter at /usr/bin/python3.8, but future installation of another Python interpreter could change the
meaning of that path. See https://docs.ansible.com/ansible-core/2.17/reference_appendices/interpreter_discovery.html for more information.
10.107.204.66 | CHANGED | rc=0 >>
文件拷贝并重命名
将sdocker.sh拷贝到model中所有节点/usr/bin目录下,并重命名为docker
ansible model -m copy -a "src=./sdocker.sh dest=/usr/bin/docker mode=0755" --becomeansible-playbook
在 Ansible 中,Playbook 是用于自动化配置、部署和任务管理的主要工具。它们是定义自动化任务的核心组件,允许用户以简洁、可读的 YAML 格式描述一系列的任务。
Playbook 的含义
Playbook 是一个包含多个 Play 的 YAML 文件。每个 Play 描述了一组要在主机上执行的任务。Playbook 的设计目的是使自动化过程更加结构化、可重复和可维护。
Playbook 的作用
- 定义自动化任务:Playbook 用于定义在目标主机上要执行的任务。这些任务可以是安装软件、配置系统、部署应用等。
- 分组任务:Playbook 可以包含多个 Play,每个 Play 可以针对一个或多个主机组执行特定的任务。这允许用户将不同的操作分组并针对特定主机进行操作。
- 管理主机:Playbook 可以指定在哪些主机上执行任务。主机可以通过主机清单(inventory)文件进行管理,Playbook 中可以通过组或单个主机来指定目标主机。
- 支持变量和条件:Playbook 支持使用变量、条件判断和循环来使自动化任务更加灵活和动态。这使得 Playbook 可以在不同环境或条件下执行不同的操作。
- 可读性和维护性:由于 Playbook 使用 YAML 格式,它们非常易于阅读和编写。这个格式使得用户能够清楚地定义和记录自动化流程,并且易于维护和更新。
Playbook 的基本结构
一个 Playbook 的基本结构包括以下几个部分:
- name:每个 Play 的名称,用于描述 Play 的目的。hosts:指定任务将要执行的主机组或主机。become:指定是否需要提升权限(例如使用sudo)。tasks:包含要执行的任务列表,每个任务使用 Ansible 模块来定义具体的操作。
示例如下:
---
- name: Install and start nginxhosts: webserversbecome: yestasks:- name: Install nginxapt:name: nginxstate: present- name: Ensure nginx is runningservice:name: nginxstate: startedenabled: yes
Playbook 是 Ansible 自动化的核心组件,提供了一个结构化的方式来定义和执行复杂的自动化任务。通过 Playbook,你可以高效地管理和配置主机,确保系统的一致性和可重复性。
ansible-inventory
/etc/ansible/hosts文件是 Ansible 的默认主机清单(inventory)文件位置。如果你将主机信息保存在这个文件中,那么在运行 Ansible 命令或 Playbook 时,可以不使用-i选项来指定inventory文件。Ansible 会默认使用/etc/ansible/hosts文件中的主机信息。
使用ansible查看主机信息
要显示当前 Ansible 控制节点所管理的主机列表
(ansible) yuzailiang@ubuntu:~/Shell$ ansible model --list-hostshosts (4):10.107.204.6610.107.204.6710.107.204.6810.107.204.69
使用ansible-inventory
(ansible) yuzailiang@ubuntu:~/Shell$ ansible-inventory --list
{"_meta": {"hostvars": {"gpu1": {"ansible_host": "10.107.204.64"},"gpu10": {"ansible_host": "10.107.204.73"},"gpu2": {"ansible_host": "10.107.204.65"},"gpu3": {"ansible_host": "10.107.204.66"},"gpu4": {"ansible_host": "10.107.204.67"},"gpu5": {"ansible_host": "10.107.204.68"},"gpu6": {"ansible_host": "10.107.204.69"},"gpu7": {"ansible_host": "10.107.204.70"},"gpu8": {"ansible_host": "10.107.204.71"},"gpu9": {"ansible_host": "10.107.204.72"}}},"all": {"children": ["ungrouped","gpus"]},"communication": {"hosts": ["10.107.204.72","10.107.204.73"]},"compile": {"hosts": ["10.107.204.70"]},"framework": {"hosts": ["10.107.204.65"]},"gpus": {"children": ["operator","framework","model","compile","hardware","communication"],"hosts": ["gpu1","gpu2","gpu3","gpu4","gpu5","gpu6","gpu7","gpu8","gpu9","gpu10"]},"hardware": {"hosts": ["10.107.204.71"]},"model": {"hosts": ["10.107.204.66","10.107.204.67","10.107.204.68","10.107.204.69"]},"operator": {"hosts": ["10.107.204.64"]}
}
(ansible) yuzailiang@ubuntu:~/Shell$ ansible-inventory --graph
@all:|--@ungrouped:|--@gpus:|  |--@operator:|  |  |--10.107.204.64|  |--@framework:|  |  |--10.107.204.65|  |--@model:|  |  |--10.107.204.66|  |  |--10.107.204.67|  |  |--10.107.204.68|  |  |--10.107.204.69|  |--@compile:|  |  |--10.107.204.70|  |--@hardware:|  |  |--10.107.204.71|  |--@communication:|  |  |--10.107.204.72|  |  |--10.107.204.73|  |--gpu1|  |--gpu2|  |--gpu3|  |--gpu4|  |--gpu5|  |--gpu6|  |--gpu7|  |--gpu8|  |--gpu9|  |--gpu10
总结
本文围绕ansible,以及ansible命令和ansible-playbook命令完成了自动化集群管理的环境部署,以及使用,通过自动完成harbor仓库配置,NAS目录挂载,更新hosts,等同类任务方便所有GPU节点的使用。ansible是一个非常良好的自动化管理工具。