Particles Color and Depth Textures
https://catlikecoding.com/unity/tutorials/custom-srp/particles/
https://blog.csdn.net/wodownload2/article/details/104865560 这篇文章我提到了,片元着色器的输入问题
1 unlit particles
a particle system can use any material, so our RP can already render them, with limitations.
in this tutorial we will only consider unlit particles. lit particles work the same way, just with more shader properties and lighting calculations.
1.2 unlit particles shader
we could use our unlit shader for particles, but let us make a dedicated one for them.
it starts as a copy of the unlit shader with its menu item changed to Custom RP/Particles/Unlit.
also, as particles are always dynamic it does not need a meat pass.
Shader "Custom RP/Particles/Unlit" {

	…

	SubShader {
		…

		//Pass {
			//Tags {
				//"LightMode" = "Meta"
			//}

			//…
		//}
	}

	CustomEditor "CustomShaderGUI"
}
create a dedicated material for unlit particles with this shader, then make the particle system use it.
currently it is equivalent to the earlier unlit material. it is also possible to set the particle system to render meshes, even with shadows if that is enabled for both the material and the particle system.
however, gpu instancing does not work beacuse particles systems use procedural drawing for that, which will not cover in this tutorial. instead all particle meshes get merged into a single mesh, just like billboard particles.
from now on we will only concern ourselves with billboard particles, without shadows.
here is a base map for a single particle, containing a simple smoothly fading white disc.
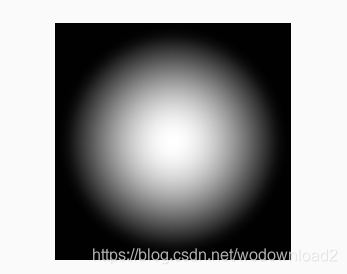
when using that texture for our fade particles we get a simplistic effect that looks somewhat like white smoke is coming out of the ground. to make it more convincing increase the emission rate to something like 100.
1.3 vertex colors
1.3 vertex colors
it is possible to use a different color per particle. the simplest way to demonstrate this is to set the starting color to randomly pick between black and white. however, doing so does not currently change the apperance of the particles.
to make this work we have to add support for vertex colors to our shader.
rather than create new HLSL files for particles we will add support for it to UnlitPass.
the first step is to add a float4 vertex attribtue with the COLOR semantic.
struct Attributes
{
	float3 positionOS : POSITION;
	float4 color : COLOR;
	float2 baseUV : TEXCOORD0;
	UNITY_VERTEX_INPUT_INSTANCE_ID
};
add it to Varyings as well and pass it through UnlitPassVertex, but only if _VERTEX_COLORS is defined. That way we can enable and disable vertex color support as desired.
struct Varyings {
	float4 positionCS : SV_POSITION;
	#if defined(_VERTEX_COLORS)
		float4 color : VAR_COLOR;
	#endif
	float2 baseUV : VAR_BASE_UV;
	UNITY_VERTEX_INPUT_INSTANCE_ID
};

Varyings UnlitPassVertex (Attributes input) {
	…
	#if defined(_VERTEX_COLORS)
		output.color = input.color;
	#endif
	output.baseUV = TransformBaseUV(input.baseUV);
	return output;
}
2.1 fragment data
we already have the fragment depth available in out fragment functions. ??
https://catlikecoding.com/unity/tutorials/custom-srp/lod-and-reflections/
it’s provided via the float4 with the SV_POSITION semantic. We’ve already used the XY components of it for dithering, but let’s now make it formal that we’re using fragment data.

float4 positionCS_SS : SV_POSITION;
Make the adjustment in the accompanying vertex functions as well.
output.positionCS_SS = TransformWorldToHClip(positionWS); //这个是在哪里做的,答:顶点着色器
next, we will introduce a new Fragment HLSL include file containing a Fragment struct and a GetFragment function that returns the fragment, given a float4 screen-space position vector.
initially the fragment only has a 2D position, which comes from the screen-space position’s XY components. these are texel coordinates with a 0.5 offset. it’s (0.5, 0.5) for the texel in the bottom left corner of the screen, (1.5,0.5) for the texel to the right of it, and so on.
#ifndef FRAGMENT_INCLUDED
#define FRAGMENT_INCLUDED

struct Fragment {
	float2 positionSS;
};

Fragment GetFragment (float4 positionSS) {
	Fragment f;
	f.positionSS = positionSS.xy;
	return f;
}

#endif
Include this file in Common after all other include statements, then adjust ClipLOD so its first argument is a Fragment instead of a float4.
#include "Packages/com.unity.render-pipelines.core/ShaderLibrary/UnityInstancing.hlsl"
#include "Packages/com.unity.render-pipelines.core/ShaderLibrary/SpaceTransforms.hlsl"
#include "Packages/com.unity.render-pipelines.core/ShaderLibrary/Packing.hlsl"

#include "Fragment.hlsl"

…

void ClipLOD (Fragment fragment, float fade) {
	#if defined(LOD_FADE_CROSSFADE)
		float dither = InterleavedGradientNoise(fragment.positionSS, 0);
		clip(fade + (fade < 0.0 ? dither : -dither));
	#endif
}
let us also define common linear and point clamp sampler states in Common as well at this point, because we will be using those in multiple places later. do so before including Fragment.
#include "Packages/com.unity.render-pipelines.core/ShaderLibrary/Packing.hlsl"

SAMPLER(sampler_linear_clamp);
SAMPLER(sampler_point_clamp);

#include "Fragment.hlsl"
Then remove the generic sampler definition from PostFXStackPasses, as that’s now a duplicate that would cause a compiler error.
TEXTURE2D(_PostFXSource2);
//SAMPLER(sampler_linear_clamp);
Next, add a fragment to the InputConfig structs of both LitInput and UnlitInput. Then add the screen-space position vector as a first parameter to the GetInputConfig functions, so they can invoke GetFragment with it.
struct InputConfig {
	Fragment fragment;
	…
};

InputConfig GetInputConfig (float4 positionSS, …) {
	InputConfig c;
	c.fragment = GetFragment(positionSS);
	…
}
Add the argument in all places that we invoke GetInputConfig.
InputConfig config = GetInputConfig(input.positionCS_SS, …);
3 soft particles
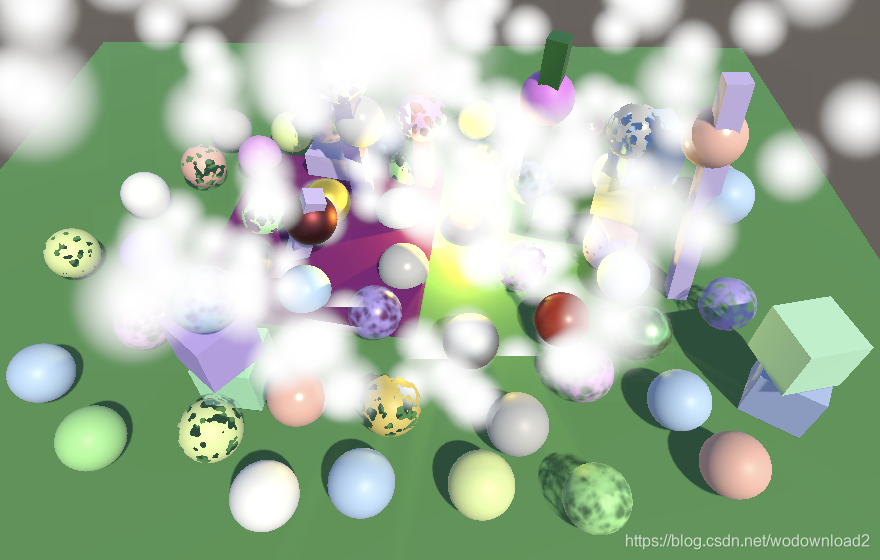
when billboard particles intersect geometry the sharp transition is both visually jarring and makes their flat nature obvious.
the solution for this is to use soft particles, which fade out when there is opaque geometry close behind them.
to make this work the particle’s fragment depth has to be compared to the depth of whatever has been drawn earlier to the same position in the camera’s buffer.
this means that we will have to sample the depth buffer.
3.1 separate depth buffer
http://www.songho.ca/opengl/gl_fbo.html
up to this point we have always used a single frame buffer to the camera, which contained both color and depth information.

this is the typical frame buffer configuration, but the color and depth data are always stored in separate buffers, known as frame buffer attachments.
to access the depth buffer we will need to define these attachments separately.
The first step is to replace the _CameraFrameBuffer identifier in CameraRenderer with two identifiers, which we’ll name _CameraColorAttachment and _CameraDepthAttachment.
//static int frameBufferId = Shader.PropertyToID("_CameraFrameBuffer");
static int
		colorAttachmentId = Shader.PropertyToID("_CameraColorAttachment"),
		depthAttachmentId = Shader.PropertyToID("_CameraDepthAttachment");
In Render we now have to pass the color attachment to PostFXStack.Render, which is functionally equivalent to what we did before.
	if (postFXStack.IsActive) {
		postFXStack.Render(colorAttachmentId);
	}
In Setup we now have to get two buffers instead of one composite buffer. The color buffer has no depth, while the depth buffer’s format is RenderTextureFormat.Depth and its filter mode is FilterMode.Point, because blending depth data makes no sense. Both attachments can be set with a single invocation of SetRenderTarget, using the same load and store actions for each.
	if (postFXStack.IsActive) {
		if (flags > CameraClearFlags.Color) {
			flags = CameraClearFlags.Color;
		}
		buffer.GetTemporaryRT(
			colorAttachmentId, camera.pixelWidth, camera.pixelHeight,
			0, FilterMode.Bilinear, useHDR ?
				RenderTextureFormat.DefaultHDR : RenderTextureFormat.Default
		);
		buffer.GetTemporaryRT(
			depthAttachmentId, camera.pixelWidth, camera.pixelHeight,
			32, FilterMode.Point, RenderTextureFormat.Depth
		);
		buffer.SetRenderTarget(
			colorAttachmentId,
			RenderBufferLoadAction.DontCare, RenderBufferStoreAction.Store,
			depthAttachmentId,
			RenderBufferLoadAction.DontCare, RenderBufferStoreAction.Store
		);
	}
Both buffers have to be released as well. Once that’s done our RP still works the same way as before, but now with frame buffer attachments that we can accessed separately.
void Cleanup () {
	lighting.Cleanup();
	if (postFXStack.IsActive) {
		buffer.ReleaseTemporaryRT(colorAttachmentId);
		buffer.ReleaseTemporaryRT(depthAttachmentId);
	}
}
3.2 Copying Depth
We cannot sample the depth buffer at the same time that it’s used for rendering.
We have to make a copy of it.
So introduce a _CameraDepthTexture identifier and add a boolean field to indicate whether we’re using a depth texture. We should only bother with copying depth when needed, which we’ll determine in Render after getting the camera settings. But we’ll initially simply always enable it.
static int
		colorAttachmentId = Shader.PropertyToID("_CameraColorAttachment"),
		depthAttachmentId = Shader.PropertyToID("_CameraDepthAttachment"),
		depthTextureId = Shader.PropertyToID("_CameraDepthTexture");

	…

	bool useDepthTexture;

	public void Render (…) {
		…
		CameraSettings cameraSettings =
			crpCamera ? crpCamera.Settings : defaultCameraSettings;

		useDepthTexture = true;

		…
	}
Create a new CopyAttachments method that gets a temporary duplicate depth texture if needed and copies the depth attachment data to it.
This can be done by invoking CopyTexture on the command buffer with a source and destination texture.
This is much more efficient than doing it via a full-screen draw call.
Also make sure to release the extra depth texture in Cleanup.
void Cleanup ()
{
		…
		if (useDepthTexture)
		{
			buffer.ReleaseTemporaryRT(depthTextureId);
		}
	}

	…

	void CopyAttachments () {
		if (useDepthTexture) {
			buffer.GetTemporaryRT(
				depthTextureId, camera.pixelWidth, camera.pixelHeight,
				32, FilterMode.Point, RenderTextureFormat.Depth
			);
			buffer.CopyTexture(depthAttachmentId, depthTextureId);
			ExecuteBuffer();
		}
	}
We’ll copy the attachments only once, after all opaque geometry has been drawn, so after the skybox in Render. This means that the depth texture is only available when rendering transparent objects.
context.DrawSkybox(camera);
CopyAttachments();
3.3 copying depth without post fx
copying depth only works if we have a depth attachment to copy from, which is currently only the case
when post FX are enabled.
to make it possible without post FX we will also need to use an intermediate frame buffer when a depth texture is used.
Introduce a useIntermediateBuffer boolean field to keep track of this, initialized in Setup before potentially getting the attachments. This should now be done when either a depth texture is used or post FX are active. Cleanup is affected in the same way.
bool useDepthTexture, useIntermediateBuffer;

	…

	void Setup () {
		context.SetupCameraProperties(camera);
		CameraClearFlags flags = camera.clearFlags;

		useIntermediateBuffer = useDepthTexture || postFXStack.IsActive;
		if (useIntermediateBuffer) {
			if (flags > CameraClearFlags.Color) {
				flags = CameraClearFlags.Color;
			}
			…
		}

		…
	}

	void Cleanup () {
		lighting.Cleanup();
		if (useIntermediateBuffer) {
			buffer.ReleaseTemporaryRT(colorAttachmentId);
			buffer.ReleaseTemporaryRT(depthAttachmentId);
		//}
			if (useDepthTexture) {
				buffer.ReleaseTemporaryRT(depthTextureId);
			}
		}
	}
But now rendering fails when no post FX are active, because we’re only rendering to the intermediate buffer. We have to perform a final copy to the camera’s target. Unfortunately we can only use CopyTexture to copy to a render texture, not to the final frame buffer. We could use the post FX copy pass to do it, but this step is specific to the camera renderer so we’ll create a dedicated CameraRenderer shader for it. It starts the same as the PostFX shader but with only a copy pass and it includes its own HLSL file.
Shader "Hidden/Custom RP/Camera Renderer" {

	SubShader {
		Cull Off
		ZTest Always
		ZWrite Off

		HLSLINCLUDE
		#include "../ShaderLibrary/Common.hlsl"
		#include "CameraRendererPasses.hlsl"
		ENDHLSL

		Pass {
			Name "Copy"

			HLSLPROGRAM
				#pragma target 3.5
				#pragma vertex DefaultPassVertex
				#pragma fragment CopyPassFragment
			ENDHLSL
		}
	}
}
The new CameraRendererPasses HLSL file has the same Varyings struct and DefaultPassVertex function as PostFXStackPasses. It also has a _SourceTexture texture and a CopyPassFragment function that simply returns the sampled source texture.
#ifndef CUSTOM_CAMERA_RENDERER_PASSES_INCLUDED
#define CUSTOM_CAMERA_RENDERER_PASSES_INCLUDED

TEXTURE2D(_SourceTexture);

struct Varyings { … };

Varyings DefaultPassVertex (uint vertexID : SV_VertexID) { … }

float4 CopyPassFragment (Varyings input) : SV_TARGET {
	return SAMPLE_TEXTURE2D(_SourceTexture, sampler_linear_clamp, input.screenUV);
}

#endif
Next, add a material field to CameraRenderer. To initialize it create a public constructor method with a shader parameter and have it invoke CoreUtils.CreateEngineMaterial with the shader as an argument. That method creates a new material and sets it to be hidden in the editor makes sure that it doesn’t get saved as an asset, so we don’t have to do this explictly ourselves. It also logs an error if the shader is missing.
Material material;

	public CameraRenderer (Shader shader) {
		material = CoreUtils.CreateEngineMaterial(shader);
	}
Also add a public Dispose method that gets rid of the material by passing it to CoreUtils.Destroy. That method either regularly or immediately destroys the material, depending on whether Unity is in play mode or not. We need to do this because new RP instances and thus renderers get created whenever the RP asset is modified, which could result in many materials getting created in the editor.
public void Dispose () {
		CoreUtils.Destroy(material);
	}
Now CustomRenderPipeline must provide a shader when it constructs its renderer. So we’ll do it in its own constructor method, also adding a parameter for the camera renderer shader to it.
CameraRenderer renderer; // = new CameraRenderer();

	…

	public CustomRenderPipeline (
		bool allowHDR,
		bool useDynamicBatching, bool useGPUInstancing, bool useSRPBatcher,
		bool useLightsPerObject, ShadowSettings shadowSettings,
		PostFXSettings postFXSettings, int colorLUTResolution, Shader cameraRendererShader
	) {
		…
		renderer = new CameraRenderer(cameraRendererShader);
	}
And it must also invoke Dispose on the renderer from now on when it is disposed itself. We’ve already created a Dispose method for it, but for editor code only. Rename that version to DisposeForEditor and only have it reset the light mapping delegate.
partial void DisposeForEditor ();
#if UNITY_EDITOR
…

partial void DisposeForEditor () {
	//base.Dispose(disposing);
	Lightmapping.ResetDelegate();
}
Then add a new Dispose method that isn’t editor-only, which invokes its base implementation, the version for the editor, and finally disposes the renderer.
protected override void Dispose (bool disposing) {
		base.Dispose(disposing);
		DisposeForEditor();
		renderer.Dispose();
	}
And at the top level CustomRenderPipelineAsset must get a shader configuration property and pass it to the pipeline constructor. Then we can finally hook up the shader.
[SerializeField]
Shader cameraRendererShader = default;
protected override RenderPipeline CreatePipeline () {
	return new CustomRenderPipeline(
		allowHDR, useDynamicBatching, useGPUInstancing, useSRPBatcher,
		useLightsPerObject, shadows, postFXSettings, (int)colorLUTResolution,
		cameraRendererShader
	);
}

At this point CameraRenderer has a functional material. Also add the _SourceTexture identifier to it and the give it a Draw method similar to the one in PostFXStack, except without a parameter for a pass, as we only have a single pass at this point.
static int
		colorAttachmentId = Shader.PropertyToID("_CameraColorAttachment"),
		depthAttachmentId = Shader.PropertyToID("_CameraDepthAttachment"),
		depthTextureId = Shader.PropertyToID("_CameraDepthTexture"),
		sourceTextureId = Shader.PropertyToID("_SourceTexture");

	…

	void Draw (RenderTargetIdentifier from, RenderTargetIdentifier to) {
		buffer.SetGlobalTexture(sourceTextureId, from);
		buffer.SetRenderTarget(
			to, RenderBufferLoadAction.DontCare, RenderBufferStoreAction.Store
		);
		buffer.DrawProcedural(
			Matrix4x4.identity, material, 0, MeshTopology.Triangles, 3
		);
	}
to finally fix our renderer copy the color attachment to the camera target in Render by invoking Draw, if post FX are not active but we do use an intermediate buffer.
if (postFXStack.IsActive) {
			postFXStack.Render(colorAttachmentId);
		}
		else if (useIntermediateBuffer) {
			Draw(colorAttachmentId, BuiltinRenderTextureType.CameraTarget);
			ExecuteBuffer();
		}
But the camera happens to target a render texture then we can use CopyTexture instead.
else if (useIntermediateBuffer) {
			if (camera.targetTexture) {
				buffer.CopyTexture(colorAttachmentId, camera.targetTexture);
			}
			else {
				Draw(colorAttachmentId, BuiltinRenderTextureType.CameraTarget);
			}
			ExecuteBuffer();
		}
3.4 reconstrucing view-space depth
to sample the depth texture we need the UV coordinates of the fragment, which are in screen space.
we can find those by dividing its position by the screen pixel dimensions, which unity makes available via the XY components of float4 _ScreenParams, so add it to UnityInput.
float4 unity_OrthoParams;
float4 _ProjectionParams;
float4 _ScreenParams;
Then we can add the fragment UV and buffer depth to Fragment. Retrieve the buffer depth by sampling the camera depth texture with a point clamp sampler via the SAMPLE_DEPTH_TEXTURE macro. This macro does the same as SAMPLE_TEXTURE2D but only returns the R channel.
TEXTURE2D(_CameraDepthTexture);

struct Fragment {
	float2 positionSS;
	float2 screenUV;
	float depth;
	float bufferDepth;
};

Fragment GetFragment (float4 positionCS_SS) {
	Fragment f;
	f.positionSS = positionSS.xy;
	f.screenUV = f.positionSS / _ScreenParams.xy;
	f.depth = IsOrthographicCamera() ?
		OrthographicDepthBufferToLinear(positionSS.z) : positionSS.w;
	f.bufferDepth =
		SAMPLE_DEPTH_TEXTURE(_CameraDepthTexture, sampler_point_clamp, f.screenUV);
	return f;
}
this gives us the raw depth buffer value.
To convert it to view-space depth we can again invoke OrthographicDepthBufferToLinear in case of an orthographic camera, like for the current fragment’s depth. The perspective depth also has to be converted, for which we can use LinearEyeDepth. It needs _ZBufferParams as a second argument.
f.bufferDepth = LOAD_TEXTURE2D(_CameraDepthTexture, f.positionSS).r;
	f.bufferDepth = IsOrthographicCamera() ?
		OrthographicDepthBufferToLinear(f.bufferDepth) :
		LinearEyeDepth(f.bufferDepth, _ZBufferParams);
_ZBufferParams is another float4 made available by Unity that contains conversion factors from raw to linear depth. Add it to UnityInput.
float4 unity_OrthoParams;
float4 _ProjectionParams;
float4 _ScreenParams;
float4 _ZBufferParams;
To check whether we sample the buffer depth correctly return it scaled in UnlitPassFragment, like we tested the fragment depth earlier.
InputConfig config = GetInputConfig(input.positionCS_SS, input.baseUV);
	return float4(config.fragment.bufferDepth.xxx / 20.0, 1.0);
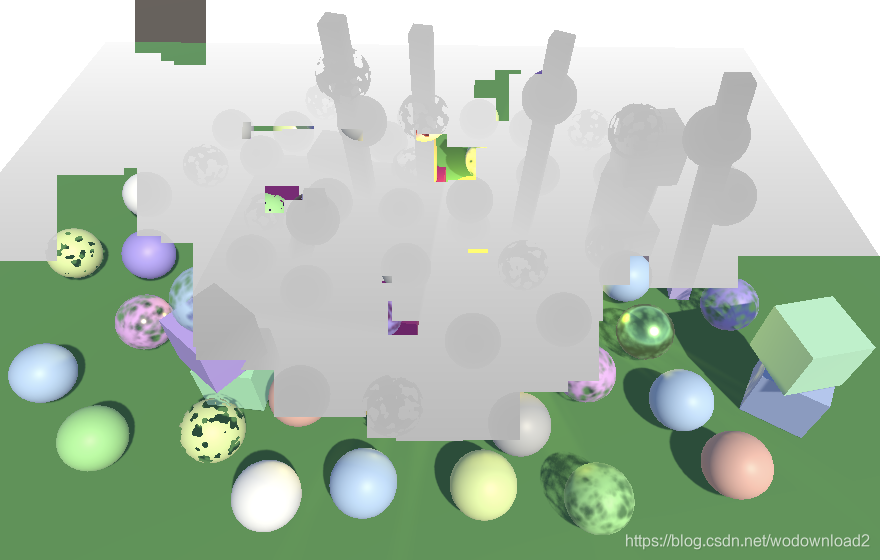

Buffer depth, perspective and orthographic projections.
3.7 Fading Particles Nearby Background
Now that we have a functional depth texture we can move on to finally support soft particles. The first step is to add shader properties for a soft particles keyword toggle, a distance, and a range to UnlitParticles, similar to the near fade properties.
In this case the distance is measured from whatever is behind the particles, so we set it to zero by default.
[Toggle(_SOFT_PARTICLES)] _SoftParticles ("Soft Particles", Float) = 0
_SoftParticlesDistance ("Soft Particles Distance", Range(0.0, 10.0)) = 0
_SoftParticlesRange ("Soft Particles Range", Range(0.01, 10.0)) = 1
Add the shader feature for it as well.
#pragma shader_feature _SOFT_PARTICLES
Like for near fading, set an appropriate config field to true in UnlitPassFragment if the keyword is defined.
#if defined(_NEAR_FADE)
		config.nearFade = true;
	#endif
	#if defined(_SOFT_PARTICLES)
		config.softParticles = true;
	#endif
In UnlitInput, add the new shader properties to UnityPerMaterial and the field to InputConfig.
UNITY_INSTANCING_BUFFER_START(UnityPerMaterial)
	…
	UNITY_DEFINE_INSTANCED_PROP(float, _SoftParticlesDistance)
	UNITY_DEFINE_INSTANCED_PROP(float, _SoftParticlesRange)
	UNITY_DEFINE_INSTANCED_PROP(float, _Cutoff)
	UNITY_DEFINE_INSTANCED_PROP(float, _ZWrite)
UNITY_INSTANCING_BUFFER_END(UnityPerMaterial)

#define INPUT_PROP(name) UNITY_ACCESS_INSTANCED_PROP(UnityPerMaterial, name)

struct InputConfig {
	…
	bool softParticles;
};

InputConfig GetInputConfig (float4 positionCC_SS, float2 baseUV) {
	…
	c.softParticles = false;
	return c;
}
Then apply another near attenuation in GetBase, this time based on the fragment’s buffer depth minus its own depth.
if (c.nearFade) {
		float nearAttenuation = (c.fragment.depth - INPUT_PROP(_NearFadeDistance)) /
			INPUT_PROP(_NearFadeRange);
		baseMap.a *= saturate(nearAttenuation);
	}
	if (c.softParticles) {
		float depthDelta = c.fragment.bufferDepth - c.fragment.depth;
		float nearAttenuation = (depthDelta - INPUT_PROP(_SoftParticlesDistance)) /
			INPUT_PROP(_SoftParticlesRange);
		baseMap.a *= saturate(nearAttenuation);
	}