2019独角兽企业重金招聘Python工程师标准>>> 
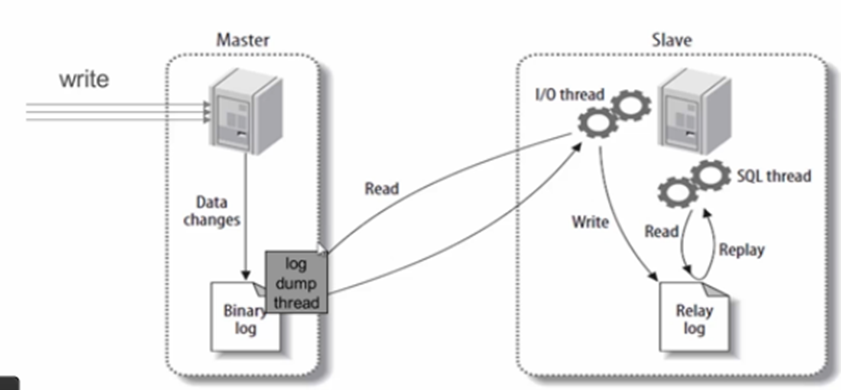
1、主从介绍:mysql主从又叫Replication,AB两台机器复制,也就是说是AB两台机器做了主从后,在A机器上写数据,另一台B机器也会跟中写数据,两者数据实时同步:
mysql主从是基于binlog,主上必须开启binlog才能进行主从:binlog是一个二进制的日记文件:
mysql主从的过程步骤:
1:主将更改操作记录(增删改)到binlog里:
2:从将主的binlog事件(SQL语句)同步到从本机并记录relaylog中:
3:从根据relaylog里面的语句按数据严格执行:
注释:主从过程涉及到三个线程, 主(logdump线程) 从(I/O线程、SQL线程)
主上有一个线程(logdump)用来和从的I/O线程传递binlog:
从上有两个线程: I/O线程用来同步主的binlog至本机并生成relaylog: SQL线程用来把relaylog里的sql语句按数据执行:
附记:master主会把操作记录到binlog中,通过线程dumplog和从线程I/O线程传递binlog,从通过线程I/O收到binlog后至本机生成relaylog,并通过线程SQL来按顺序执行relaylog里的sql语句:
应用场景:
1、用于备份重要数据:(仅仅只作为备份):主机器宕机,从机器还能随时对web提供服务:
2、主从同时对web服务,目的在与减轻主库压,从库作为一个只读的库存在(从mysql只能读数据,不能写数据),数据备份的同时可分担主机器被调用数据时的压力,mysql主从有方向性,写数据必须从主机器开始,如果不依照原理会导致数据紊乱:
mysql主从原理图:如下: Master:主 Slave:从
2、主从操作步骤:首先准备两台单独都运行了mysql的服务器,或者同一台机器上的两个mysql实例也可以(端口不能相同):开启mysql服务:
mysql的详细安装步骤:
1:首先下载mysql二进制免编译包,放在目录/usr/local/src
2:解压压缩包:
3:解压之后,把解压后的mysql目录及文件放到/usr/local/mysql
注释:首先查看/usr/local/mysql这个目录是否存在,存在则修改名称或者挪到其它目录:
4:进入到/usr/local/mysql目录下:创建mysql用户和数据库目录,然后初始化s时使用:
useradd mysqld ; mkdir -p /data/mysql
./scripts/mysql_install_db --user=msyql --datadir=/data/mysql
注释:此时可能会需要安装两个包: perl-Data-Dumper.x86_64 libaio.x86_64 libaio-devel.x86_64
看到安装过程里有两个OK,或者用echo $?测试是0则为正常:
5:编辑配置文件/etc/my.cnf -------->默认自带配置文件:
在/etc/my.cnf中:
定义  datadir=/data/mysql
定义 socket=/tmp/mysql.sock6:拷贝启动脚本: cp /usr/lcoal/mysql/support-file/mysql.server /etc/init.d/mysqld
在/etc/init.d/mysqld
定义 basedir=/usr/local/mysql
定义 datadir=/data/mysql
7:然后可以启动mysqld了,建议查看/data/mysql/的文件和目录是否是mysql属主和属主:启动会因为不是mysql用户而无法启动:
注释:若想开机启动建议设置chkconfig:
mysql主从----主上操作:
1:安装mysql:
2:修改my.cnf,增加server-id=130和log_bin=aminglinux1
修改完配置后重启后,启动或者重启mysql服务:
注释:打开binlog二进制日记,自定义前缀amingliunx1,同一个集群内的server-id不能重复:
3:把zrlog库备份并恢复成FEKU库,作为测试数据:
mysqldump -uroot -pnihao123! zrlog > /tmp/zrlog.sql
mysql -uroot -pnihao123! -e “create database FYKU”
mysql -uroot -pnihao123! < /tmp/FYKU.sql
4:创建用作同步数据的账户,用于主从之间的数据同步:
grant replication slave on *.* to 'repl'@slave_ip identified by 'nihao123!'
5:锁表,为了两边的数据一致:
flush tables with read lock;
5:show master status; #要记住filename和position的位置:
主从配置-主上详细操作命令:
1、首先在两台机器安装并启动mysql,我们先在主上操作:
2、修改/etc/my.cnf配置文件:定义server-id和binlog:
[root@localhost_02 ~]# vim /etc/my.cnf
[root@localhost_02 ~]# cat !$ |grep -v '^#'|grep -v '^$'
cat /etc/my.cnf |grep -v '^#'|grep -v '^$'
[mysqld]
datadir=/data/mysql
socket=/tmp/mysql.sock
server-id=130              #这个id可以自定义,本处以当前系统IP地址定义:
bin_log=fenye520           #打开binlog日记,定义fenye520为前缀名称:
3、重启启动mysql服务:
[root@localhost_02 ~]# /etc/init.d/mysqld restart
Shutting down MySQL. SUCCESS!
Starting MySQL. SUCCESS! 4、这时候我们查看mysql的数据目录:会生成两个文件:fenye520.000005(binlog日记) fenye520.index(索引页)
#binlog详细记录mysql数据库每一步操作过程,增加和删除等操作:
[root@localhost_01 ~]# ls -lt /data/mysql/
总用量 110740
drwx------ 2 mysql mysql     4096 9月   4 14:31 zrlog            #原博客的目录:
-rw-rw---- 1 mysql mysql    13853 9月   4 14:22 localhost_02.err
-rw-rw---- 1 mysql mysql        5 9月   4 14:22 localhost_02.pid
-rw-rw---- 1 mysql mysql       90 9月   4 14:22 fenye520.index    #索引页:
-rw-rw---- 1 mysql mysql     1852 9月   4 14:31 fenye520.000005   #binlog:
-rw-rw---- 1 mysql mysql      143 9月   4 14:22 fenye520.000004
-rw-rw---- 1 mysql mysql      143 9月   4 14:22 fenye520.000001
-rw-rw---- 1 mysql mysql      143 9月   4 14:21 fenye520.000003
-rw-rw---- 1 mysql mysql      143 9月   4 14:21 fenye520.000002
-rw-rw---- 1 mysql mysql    16384 8月  23 22:12 aria_log.00000001
-rw-rw---- 1 mysql mysql       52 8月  23 22:12 aria_log_control
-rw-rw---- 1 mysql mysql        0 8月  23 21:49 multi-master.info
-rw-rw---- 1 mysql mysql 50331648 8月  23 21:48 ib_logfile1
-rw-rw---- 1 mysql mysql       56 8月  21 22:00 auto.cnf
drwx------ 2 mysql mysql     4096 8月  21 21:10 mysql         #mysql自带的数据库,存放用户名密码等:
drwx------ 2 mysql mysql        6 8月  21 21:07 test
注释: 会生成两个文件:fenye520.000005(binlog日记) fenye520.index(索引页)
.index:索引页,这个文件是必须要有的:
.000001:这个是二进制binlog文件,会持续生成2 3 4等等(这个文件是实现主从配置的根本,没有这个文件则没办法完成主从):
5、测试:准备用mysql数据库下zrlog做演示用:
首先做一个备份: mysqldump -uroot -pnihao123! zrlog > /tmpt/zrlog.sql
[root@localhost_01 ~]# mysqldump -uroot -pnihao123! zrlog > /tmp/zrlog.sql
Warning: Using a password on the command line interface can be insecure.
[root@localhost_02 ~]# ls /tmp/zrlog.sql
/tmp/zrlog.sql
创建一个新的库: mysql -uroot -pnihao123! -e "create databese FYKU"
[root@localhost_01 ~]# mysql -uroot -pnihao123! -e "create database FYKU"
Warning: Using a password on the command line interface can be insecure.
创建好库后,在把数据恢复一下,也就是说主从是以FYKU这个库为准的:
[root@localhost_01 ~]# mysql -uroot  -pnihao123! FYKU < /tmp/zrlog.sql
Warning: Using a password on the command line interface can be insecure.
6、再次查看/data/mysql下的文件,能看到fenye520.000001这个文件有增加的:
7、下面创建用于主从同步数据时所需的用户和密码: 也就是binlog和I/Olog之间使用:
grant replication slave on *.* 'repl'@slave_ip identified by 'nihao123!';
[root@localhost_01 ~]# mysql -uroot -pnihao123!
mysql> grant replication slave on *.* to 'repl'@192.168.149.129 identified by 'nihao123!';
Query OK, 0 rows affected (0.01 sec)
replication slave 指定权限,
*.* 表示所有库所有表:
repl@192.168.149.129: 指定用户以及来源IP,指定all会很危险:
8、锁定表,目的是不让变继续写数据,因为一会从要同步数据,需要进行一个同步,让两者的数据相同:
mysql> flush tables with read lock;
Query OK, 0 rows affected (0.04 sec)
9、查看一下binlog文件的大小,并记住filename:
mysql> show master status;
+-----------------+----------+--------------+------------------+-------------------+
| File            | Position | Binlog_Do_DB | Binlog_Ignore_DB | Executed_Gtid_Set |
+-----------------+----------+--------------+------------------+-------------------+
| fenye520.000005 |     9946 |              |                  |                   |
+-----------------+----------+--------------+------------------+-------------------+
1 row in set (0.00 sec)
10、退出数据库,做了一个数据同步:
查看/data/mysql目录,主上有哪些库,一会儿从上也要有这些库,主从同步,就是把这些库同步到从上面:
[root@localhost_01 ~]# ls /data/mysql/
aria_log.00000001  fenye520.000001  fenye520.000004  FYKU            ib_logfile0        localhost_02.err   mysql               zrlog
aria_log_control   fenye520.000002  fenye520.000005  ib_buffer_pool  ib_logfile1        localhost_02.pid   performance_schema
auto.cnf           fenye520.000003  fenye520.index   ibdata1         localhost_002.err  multi-master.info  test
备份其他的库并查看所有的库: mysqldump -uroot -pnihao123! test > /tmp/test.sql
[root@localhost_01 ~]# mysqldump -uroot -pnihao123! test > /tmp/test.sql
Warning: Using a password on the command line interface can be insecure.
[root@localhost_01 ~]# ls /tmp/*.sql
/tmp/test.sql /tmp/zrlog.sql注释:等一会儿后要把/tmp/目录下的*.sql的文件拷贝到从的上面:
由此主上操作完成,接下来操作从:
主从配置——从上操作:
1:安装mysql:
2:查看/etc/my.cnf,配置server-id: #无需配置binlog:
重启启动mysql:
把主上的zrlog库同步到从上:可以先在从上创建相应zrlog FEKU库,然后把主上/tmp/*.sql拷贝到主上,然后导入zrlog库:
scp 192.168.149.130/tmp/*.sql /tmp/
3、mysql -uroot -pnihao123
stop slave;
change master to master_host='', master_user='repl', master_password='', master_log_file='', master_log_pos=xx,
start slave;
最后去主上执行 unlock tables;
主从配置---从上操作:
1、修改/etc/my.cnf文件,定义server-id #注释:从上不需要定义binlog:
[root@localhost_02 ~]# vim /etc/my.cnf
[mysqld]
datadir=/data/mysql
socket=/tmp/mysql.sock
server-id=129                #此处用IP地址定义的:
2、重启启动mysql服务:
[root@localhost_02 ~]# /etc/init.d/mysqld restart
Shutting down MySQL.. SUCCESS!
Starting MySQL. SUCCESS! 并且再增加server-id后,对数据库目录/data/mysql没有任何变化:
[root@localhost_02 ~]# ls /data/mysql/
auto.cnf  ibdata1  ib_logfile0  ib_logfile1  localhost_02.err  localhost_02.pid  mysql  performance_schema  test
3:然后把主机器上的.sql数据拷贝到从机器上,做一个数据恢复: scp 192.168.149.130:/tmp/*.sql /tmp/
[root@localhost_02 ~]# scp -P 52588 192.168.149.130:/tmp/*.sql  /tmp/
root@192.168.149.130's password:
test.sql                                                                                           100% 1259   926.8KB/s   00:00
zrlog.sql                                                                                          100% 7713   488.5KB/s   00:00
[root@localhost_02 ~]# ls /tmp/*.sql
/tmp/test.sql  /tmp/zrlog.sql
4:在从数据库上创建相应的库: zrlog FYKU库:
[root@localhost_02 ~]# mysql
Welcome to the MySQL monitor.  Commands end with ; or \g.
mysql> create database zrlog;
Query OK, 1 row affected (0.00 sec)
mysql> create database FEKU;
Query OK, 1 row affected (0.00 sec)
5:然后对数据库做个恢复: mysql -uroot zrlog < /tmp/zrlog.sql
[root@localhost_02 ~]# mysql -uroot zrlog < /tmp/zrlog.sql
[root@localhost_02 ~]# mysql -uroot FYKU < /tmp/zrlog.sql
[root@localhost_02 ~]# mysql -uroot test < /tmp/test.sql
注释;要保证两边的数据一致,查看两个目录的文件目录是否相同:
开始实现主从:
6:登录从机器,执行stop slave操作:
[root@localhost_02 ~]# mysql -uroot
Welcome to the MySQL monitor.  Commands end with ; or \g.
mysql> stop slave;
Query OK, 0 rows affected, 1 warning (0.00 sec)
7:在从机器配置同步的相关配置(主机名、用户名、密码、日记文件等):
change master to master_host='192.168.149.130', master_user='repl', master_password='nihao123!', master_log_file='fenye520.000005', master_log_pos=9946;
master_host=192.168.149.130:指定主机器host:
master_user='repl':指定主机器用户:
master_password='nihao123!':指定主机器密码:
master_log_file='fenye520.000005':指定binlog文件名:
master_log_pos='9949':指定binlog文件大小:
master_port=' ':指定主机的端口,因为在生产环境中,很少有人会修改mysql的默认端口,此选项一般极少使用:
mysql> change master to master_host='192.168.149.130', master_user='repl', master_password='nihao123!', master_log_file='fenye520.000005', master_log_pos=9946;
Query OK, 0 rows affected, 2 warnings (0.06 sec)
8:开启start salve:
mysql> start  slave;
Query OK, 0 rows affected (0.01 sec)
最后需要解锁主上的表(在mysql主上操作): unlock table;
[root@localhost_01 ~]# mysql -uroot -pnihao123!
Warning: Using a password on the command line interface can be insecure.
mysql> unlock table;
Query OK, 0 rows affected (0.00 sec)
到这一步了,mysql主从就搭建完成:
注释:可以通过 从上show slave status\G 判断主从是否配置成功:
注意: \G后面不需要加分号,\G本身就是结束符:
看 Slave_IO_Running: Yes 是否为yes
看 Slave_SQL_Running: Yes 是否为yes
注释:有时可能防火墙或者SElinux会影响到此处这两个选项:
mysql> show slave status\G
*************************** 1. row ***************************
               Slave_IO_State: Waiting for master to send event
                  Master_Host: 192.168.149.130
                  Master_User: repl
                  Master_Port: 3306
                Connect_Retry: 60
              Master_Log_File: fenye520.000005
          Read_Master_Log_Pos: 9946
               Relay_Log_File: localhost_02-relay-bin.000002
                Relay_Log_Pos: 282
        Relay_Master_Log_File: fenye520.000005
             Slave_IO_Running: Yes
            Slave_SQL_Running: Yes
              Replicate_Do_DB:
          Replicate_Ignore_DB:
           Replicate_Do_Table:
       Replicate_Ignore_Table:
      Replicate_Wild_Do_Table:
  Replicate_Wild_Ignore_Table:
                   Last_Errno: 0
                   Last_Error:
                 Skip_Counter: 0
          Exec_Master_Log_Pos: 9946
              Relay_Log_Space: 462
              Until_Condition: None
               Until_Log_File:
                Until_Log_Pos: 0
           Master_SSL_Allowed: No
           Master_SSL_CA_File:
           Master_SSL_CA_Path:
              Master_SSL_Cert:
            Master_SSL_Cipher:
               Master_SSL_Key:
        Seconds_Behind_Master: 0
Master_SSL_Verify_Server_Cert: No
                Last_IO_Errno: 0
                Last_IO_Error:
               Last_SQL_Errno: 0
               Last_SQL_Error:
  Replicate_Ignore_Server_Ids:
             Master_Server_Id: 130
                  Master_UUID: 94f8afad-a54a-11e8-935c-000c2981f44b
             Master_Info_File: /data/mysql/master.info
                    SQL_Delay: 0
          SQL_Remaining_Delay: NULL
      Slave_SQL_Running_State: Slave has read all relay log; waiting for the slave I/O thread to update it
           Master_Retry_Count: 86400
                  Master_Bind:
      Last_IO_Error_Timestamp:
     Last_SQL_Error_Timestamp:
               Master_SSL_Crl:
           Master_SSL_Crlpath:
           Retrieved_Gtid_Set:
            Executed_Gtid_Set:
                Auto_Position: 0
1 row in set (0.00 sec)
注释:如何主从同步是否正常:
首先在从上执行登录mysql,然后执行 show slave status\G
查看是否有:
Slave_IO_Running: Yes
Slave_SQL_Running: Yes
还需关注:
Seconds_Behind_Master: 0 #主从延迟的时间:
Master_SSL_Verify_Server_Cert: No
Last_IO_Errno: 0
Last_IO_Error:
Last_SQL_Errno: 0
Last_SQL_Error:
几个配置参数情况如下:
主服务器:
binlog-do-db=             //仅同步指定的库,多个库可以用逗号','隔开:
binlog-ignore-db=         //忽略指定库
从服务器:
replicate_do_db=                          //仅同步指定的库:
replicate_ignore_db=                      //忽略指定库:
replicate_do_table=                       //仅同步指定的表:
replicate_ignore_table=                   //忽略指定表:
例如:有一个临时表,写的数据非常快,数据也大,每天都需要删除这时就可以更新删除这个,那么就不需要每天去做同步
replicate_wild_do_table=                  //如aming.%, 支持通配符%  指定同步靠谱的匹配  同步表
replicate_wild_ignore_table=              //如aming.%, 支持通配符%  指定同步靠谱的匹配  忽略表
注释:进行从服务器的配置时尽量使用参数“replicate_wild_”,使匹配更精确,提升使用性能
3、主从测试:
1、主上操作:mysql -uroot -pnihao123
use zrlog;
select count(*) from t1111;
truncate table db;
2、从上 mysql -uroot aming
select count(*) from t111;
主上继续drop table t111;
从上查看tables表:
主上操作:进入到mysql,并查看有几个表: show tables;
[root@localhost_01 ~]# mysql -uroot  -pnihao123!
Warning: Using a password on the command line interface can be insecure.
mysql> use zrlog
Database changed
mysql> show tables;
+-----------------+
| Tables_in_zrlog |
+-----------------+
| t1111           |
| t112312312      |
| t2222           |
| t3333           |
| t334tasgs       |
| t44444          |
+-----------------+
12 rows in set (0.00 sec)主上操作:此时我们在主上往t1111表里插入一条数据:
mysql> insert into t1111 values(10);
Query OK, 1 row affected (0.00 sec)
mysql> select count(*) from t1111;
+----------+
| count(*) |
+----------+
|        1 |
+----------+
1 row in set (0.00 sec)
从上操作:此时来从上zrlog库里t1111表查看,看到的内容是一样的:
mysql> use zrlog;
mysql> select count(*) from t1111;
+----------+
| count(*) |
+----------+
|        1 |
+----------+
1 row in set (0.00 sec)注释:truncate table t1111; 表示清空表的内容:
第二次操作:在主上删除这个t1111表,然后在从上观察:
主上操作:删除t1111这个表: drop table t1111;
mysql> drop table t1111;
Query OK, 0 rows affected (0.00 sec)

mysql> show tables;
+-----------------+
| Tables_in_zrlog |
+-----------------+
| t112312312      |
| t2222           |
| t3333           |
| t334tasgs       |
| t44444          |
11 rows in set (0.00 sec)
从上操作:在从上查看: show table t1111;
mysql> show tables;
+-----------------+
| Tables_in_zrlog |
+-----------------+
| t112312312      |
| t2222           |
| t3333           |
| t334tasgs       |
| t44444          |
11 rows in set (0.00 sec)注释:发现从上的表t1111也被删除了:
注释:若是误操作了,比如在从机器误删除了,再去主上删除相同的数据,就会有可能导致主从失败
这时在从机器上 stop slave;
然后在start slave;
再来查看show slave status\G
若是还是失败,则只能 重新做主从了:
如何重新做主从呢:
在主机器的数据库上 show mater status;
查看文件大小:并记录到那个position:
然后在从机器上先stop slave;
然后直接change master to master_host='192.168.180.134', master_user='repl', master_password='123456', master_log_file='yueyong123.000001', master_log_pos=10470;
#仅仅只修改后面的master_log_pos=' ';这步就可以了:
因为基本还没做什么操作的,数据还是一致的,
直接改下数据大小就可以了:
然后在从机器上 start slave;
再来查看 show slave status\G
看是否为两个Yes: