2019独角兽企业重金招聘Python工程师标准>>> 
摘要: 在Kubernetes 1.10版本中,默认并推荐使用DevicePlugins Feature Gate来发现和使用Nvidia GPU资源,抛弃了Kubernetes 1.8之前推荐使用的Accelerators Feature Gate的built-in方式,继承了Kubernetes的插件化的思想,把专业的事交给专业的厂商去做。本文将介绍Device Plugins的的原理和工作机制、Extended Resource、异常处理及改进、如何使用和调度GPU等内容。
Device Plugins
Device Pulgins在Kubernetes 1.10中是beta特性,开始于Kubernetes 1.8,用来给第三方设备厂商通过插件化的方式将设备资源对接到Kubernetes,给容器提供Extended Resources。
通过Device Plugins方式,用户不需要改Kubernetes的代码,由第三方设备厂商开发插件,实现Kubernetes Device Plugins的相关接口即可。
目前关注度比较高的Device Plugins实现有:
- Nvidia提供的GPU插件:NVIDIA device plugin for Kubernetes
- 高性能低延迟RDMA卡插件:RDMA device plugin for Kubernetes
- 低延迟Solarflare万兆网卡驱动:Solarflare Device Plugin
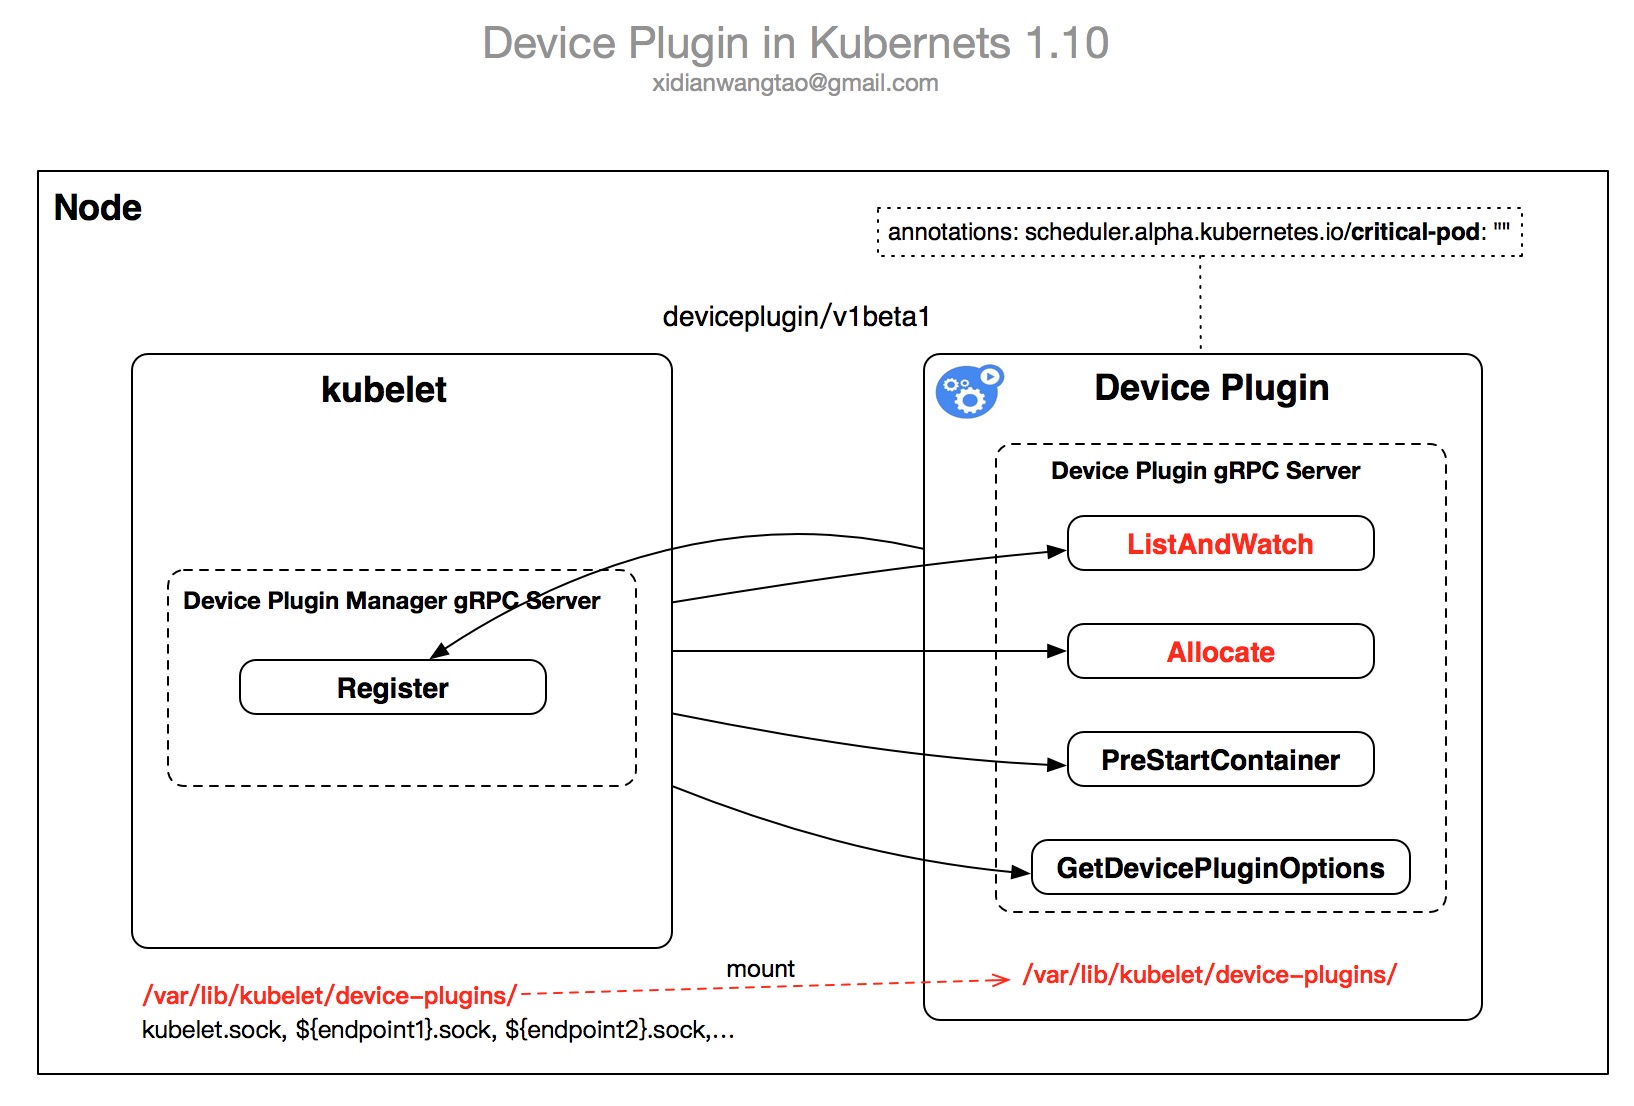
Device plugins启动时,对外暴露几个gRPC Service提供服务,并通过/var/lib/kubelet/device-plugins/kubelet.sock向kubelet进行注册。
Device Plugins Registration
-
在Kubernetes 1.10之前的版本,默认disable DevicePlugins,用户需要在Feature Gate中enable。
-
在Kubernetes 1.10,默认enable DevicePlugins,用户可以在Feature Gate中disable it。
-
当DevicePlugins Feature Gate enable,kubelet就会暴露一个Register gRPC接口。Device Plugins通过调用Register接口完成Device的注册。
-
Register接口描述如下:
pkg/kubelet/apis/deviceplugin/v1beta1/api.pb.go:440 type RegistrationServer interface { Register(context.Context, *RegisterRequest) (*Empty, error) } pkg/kubelet/apis/deviceplugin/v1beta1/api.pb.go:87 type RegisterRequest struct { // Version of the API the Device Plugin was built against Version string `protobuf:"bytes,1,opt,name=version,proto3" json:"version,omitempty"` // Name of the unix socket the device plugin is listening on // PATH = path.Join(DevicePluginPath, endpoint) Endpoint string `protobuf:"bytes,2,opt,name=endpoint,proto3" json:"endpoint,omitempty"` // Schedulable resource name. As of now it's expected to be a DNS Label ResourceName string `protobuf:"bytes,3,opt,name=resource_name,json=resourceName,proto3" json:"resource_name,omitempty"` // Options to be communicated with Device Manager Options *DevicePluginOptions `protobuf:"bytes,4,opt,name=options" json:"options,omitempty"` } -
RegisterRequest要求的参数如下:
- Version, 目前有v1alpha,v1beta1两个版本。
- Endpoint, 表示device plugin暴露的socket名称,Register时会根据Endpoint生成plugin的socket放在
/var/lib/kubelet/device-plugins/目录下,比如Nvidia GPU Device Plugin对应/var/lib/kubelet/device-plugins/nvidia.sock。 - ResourceName, 须按照Extended Resource Naming Scheme格式
vendor-domain/resource,比如nvidia.com/gpu - DevicePluginOptions, 作为kubelet与device plugin通信时的额外参数传递。
-
对于nvidia gpu,只有一个PreStartRequired选项,表示每个Container启动前是否要调用Device Plugin的PreStartContainer接口(是Kubernetes 1.10中Device Plugin Interface接口之一),默认为false。
	vendor/k8s.io/kubernetes/pkg/kubelet/apis/deviceplugin/v1beta1/api.pb.go:71
	func (m *NvidiaDevicePlugin) GetDevicePluginOptions(context.Context, *pluginapi.Empty) (*pluginapi.DevicePluginOptions, error) {
		return &pluginapi.DevicePluginOptions{}, nil
	}

	github.com/NVIDIA/k8s-device-plugin/server.go:80
	type DevicePluginOptions struct {
		// Indicates if PreStartContainer call is required before each container start
		PreStartRequired bool `protobuf:"varint,1,opt,name=pre_start_required,json=preStartRequired,proto3" json:"pre_start_required,omitempty"`
	}
-
-
前面提到Device Plugin Interface目前有v1alpha, v1beta1两个版本,每个版本对应的接口如下:
-
v1alpha:
-
/deviceplugin.Registration/Register
pkg/kubelet/apis/deviceplugin/v1alpha/api.pb.go:374 var _Registration_serviceDesc = grpc.ServiceDesc{ ServiceName: "deviceplugin.Registration", HandlerType: (*RegistrationServer)(nil), Methods: []grpc.MethodDesc{ { MethodName: "Register", Handler: _Registration_Register_Handler, }, }, Streams: []grpc.StreamDesc{}, Metadata: "api.proto", } -
/deviceplugin.DevicePlugin/Allocate
-
/deviceplugin.DevicePlugin/ListAndWatch
	pkg/kubelet/apis/deviceplugin/v1alpha/api.pb.go:505
	var _DevicePlugin_serviceDesc = grpc.ServiceDesc{
		ServiceName: "deviceplugin.DevicePlugin",
		HandlerType: (*DevicePluginServer)(nil),
		Methods: []grpc.MethodDesc{
			{
				MethodName: "Allocate",
				Handler:    _DevicePlugin_Allocate_Handler,
			},
		},
		Streams: []grpc.StreamDesc{
			{
				StreamName:    "ListAndWatch",
				Handler:       _DevicePlugin_ListAndWatch_Handler,
				ServerStreams: true,
			},
		},
		Metadata: "api.proto",
	}
-
-
v1beta1:
-
/v1beta1.Registration/Register
/v1beta1.Registration/Register pkg/kubelet/apis/deviceplugin/v1beta1/api.pb.go:466 var _Registration_serviceDesc = grpc.ServiceDesc{ ServiceName: "v1beta1.Registration", HandlerType: (*RegistrationServer)(nil), Methods: []grpc.MethodDesc{ { MethodName: "Register", Handler: _Registration_Register_Handler, }, }, Streams: []grpc.StreamDesc{}, Metadata: "api.proto", } -
/v1beta1.DevicePlugin/ListAndWatch
-
/v1beta1.DevicePlugin/Allocate
-
/v1beta1.DevicePlugin/PreStartContainer
-
/v1beta1.DevicePlugin/GetDevicePluginOptions
	pkg/kubelet/apis/deviceplugin/v1beta1/api.pb.go:665
	var _DevicePlugin_serviceDesc = grpc.ServiceDesc{
		ServiceName: "v1beta1.DevicePlugin",
		HandlerType: (*DevicePluginServer)(nil),
		Methods: []grpc.MethodDesc{
			{
				MethodName: "GetDevicePluginOptions",
				Handler:    _DevicePlugin_GetDevicePluginOptions_Handler,
			},
			{
				MethodName: "Allocate",
				Handler:    _DevicePlugin_Allocate_Handler,
			},
			{
				MethodName: "PreStartContainer",
				Handler:    _DevicePlugin_PreStartContainer_Handler,
			},
		},
		Streams: []grpc.StreamDesc{
			{
				StreamName:    "ListAndWatch",
				Handler:       _DevicePlugin_ListAndWatch_Handler,
				ServerStreams: true,
			},
		},
		Metadata: "api.proto",
	}
-
-
-
当Device Plugin成功注册后,它将通过ListAndWatch向kubelet发送它管理的device列表,kubelet收到数据后通过API Server更新etcd中对应node的status中。
-
然后用户就能在Container Spec request中请求对应的device,注意以下限制:
- Extended Resource只支持请求整数个device,不支持小数点。
- 不支持超配,即Resource QoS只能是Guaranteed。
- 同一块Device不能多个Containers共享。
Device Plugins Workflow
Device Plugins的工作流如下:
-
初始化:Device Plugin启动后,进行一些插件特定的初始化工作以确定对应的Devices处于Ready状态,对于Nvidia GPU,就是加载NVML Library。
-
启动gRPC服务:通过
/var/lib/kubelet/device-plugins/${Endpoint}.sock对外暴露gRPC服务,不同的API Version对应不同的服务接口,前面已经提过,下面是每个接口的描述。- v1alpha:
-
ListAndWatch
-
Allocate
	pkg/kubelet/apis/deviceplugin/v1alpha/api.proto
	// DevicePlugin is the service advertised by Device Plugins
	service DevicePlugin {
		// ListAndWatch returns a stream of List of Devices
		// Whenever a Device state changes or a Device disappears, ListAndWatch
		// returns the new list
		rpc ListAndWatch(Empty) returns (stream ListAndWatchResponse) {}

		// Allocate is called during container creation so that the Device
		// Plugin can run device specific operations and instruct Kubelet
		// of the steps to make the Device available in the container
		rpc Allocate(AllocateRequest) returns (AllocateResponse) {}
	}
-
- v1beta1:
-
ListAndWatch
-
Allocate
-
GetDevicePluginOptions
-
PreStartContainer
	pkg/kubelet/apis/deviceplugin/v1beta1/api.proto
	// DevicePlugin is the service advertised by Device Plugins
	service DevicePlugin {
		// GetDevicePluginOptions returns options to be communicated with Device
	        // Manager
		rpc GetDevicePluginOptions(Empty) returns (DevicePluginOptions) {}

		// ListAndWatch returns a stream of List of Devices
		// Whenever a Device state change or a Device disapears, ListAndWatch
		// returns the new list
		rpc ListAndWatch(Empty) returns (stream ListAndWatchResponse) {}

		// Allocate is called during container creation so that the Device
		// Plugin can run device specific operations and instruct Kubelet
		// of the steps to make the Device available in the container
		rpc Allocate(AllocateRequest) returns (AllocateResponse) {}

    // PreStartContainer is called, if indicated by Device Plugin during registeration phase,
    // before each container start. Device plugin can run device specific operations
    // such as reseting the device before making devices available to the container
		rpc PreStartContainer(PreStartContainerRequest) returns (PreStartContainerResponse) {}
	}
-
- v1alpha:
-
Device Plugin通过
/var/lib/kubelet/device-plugins/kubelet.sock向kubelet进行注册。 -
注册成功后,Device Plugin就正式进入了Serving模式,提供前面提到的gRPC接口调用服务,下面是v1beta1的每个接口对应的具体分析:
-
ListAndWatch:监控对应Devices的状态变更或者Disappear事件,返回
ListAndWatchResponse给kubelet, ListAndWatchResponse就是Device列表。type ListAndWatchResponse struct { Devices []*Device `protobuf:"bytes,1,rep,name=devices" json:"devices,omitempty"` } type Device struct { // A unique ID assigned by the device plugin used // to identify devices during the communication // Max length of this field is 63 characters ID string `protobuf:"bytes,1,opt,name=ID,json=iD,proto3" json:"ID,omitempty"` // Health of the device, can be healthy or unhealthy, see constants.go Health string `protobuf:"bytes,2,opt,name=health,proto3" json:"health,omitempty"` }
下面是
struct Device的GPU Sample:struct Device { ID: "GPU-fef8089b-4820-abfc-e83e-94318197576e", State: "Healthy", }-
Allocate:Device Plugin执行device-specific操作,返回
AllocateResponse给kubelet,kubelet再传给dockerd,由dockerd(调用nvidia-docker)在创建容器时分配device时使用。下面是这个接口的Request和Response的描述。-
Allocate is expected to be called during pod creation since allocation failures for any container would result in pod startup failure.
-
Allocate allows kubelet to exposes additional artifacts in a pod's environment as directed by the plugin.
-
Allocate allows Device Plugin to run device specific operations on the Devices requested
type AllocateRequest struct { ContainerRequests []*ContainerAllocateRequest `protobuf:"bytes,1,rep,name=container_requests,json=containerRequests" json:"container_requests,omitempty"` } type ContainerAllocateRequest struct { DevicesIDs []string `protobuf:"bytes,1,rep,name=devicesIDs" json:"devicesIDs,omitempty"` } // AllocateResponse includes the artifacts that needs to be injected into // a container for accessing 'deviceIDs' that were mentioned as part of // 'AllocateRequest'. // Failure Handling: // if Kubelet sends an allocation request for dev1 and dev2. // Allocation on dev1 succeeds but allocation on dev2 fails. // The Device plugin should send a ListAndWatch update and fail the // Allocation request type AllocateResponse struct { ContainerResponses []*ContainerAllocateResponse `protobuf:"bytes,1,rep,name=container_responses,json=containerResponses" json:"container_responses,omitempty"` } type ContainerAllocateResponse struct { // List of environment variable to be set in the container to access one of more devices. Envs map[string]string `protobuf:"bytes,1,rep,name=envs" json:"envs,omitempty" protobuf_key:"bytes,1,opt,name=key,proto3" protobuf_val:"bytes,2,opt,name=value,proto3"` // Mounts for the container. Mounts []*Mount `protobuf:"bytes,2,rep,name=mounts" json:"mounts,omitempty"` // Devices for the container. Devices []*DeviceSpec `protobuf:"bytes,3,rep,name=devices" json:"devices,omitempty"` // Container annotations to pass to the container runtime Annotations map[string]string `protobuf:"bytes,4,rep,name=annotations" json:"annotations,omitempty" protobuf_key:"bytes,1,opt,name=key,proto3" protobuf_val:"bytes,2,opt,name=value,proto3"` } // DeviceSpec specifies a host device to mount into a container. type DeviceSpec struct { // Path of the device within the container. ContainerPath string `protobuf:"bytes,1,opt,name=container_path,json=containerPath,proto3" json:"container_path,omitempty"` // Path of the device on the host. HostPath string `protobuf:"bytes,2,opt,name=host_path,json=hostPath,proto3" json:"host_path,omitempty"` // Cgroups permissions of the device, candidates are one or more of // * r - allows container to read from the specified device. // * w - allows container to write to the specified device. // * m - allows container to create device files that do not yet exist. Permissions string `protobuf:"bytes,3,opt,name=permissions,proto3" json:"permissions,omitempty"` } -
AllocateRequest就是DeviceID列表。
-
AllocateResponse包括需要注入到Container里面的Envs、Devices的挂载信息(包括device的cgroup permissions)以及自定义的Annotations。
-
-
PreStartContainer:
-
PreStartContainer is expected to be called before each container start if indicated by plugin during registration phase.
-
PreStartContainer allows kubelet to pass reinitialized devices to containers.
-
PreStartContainer allows Device Plugin to run device specific operations on the Devices requested.
	type PreStartContainerRequest struct {
		DevicesIDs []string `protobuf:"bytes,1,rep,name=devicesIDs" json:"devicesIDs,omitempty"`
	}

	// PreStartContainerResponse will be send by plugin in response to PreStartContainerRequest
	type PreStartContainerResponse struct {
	}
-
-
GetDevicePluginOptions: 目前只有
PreStartRequired这一个field。type DevicePluginOptions struct { // Indicates if PreStartContainer call is required before each container start PreStartRequired bool `protobuf:"varint,1,opt,name=pre_start_required,json=preStartRequired,proto3" json:"pre_start_required,omitempty"` }
-
异常处理
-
每次kubelet启动(重启)时,都会将/var/lib/kubelet/device-plugins下的所有sockets文件删除。
-
Device Plugin要负责监测自己的socket被删除,然后进行重新注册,重新生成自己的socket。
-
当plugin socket被误删,Device Plugin该怎么办?
我们看看Nvidia Device Plugin是怎么处理的,相关的代码如下:
github.com/NVIDIA/k8s-device-plugin/main.go:15

func main() {
	...

	log.Println("Starting FS watcher.")
	watcher, err := newFSWatcher(pluginapi.DevicePluginPath)

    ...

	restart := true
	var devicePlugin *NvidiaDevicePlugin

L:
	for {
		if restart {
			if devicePlugin != nil {
				devicePlugin.Stop()
			}

			devicePlugin = NewNvidiaDevicePlugin()
			if err := devicePlugin.Serve(); err != nil {
				log.Println("Could not contact Kubelet, retrying. Did you enable the device plugin feature gate?")
				log.Printf("You can check the prerequisites at: https://github.com/NVIDIA/k8s-device-plugin#prerequisites")
				log.Printf("You can learn how to set the runtime at: https://github.com/NVIDIA/k8s-device-plugin#quick-start")
			} else {
				restart = false
			}
		}

		select {
		case event := <-watcher.Events:
			if event.Name == pluginapi.KubeletSocket && event.Op&fsnotify.Create == fsnotify.Create {
				log.Printf("inotify: %s created, restarting.", pluginapi.KubeletSocket)
				restart = true
			}

		case err := <-watcher.Errors:
			log.Printf("inotify: %s", err)

		case s := <-sigs:
			switch s {
			case syscall.SIGHUP:
				log.Println("Received SIGHUP, restarting.")
				restart = true
			default:
				log.Printf("Received signal \"%v\", shutting down.", s)
				devicePlugin.Stop()
				break L
			}
		}
	}
}
- 通过
fsnotify.Watcher监控/var/lib/kubelet/device-plugins/目录。 - 如果
fsnotify.Watcher的Events Channel收到Createkubelet.sock事件(说明kubelet发生重启),则会触发Nvidia Device Plugin的重启。 - Nvidia Device Plugin重启的逻辑是:先检查devicePlugin对象是否为空(说明完成了Nvidia Device Plugin的初始化):
- 如果不为空,则先停止Nvidia Device Plugin的gRPC Server。
- 然后调用NewNvidiaDevicePlugin()重建一个新的DevicePlugin实例。
- 调用Serve()启动gRPC Server,并先kubelet注册自己。
因此,这其中只监控了kubelet.sock的Create事件,能很好处理kubelet重启的问题,但是并没有监控自己的socket是否被删除的事件。所以,如果Nvidia Device Plugin的socket被误删了,那么将会导致kubelet无法与该节点的Nvidia Device Plugin进行socket通信,则意味着Device Plugin的gRPC接口都无法调通:
- 无法ListAndWatch该节点上的Device列表、健康状态,Devices信息无法同步。
- 无法Allocate Device,导致容器创建失败。
因此,建议加上对自己device plugin socket的删除事件的监控,一旦监控到删除,则应该触发restart。
select {
    case event := <-watcher.Events:
    	if event.Name == pluginapi.KubeletSocket && event.Op&fsnotify.Create == fsnotify.Create {
    		log.Printf("inotify: %s created, restarting.", pluginapi.KubeletSocket)
    		restart = true
    	}

    	// 增加对nvidia.sock的删除事件监控
    	if event.Name == serverSocket && event.Op&fsnotify.Delete == fsnotify.Delete {
    		log.Printf("inotify: %s deleted, restarting.", serverSocket)
    		restart = true
    	}

    	...
}
Extended Resources
-
Device Plugin是通过Extended Resources来expose宿主机上的资源的,Kubernetes内置的Resources都是隶属于
kubernetes.iodomain的,因此Extended Resource不允许advertise在kubernetes.iodomain下。 -
Node-level Extended Resource
-
Device plugin管理的资源
-
其他资源
- 给API Server提交PATCH请求,给node的status.capacity添加新的资源名称和数量;
- kubelet通过定期更新node status.allocatable到API Server,这其中就包括事先给node打PATCH新加的资源。之后请求了新加资源的Pod就会被scheduler根据node status.allocatable进行FitResources Predicate甩选node。
- 注意:kubelet通过--node-status-update-frequency配置定期更新间隔,默认10s。因此,当你提交完PATCH后,最坏情况下可能要等待10s左右的时间才能被scheduler发现并使用该资源。
curl --header "Content-Type: application/json-patch+json" \
--request PATCH \
--data '[{"op": "add", "path": "/status/capacity/example.com~1foo", "value": "5"}]' \
http://k8s-master:8080/api/v1/nodes/k8s-node-1/status
注意:~1 is the encoding for the character / in the patch path。
-
-
Cluster-level Extended Resources
-
通常集群级的Extended Resources是给scheduler extender使用的,用来做Resources的配额管理。
-
当Pod请求的resource中包含该extended resources时,default scheduler才会将这个Pod发给对应的scheduler extender进行二次调度。
-
ignoredByScheduler field如果设置为true,则default scheduler将不会对该资源进行PodFitsResources预选检查,通常都会设置为true,因为Cluster-level不是跟node相关的,不适合进行PodFitResources对Node资源进行检查。
{
  "kind": "Policy",
  "apiVersion": "v1",
  "extenders": [
    {
      "urlPrefix":"<extender-endpoint>",
      "bindVerb": "bind",
      "ManagedResources": [
        {
          "name": "example.com/foo",
          "ignoredByScheduler": true
        }
      ]
    }
  ]
}
-
-
API Server限制了Extender Resources只能为整数,比如2,2000m,2Ki,不能为1.5, 1500m。
-
Contaienr resources filed中只配置的Extended Resources必须是Guaranteed QoS。即要么只显示设置了limits(此时requests默认同limits),要么requests和limit显示配置一样。
Scheduler GPU
https://kubernetes.io/docs/tasks/manage-gpus/scheduling-gpus/
这里我们只讨论Kubernetes 1.10中如何调度使用GPU。
在Kubernetes 1.8之前,官方还是建议enable alpha gate feature: Accelerators,通过请求resource alpha.kubernetes.io/nvidia-gpu来使用gpu,并且要求容器挂载Host上的nvidia lib和driver到容器内。这部分内容,请参考我的博文:如何在Kubernetes集群中利用GPU进行AI训练。
- 从Kubernetes 1.8开始,官方推荐使用Device Plugins方式来使用GPU。
- 需要在Node上pre-install NVIDIA Driver,并建议通过Daemonset部署NVIDIA Device Plugin,完成后Kubernetes才能发现nvidia.com/gpu。
- 因为device plugin通过extended resources来expose gpu resource的,所以在container请求gpu资源的时候要注意resource QoS为Guaranteed。
- Containers目前仍然不支持共享同一块gpu卡。每个Container可以请求多块gpu卡,但是不支持gpu fraction。
使用官方nvidia driver除了以上注意事项之外,还需注意:
-
Node上需要pre-install nvidia docker 2.0,并使用nvidia docker替换runC作为docker的默认runtime。
-
在CentOS上,参考如下方式安装nvidia docker 2.0 :
# Add the package repositories distribution=$(. /etc/os-release;echo $ID$VERSION_ID) curl -s -L https://nvidia.github.io/nvidia-docker/$distribution/nvidia-docker.repo | \ sudo tee /etc/yum.repos.d/nvidia-docker.repo # Install nvidia-docker2 and reload the Docker daemon configuration sudo yum install -y nvidia-docker2 sudo pkill -SIGHUP dockerd # Test nvidia-smi with the latest official CUDA image docker run --runtime=nvidia --rm nvidia/cuda nvidia-smi -
以上工作都完成后,Container就可以像请求buit-in resources一样请求gpu资源了:
	apiVersion: v1
	kind: Pod
	metadata:
	  name: cuda-vector-add
	spec:
	  restartPolicy: OnFailure
	  containers:
	    - name: cuda-vector-add
	      # https://github.com/kubernetes/kubernetes/blob/v1.7.11/test/images/nvidia-cuda/Dockerfile
	      image: "k8s.gcr.io/cuda-vector-add:v0.1"
	      resources:
	        limits:
	          nvidia.com/gpu: 2 # requesting 2 GPU
使用NodeSelector区分不同型号的GPU服务器
如果你的集群中存在不同型号的GPU服务器,比如nvidia tesla k80, p100, v100等,而且不同的训练任务需要匹配不同的GPU型号,那么先给Node打上对应的Label:
# Label your nodes with the accelerator type they have.
kubectl label nodes <node-with-k80> accelerator=nvidia-tesla-k80
kubectl label nodes <node-with-p100> accelerator=nvidia-tesla-p100
Pod中通过NodeSelector来指定对应的GPU型号:
apiVersion: v1
kind: Pod
metadata:
  name: cuda-vector-add
spec:
  restartPolicy: OnFailure
  containers:
    - name: cuda-vector-add
      # https://github.com/kubernetes/kubernetes/blob/v1.7.11/test/images/nvidia-cuda/Dockerfile
      image: "k8s.gcr.io/cuda-vector-add:v0.1"
      resources:
        limits:
          nvidia.com/gpu: 1
  nodeSelector:
    accelerator: nvidia-tesla-p100 # or nvidia-tesla-k80 etc.
思考:其实仅仅使用NodeSelector是不能很好解决这个问题的,这要求所有的pod都要加上对应的NodeSelector。对于V100这样的昂贵稀有的GPU卡,通常还要求不能让别的训练任务使用,只给某些算法训练使用,这个时候我们可以通过给Node打上对应的Taint,给需要的Pod的打上对应Toleration就能完美满足需求了。
Deploy
- 建议通过Daemonset来部署Device Plugin,方便实现failover。
- Device Plugin Pod必须具有privileged特权才能访问/var/lib/kubelet/device-plugins
- Device Plugin Pod需将宿主机的hostpath /var/lib/kubelet/device-plugins挂载到容器内相同的目录。
kubernetes 1.8
apiVersion: extensions/v1beta1
kind: DaemonSet
metadata:
  name: nvidia-device-plugin-daemonset
spec:
  template:
    metadata:
      labels:
        name: nvidia-device-plugin-ds
    spec:
      containers:
      - image: nvidia/k8s-device-plugin:1.8
        name: nvidia-device-plugin-ctr
        securityContext:
          privileged: true
        volumeMounts:
          - name: device-plugin
            mountPath: /var/lib/kubelet/device-plugins
      volumes:
        - name: device-plugin
          hostPath:
            path: /var/lib/kubelet/device-plugins
kubernetes 1.10
apiVersion: extensions/v1beta1
kind: DaemonSet
metadata:
  name: nvidia-device-plugin-daemonset
  namespace: kube-system
spec:
  template:
    metadata:
      # Mark this pod as a critical add-on; when enabled, the critical add-on scheduler
      # reserves resources for critical add-on pods so that they can be rescheduled after
      # a failure.  This annotation works in tandem with the toleration below.
      annotations:
        scheduler.alpha.kubernetes.io/critical-pod: ""
      labels:
        name: nvidia-device-plugin-ds
    spec:
      tolerations:
      # Allow this pod to be rescheduled while the node is in "critical add-ons only" mode.
      # This, along with the annotation above marks this pod as a critical add-on.
      - key: CriticalAddonsOnly
        operator: Exists
      containers:
      - image: nvidia/k8s-device-plugin:1.10
        name: nvidia-device-plugin-ctr
        securityContext:
          privileged: true
        volumeMounts:
          - name: device-plugin
            mountPath: /var/lib/kubelet/device-plugins
      volumes:
        - name: device-plugin
          hostPath:
            path: /var/lib/kubelet/device-plugins
关于Kubernetes对critical pod的处理,越来越有意思了,找个时间单独写个博客再详细聊这个。
Device Plugins原理图
总结
几个月前,在我的博客如何在Kubernetes集群中利用GPU进行AI训练对Kubernetes 1.8如何使用GPU进行了分析,在Kubernetes 1.10中,已经推荐使用Device Plugins来使用GPU了。本文分析了Device Plugin的的原理和工作机制,介绍了Extended Resource,Nvidia Device Plugin的异常处理及改进点,如何使用和调度GPU等。下一篇篇博客,我将对NVIDIA/k8s-device-plugin和kubelet device plugin进行源码分析,更加深入了解kubelet和nvidia device plugin的交互细节。