参考文献:
http://ice-k.iteye.com/blog/1068275
http://www.cnblogs.com/chen1987lei/archive/2010/11/26/1888391.html
背景:
有一台主机,安装了windows7,在其安装了virtualbox,然后安装了ubuntu虚拟机。在windows7上安装SecureCRT来ssh连接ubuntu虚拟机。一般在windows上面下载软件,然后通过vsftp上传到ubuntu虚拟机上。但是这样非常麻烦,现在考虑使用sftp协议来直接传输。
方案:
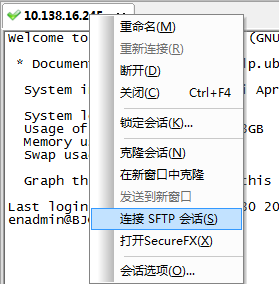
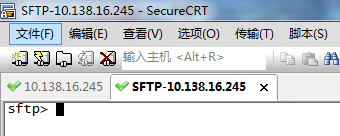
使用SecureCRT软件ssh连接到ubuntu虚拟机。然后在SecureCRT上面打开SFTP会话,如下图所示:
SFTP命令
进入到sftp命令窗口以后,就可以通过sftp命令来进行文件互传的操作。下面主要介绍一下sftp命令的含义。

sftp> help
Available commands:
ascii                          Set transfer mode to ASCII
binary                         Set transfer mode to binary
cd path                        Change remote directory to 'path'
lcd path                       Change local directory to 'path'
detail remote-path             Display system information about remote
                                 file or folder
ldetail local-path             Display system information about local
                                 file or folder
chgrp group path               Change group of file 'path' to 'group'
chmod mode path                Change permissions of file 'path' to 'mode'
chown owner path               Change owner of file 'path' to 'owner'
exit                           Quit sftp
help                           Display this help text
include filename               Include commands from 'filename'
                                 Alternate: < filename
get [-r][-a | -b] remote-path  Download file
                                 -r downloads directory recursively
                                 force ascii (-a) or binary (-b) mode
ln [-s] existingpath linkpath  Hardlink / symlink remote file
ls [options] [path]            Display remote directory listing
lls [options] [path]           Display local directory listing
mkdir path                     Create remote directory
lmkdir path                    Create local directory
mv oldpath newpath             Move remote file
lmv oldpath newpath            Move local file
open [user@]host[:port]        Connect to remote host
put [-r][-a | -b] local-path   Upload file
                                 -r uploads directory recursively
                                 force ascii (-a) or binary (-b) mode
pwd                            Display remote working directory
lpwd                           Print local working directory
quit                           Quit sftp
rename oldname newname         Rename remote file
lrename oldname newname        Rename local file
rmdir path                     Remove remote directory
lrmdir path                    Remove local directory
rm path                        Delete remote file
lrm path                       Delete local file
su username                    Substitutes the current user
                                 This is only supported with VShell for
                                 Windows 3.5 or later.
type [transfer-mode]           Display or set file transfer mode
view remote-path               Download and open file
version                        Display protocol version
翻译一下就是:
sftp-- help
可用命令:
cd 路径                        更改远程目录到“路径”
lcd 路径                       更改本地目录到“路径”
chgrp group path               将文件“path”的组更改为“group”
chmod mode path                将文件“path”的权限更改为“mode”
chown owner path               将文件“path”的属主更改为“owner”
exit                           退出 sftp
help                           显示这个帮助文本
get 远程路径                   下载文件
ln existingpath linkpath       符号链接远程文件
ls [选项] [路径]               显示远程目录列表
lls [选项] [路径]              显示本地目录列表
mkdir 路径                     创建远程目录
lmkdir 路径                    创建本地目录
mv oldpath newpath             移动远程文件
open [用户@]主机[:端口]        连接到远程主机
put 本地路径                   上传文件
pwd                            显示远程工作目录
lpwd                           打印本地工作目录
quit                           退出 sftp
rmdir 路径                     移除远程目录
lrmdir 路径                    移除本地目录
rm 路径                        删除远程文件
lrm 路径                       删除本地文件
symlink existingpath linkpath  符号链接远程文件
version                        显示协议版本
我们主要用到的就是一下六个命令
cd 路径                        更改远程目录到“路径”
lcd 路径                       更改本地目录到“路径”
ls [选项] [路径]               显示远程目录列表
lls [选项] [路径]              显示本地目录列表
put 本地路径                   上传文件
get 远程路径                   下载文件
这里在详细说明一下远程目录和本地目录。
远程目录:ls查看到的是ubuntu虚拟机上面的目录
本地目录:lls查看到的是windows实体机上面的目录。
实例:
假设我需要实现windows下的e:\sftp\test1.txt和ubuntu下/home/enadmin/test2.txt的互换,可以进行一下操作:
put操作:windows->linux
查看目录权限
root@BJCGNMON01:/home# ll
total 20
drwxr-xr-x  5 root    root    4096 Apr 18 15:21 ./
drwxr-xr-x 24 root    root    4096 Jan  3 14:14 ../
drwxr-xr-x  9 enadmin enadmin 4096 Apr 18 15:22 enadmin/
drwxr-xr-x  2 root    root    4096 Apr 18 15:21 sftp/--可以看到sftp的权限是root的
drwxr-xr-x  2 root    root    4096 Apr 18 14:57 test/
root@BJCGNMON01:/home# chown -R enadmin.enadmin sftp/
root@BJCGNMON01:/home# ll
total 20
drwxr-xr-x  5 root    root    4096 Apr 18 15:21 ./
drwxr-xr-x 24 root    root    4096 Jan  3 14:14 ../
drwxr-xr-x  9 enadmin enadmin 4096 Apr 18 15:22 enadmin/
drwxr-xr-x  2 enadmin enadmin 4096 Apr 18 15:21 sftp/--修改以后权限变成enadmin的了
drwxr-xr-x  2 root    root    4096 Apr 18 14:57 test/
拷贝文件
sftp> put test* --初始想将文件从windows系统put到ubuntu系统,发现失败,提示拒绝访问
Uploading test1.txt to /home/test1.txt
put: failed to upload e:/sftp/test1.txt. 拒绝访问。
Uploading test2.txt to /home/test2.txt
put: failed to upload e:/sftp/test2.txt. 拒绝访问。
Uploading test3.txt to /home/test3.txt
put: failed to upload e:/sftp/test3.txt. 拒绝访问。
sftp> pwd --查看当前目录是/home目录,权限是root的
/home
sftp> cd /home/enadmin/ --我切换到enadmin目录下
sftp> ls
Graphs.pm             msmtp                 ntp
sent                  smokeping.tar.gz      smokepingrtt.tar.gz
smokepingrtt2.tar.gz  Target                wqy
wqy-zenhei-0.8.38-1.deb
sftp> lls
test1.txt             test2.txt             test3.txt
sftp> put test* -再次尝试将windows下的文件put到/homg/enadmin目录下,这次成功
Uploading test1.txt to /home/enadmin/test1.txt
  100% 4 bytes      4 bytes/s 00:00:00
e:/sftp/test1.txt: 4 bytes transferred in 0 seconds (4 bytes/s)
Uploading test2.txt to /home/enadmin/test2.txt
  100% 4 bytes      4 bytes/s 00:00:00
e:/sftp/test2.txt: 4 bytes transferred in 0 seconds (4 bytes/s)
Uploading test3.txt to /home/enadmin/test3.txt
  100% 5 bytes      5 bytes/s 00:00:00
e:/sftp/test3.txt: 5 bytes transferred in 0 seconds (5 bytes/s)

sftp> cd /home/sftp/--在修改sftp目录权限以后,再次切换到sftp目录下
sftp> ls
sftp> lls
test1.txt             test2.txt             test3.txt
sftp> put test* --这回put成功。所以跟权限相关
Uploading test1.txt to /home/sftp/test1.txt
  100% 4 bytes      4 bytes/s 00:00:00
e:/sftp/test1.txt: 4 bytes transferred in 0 seconds (4 bytes/s)
Uploading test2.txt to /home/sftp/test2.txt
  100% 4 bytes      4 bytes/s 00:00:00
e:/sftp/test2.txt: 4 bytes transferred in 0 seconds (4 bytes/s)
Uploading test3.txt to /home/sftp/test3.txt
  100% 5 bytes      5 bytes/s 00:00:00
e:/sftp/test3.txt: 5 bytes transferred in 0 seconds (5 bytes/s)
注意点:这里需要注意权限的问题。加入我是使用enadmin账户初始连接ubuntu的,那么我put的文件只能放到文件夹权限是enadmin的目录下,不能放到文件夹权限是root的目录下。如果想放到文件夹权限是root的目录下,那么初始就使用root账户连接ubunut,然后再创建sftp会话,这样就可以了。
get操作:linux->windows
get操作没有权限设定
sftp> pwd
/home/enadmin
sftp> lpwd
e:/Documents
sftp> lcd e:/sftp --切换目录
sftp> lls
rc.local              test1.txt             test2.txt
test3.txt
sftp> ls
Graphs.pm             msmtp                 ntp
sent                  smokeping.tar.gz      smokepingrtt.tar.gz
smokepingrtt2.tar.gz  Target                test1.txt
test2.txt             test3.txt             wqy
wqy-zenhei-0.8.38-1.deb
sftp> get Graphs.pm --下载文件到windows
Downloading Graphs.pm from /home/enadmin/Graphs.pm
  100% 13KB     13KB/s 00:00:00
/home/enadmin/Graphs.pm: 13503 bytes transferred in 0 seconds (13 KB/s)
sftp> lls --查看windows目录
Graphs.pm             rc.local              test1.txt
test2.txt             test3.txt
sftp>