#调用传感器数据_Flink使用函数之监控传感器温度上升提醒
使用函数ProcessFunction介绍
Flink的ProcessFunction 函数是低阶流处理算子,可以访问流应用程序所有(非循环)基本构建块:
事件 (数据流元素)
状态 (容错和一致性)
定时器 (事件时间和处理时间)
DataStream API提供了ProcessFunction转换算子,可以访问时间戳、注册定时事件。输出特定的一些事件。
ProcessFunction 是一种提供对 KeyedState 和定时器访问的 FlatMapFunction。每在输入流中接收到一个事件,就会调用来此函数来处理。对于容错的状态,ProcessFunction 可以通过 RuntimeContext 访问 KeyedState。
Timers 定时器可以对处理时间和事件时间的变化做一些处理。每次调用 processElement() 都可以获得一个 Context 对象,通过该对象可以访问元素的事件时间戳以及 TimerService。TimerService 可以为尚未发生的事件时间/处理时间实注册回调。当定时器到达某个时刻时,会调用 onTimer() 方法。在调用期间,所有状态再次限定为定时器创建的键,允许定时器操作 KeyedState。
ProcessFunction使用
模拟案例场景:传感器状态信息(这里举例:温度)会隔几秒上传,如果这次上传的温度
比上一次上传的温度高,温度10秒以内都是比较高,就进行持续的提示。
1、这里传感器状态消息模拟从socket接收,消息格式包含二个字段分别是:传感器标识id,传感器温度。
2、接收消息之后对数据流按 传感器标识Id 进行分组,对于温度比上一次高的消息,设置定时器10秒以内如果都是对比上一次温度高,则定时进行提示,如果10秒内对比上一次温度低,则认为温度没有升高,则删除定时器,取消提示。
传感器消息类SensorReading,代码如下:
public class SensorReading { // 传感器 id public String sensorId; // 时间戳 public String timeStamp; // 温度 public Double temperature; // 状态描述 public String lowOrhigt; // 状态标识 public String status; public SensorReading() {} public SensorReading(String sensorId,String timeStamp,Double temperature){ this.sensorId = sensorId; this.timeStamp = timeStamp; this.temperature = temperature; } public SensorReading(String sensorId,Double temperature,String status){ this.sensorId = sensorId; this.temperature = temperature; this.status=status; } public SensorReading(String sensorId,Double temperature){ this.sensorId = sensorId; this.temperature = temperature; } @Override public String toString() { return "SensorReading{" + "sensorId='" + sensorId + '\'' + ", timeStamp=" + timeStamp + ", temperature=" + temperature + ", lowOrhigt=" + lowOrhigt + ", status=" + status + '}'; }}自定义TempIncreKeyedProcessFunction类继承自KeyedProcessFunction,代码如下:
可仔细阅读代码注释
/** * @author: Created By yanshien * @company ChinaUnicom Software ysn * @date: 2020-12-24 15:13 * @version: v1.0 * @description: 监控传感器温度是否上升 **/public class TempIncreKeyedProcessFunction extends KeyedProcessFunction<String, SensorReading, String> { ValueState lastTempState; // 上一次温度值 ValueState timerTsState; // 注册定时器的时间戳 @Override public void open(Configuration parameters) throws Exception { super.open(parameters); lastTempState=getRuntimeContext().getState(new ValueStateDescriptor<>("last-temp", Double.class)); timerTsState=getRuntimeContext().getState(new ValueStateDescriptor<>("timer-ts", Long.class)); } @Override public void processElement(SensorReading sensorReading, Context context, Collector collector) throws Exception { // 先取出上一次状态 Double lastTemp = lastTempState.value(); Long timerTs = timerTsState.value(); // 更新温度值 lastTempState.update(sensorReading.temperature); // 当前温度值和上次温度进行比较,如果温度上升,且没有定时器,注册当前时间10s后进行提醒 // System.out.println( sensorReading.temperature); if (lastTemp == null) { lastTemp = sensorReading.temperature; } if (timerTs == null) { timerTs = 0L; } if( sensorReading.temperature > lastTemp && timerTs == 0 ){ // 注册当前时间10s后的定时器 Long ts = context.timerService().currentProcessingTime() +10000L; context.timerService().registerProcessingTimeTimer(ts); timerTsState.update(ts); // 如果温度下降,那么删除定时器 } else if( sensorReading.temperature < lastTemp ){ context.timerService().deleteProcessingTimeTimer(timerTs); timerTsState.clear(); } } @Override public void onTimer(long timestamp, OnTimerContext ctx, Collector out) throws Exception { out.collect("传感器" + ctx.getCurrentKey() + "的温度连续" + 10000L/1000 + "秒连续上升"); timerTsState.clear(); }}主函数代码如下:
/** * @author: Created By yanshien * @company ChinaUnicom Software ysn * @date: 2020-12-24 15:13 * @version: v1.0 * @description: 监控传感器温度是否上升 **/public class ProcessFunctionDemo { public static void main(String[] args) throws Exception { // 创建流处理的执行环境 StreamExecutionEnvironment env = StreamExecutionEnvironment.getExecutionEnvironment(); /*设置使用EventTime作为Flink的时间处理标准,不指定默认是ProcessTime*/ env.setStreamTimeCharacteristic(TimeCharacteristic.EventTime); // 这里为了便于理解,设置并行度为1,默认并行度是当前机器的cpu数量 env.setParallelism(1); // 指定数据源 从socket的9000端口接收数据 // 在 cmd 打开 nc -L -p 9000 DataStream inputStream = env.socketTextStream("localhost", 9000); DataStream sourceDS = inputStream.filter(new FilterFunction() { @Override public boolean filter(String line) throws Exception { if (null == line || "".equals(line)) { return false; } String[] lines = line.split(","); if (lines.length != 2) { return false; } return true; } }); // map转换,将数据转换成SensorReading格式,第一个字段代表是传感器id,第二个字段的代表的是传感器温度 DataStream warningDS = sourceDS.map(new MapFunction() { @Override public SensorReading map(String line) throws Exception { String[] lines = line.split(","); return new SensorReading(lines[0], Double.valueOf(lines[1])); } }).keyBy(new KeySelector() { @Override public String getKey(SensorReading value) throws Exception { return value.sensorId; } }).process(new TempIncreKeyedProcessFunction()); // 打印提醒信息 warningDS.print(); env.execute(); }程序测试
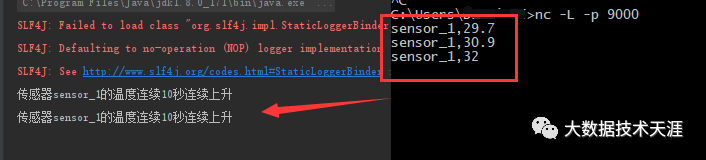
在 cmd 打开执行命令:nc -L -p 9000,然后运行程序,从socket端发送数据如下:
sensor_1,29.7sensor_1,30.9sensor_1,32测试10秒内发送温度比前一次高,则进行提醒输出,如下图所示:
如果觉得文章能帮到您,欢迎关注、转发。