制作证书的过程详细看官方文档或者如下推荐:
http://jingyan.baidu.com/article/c1465413975cba0bfcfc4ccf.html
http://docs.jpush.io/client/ios_tutorials/#ios_1
http://docs.jpush.io/guideline/ios_guide/
http://allluckly.cn/投稿/tuogao28?utm_source=tuicool&utm_medium=referral
创建完证书,就是去极光官网注册账号,创建应用,截图如下:
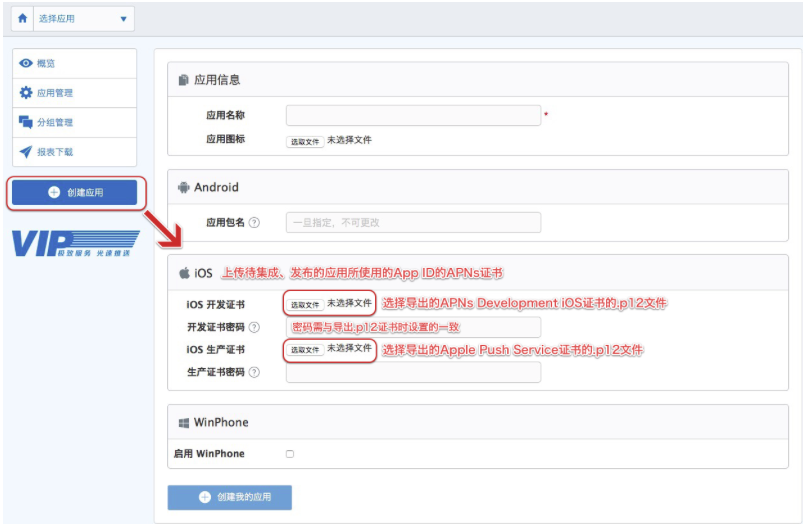
将创建的证书上传到应用上了,上传成功后的截图如下:
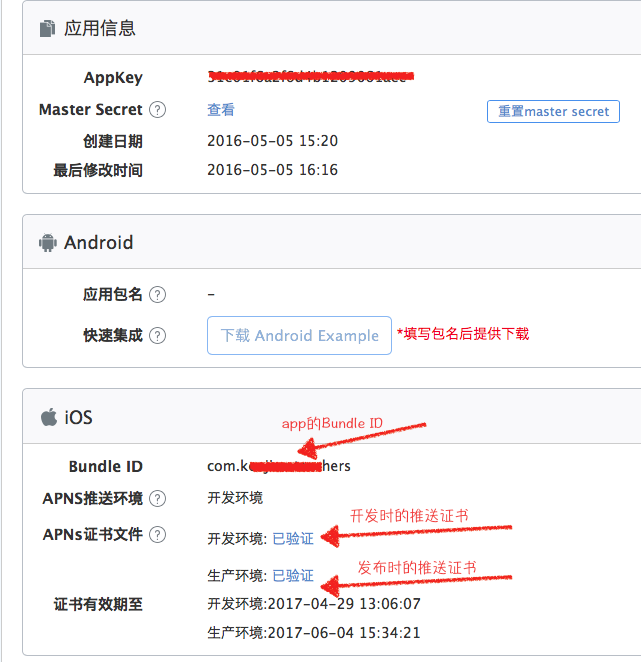
证书上传成功后,生成APP Key,截图如下:

好了,这下工作做完了,剩下的就是代码实现了:
第一步:下载SDK,将需要的两个文件导入项目中:

集成压缩包内容
包名为JPush-iOS-SDK-{版本号}
- lib文件夹:包含头文件 JPUSHService.h,静态库文件jpush-ios-x.x.x.a ,支持的iOS版本为 5.0 及以上版本。(请注意:模拟器不支持APNs)
- pdf文件:集成指南
- demo文件夹:示例
第二步:导入需要依赖的库文件:
必要的框架
- CFNetwork.framework
- CoreFoundation.framework
- CoreTelephony.framework
- SystemConfiguration.framework
- CoreGraphics.framework
- Foundation.framework
- UIKit.framework
- Security.framework
- Xcode7需要的是libz.tbd;Xcode7以下版本是libz.dylib
- Adsupport.framework (获取IDFA需要;如果不使用IDFA,请不要添加)
第三步:创建一个工具类,名称为KJJPushHelper,封装注册时的各种方法
.h

//
//  KJJPushHelper.h
//
//  Created by mac on 16/5/5.
//  Copyright © 2016年 mac. All rights reserved.
//

#import <Foundation/Foundation.h>

@interface KJJPushHelper : NSObject

// 在应用启动的时候调用
+ (void)setupWithOption:(NSDictionary *)launchingOption
                 appKey:(NSString *)appKey
                channel:(NSString *)channel
       apsForProduction:(BOOL)isProduction
  advertisingIdentifier:(NSString *)advertisingId;

// 在appdelegate注册设备处调用
+ (void)registerDeviceToken:(NSData *)deviceToken;

// ios7以后,才有completion,否则传nil
+ (void)handleRemoteNotification:(NSDictionary *)userInfo completion:(void (^)(UIBackgroundFetchResult))completion;

// 显示本地通知在最前面
+ (void)showLocalNotificationAtFront:(UILocalNotification *)notification;

@end
.m
//
//  KJJPushHelper.m

//  Created by mac on 16/5/5.
//  Copyright © 2016年 mac. All rights reserved.
//

#import "KJJPushHelper.h"
#import "JPUSHService.h"

@implementation KJJPushHelper

+ (void)setupWithOption:(NSDictionary *)launchingOption
                 appKey:(NSString *)appKey
                channel:(NSString *)channel
       apsForProduction:(BOOL)isProduction
  advertisingIdentifier:(NSString *)advertisingId{
    // Required
#if __IPHONE_OS_VERSION_MAX_ALLOWED > __IPHONE_7_1
    // ios8之后可以自定义category
    if ([[UIDevice currentDevice].systemVersion floatValue] >= 8.0) {
        // 可以添加自定义categories
        [JPUSHService registerForRemoteNotificationTypes:(UIUserNotificationTypeBadge |
                                                          UIUserNotificationTypeSound |
                                                          UIUserNotificationTypeAlert)
                                           categories:nil];
    } else {
#if __IPHONE_OS_VERSION_MAX_ALLOWED < __IPHONE_8_0
        // ios8之前 categories 必须为nil
        [JPUSHService registerForRemoteNotificationTypes:(UIRemoteNotificationTypeBadge |
                                                          UIRemoteNotificationTypeSound |
                                                          UIRemoteNotificationTypeAlert)
                                           categories:nil];
#endif
    }
#else
    // categories 必须为nil
    [JPUSHService registerForRemoteNotificationTypes:(UIRemoteNotificationTypeBadge |
                                                      UIRemoteNotificationTypeSound |
                                                      UIRemoteNotificationTypeAlert)
                                          categories:nil];
#endif

    // Required
    [JPUSHService setupWithOption:launchingOption appKey:appKey channel:channel apsForProduction:isProduction advertisingIdentifier:advertisingId];
    return;
}

+ (void)registerDeviceToken:(NSData *)deviceToken {
    [JPUSHService registerDeviceToken:deviceToken];
    return;
}

+ (void)handleRemoteNotification:(NSDictionary *)userInfo completion:(void (^)(UIBackgroundFetchResult))completion {
    [JPUSHService handleRemoteNotification:userInfo];

    if (completion) {
        completion(UIBackgroundFetchResultNewData);
    }
    return;
}

+ (void)showLocalNotificationAtFront:(UILocalNotification *)notification {
    [JPUSHService showLocalNotificationAtFront:notification identifierKey:nil];
    return;
}

@end
第四步:创建一个APPDelegate的分类,在该类中调用KJJPushHelper中的类方法
//  AppDelegate+KJJPushSDK.h
//
//  Created by mac on 16/5/5.
//  Copyright © 2016年 mac. All rights reserved.
//

#import "AppDelegate.h"

@interface AppDelegate (KJJPushSDK)
-(void)JPushApplication:(UIApplication *)application didFinishLaunchingWithOptions:(NSDictionary *)launchOptions;
@end


//  AppDelegate+KJJPushSDK.m
//
//  Created by mac on 16/5/5.
//  Copyright © 2016年 mac. All rights reserved.
//

#import "AppDelegate+KJJPushSDK.h"
#import "KJJPushHelper.h"

#define JPushSDK_AppKey  @"31e01f6a2f6d4b1209061aec"
#define isProduction     NO

@implementation AppDelegate (KJJPushSDK)
-(void)JPushApplication:(UIApplication *)application didFinishLaunchingWithOptions:(NSDictionary *)launchOptions{

    [KJJPushHelper setupWithOption:launchOptions appKey:JPushSDK_AppKey channel:nil apsForProduction:isProduction advertisingIdentifier:nil];
}

- (void)application:(UIApplication *)application didRegisterForRemoteNotificationsWithDeviceToken:(NSData *)deviceToken {
    // Required - 注册 DeviceToken
    [KJJPushHelper registerDeviceToken:deviceToken];
}


- (void)application:(UIApplication *)application didReceiveRemoteNotification:(NSDictionary *)userInfo {

    // Required,For systems with less than or equal to iOS6
    [KJJPushHelper handleRemoteNotification:userInfo completion:nil];
}


- (void)application:(UIApplication *)application didReceiveRemoteNotification:(NSDictionary *)userInfo fetchCompletionHandler:(void (^)(UIBackgroundFetchResult))completionHandler {

    // IOS 7 Support Required
    [KJJPushHelper handleRemoteNotification:userInfo completion:completionHandler];

    // 应用正处理前台状态下,不会收到推送消息,因此在此处需要额外处理一下
    if (application.applicationState == UIApplicationStateActive) {
        UIAlertView *alert = [[UIAlertView alloc]
                              initWithTitle:@"收到推送消息"
                              message:userInfo[@"aps"][@"alert"]
                              delegate:nil
                              cancelButtonTitle:@"取消"
                              otherButtonTitles:@"确定",nil];
        [alert show];
    }
}


- (void)application:(UIApplication *)application didFailToRegisterForRemoteNotificationsWithError:(NSError *)error {
    //Optional
    NSLog(@"did Fail To Register For Remote Notifications With Error: %@", error);
}


- (void)application:(UIApplication *)application didReceiveLocalNotification:(UILocalNotification *)notification {
    [KJJPushHelper showLocalNotificationAtFront:notification];
    return;
}

- (void)applicationDidBecomeActive:(UIApplication *)application {
    [application setApplicationIconBadgeNumber:0];
    return;
}

@end
第五步:在AppDelegate中注册即可
//注册极光推送
[self JPushApplication:application didFinishLaunchingWithOptions:launchOptions];
好了,大功告成,插上真机运行:打印结果如下

如果出现下列错误信息JPUSH | W - [JPUSHClientController] Not get deviceToken yet. Maybe: your certificate not configured APNs? or current network is not so good so APNs registration failed? or there is no APNs register code? Please refer to JPush docs.
修改方法:
由于项目之前用到了环信SDK,环信得已经注册了通知,在AppDelegate中注册通知,didRegisterForRemoteNotificationsWithDeviceToken与didFailToRegisterForRemoteNotificationsWithError方法,均不执行。。。需到环信注册通知的地方,再次注册极光通知。方可以获取到Token执行。