网络编程之BIO、NIO、AIO
TCP直连Socket与ServerSocket通信
Server.java
import java.io.IOException;
import java.net.ServerSocket;
import java.net.Socket;

public class Server {

	final static int PROT = 8765;

	public static void main(String[] args) {

		ServerSocket server = null;
		try {
			server = new ServerSocket(PROT);
			System.out.println(" server start .. ");
			//进行阻塞
			Socket socket = server.accept();
			//新建一个线程执行客户端的任务
			new Thread(new ServerHandler(socket)).start();

		} catch (Exception e) {
			e.printStackTrace();
		} finally {
			if(server != null){
				try {
					server.close();
				} catch (IOException e) {
					e.printStackTrace();
				}
			}
			server = null;
		}
	}
}
ServerHandler.java
import java.io.BufferedReader;
import java.io.IOException;
import java.io.InputStreamReader;
import java.io.PrintWriter;
import java.net.Socket;

public class ServerHandler implements Runnable{

	private Socket socket ;

	public ServerHandler(Socket socket){
		this.socket = socket;
	}

	@Override
	public void run() {
		BufferedReader in = null;
		PrintWriter out = null;
		try {
			in = new BufferedReader(new InputStreamReader(this.socket.getInputStream()));
			out = new PrintWriter(this.socket.getOutputStream(), true);
			String body = null;
			while(true){
				body = in.readLine();
				if(body == null) break;
				System.out.println("Server :" + body);
				out.println("服务器端返回给客户端的响应数据.");
			}

		} catch (Exception e) {
			e.printStackTrace();
		} finally {
			if(in != null){
				try {
					in.close();
				} catch (IOException e) {
					e.printStackTrace();
				}
			}
			if(out != null){
				try {
					out.close();
				} catch (Exception e) {
					e.printStackTrace();
				}
			}
			if(socket != null){
				try {
					socket.close();
				} catch (IOException e) {
					e.printStackTrace();
				}
			}
			socket = null;
		}
	}
}
启动Server
Client.java
import java.io.BufferedReader;
import java.io.IOException;
import java.io.InputStreamReader;
import java.io.PrintWriter;
import java.net.Socket;

public class Client {

	final static String ADDRESS = "127.0.0.1";
	final static int PORT = 8765;

	public static void main(String[] args) {

		Socket socket = null;
		BufferedReader in = null;
		PrintWriter out = null;

		try {
			socket = new Socket(ADDRESS, PORT);
			in = new BufferedReader(new InputStreamReader(socket.getInputStream()));
			out = new PrintWriter(socket.getOutputStream(), true);

			//向服务器端发送数据
			out.println("客户端发送的的请求测试数据");
			String response = in.readLine();
			System.out.println("Client: " + response);

		} catch (Exception e) {
			e.printStackTrace();
		} finally {
			if(in != null){
				try {
					in.close();
				} catch (IOException e) {
					e.printStackTrace();
				}
			}
			if(out != null){
				try {
					out.close();
				} catch (Exception e) {
					e.printStackTrace();
				}
			}
			if(socket != null){
				try {
					socket.close();
				} catch (IOException e) {
					e.printStackTrace();
				}
			}
			socket = null;
		}
	}
}
Eclispe的client、server输出如下:
每次建立连接都要新启动一个线程,而线程会占用一定的资源。如果Client与Server建立的连接很多,就会创建很多的线程,ServerSocket所在的机器可能会出现资源逐步趋于耗尽的问题。
TCP建立连接三次握手:
第一次握手:建立连接时,客户端发送syn包(syn=j)到服务器,并进入SYN_SENT状态,等待服务器确认;SYN:同步序列编号(Synchronize Sequence Numbers)。
第二次握手:服务器收到syn包,必须确认客户的SYN(ack=j+1),同时自己也发送一个SYN包(syn=k),即SYN+ACK包,此时服务器进入SYN_RECV状态;
第三次握手:客户端收到服务器的SYN+ACK包,向服务器发送确认包ACK(ack=k+1),此包发送完毕,客户端和服务器进入ESTABLISHED(TCP连接成功)状态,完成三次握手。
三次握手完成后,客户端与服务器开始传送数据。
网络编程的基本模型是Client/Server模型,即Client进程与Server进程直接进行相互通信。服务器端绑定某个端口并进行监听,而客户端通过指定IP、端口号向指定的Server发出连接请求,通过三次握手建立连接,若连接成功则客户端与服务器端即可进行相互通信。
BIO同步阻塞
在JDK1.5之前,采用伪异步的方式避免Server Socket建立过多的线程来处理客户端的请求,其内部维护着一个线程池,将客户端请求建立的Socket封装成一个任务Task对象(任务Task类实现Runnable接口),把任务对象交给线程池处理,并配置相应的阻塞队列BlockingQueue用于缓冲任务对象。在线程池中可以设置,用于处理Client建立连接Socket的线程池最大线程数,这样就避免了Server Socket端无限制的创建子线程去处理每一个Client建立的连接而导致系统资源耗尽,机器宕机的问题。
Client.java
import java.io.BufferedReader;
import java.io.IOException;
import java.io.InputStreamReader;
import java.io.PrintWriter;
import java.net.Socket;
import java.net.UnknownHostException;

public class Client {

	final static String ADDRESS = "127.0.0.1";
	final static int PORT =8765;

	public static void main(String[] args) {
		Socket socket = null;
		BufferedReader in = null;
		PrintWriter out = null;
		try {
			socket = new Socket(ADDRESS, PORT);
			in = new BufferedReader(new InputStreamReader(socket.getInputStream()));
			out = new PrintWriter(socket.getOutputStream(), true);

			out.println("Client request");

			String response = in.readLine();
			System.out.println("Client:" + response);
		}  catch (Exception e) {
			e.printStackTrace();
		} finally {
			if(in != null){
				try {
					in.close();
				} catch (Exception e1) {
					e1.printStackTrace();
				}
			}
			if(out != null){
				try {
					out.close();
				} catch (Exception e2) {
					e2.printStackTrace();
				}
			}
			if(socket != null){
				try {
					socket.close();
				} catch (Exception e3) {
					e3.printStackTrace();
				}
			}
			socket = null;
		}
	}
}
Server.java
在Server Socket端使用自定义线程池HandlerExecutorPool,参数50是线程池的最大线程数,100为ArrayBlockingQueue排队等待的缓冲队列长度。针对监听并建立连接的Socket,经过自定义的ServerHandler包装后,交给自定义线程池进行处理,Server Socket继续处于accept状态,监听来自Client的连接请求。
import java.io.BufferedReader;
import java.io.PrintWriter;
import java.net.ServerSocket;
import java.net.Socket;

public class Server {

	final static int PORT = 8765;

	public static void main(String[] args) {
		ServerSocket server = null;
		BufferedReader in = null;
		PrintWriter out = null;
		try {
			server = new ServerSocket(PORT);
			System.out.println("server start");
			Socket socket = null;
			HandlerExecutorPool executorPool = new HandlerExecutorPool(50, 100);
			while(true){
				socket = server.accept();
				executorPool.execute(new ServerHandler(socket));
			}

		} catch (Exception e) {
			e.printStackTrace();
		} finally {
			if(in != null){
				try {
					in.close();
				} catch (Exception e1) {
					e1.printStackTrace();
				}
			}
			if(out != null){
				try {
					out.close();
				} catch (Exception e2) {
					e2.printStackTrace();
				}
			}
			if(server != null){
				try {
					server.close();
				} catch (Exception e3) {
					e3.printStackTrace();
				}
			}
			server = null;
		}
	}

}
HandlerExecutorPool.java
由于在Server Socket中传递的参数maxPoolSize=50, queueSize=100。创建的ThreadPoolExecutor对象初始化线程池时就创建的线程数为Runtime.getRuntime().availableProcessors()即JVM可用的处理器数,线程池的最大线程数为50,空闲时间为120秒,即线程池中的某个线程若空闲时间超过120秒仍未有新的任务分配给这个线程,则这个线程会停止,其占用的资源会被回收。ArrayBlockingQueue是一个基于数组的阻塞队列,是一个有界队列,其内部维护着一个定长数组,以便缓冲队列中数据对象,队列的读写未实现分离,因此数据的生产和消费不能完全并行。由于queueSize=100,则该有界队列的长度为100。
在下面代码中,使用的是ArrayBlockingQueue有界队列,当有新的Socket交给线程池处理时,若线程池的实际线程数小于Runtime.getRuntime().availableProcessors()时,则优先创建线程;若当前线程数大于Runtime.getRuntime().availableProcessors()则将任务加入到ArrayBlockingQueue队列中。在队列已满情况下,若在线程池的总线程数不大于50的前提下,创建新的线程处理当前这个新任务;若线程池的线程数已达到50个,则对新任务执行拒绝策略。
import java.util.concurrent.ArrayBlockingQueue;
import java.util.concurrent.ExecutorService;
import java.util.concurrent.ThreadPoolExecutor;
import java.util.concurrent.TimeUnit;

public class HandlerExecutorPool {

	private ExecutorService executor;
	public HandlerExecutorPool(int maxPoolSize, int queueSize){
		this.executor = new ThreadPoolExecutor(
				Runtime.getRuntime().availableProcessors(),
				maxPoolSize,
				120L,
				TimeUnit.SECONDS,
				new ArrayBlockingQueue<Runnable>(queueSize));
	}

	public void execute(Runnable task){
		this.executor.execute(task);
	}
}
ServerHandler.java
在上述Server.java中存在代码executorPool.execute(new ServerHandler(socket));,将经过ServerHandler包装的Socket交给线程池中线程处理。ServerHandler实现了Runnable接口,在run()方法中获取Client端传递给来的数据流,经过处理转换后输出,并使用out.println()方法给Client回传Server Socket端的响应信息。
import java.io.BufferedReader;
import java.io.InputStreamReader;
import java.io.PrintWriter;
import java.net.Socket;

public class ServerHandler implements Runnable {

	private Socket socket;
	public ServerHandler (Socket socket){
		this.socket = socket;
	}

	@Override
	public void run() {
		BufferedReader in = null;
		PrintWriter out = null;
		try {
			in = new BufferedReader(new InputStreamReader(this.socket.getInputStream()));
			out = new PrintWriter(this.socket.getOutputStream(), true);
			String body = null;
			while(true){
				body = in.readLine();
				if(body == null) break;
				System.out.println("Server:" + body);
				out.println("Server response");
			}
		} catch (Exception e) {
			e.printStackTrace();
		} finally {
			if(in != null){
				try {
					in.close();
				} catch (Exception e1) {
					e1.printStackTrace();
				}
			}
			if(out != null){
				try {
					out.close();
				} catch (Exception e2) {
					e2.printStackTrace();
				}
			}
			if(socket != null){
				try {
					socket.close();
				} catch (Exception e3) {
					e3.printStackTrace();
				}
			}
			socket = null;
		}
	}
}
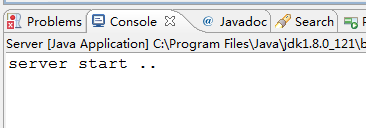
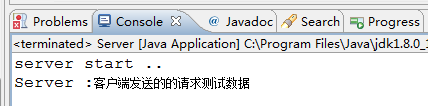
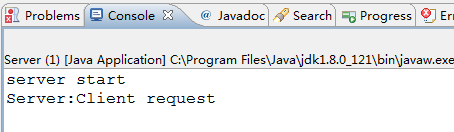
先启动Server.java
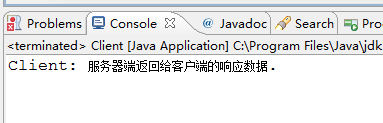
再启动Client.java,此时Server对应的console内容如下
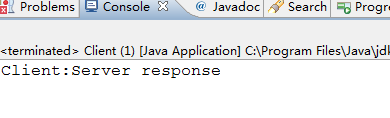
Client对应的console内容如下
NIO同步非阻塞
NIO是非阻塞IO,在传统TCP点对点直接连接的基础上做了一层封装,并不是Client与Server直接建立连接,而是Client先到Server端进行管道注册。在Server端创建一个Selector多路复用器,启动一个线程轮询注册到Selector上所有Channel的状态,根据通道的状态,执行相关操作。通道的状态包括:Connect连接状态、Accept阻塞状态、Read可读状态、Write可写状态。NIO编程中有3个重要部分:Buffer缓冲区、Channel管道、Selector多路复用器
Buffer缓冲区
在NIO类库中加入了Buffer对象,它包含一些需要写入或读取的数据。在面向流的IO中,可以将数据直接写入或读取到Stream对象中。在NIO库中,所有数据的读取与写入都是用缓冲区处理的。缓冲区实际上是一个数组,这个数组为缓冲区提供了数据的访问读写等操作属性,如位置、容量、上限等。通常为一个字节数组(ByteBuffer),也可以是其它java基本类型(Boolean除外)的数组,如:ByteBuffer、ShortBuffer、IntBuffer、LongBuffer、FloatBuffer、DoubleBuffer、CharBuffer。
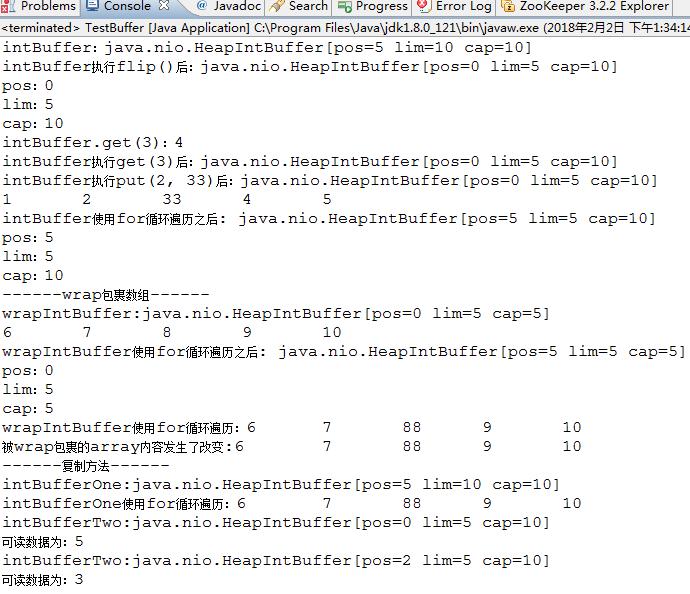
NIO编程中,在get()、put(value)、put(array)之后,注意执行Buffer对象的flip()方法,将position复位为0
import java.nio.IntBuffer;

public class TestBuffer {
	public static void main(String[] args) {
		//创建指定长度的缓冲区
		IntBuffer intBuffer = IntBuffer.allocate(10);
		intBuffer.put(1);//pos=0值为1
		intBuffer.put(2);//pos=1值为2
		intBuffer.put(3);//pos=2值为3
		intBuffer.put(4);//pos=3值为4
		intBuffer.put(5);//pos=4值为5
		System.out.println("intBuffer:" + intBuffer);
		//位置pos复位为0
		intBuffer.flip();
		System.out.println("intBuffer执行flip()后:" + intBuffer);
		System.out.println("pos:" + intBuffer.position());
		System.out.println("lim:" + intBuffer.limit());//intBuffer中已放置元素的个数
		System.out.println("cap:" + intBuffer.capacity());//intBuffer容量

		//get(index)方法,pos不改变
		System.out.println("intBuffer.get(3):" + intBuffer.get(3));
		System.out.println("intBuffer执行get(3)后:" + intBuffer);

		//put(index, change)方法,pos不改变
		intBuffer.put(2, 33);
		System.out.println("intBuffer执行put(2, 33)后:" + intBuffer);;

		//get()方法,pos改变,pos值加1
		for (int i = 0; i < intBuffer.limit(); i++) {
			System.out.print(intBuffer.get() + "\t");
		}
		System.out.println();
		System.out.println("intBuffer使用for循环遍历之后: " + intBuffer);
		System.out.println("pos:" + intBuffer.position());
		System.out.println("lim:" + intBuffer.limit());//intBuffer中已放置元素的个数
		System.out.println("cap:" + intBuffer.capacity());//intBuffer容量

		//wrap包裹数组
		System.out.println("------wrap包裹数组------");
		int[] array = new int[]{6,7,8,9,10};
		IntBuffer wrapIntBuffer = IntBuffer.wrap(array);
		System.out.println("wrapIntBuffer:"+wrapIntBuffer);

		for (int i = 0; i < wrapIntBuffer.limit(); i++) {
			System.out.print(wrapIntBuffer.get() + "\t");
		}
		System.out.println();
		System.out.println("wrapIntBuffer使用for循环遍历之后: " + wrapIntBuffer);

		//pos复位为0
		wrapIntBuffer.flip();

		//修改wrapIntBuffer下标2位置处的8为88
		wrapIntBuffer.put(2,88);
		System.out.println("pos:" + wrapIntBuffer.position());
		System.out.println("lim:" + wrapIntBuffer.limit());//intBuffer中已放置元素的个数
		System.out.println("cap:" + wrapIntBuffer.capacity());//intBuffer容量
		System.out.print("wrapIntBuffer使用for循环遍历:");
		for (int i = 0; i < wrapIntBuffer.limit(); i++) {
			System.out.print(wrapIntBuffer.get() + "\t");
		}
		System.out.println();
		System.out.print("被wrap包裹的array内容发生了改变:");
		for(int j=0;j<array.length;j++){
			System.out.print(array[j]+"\t");
		}


		//复制方法
		System.out.println();
		System.out.println("------复制方法------");

		IntBuffer intBufferOne = IntBuffer.allocate(10);
		intBufferOne.put(array);//pos发生变化
		System.out.println("intBufferOne:"+intBufferOne);
		intBufferOne.flip();//pos复位
		System.out.print("intBufferOne使用for循环遍历:");
		for (int i = 0; i < intBufferOne.limit(); i++) {
			System.out.print(intBufferOne.get() + "\t");
		}

		//duplicate()复制
		intBufferOne.flip();//pos复位
		IntBuffer intBufferTwo = intBufferOne.duplicate();
		System.out.println();
		System.out.println("intBufferTwo:"+intBufferTwo);
		System.out.println("可读数据为:" + intBufferTwo.remaining());//limit - position
		intBufferTwo.position(2);
		System.out.println("intBufferTwo:"+intBufferTwo);
		System.out.println("可读数据为:" + intBufferTwo.remaining());//limit - position

	}
}
Eclipse的console输出如下:
Channel通道
网络数据通过Channel通道读取和写入,通道与流不同之处在于通道是双向的,而流(InputStream或OutputStream的子类)只能在一个方向上移动。通道可以用于读、写或者两者同时进行。Channel通道可以与多路复用器结合起来,有多种状态位,方便多路复用器识别并执行相应操作。
Channel通道分为两大类:一类是网络读写的SelectableChannel,一类是用于文件操作的FileChannel。SocketChannel和ServerSocketChannel都是SelectableChannel的子类。
Selector多路复用器
它是NIO编程的基础,提供选择已经就绪任务的能力。当IO事件(管道)注册到选择器以后,Selector会分配给每个管道一个key值。Selector会不断轮询注册在其上的通道Channel,如果某个通道发生了读写操作,这个通道就处于就绪状态,会被Selector轮询出来,然后通过SelectionKey可以取得就绪的Channel集合,从而进行后续的IO操作,从管道中读取或者写入数据,写到数据缓冲区Buffer中。一个多路复用器Selector可以负责成千上万的Channel通道,JDK使用epoll代替了传统的select实现,使得获取连接句柄没有限制。只需要一个线程负责Selector轮询,就可以接入成千上万的客户端。
下面代码,在Server类的构造方法中,创建ServerSocketChannel对象,将该对象注册到多路复用器Selector上,并处于阻塞accept状态。由于Server类实现了Runnable接口,在run()方法中存在while(true)循环,在while循环体中不论客户端Channel还是服务器Channel,都在多路复用器的轮询的范围。在轮询过程中,获取所有注册到多路复用器Selector上的key,在这个while(true)首次执行的时候,获取到的处于阻塞状态的Channel为服务器Channel,这个服务器端Channel执行accept()方法,监听处于就绪状态的客户端Channel,将客户端Channel通道注册到多路复用器Selector上,并监听其读标示位。在存在客户端Channel注册到Selector的情况下,在while(true)循环体中,若客户端key处于key.isReadable()为true时,就会执行read()方法。在read方法中,首先将缓冲区清空,获取调用read()方法的客户端Channel,读取客户端Channel中的数据到缓冲区Buffer。
综合使用Buffer、Channel、Selector的Client端与Server端双向通信示例
Server.java
import java.io.IOException;
import java.net.InetSocketAddress;
import java.nio.ByteBuffer;
import java.nio.channels.SelectionKey;
import java.nio.channels.Selector;
import java.nio.channels.ServerSocketChannel;
import java.nio.channels.SocketChannel;
import java.util.Iterator;
public class Server implements Runnable{
//多路复用器(管理所有的通道)
private Selector selector;
//建立读缓冲区,缓存空间大小1024
private ByteBuffer readBuf = ByteBuffer.allocate(1024);
//建立写缓冲区,缓存空间大小1024
private ByteBuffer writeBuf = ByteBuffer.allocate(1024);
public Server(int port){
try {
//打开多路复用器
this.selector = Selector.open();
//打开服务器通道
ServerSocketChannel ssc = ServerSocketChannel.open();
//设置服务器通道为非阻塞模式
ssc.configureBlocking(false);
//绑定监听端口
ssc.bind(new InetSocketAddress(port));
//把服务器通道注册到多路复用器上,并且监听阻塞事件
ssc.register(this.selector, SelectionKey.OP_ACCEPT);
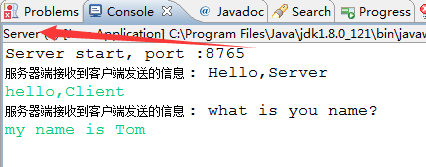
System.out.println("Server start, port :" + port);
} catch (IOException e) {
e.printStackTrace();
}
}
@Override
public void run() {
while(true){
try {
//要让多路复用器开始监听
this.selector.select();
//返回多路复用器已经选择的结果集
Iterator<SelectionKey> keys = this.selector.selectedKeys().iterator();
//进行遍历
while(keys.hasNext()){
//获取一个选择的元素
SelectionKey key = keys.next();
//直接从容器中移除就可以了
keys.remove();
//如果是有效的
if(key.isValid()){
//如果为阻塞状态
if(key.isAcceptable()){
this.accept(key);
}
//如果为可读状态
if(key.isReadable()){
this.read(key);
}
//如果为可 写状态
if(key.isWritable()){
this.write(key);
}
}
}
} catch (IOException e) {
e.printStackTrace();
}
}
}
/*向SocketChannel中写数据*/
private void write(SelectionKey key){
SocketChannel sc = (SocketChannel) key.channel();
try {
//定义一个字节数组
byte[] bytes = new byte[1024];
//使用系统录入功能,等待用户输入数据并回车
System.in.read(bytes);
//把数据放到缓冲区中
writeBuf.put(bytes);
//对缓冲区进行复位
writeBuf.flip();
//写出数据给Client端
sc.write(writeBuf);
//清空缓冲区数据
writeBuf.clear();
//因已经执行了向SocketChannel的写操作,这里向selector注册sc通道的读事件状态
sc.register(this.selector, SelectionKey.OP_READ);
} catch (Exception e) {
e.printStackTrace();
}
}
private void read(SelectionKey key) {
try {
//清空缓冲区旧的数据
this.readBuf.clear();
//获取之前注册的socket通道对象
SocketChannel sc = (SocketChannel) key.channel();
//读取数据到缓冲区
int count = sc.read(this.readBuf);
//如果没有数据
if(count == -1){
key.channel().close();
key.cancel();
return;
}
//有数据则进行读取 读取之前需要进行复位方法(把position 和limit进行复位)
/*Flips this buffer. The limit is set to the current position and then
the position is set to zero. If the mark is defined then it is discarded.*/
this.readBuf.flip();
//根据缓冲区的数据长度创建相应大小的byte数组,接收缓冲区的数据
byte[] bytes = new byte[this.readBuf.remaining()];//this.readBuf.remaining()可用数据个数
//接收缓冲区数据到字节数组
this.readBuf.get(bytes);
//打印结果
String body = new String(bytes).trim();
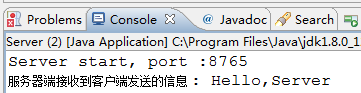
System.out.println("服务器端接收到客户端发送的信息 : " + body);
//因已经执行了向SocketChannel的读操作,这里向selector注册sc通道的写事件状态
sc.register(this.selector,SelectionKey.OP_WRITE);
} catch (IOException e) {
e.printStackTrace();
}
}
private void accept(SelectionKey key) {
try {
//服务通道
ServerSocketChannel ssc = (ServerSocketChannel) key.channel();
//阻塞方法
SocketChannel sc = ssc.accept();
//阻塞模式
sc.configureBlocking(false);
//将客户端通道注册到多路复用器上,并设置读取标识
sc.register(this.selector, SelectionKey.OP_READ);
} catch (IOException e) {
e.printStackTrace();
}
}
public static void main(String[] args) {
new Thread(new Server(8765)).start();;
}
}
在Server.java中,因为ServerSocketChannel对象在Selector上仅仅注册了SelectionKey.OP_ACCEPT事件状态,因此Server端创建的一个线程,在轮询Selector过程中,获取处于就绪状态的所有Channel通道的集合。Selector分配给ServerSocketChannel对象的唯一key,这个key.isAcceptable()为true则执行accept(key)方法,使这个key对应的服务器端Channel一直处于accept监听状态。
Client.java
import java.io.IOException;
import java.net.InetSocketAddress;
import java.nio.ByteBuffer;
import java.nio.channels.ClosedChannelException;
import java.nio.channels.SelectionKey;
import java.nio.channels.Selector;
import java.nio.channels.SocketChannel;
import java.util.Iterator;
public class Client implements Runnable{
//多路复用器(管理所有的通道)
private Selector selector;
//建立写缓冲区
private ByteBuffer bufferWrite = ByteBuffer.allocate(1024);
//建立读缓冲区
private ByteBuffer bufferRead = ByteBuffer.allocate(1024);
//创建连接的地址
InetSocketAddress address = new InetSocketAddress("127.0.0.1", 8765);
public Client(){
try {
//打开多路复用器
this.selector = Selector.open();
//打开客户端通道
SocketChannel sc = SocketChannel.open();
//客户端通道为非阻塞模式
sc.configureBlocking(false);
//多路复用器Selector上,给sc注册connect事件状态
sc.register(selector, SelectionKey.OP_CONNECT);
//进行连接
sc.connect(address);
} catch (IOException e) {
e.printStackTrace();
}
}
@Override
public void run() {
SocketChannel socketChannel;
while(true){
try {
//要让多路复用器开始监听
this.selector.select();
//返回多路复用器已经选择的结果集
Iterator<SelectionKey> keys = this.selector.selectedKeys().iterator();
//进行遍历
while(keys.hasNext()){
//获取一个选择的元素
SelectionKey key = keys.next();
//直接从容器中移除就可以了
keys.remove();
//如果是有效的
if(key.isValid()){
//如果为连接状态
if(key.isConnectable()){
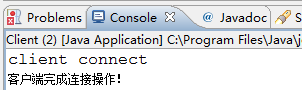
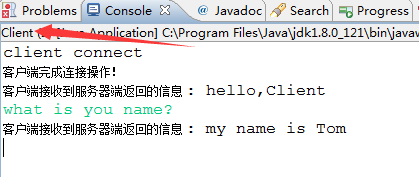
System.out.println("client connect");
socketChannel =(SocketChannel)key.channel();
/*Returns:
true if, and only if, a connection operation has been initiated on
this channel but not yet completed by invoking the finishConnect method*/
if(socketChannel.isConnectionPending()){
socketChannel.finishConnect();
System.out.println("客户端完成连接操作!");
//把数据放到缓冲区中
bufferWrite.put("Hello,Server".getBytes());
//对缓冲区进行复位
bufferWrite.flip();
//写出数据给Server端
socketChannel.write(bufferWrite);
//清空写缓冲区
bufferWrite.clear();
}
socketChannel.register(selector, SelectionKey.OP_READ);
}
// 如果为可读状态
if(key.isReadable()){
this.read(key);
}
// 如果为可写状态
if(key.isWritable()){
this.write(key);
}
}
}
} catch (IOException e) {
e.printStackTrace();
}
}
}
private void write(SelectionKey key){
try {
SocketChannel sc = (SocketChannel) key.channel();
byte[] bytes = new byte[1024];
System.in.read(bytes);
//把数据放到缓冲区中
bufferWrite.put(bytes);
//对缓冲区进行复位
bufferWrite.flip();
//写出数据给Server端
sc.write(bufferWrite);
//清空缓冲区数据
bufferWrite.clear();
sc.register(this.selector, SelectionKey.OP_READ);
} catch (ClosedChannelException e) {
e.printStackTrace();
} catch (IOException e) {
e.printStackTrace();
}
}
private void read(SelectionKey key) {
try {
//清空缓冲区旧的数据
this.bufferRead.clear();
//获取之前注册的socket通道对象
SocketChannel sc = (SocketChannel) key.channel();
//读取数据到缓冲区
int count = sc.read(this.bufferRead);
//如果没有数据
if(count == -1){
key.channel().close();
key.cancel();
return;
}
//有数据则进行读取 读取之前需要进行复位方法(把position 和limit进行复位)
this.bufferRead.flip();
//根据缓冲区的数据长度创建相应大小的byte数组,接收缓冲区的数据
byte[] bytes = new byte[this.bufferRead.remaining()];//this.readBuf.remaining()可用数据个数
//接收缓冲区数据到字节数组
this.bufferRead.get(bytes);
// 打印结果
String body = new String(bytes).trim();
System.out.println("客户端接收到服务器端返回的信息 : " + body);
sc.register(this.selector, SelectionKey.OP_WRITE);
} catch (IOException e) {
e.printStackTrace();
}
}
public static void main(String[] args) {
try {
Client client=new Client();
new Thread(client).start();//单独启动一个线程,去轮询注册到多路复用器上的所有通道
} catch (Exception e) {
e.printStackTrace();
}
}
}
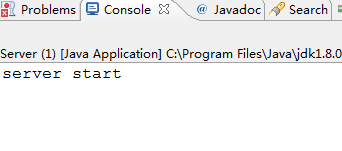
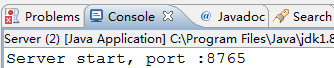
run as --java application,首先启动Server,Eclipse的console输出如下:
再启动Client,此时Server对应的console如下:
Client对应的console如下:
Client与Server进行交互通信,互相发送聊天消息后,Eclipse的console输入如下:
AIO
传统的BIO建立连接需要三次握手,并且在服务器端创建一个线程去处理客户端请求。在NIO中,客户端Channel通道注册到多路复用器Selector上,减少了三次握手的过程,在服务器端只需要一个线程去轮询注册到多路复用器上的Channel的状态位,根据不同状态位执行不同的操作。
JDK1.7之后,AIO在之前NIO的基础上引入异步通道的概念,并提供了异步文件和异步套接字通道的实现,实现了异步非阻塞。AIO不需要通过多路复用器来对注册的通道进行轮询操作,即可实现异步读写,简化了NIO编程模型。相对于NIO中使用的SocketChannel、ServerSocketChannel,AIO中使用的是AsynchronousSocketChannel、AsynchronousServerSocketChannel。
Server.java
import java.net.InetSocketAddress;
import java.nio.channels.AsynchronousChannelGroup;
import java.nio.channels.AsynchronousServerSocketChannel;
import java.nio.channels.Channel;
import java.util.concurrent.ExecutorService;
import java.util.concurrent.Executors;

public class Server {
	//线程池
	private ExecutorService executorService;
	//通道group
	private AsynchronousChannelGroup channelGroup;
	//异步服务器通道
	public AsynchronousServerSocketChannel assc;

	public Server(int port){
		try {
			//创建一个缓存池,注意不要使用FixedThreadPool,否则只能接受指定数量的并发客户端请求
			executorService = Executors.newCachedThreadPool();
			//创建异步channel group,1代表初始化线程的数量
			/*Creates an asynchronous channel group with a given thread
			pool that creates new threads as needed.*/
			channelGroup = AsynchronousChannelGroup.withCachedThreadPool(executorService, 1);
			//创建异步服务器通道
			/*Opens an asynchronous server-socket channel.*/
			assc = AsynchronousServerSocketChannel.open(channelGroup);
			//进行绑定监听端口
			assc.bind(new InetSocketAddress(port));

			System.out.println("server start , port : " + port);
			//此处不是阻塞,而是继续向下执行。进行通信的相关处理操作在ServerCompletionHandler
			assc.accept(this, new ServerCompletionHandler());//this指的是Server类的对象
			//一直休眠 不让服务器线程停止
			Thread.sleep(Integer.MAX_VALUE);

		} catch (Exception e) {
			e.printStackTrace();
		}
	}

	public static void main(String[] args) {
		Server server = new Server(8765);
	}
}
在Server端创建一个缓存线程池,服务器端使用的是AsynchronousServerSocketChannel,使用bind()方法绑定监听端口,使用如上述代码Server.java中accept(this, new ServerCompletionHandler())接收和处理客户端请求,但是这个accept是一个异步操作,交给线程池去异步的处理当前这个客户端操作,而Server.java对应的主线程继续向下执行,所以在代码中使用了Thread.sleep(Integer.MAX_VALUE);保持Server对应的线程非关闭。
ServerCompletionHandler.java
import java.nio.ByteBuffer;
import java.nio.channels.AsynchronousSocketChannel;
import java.nio.channels.CompletionHandler;
import java.util.concurrent.ExecutionException;

public class ServerCompletionHandler implements CompletionHandler<AsynchronousSocketChannel, Server> {

	@Override
	public void completed(AsynchronousSocketChannel asc, Server attachment) {
		//当有一个客户端接入的时候 直接调用Server的accept方法
		attachment.assc.accept(attachment, this);//this指的是ServerCompletionHandler对象
		read(asc);
	}

	//AsynchronousSocketChannel为客户端通道
	private void read(final AsynchronousSocketChannel asc) {
		//读取数据
		ByteBuffer buf = ByteBuffer.allocate(1024);
		//异步方法,不会阻塞在这,主程序继续执行下面操作
		/*This method initiates an asynchronous read operation to read a sequence of bytes
		from this channel into the given buffer. */
		asc.read(buf, buf, new CompletionHandler<Integer, ByteBuffer>() {
			@Override
			public void completed(Integer resultSize, ByteBuffer attachment) {
				//进行读取之后,重置标识位
				attachment.flip();
				//获得读取的字节数
				System.out.println("Server接收内容字节数:" + resultSize);
				//获取读取的数据
				String resultData = new String(attachment.array()).trim();
				System.out.println("Server接收到的内容:" + resultData);
				String response = "收到数据" + resultData;
				write(asc, response);
			}
			@Override
			public void failed(Throwable exc, ByteBuffer attachment) {
				exc.printStackTrace();
			}
		});
	}

	private void write(AsynchronousSocketChannel asc, String response) {
		try {
			ByteBuffer buf = ByteBuffer.allocate(1024);
			buf.put(response.getBytes());
			buf.flip();
			/*This method initiates an asynchronous write operation to write a sequence of bytes
			to this channel from the given buffer. */
			//使用到多线程设计模式中的Future,先返回一个Future代理对象。后台新启动一个线程A,进行数据的写操作。调用get()方法时才真正获取线程A执行任务的结果
			asc.write(buf).get();
		} catch (InterruptedException e) {
			e.printStackTrace();
		} catch (ExecutionException e) {
			e.printStackTrace();
		}
	}

	@Override
	public void failed(Throwable exc, Server attachment) {
		exc.printStackTrace();
	}

}
Client.java
import java.io.UnsupportedEncodingException;
import java.net.InetSocketAddress;
import java.nio.ByteBuffer;
import java.nio.channels.AsynchronousSocketChannel;
import java.util.concurrent.ExecutionException;

public class Client implements Runnable{

	private AsynchronousSocketChannel asc ;

	public Client() throws Exception {
		asc = AsynchronousSocketChannel.open();
	}

	public void connect(){
		asc.connect(new InetSocketAddress("127.0.0.1", 8765));
	}

	public void write(String content){
		try {
			asc.write(ByteBuffer.wrap(content.getBytes())).get();//调用get()方法异步写
			read();
		} catch (Exception e) {
			e.printStackTrace();
		}
	}

	private void read() {
		ByteBuffer buf = ByteBuffer.allocate(1024);
		try {
			asc.read(buf).get();
			buf.flip();
			byte[] respByte = new byte[buf.remaining()];
			buf.get(respByte);
			System.out.println("客户端接收到的反馈信息:"+new String(respByte,"utf-8").trim());
		} catch (InterruptedException e) {
			e.printStackTrace();
		} catch (ExecutionException e) {
			e.printStackTrace();
		} catch (UnsupportedEncodingException e) {
			e.printStackTrace();
		}
	}

	@Override
	public void run() {
		while(true){

		}
	}

	public static void main(String[] args) throws Exception {
		Client c1 = new Client();
		c1.connect();
		Client c2 = new Client();
		c2.connect();
		Client c3 = new Client();
		c3.connect();

		new Thread(c1, "c1").start();
		new Thread(c2, "c2").start();
		new Thread(c3, "c3").start();

		Thread.sleep(1000);

		c1.write("this is c1");
		c2.write("this is c2");
		c3.write("this is c3");
	}

}
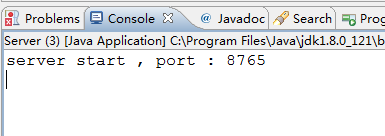
启动Server,在Eclipse的console输出如下:
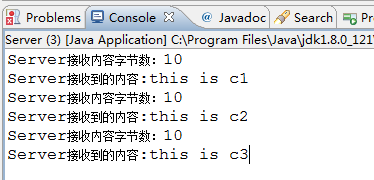
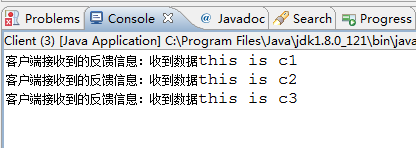
启动Client,此时服务器端和客户端对应的console输出如下:
阻塞与非阻塞、同步与异步
阻塞:应用程序在获取网络数据的时候,如果网络传输数据很慢,那么程序就一直等待,直到数据传输完毕为止。
非阻塞:应用程序直接可以获取已经准备就绪好的数据,无须等待。
IO(BIO)为同步阻塞形式,NIO为同步非阻塞形式。在JDK1.7之后,升级了NIO库包,支持异步非阻塞通信模型NIO2.0(AIO)
同步与异步一般是面向操作系统与应用程序对IO操作的层面上来区别的
同步:应用程序会直接参与IO读写操作,并直接阻塞到某一个方法上,直到数据准备就绪;或者采用轮询的策略实时检查数据的就绪状态,如果就绪则获取数据。
异步:所有的IO读写操作交给操作系统处理,与应用程序没有直接关系。当操作系统完成了IO读写操作时,会给应用程序发通知,应用程序直接拿走数据即可。
BIO、NIO、AIO三者区别
BIO:它属于传统的Socket编程,客户端与服务器端连接的建立需要经过TCP3次握手的过程。服务器端ServerSocket首先启动,指定端口并执行accept()进行阻塞,监听客户端的连接请求。若接收到客户端的连接请求并成功建立连接后,客户端与服务器端通过Socket套接字中的数据流进行相互之间的数据通信。针对每一个成功建立连接的客户端,服务器端都会创建一个线程去处理这个客户端的请求,若建立连接的客户端规模很大的时候,对服务器端资源是一种严重浪费。
NIO:在NIO中引入了Channel通道、Buffer缓冲区、Selector多路复用器的概念,客户端SocketChannel与服务器端ServerSocketChannel都需要在Selector多路复用器上进行注册。在服务器端会创建一个线程对注册到Selector多路复用器上的所有Channel进行轮询,轮询出处于就绪状态的Channel集合,根据为每个Channel分配的唯一key,获取具体的某个Channel,并根据其状态标志位,进行处理,从Channel中读取或者写入数据,写到Buffer数据缓冲区中。每个管道都会对Selector进行注册不同的事件状态,方便Selector查找,事件状态包括:SelectionKey.OP_CONNECT连接状态、SelectionKey.OP_ACCEPT阻塞状态、SelectionKey.OP_READ可读状态、SelectionKey.OP_WRITE可写状态。
AIO:使用线程池中的线程来处理客户端的请求,针对每一个客户端的请求,会创建一个处理该任务的对象,如上面ServerCompletionHandler类的对象,来完成读、写任务。AIO真正实现了异步非阻塞。
欢迎关注个人微信公众号“我爱编程持之以恒”