.xml 下拉列表_RecyclerView嵌套recyclerview实现二级下拉列表,包含自定义IOS对话框...
无图无真相,一言不合就上图:

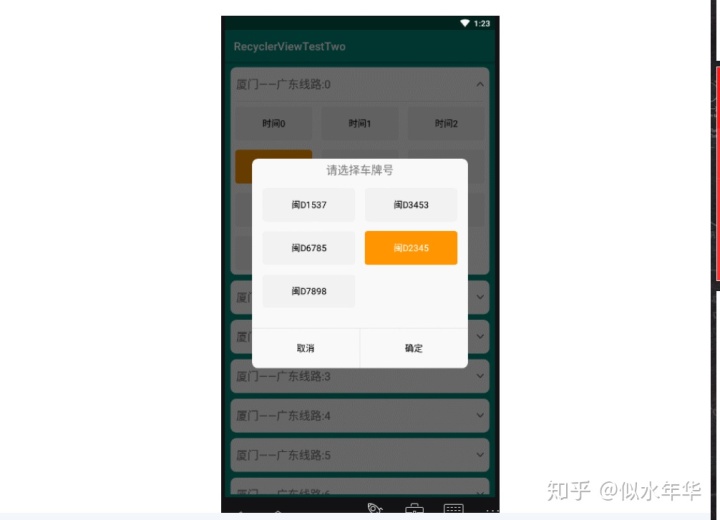
- 功能简介:下拉显示时间列表,点击时间弹出自定义的IOS对话框,然后选择对应的车牌号,跳转到第二个界面。
本以为是个很简单的东西,写了之后才发现坑不断,特此纪念下。(里面用的都是假数据,如需请求网络数据不止如何修改的可以联系我qq:2872960735) 代码有点长,麻烦看官慢慢看,接下来让我们开心的撸码吧!

1、好了,因为这个东西还是比较大的,所以这边就不贴出全部布局,需要的可以去下载我的源码,首先我们先编写IOSDialog.class:
package 2、编写IosDialog的布局文件dialog_check_main.xml:
<?xml version="1.0" encoding="utf-8"?>
<LinearLayout xmlns:android="http://schemas.android.com/apk/res/android"
              android:id="@+id/lLayout_bg"
              android:layout_width="match_parent"
              android:layout_height="wrap_content"
              android:background="@drawable/shape_editfee"
              android:orientation="vertical">

    <TextView
        android:id="@+id/txt_title"
        android:layout_width="wrap_content"
        android:layout_height="wrap_content"
        android:layout_gravity="center_horizontal"
        android:layout_marginTop="6dp"
        android:text="请选择车牌号"
        android:textSize="20sp"/>

    <android.support.v7.widget.RecyclerView
        android:id="@+id/rlv_car_number"
        android:layout_width="match_parent"
        android:layout_height="wrap_content"
        android:layout_margin="10dp"/>

    <View
        android:layout_width="match_parent"
        android:layout_height="2dp"
        android:layout_marginTop="17dp"
        android:background="@color/gray"/>

    <LinearLayout
        android:layout_width="match_parent"
        android:layout_height="wrap_content"
        android:orientation="horizontal">

        <TextView
            android:id="@+id/btn_neg"
            android:layout_width="wrap_content"
            android:layout_height="70dp"
            android:layout_weight="1"
            android:gravity="center"
            android:text="取消"
            android:textColor="@color/black"
            android:textSize="16sp"
            />

        <View
            android:id="@+id/img_line"
            android:layout_width="2dp"
            android:layout_height="match_parent"
            android:background="@color/gray"/>

        <TextView
            android:id="@+id/btn_pos"
            android:layout_width="wrap_content"
            android:layout_height="70dp"
            android:layout_weight="1"
            android:gravity="center"
            android:text="确定"
            android:textColor="@color/black"
            android:textSize="16sp"

            />
    </LinearLayout>

</LinearLayout>
3、编写IosDialog适配器DialogAdapter.class:
package com.lenz.arouter.recyclerviewtesttwo.adapter;

import android.content.Context;
import android.graphics.Color;
import android.os.Build;
import android.support.annotation.NonNull;
import android.support.annotation.RequiresApi;
import android.support.v7.widget.RecyclerView;
import android.view.LayoutInflater;
import android.view.View;
import android.view.ViewGroup;
import android.widget.TextView;
import com.lenz.arouter.recyclerviewtesttwo.R;
import com.lenz.arouter.recyclerviewtesttwo.SpUtils;

import java.util.ArrayList;
import java.util.List;

/**
 * Author: LJW
 * Date: 2019-07-17 14:24
 * Description: 自定义dialog里面的列表适配器
 */
public class DialogAdapter extends RecyclerView.Adapter<DialogAdapter.ViewHolder> {
    private List<String> cards;
    private Context mContext;
    private List<Boolean> isClicks;//控件是否被点击,默认为false,如果被点击,改变值,控件根据值改变自身颜色

    public DialogAdapter(List<String> beans, Context context) {
        cards = beans;
        mContext = context;
        isClicks =new ArrayList<>();
        for (int i = 0; i <cards.size() ; i++) {
            isClicks.add(false);
        }
    }

    @NonNull
    @Override
    public ViewHolder onCreateViewHolder(@NonNull ViewGroup group, int i) {
        return new ViewHolder(LayoutInflater.from(mContext).inflate(R.layout.in_item, null));
    }

    @Override
    public void onBindViewHolder(@NonNull final ViewHolder holder, final int position) {
        holder.tv.setText(cards.get(position));
        //当前位置为被点中时就改变颜色
        if (isClicks.get(position)){
            holder.tv.setBackgroundResource(R.drawable.shape_radius10_orange);
            holder.tv.setTextColor(Color.WHITE);
        }else {
            holder.tv.setBackgroundResource(R.drawable.shape_radius5_light_gray);
            holder.tv.setTextColor(Color.BLACK);
        }
        holder.tv.setOnClickListener(new View.OnClickListener() {
            @RequiresApi(api = Build.VERSION_CODES.LOLLIPOP)
            @Override
            public void onClick(View v) {
                SpUtils.putString(mContext,"carNumber",cards.get(position));
                //点击的时候,把所有的按钮都变回原色
                for (int i = 0; i < cards.size(); i++) {
                    isClicks.set(i,false);
                }
                //对点击的按钮,设置成true,以便后面变颜色
                isClicks.set(position,true);
                //刷新数据源改变item颜色
                notifyDataSetChanged();
            }
        });
    }

    @Override
    public int getItemCount() {
        return cards.size();
    }

    public static class ViewHolder extends RecyclerView.ViewHolder {
        private TextView tv;

        public ViewHolder(@NonNull View itemView) {
            super(itemView);
            tv = itemView.findViewById(R.id.tv);
        }
    }
4、编写styles.xml
<resources>
    <!-- Base application theme. -->
    <style name="AppTheme" parent="Theme.AppCompat.Light.DarkActionBar">
        <!-- Customize your theme here. -->
        <item name="colorPrimary">@color/colorPrimary</item>
        <item name="colorPrimaryDark">@color/colorPrimaryDark</item>
        <item name="colorAccent">@color/colorAccent</item>
    </style>
     <!--自定义ios对话框样式-->
    <style name="AlertDialogStyle" parent="@android:style/Theme.Dialog">
        <item name="android:windowBackground">@android:color/transparent</item>
        <item name="android:windowContentOverlay">@null</item>
        <item name="android:windowIsFloating">true</item>
        <item name="android:windowFrame">@null</item>
        <item name="android:backgroundDimEnabled">true</item>
        <item name="android:windowNoTitle">true</item>
        <item name="android:windowIsTranslucent">true</item>
    </style>
</resources>
到这里我们自定义的IOS对话框就好了,让我们继续往下写:

5、编写MainActivity.class类:
package com.lenz.arouter.recyclerviewtesttwo;

import android.content.Context;
import android.content.Intent;
import android.graphics.Color;
import android.os.Bundle;
import android.support.v7.app.AppCompatActivity;
import android.support.v7.widget.LinearLayoutManager;
import android.support.v7.widget.RecyclerView;
import android.view.View;
import android.view.ViewGroup;
import android.widget.TextView;

import com.lenz.arouter.recyclerviewtesttwo.adapter.OutAdapter;
import com.lenz.arouter.recyclerviewtesttwo.bean.InBean;
import com.lenz.arouter.recyclerviewtesttwo.bean.OutBean;
import com.lenz.arouter.recyclerviewtesttwo.dialog.IosDialog;

import java.util.ArrayList;
import java.util.List;

public class MainActivity extends AppCompatActivity {
    private RecyclerView mRecyclerView;
    private List<OutBean> mList;
    private OutAdapter mAdapter;
    private Context mContext;
    OutBean outBean;

    @Override
    protected void onCreate(Bundle savedInstanceState) {
        super.onCreate(savedInstanceState);
        setContentView(R.layout.activity_main);
        mContext = this;
        mRecyclerView = findViewById(R.id.rlv_outside);
        //外部recyclerview假数据
        mList = new ArrayList<>();
        for (int i = 0; i < 12; i++) {
            outBean = new OutBean("厦门——广东线路:" + i, R.drawable.down, true);
            mList.add(outBean);
        }
        //dialog假数据
        final List<String> dialogList = new ArrayList<>(); //用来测试车牌号只能单选的数据
        dialogList.add("闽D1537");
        dialogList.add("闽D3453");
        dialogList.add("闽D6785");
        dialogList.add("闽D2345");
        dialogList.add("闽D7898");
        mAdapter = new OutAdapter(mList, mContext);
        mAdapter.setOnItemClickListener(new OutAdapter.OnInItemClickListener() {
            @Override
            public void onExcuteCheck(final InBean inBean, final TextView tv) {
                new IosDialog(mContext).builder().setTitle("请选择车牌号").
                        setRecyclerView(dialogList).setPositiveButton("确定", new View.OnClickListener() {
                    @Override
                    public void onClick(View v) {
                        //跳转到第二界面的同时,把原来的时间背景和字体颜色变回来
                        tv.setBackground(getResources().getDrawable(R.drawable.shape_radius5_light_gray));
                        tv.setTextColor(Color.BLACK);
                        String time =inBean.getRouteTime();
                        String carNumber =SpUtils.getString(mContext,"carNumber","");
                        Intent  intent =new Intent(mContext,Main2Activity.class);
                        intent.putExtra("time",time);
                        intent.putExtra("carNumber",carNumber);
                        startActivity(intent);
                    }
                }).setNegativeButton("取消", new View.OnClickListener() {
                    @Override
                    public void onClick(View v) {
                        //点击取消时,把原先选择的时间变回原色
                        tv.setBackground(getResources().getDrawable(R.drawable.shape_radius5_light_gray));
                        tv.setTextColor(Color.BLACK);
                    }
                }).setCancelable(false).show();//setCancelable属性:点击对话框以为区域无效
            }
        });
        //使用这个属性让布局填满
        LinearLayoutManager layoutManager = new LinearLayoutManager(this) {
            @Override
            public RecyclerView.LayoutParams generateDefaultLayoutParams() {

                return new RecyclerView.LayoutParams(ViewGroup.LayoutParams.MATCH_PARENT, ViewGroup.LayoutParams.WRAP_CONTENT);
            }
        };
        layoutManager.setOrientation(LinearLayoutManager.VERTICAL);
        mRecyclerView.setLayoutManager(layoutManager);
        mRecyclerView.setAdapter(mAdapter);
    }
}
6、activity的布局文件activity_main.xml:
<?xml version="1.0" encoding="utf-8"?>
<LinearLayout
    xmlns:android="http://schemas.android.com/apk/res/android"
    xmlns:app="http://schemas.android.com/apk/res-auto"
    xmlns:tools="http://schemas.android.com/tools"
    android:layout_width="match_parent"
    android:layout_height="match_parent"
    android:orientation="vertical"
    tools:context=".MainActivity"
    android:background="@color/colorPrimary">

  <android.support.v7.widget.RecyclerView
      android:layout_margin="5dp"
      android:id="@+id/rlv_outside"
      android:layout_width="match_parent"
      android:layout_height="wrap_content"/>

</LinearLayout>
到这里我们已经把Activity写好了,离胜利 又近了一步,接下来我们要憋足了气,把内部和外部的recyclerview适配器写了。


7、编写外层recyclerview的布局out_item.xml:
<?xml version="1.0" encoding="utf-8"?>
<LinearLayout xmlns:android="http://schemas.android.com/apk/res/android"
              android:layout_width="match_parent"
              android:layout_height="wrap_content"
              android:orientation="vertical"
              android:padding="5dp">

    <LinearLayout
        android:layout_width="match_parent"
        android:layout_height="wrap_content"
        android:background="@drawable/shape_white_corner_10dp"
        android:orientation="vertical">

        <FrameLayout
            android:layout_width="match_parent"
            android:layout_height="60dp">

            <TextView
                android:id="@+id/tv_title"
                android:layout_width="wrap_content"
                android:layout_height="wrap_content"
                android:layout_gravity="center_vertical"
                android:layout_marginLeft="10dp"
                android:text="123e423"
                android:textSize="20sp" />
<!-- 默认是让这个图标向下的-->
            <ImageView
                android:id="@+id/iv_show"
                android:layout_width="wrap_content"
                android:layout_height="wrap_content"
                android:layout_gravity="right|center_vertical"
                android:layout_marginRight="10dp"
                android:background="@drawable/down" />
        </FrameLayout>

        <View
            android:id="@+id/view_divider"
            android:layout_width="match_parent"
            android:layout_height="2dp"
            android:layout_gravity="center_horizontal"
            android:layout_marginLeft="10dp"
            android:layout_marginRight="10dp"
            android:background="@color/inside_showtime_carnum"
            android:visibility="gone" />
        <android.support.v7.widget.RecyclerView
            android:id="@+id/rlv_inside"
            android:layout_width="match_parent"
            android:layout_height="wrap_content"
            android:background="@drawable/shape_bottom_corner_10dp" />
    </LinearLayout>
</LinearLayout>
8、编写外层recyclerview的适配器OutAdapter.class:
package com.lenz.arouter.recyclerviewtesttwo.adapter;

import android.content.Context;
import android.support.annotation.NonNull;
import android.support.v7.widget.GridLayoutManager;
import android.support.v7.widget.RecyclerView;
import android.view.LayoutInflater;
import android.view.View;
import android.view.ViewGroup;
import android.widget.ImageView;
import android.widget.TextView;

import com.lenz.arouter.recyclerviewtesttwo.R;
import com.lenz.arouter.recyclerviewtesttwo.bean.InBean;
import com.lenz.arouter.recyclerviewtesttwo.bean.OutBean;

import java.util.ArrayList;
import java.util.List;

/**
 * Author: LJW
 * Date: 2019-07-17 10:12
 * Description: 外部recyclerview适配器
 */
public class OutAdapter extends RecyclerView.Adapter<OutAdapter.MyHolder> implements InAdapter.OnItemClickListener{
    private List<OutBean> mList;
    private Context mContext;
    private List<Integer> positions = new ArrayList<>();

    public OutAdapter(List<OutBean> list, Context context) {
        mList = list;
        mContext = context;
    }

    @NonNull
    @Override
    public MyHolder onCreateViewHolder(@NonNull ViewGroup group, int i) {
        View view = LayoutInflater.from(mContext).inflate(R.layout.out_item, null);
        MyHolder myHolder = new MyHolder(view);
        return myHolder;
    }

    @Override
    public void onBindViewHolder(final MyHolder holder, final int i) {
        final OutBean outBean = mList.get(i);
        holder.mView.setTag(outBean);
        holder.title.setText(outBean.getTitle());
        holder.img.setBackgroundResource(outBean.getImg());
        List<InBean> inBeans = new ArrayList<>();
        for (int j = 0; j < 10; j++) {
            InBean inBean = new InBean("时间" + j);
            inBeans.add(inBean);
        }
        InAdapter inAdapter = new InAdapter(inBeans, mContext);
        GridLayoutManager gridLayoutManager = new GridLayoutManager(mContext, 3);
        holder.mRecyclerView.setLayoutManager(gridLayoutManager);
        inAdapter.setOnItemClickListener(OutAdapter.this);//记得在这里监听内部adapter
        holder.mRecyclerView.setAdapter(inAdapter);
        holder.mRecyclerView.setVisibility(View.GONE);//里面的recyclerview是先隐藏的
        holder.mView.setOnClickListener(new View.OnClickListener() {
            @Override
            public void onClick(View v) {

                if (holder.mRecyclerView.getVisibility() == View.VISIBLE) {
                    holder.img.setBackgroundResource(R.drawable.down);
                    holder.mRecyclerView.setVisibility(View.GONE);
                    holder.mDivider.setVisibility(View.GONE);
                }else {
                    //第一次点击的时候,因为最开始里面的recyclerview是隐藏,所以会走这里
                    holder.img.setBackgroundResource(R.drawable.up);
                    holder.mDivider.setVisibility(View.VISIBLE);
                    holder.mRecyclerView.setVisibility(View.VISIBLE);
                }

            }
        });


    }
    //实现内部Recyclerview适配器的接口
    @Override
    public void onClickItem(InBean inBean,TextView tv) {
        if (mOnItemClickListener!=null){
            mOnItemClickListener.onExcuteCheck(inBean,tv);//通过接口回调返回到Activity处理逻辑
        }
    }
    @Override
    public int getItemCount() {
        return mList.size();
    }

    public static class MyHolder extends RecyclerView.ViewHolder {
        private TextView title;
        private ImageView img;
        private RecyclerView mRecyclerView;
        private View mDivider;
        private View mView;

        public MyHolder(@NonNull View itemView) {
            super(itemView);
            mView = itemView;
            title = itemView.findViewById(R.id.tv_title);
            img = itemView.findViewById(R.id.iv_show);
            mDivider = itemView.findViewById(R.id.view_divider);
            mRecyclerView = itemView.findViewById(R.id.rlv_inside);
        }
    }
    private OnInItemClickListener mOnItemClickListener;
    public interface OnInItemClickListener {
        void onExcuteCheck(InBean inBean,TextView tv);
    }
    public void setOnItemClickListener(OnInItemClickListener onItemClickListener){
        this.mOnItemClickListener =onItemClickListener;
    }

}
9、编写内层recyclerview的布局文件in_item.xml:
<?xml version="1.0" encoding="utf-8"?>
<LinearLayout xmlns:android="http://schemas.android.com/apk/res/android"
              android:layout_width="match_parent"
              android:layout_height="match_parent"
    >

    <TextView
        android:layout_margin="8dp"
        android:padding="10dp"
        android:gravity="center"
        android:background="@drawable/shape_radius5_light_gray"
        android:id="@+id/tv"
        android:layout_width="match_parent"
        android:layout_height="60dp"
        android:text="nihaoya"
        android:textColor="@color/black"
        android:textSize="16sp"/>
</LinearLayout>
10、编写内层recyclerview的适配器InAdapter.class:
package com.lenz.arouter.recyclerviewtesttwo.adapter;

import android.content.Context;
import android.graphics.Color;
import android.support.annotation.NonNull;
import android.support.v7.widget.RecyclerView;
import android.view.LayoutInflater;
import android.view.View;
import android.view.ViewGroup;
import android.widget.TextView;

import com.lenz.arouter.recyclerviewtesttwo.R;
import com.lenz.arouter.recyclerviewtesttwo.bean.InBean;

import java.util.List;

/**
 * Author: LJW
 * Date: 2019-07-17 10:56
 * Description: 内部recyclerview适配器
 */
public class InAdapter extends RecyclerView.Adapter<InAdapter.ViewHolder>{
    private List<InBean> mBeans;
    private Context mContext;

    public InAdapter(List<InBean> beans, Context context) {
        mBeans = beans;
        mContext = context;
    }

    private OnItemClickListener mOnItemClickListener;

    public interface OnItemClickListener {
        void onClickItem(InBean inBean,TextView tv);
    }

    public void setOnItemClickListener(OnItemClickListener onItemClickListener) {
        this.mOnItemClickListener = onItemClickListener;
    }

    @NonNull
    @Override
    public ViewHolder onCreateViewHolder(@NonNull ViewGroup group, int i) {
        return new ViewHolder(LayoutInflater.from(mContext).inflate(R.layout.in_item, null));
    }

    @Override
    public void onBindViewHolder(@NonNull final ViewHolder holder, final int position) {
        holder.tv.setText(mBeans.get(position).getRouteTime());
        holder.tv.setOnClickListener(new View.OnClickListener() {
            @Override
            public void onClick(View v) {
                if (mOnItemClickListener != null) {
                    //当内部recyclerview的item被点击,就接口回调出去到OutAdapter,再到activity处理业务逻辑
                    mOnItemClickListener.onClickItem(mBeans.get(position),holder.tv);
                    holder.tv.setBackgroundResource(R.drawable.shape_radius10_orange);
                    holder.tv.setTextColor(Color.WHITE);
                }
                //简单的recyclerview点击事件
//                int position =holder.getAdapterPosition();
//                InBean inBean =mBeans.get(position);
//                Toast.makeText(mContext, "这个是"+inBean.getTv(), Toast.LENGTH_SHORT).show();
                //当点击item时就让他背景和字体颜色改变

            }
        });
    }

    @Override
    public int getItemCount() {
        return mBeans.size();
    }

    public static class ViewHolder extends RecyclerView.ViewHolder {
        private TextView tv;

        public ViewHolder(@NonNull View itemView) {
            super(itemView);
            tv = itemView.findViewById(R.id.tv);
        }
    }
}
主要的代码都在这了,如果还有不懂劳烦下载源码,注释写的很清楚,再不懂的也可以来骚扰我。

源码地址:
https://download.csdn.net/download/qq_38363506/11445305