本篇主要就java语言对原型模式扩展探讨理解,但是接触java的时间有限,所以不能保证没有谬误。主要内容就如下几个方面展开:
- java创建对象的几种方式
- 探讨clone方式-深复制与浅复制的问题
- serializable原型的实现
- 原型模式的实现
【java创建对象的方式】
java创建对象,最先我们肯定接触的是用new进行构建。之后我们会接触反射(反射有俩种方式直接使用class类和使用Constructor类创建),之后使用原型模式,肯定会了解到clone方式,之后因为clone存在浅复制的问题,所以了解到serializable方式创建。
1,new Object()。这种方式没有太多可说的
2,利用反射创建对象
 1 public class CreateT {
 2     //Class类创建
 3     public static <T> T Create(Class<T> tClass) throws NoSuchMethodException,InstantiationException, IllegalAccessException,
 4             IllegalArgumentException {
 5         return (T) tClass.newInstance();
 6     }
 7     //Constructor类创建
 8     public static <T> T Create2(Class<T> tClass) throws NoSuchMethodException,InstantiationException, IllegalAccessException,
 9             IllegalArgumentException, InvocationTargetException {
10         Constructor<T> constructor = tClass.getConstructor();
11         return (T) constructor.newInstance();
12     }
13 }
3,利用clone进行创建。因为Object对象有clone的方法,该方法能够创建对象,所以可以调用clone方法进行创建。
**Object中clone方法是protect类型,只有重载成public之后才能在类外使用,这处设计的确实挺精妙的。
4,使用序列化,反序列化创建对象(后面介绍)
【传统的原型方式-clone】
Object类为什么有一个protect类型的clone方法,这就是java当初设计的时候,为原型模式保留的,这我们就管它叫传统的原型模式。
public class Test3 implements Cloneable {
    @Override
    protected Object clone() throws CloneNotSupportedException {
        return super.clone();
    }
}
1 public interface Cloneable {
2 }
上面代码是一个标准的clone方法的标准实现,我们发现该方法可能会抛出异常,而且要实现空白接口Cloneable
那为什么要实现这个接口?什么情况下会抛出异常呢?下面我们看个例子
 1 //实现Cloneable并且调用super.clone()
 2 public class Test6 implements Cloneable {
 3     @Override
 4     protected Object clone() throws CloneNotSupportedException {
 5         return super.clone();
 6     }
 7 }
 8 //未实现Cloneable未调用super.clone()
 9 public class Test5{
10     @Override
11     public Object clone() throws CloneNotSupportedException {
12         return new Test5();
13     }
14 }
15 //未实现Cloneable并且调用super.clone()
16 public class Test4{
17     @Override
18     public Object clone() throws CloneNotSupportedException {
19         return super.clone();
20     }
21 }
22 //测试类
23     public static void main(String[] args) {
24         try {
25             Test6 test6=new Test6();
26             Test6 test6clone=(Test6) test6.clone();
27             System.out.println(test6clone.getClass());
28             Test5 test5=new Test5();
29             Test5 test5clone=(Test5) test5.clone();
30             System.out.println(test5clone.getClass());
31             Test4 test4=new Test4();
32             Test4 test4clone=(Test4) test4.clone();
33             System.out.println(test4clone.getClass());
34         }catch (Exception ex){
35             System.out.println(ex.getClass());
36         }
37     }
运行结果:
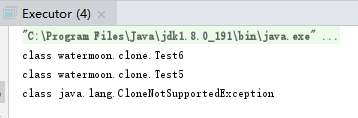
通过运行结果我们可以得到一个结论:如果调用super.clone方法,必须实现空接口Cloneable,否则会抛出异常。那我们实现的时候,像Test5一样,使用构造函数构造,不调用super.clone()是不是就可以了。原则上应该没问题,不过还有一些细节的地方是不一致的,下面继续看测试代码:
 1 //直接new
 2 public class Test5{
 3     @Override
 4     protected Object clone() throws CloneNotSupportedException {
 5         return new Test5();
 6     }
 7     public Test5(){
 8         System.out.println("Test5构造函数");
 9     }
10     private static int index=0;
11     public int getIindex() {
12         return iindex;
13     }
14     private int iindex=++index;
15     @Override
16     public String toString() {
17         return String.valueOf(iindex);
18     }
19 }
20 //使用super.clone()
21 public class Test6 implements Cloneable {
22     @Override
23     protected Object clone() throws CloneNotSupportedException {
24         return super.clone();
25     }
26
27     public Test6(){
28         System.out.println("Test6构造函数");
29     }
30     private static int index=0;
31     public int getIindex() {
32         return iindex;
33     }
34     private int iindex=++index;
35     @Override
36     public String toString() {
37         return String.valueOf(iindex);
38     }
39 }
40 //测试代码
41 public static void main(String[] args) {
42         try {
43             Test6 test6=new Test6();
44             Test6 test6clone=(Test6) test6.clone();
45             System.out.println("test6:"+test6.toString());
46             System.out.println("test6clone:"+test6clone.toString());
47             Test5 test5=new Test5();
48             Test5 test5clone=(Test5) test5.clone();
49             System.out.println("test5:"+test5.toString());
50             System.out.println("test5clone:"+test5clone.toString());
51         }catch (Exception ex){
52             System.out.println(ex.getClass());
53         }
54     }
输出结果:
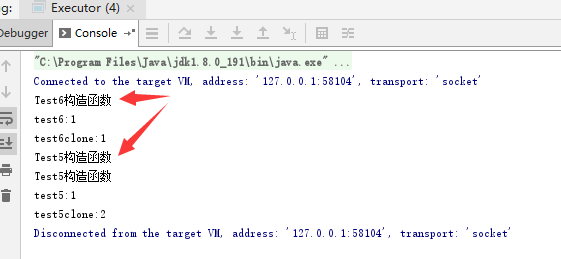
我们明显可以看出:super.clone是不走构造函数,并且私有变量也能复制;而直接使用new创建,会走构造函数,并且内部私有变量也可能会有变化。我们之前说创建对象的几种方式有clone,而没把他算到new Object中,因为clone压根就不会走构造函数!!!!
我们看下Object类的clone方法签名:
1 protected native Object clone() throws CloneNotSupportedException;
我们发现这有一个native的关键字,之前重来没见过的,百度之后才知道,native关键字代表与C语言(其他语言)交互,也就是说Object类的clone方法是用底层实现的,当然效率也会更高些。
【深复制与浅复制】
下面我们再看一个例子:
 1 public class Test7 {
 2 }
 3 public class Test8 implements Cloneable {
 4     public Test7 getTest7() {
 5         return test7;
 6     }
 7     public void setTest7(Test7 test7) {
 8         this.test7 = test7;
 9     }
10     Test7 test7;
11     @Override
12     protected Object clone() throws CloneNotSupportedException {
13         return super.clone();
14     }
15 }
16 public static void main(String[] args) {
17         try {
18             Test7 test7=new Test7();
19             Test8 test8=new Test8();
20             Test8 test8Copy= (Test8) test8.clone();
21             System.out.println("test8==test8Copy:"+(test8==test8Copy));
22             System.out.println("test8.getTest7==test8Copy.getTest7:"+(test8.getTest7()==test8Copy.getTest7()));
23         }catch (Exception ex){
24             System.out.println(ex.getClass());
25         }
26     }
运行结果:
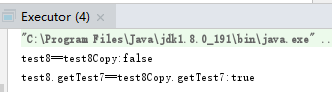
重结果中我们可以看出test8和test8Copy对象不是同一个对象,但是test8和test8Copy内部引用的Test7对象是同一个对象,也就是说test8中的Test7被修改,test8Copy中的Test7也会被修改,这几乎就不是我们想要的。我们管这种复制叫浅复制。如果对象内所有属性都被复制我们叫做深复制。
【序列化】
如果我们想彻底深复制,可以使用序列化的方式,示例代码如下:
//需要实现Serializable
public class Test7  implements Serializable {
}
//需要实现Serializable
public class Test8 implements Serializable {
    public Test7 getTest7() {
        return test7;
    }
    public void setTest7(Test7 test7) {
        this.test7 = test7;
    }
    Test7 test7;
    @Override
    protected Object clone() throws CloneNotSupportedException {
        return super.clone();
    }
}
//序列化帮助代码
public class CommonClone {
    public static <T> T deepclone(T instance) throws IOException, ClassNotFoundException {
        ByteArrayOutputStream bao = new ByteArrayOutputStream();
        ObjectOutputStream oos = new ObjectOutputStream(bao);
        oos.writeObject(instance);

        //将对象从流中取出
        ByteArrayInputStream bis = new ByteArrayInputStream(bao.toByteArray());
        ObjectInputStream ois = new ObjectInputStream(bis);
        return (T) ois.readObject();
    }
}
//测试代码
public class Executor {
    public static void main(String[] args) {
        try {
            Test7 t7=new Test7();
            Test8 t8=new Test8();
            t8.setTest7(t7);
            Test8 t8Copy = CommonClone.deepclone(t8);
            ComparableObj(t8,t8Copy);
            ComparableObj(t8.getTest7(),t8Copy.getTest7());
        }catch (Exception ex){
            System.out.println(ex.getClass());
        }
    }

    private static <T>void ComparableObj(T t1,T t2){
        System.out.println("t1:"+t1.toString());
        System.out.println("t2:"+t2.toString());
        System.out.println("t1==t2:"+(t1==t2));
    }
}
运行结果:
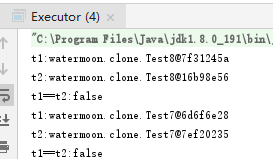
我们可以看见属性Test7也是不同的,实现了深复制。需要注意的是序列化也不会调用类的构造函数,可能与Object的clone方法机制类似,但不太明确
由于序列化和反序列化也是一个比较大的话题,这里就不展开讨论。这里只简单的介绍下,被序列化的对象以及其属性都要实现接口Serializable(和Cloneable一样,也不包含方法),如果不实现会抛出异常。
【总结】
- 如果不包含属性或者属性较少,并且内部使用,建议不必实现Cloneable接口,直接实现一个方法类似于copyInstance等,方法内部实现深复制即可
- 如果做为jar包给其他人使用,建议按照标准实现Cloneable接口,并内部实现深复制
- 对于部分接口可以将CommonClone类做成帮助类,实现序列化和反序列化,但是不建议将他作为深复制的工具,毕竟Serializable接口侵入性太高。
- 海空凭鱼跃,天高任鸟飞,对于原型模式,你只要能控制好深复制与浅复制,怎么做随你。