HyperLedger Fabric ca正式环境部署
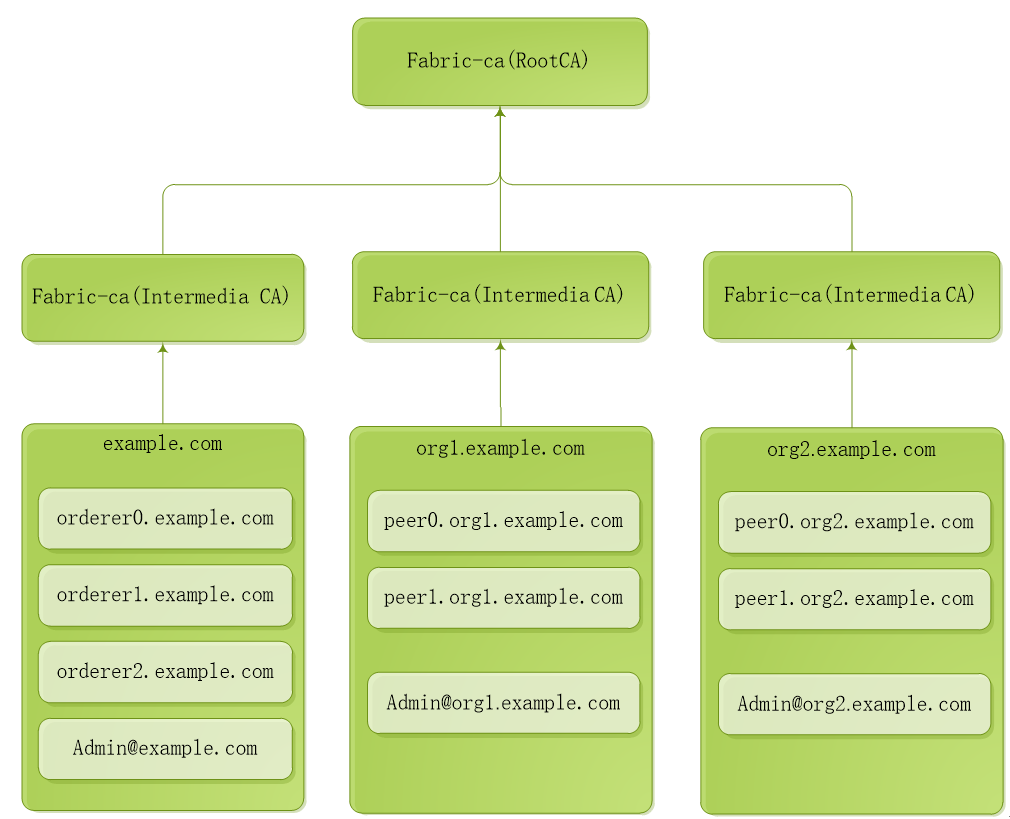
生成一个根CA(RootCA),在根CA下3个中间CA(IntermediaCA)。
1. 运行和配置RootCA服务
#cd /opt/gopath/src/github.com/hyperledger/fabric-ca/bin
#mkdir ca-server
#cd ca-server
#fabric-ca-server start -b admin:adminpw --home ./rootca --cfg.affiliations.allowremove --cfg.identities.allowremove
【docker】方式运行
拷贝文件docker-rootca.yml到ca-server目录
#docker-compose -f docker-rootca.yaml up –d
2. 运行和配置IntermediaCA1
步骤一:启动 ca
#cd /opt/gopath/src/github.com/hyperledger/fabric-ca/bin/ca-server
#fabric-ca-server init -b admin1:adminpw1 -u http://admin:adminpw@localhost:7054 --home ./intermediaca1
#vi ./intermediaca1/fabric-ca-server-config.yaml
修改port为7055
#fabric-ca-server start -b admin1:adminpw1 -u http://admin:adminpw@localhost:7054 --home ./intermediaca1 --cfg.affiliations.allowremove --cfg.identities.allowremove
【docker】方式运行
拷贝文件docker-intermediaca1.yml到ca-server目录
#docker-compose -f docker-intermediaca1.yaml up
#vi ./intermediaca1/fabric-ca-server-config.yaml
修改port为7055
#docker-compose -f docker-intermediaca1.yaml up
步骤二:为example.com准备msp
#cd /opt/gopath/src/github.com/hyperledger/fabric-ca/bin/ca-server
#fabric-ca-client enroll -M ./crypto-config/ordererOrganizations/example.com/msp -u http://admin1:adminpw1@localhost:7055 --home ./fabric-ca-client
#fabric-ca-client affiliation list -M ./crypto-config/ordererOrganizations/example.com/msp -u http://admin1:adminpw1@localhost:7055 --home ./fabric-ca-client
#fabric-ca-client affiliation remove --force org1 -M ./crypto-config/ordererOrganizations/example.com/msp -u http://admin1:adminpw1@localhost:7055 --home ./fabric-ca-client
#fabric-ca-client affiliation remove --force org2 -M ./crypto-config/ordererOrganizations/example.com/msp -u http://admin1:adminpw1@localhost:7055 --home ./fabric-ca-client
#fabric-ca-client affiliation add com -M ./crypto-config/ordererOrganizations/example.com/msp -u http://admin1:adminpw1@localhost:7055 --home ./fabric-ca-client
#fabric-ca-client affiliation add com.example -M ./crypto-config/ordererOrganizations/example.com/msp -u http://admin1:adminpw1@localhost:7055 --home ./fabric-ca-client
步骤三:注册example.com的管理员Admin@example.com
#fabric-ca-client register --id.name Admin@example.com --id.type client --id.affiliation "com.example" --id.attrs '"hf.Registrar.Roles=client,orderer,peer,user","hf.Registrar.DelegateRoles=client,orderer,peer,user",hf.Registrar.Attributes=*,hf.GenCRL=true,hf.Revoker=true,hf.AffiliationMgr=true,hf.IntermediateCA=true,role=admin:ecert' --id.secret=123456 -M ./crypto-config/ordererOrganizations/example.com/msp -u http://admin1:adminpw1@localhost:7055 --home ./fabric-ca-client
#fabric-ca-client enroll -u http://Admin@example.com:123456@localhost:7055 -M ./crypto-config/ordererOrganizations/example.com/users/Admin@example.com/msp --home ./fabric-ca-client
#mkdir ./fabric-ca-client/crypto-config/ordererOrganizations/example.com/users/Admin@example.com/msp/admincerts
#cp ./fabric-ca-client/crypto-config/ordererOrganizations/example.com/users/Admin@example.com/msp/signcerts/cert.pem ./fabric-ca-client/crypto-config/ordererOrganizations/example.com/users/Admin@example.com/msp/admincerts
#mkdir ./fabric-ca-client/crypto-config/ordererOrganizations/example.com/msp/admincerts
#cp ./fabric-ca-client/crypto-config/ordererOrganizations/example.com/users/Admin@example.com/msp/signcerts/cert.pem ./fabric-ca-client/crypto-config/ordererOrganizations/example.com/msp/admincerts
步骤四:为orderer0.example.com准备msp
#fabric-ca-client register --id.name orderer0.example.com --id.type orderer --id.affiliation "com.example" --id.attrs '"role=orderer",ecert=true' --id.secret=123456 -M ./crypto-config/ordererOrganizations/example.com/msp -u http://admin1:adminpw1@localhost:7055 --home ./fabric-ca-client
#fabric-ca-client enroll -u http://orderer0.example.com:123456@localhost:7055 -M ./crypto-config/ordererOrganizations/example.com/orderers/orderer0.example.com/msp --home ./fabric-ca-client
#mkdir ./fabric-ca-client/crypto-config/ordererOrganizations/example.com/orderers/orderer0.example.com/msp/admincerts
#cp ./fabric-ca-client/crypto-config/ordererOrganizations/example.com/users/Admin@example.com/msp/signcerts/cert.pem ./fabric-ca-client/crypto-config/ordererOrganizations/example.com/orderers/orderer0.example.com/msp/admincerts
步骤五:为orderer1.example.com准备msp
#fabric-ca-client register --id.name orderer1.example.com --id.type orderer --id.affiliation "com.example" --id.attrs '"role=orderer",ecert=true' --id.secret=123456 -M ./crypto-config/ordererOrganizations/example.com/msp -u http://admin1:adminpw1@localhost:7055 --home ./fabric-ca-client
#fabric-ca-client enroll -u http://orderer1.example.com:123456@localhost:7055 -M ./crypto-config/ordererOrganizations/example.com/orderers/orderer1.example.com/msp --home ./fabric-ca-client
#mkdir ./fabric-ca-client/crypto-config/ordererOrganizations/example.com/orderers/orderer1.example.com/msp/admincerts
#cp ./fabric-ca-client/crypto-config/ordererOrganizations/example.com/users/Admin@example.com/msp/signcerts/cert.pem ./fabric-ca-client/crypto-config/ordererOrganizations/example.com/orderers/orderer1.example.com/msp/admincerts
步骤六:为orderer2.example.com准备msp
#fabric-ca-client register --id.name orderer2.example.com --id.type orderer --id.affiliation "com.example" --id.attrs '"role=orderer",ecert=true' --id.secret=123456 -M ./crypto-config/ordererOrganizations/example.com/msp -u http://admin1:adminpw1@localhost:7055 --home ./fabric-ca-client
#fabric-ca-client enroll -u http://orderer2.example.com:123456@localhost:7055 -M ./crypto-config/ordererOrganizations/example.com/orderers/orderer2.example.com/msp --home ./fabric-ca-client
#mkdir ./fabric-ca-client/crypto-config/ordererOrganizations/example.com/orderers/orderer2.example.com/msp/admincerts
#cp ./fabric-ca-client/crypto-config/ordererOrganizations/example.com/users/Admin@example.com/msp/signcerts/cert.pem ./fabric-ca-client/crypto-config/ordererOrganizations/example.com/orderers/orderer2.example.com/msp/admincerts
3. 运行和配置IntermediaCA2
步骤一:启动 ca
#cd /opt/gopath/src/github.com/hyperledger/fabric-ca/bin/ca-server
#fabric-ca-server init -b admin2:adminpw2 -u http://admin:adminpw@localhost:7054 --home ./intermediaca2
#vi ./intermediaca2/fabric-ca-server-config.yaml
修改port为7056
#fabric-ca-server start -b admin2:adminpw2 -u http://admin:adminpw@localhost:7054 --home ./intermediaca2 --cfg.affiliations.allowremove --cfg.identities.allowremove
【docker】方式运行
拷贝文件docker-intermediaca2.yml到ca-server目录
#docker-compose -f docker-intermediaca2.yaml up
#vi ./intermediaca2/fabric-ca-server-config.yaml
修改port为7056
#docker-compose -f docker-intermediaca2.yaml up
步骤二:为org1.example.com准备msp
#fabric-ca-client enroll -M ./crypto-config/peerOrganizations/org1.example.com/msp -u http://admin2:adminpw2@localhost:7056 --home ./fabric-ca-client
#fabric-ca-client affiliation list -M ./crypto-config/peerOrganizations/org1.example.com/msp -u http://admin2:adminpw2@localhost:7056 --home ./fabric-ca-client
#fabric-ca-client affiliation remove --force org1 -M ./crypto-config/peerOrganizations/org1.example.com/msp -u http://admin2:adminpw2@localhost:7056 --home ./fabric-ca-client
#fabric-ca-client affiliation remove --force org2 -M ./crypto-config/peerOrganizations/org1.example.com/msp -u http://admin2:adminpw2@localhost:7056 --home ./fabric-ca-client
#fabric-ca-client affiliation add com -M ./crypto-config/peerOrganizations/org1.example.com/msp -u http://admin2:adminpw2@localhost:7056 --home ./fabric-ca-client
#fabric-ca-client affiliation add com.example -M ./crypto-config/peerOrganizations/org1.example.com/msp -u http://admin2:adminpw2@localhost:7056 --home ./fabric-ca-client
#fabric-ca-client affiliation add com.example.org1 -M ./crypto-config/peerOrganizations/org1.example.com/msp -u http://admin2:adminpw2@localhost:7056 --home ./fabric-ca-client
步骤三:注册org1.example.com的管理员Admin@org1.example.com
#fabric-ca-client register --id.name Admin@org1.example.com --id.type client --id.affiliation "com.example.org1" --id.attrs '"hf.Registrar.Roles=client,orderer,peer,user","hf.Registrar.DelegateRoles=client,orderer,peer,user",hf.Registrar.Attributes=*,hf.GenCRL=true,hf.Revoker=true,hf.AffiliationMgr=true,hf.IntermediateCA=true,role=admin:ecert' --id.secret=123456 -M ./crypto-config/peerOrganizations/org1.example.com/msp -u http://admin2:adminpw2@localhost:7056 --home ./fabric-ca-client
#fabric-ca-client enroll -u http://Admin@org1.example.com:123456@localhost:7056 -M ./crypto-config/peerOrganizations/org1.example.com/users/Admin@org1.example.com/msp --home ./fabric-ca-client
#mkdir ./fabric-ca-client/crypto-config/peerOrganizations/org1.example.com/users/Admin@org1.example.com/msp/admincerts
#cp ./fabric-ca-client/crypto-config/peerOrganizations/org1.example.com/users/Admin@org1.example.com/msp/signcerts/cert.pem ./fabric-ca-client/crypto-config/peerOrganizations/org1.example.com/users/Admin@org1.example.com/msp/admincerts
#mkdir ./fabric-ca-client/crypto-config/peerOrganizations/org1.example.com/msp/admincerts
#cp ./fabric-ca-client/crypto-config/peerOrganizations/org1.example.com/users/Admin@org1.example.com/msp/signcerts/cert.pem ./fabric-ca-client/crypto-config/peerOrganizations/org1.example.com/msp/admincerts
步骤四:为peer0.org1.example.com准备msp
#fabric-ca-client register --id.name peer0.org1.example.com --id.type peer --id.affiliation "com.example.org1" --id.attrs '"role=peer",ecert=true' --id.secret=123456 -M ./crypto-config/peerOrganizations/org1.example.com/msp -u http://admin2:adminpw2@localhost:7056 --home ./fabric-ca-client
#fabric-ca-client enroll -u http://peer0.org1.example.com:123456@localhost:7056 -M ./crypto-config/peerOrganizations/org1.example.com/peers/peer0.org1.example.com/msp --home ./fabric-ca-client
#mkdir ./fabric-ca-client/crypto-config/peerOrganizations/org1.example.com/peers/peer0.org1.example.com/msp/admincerts
#cp ./fabric-ca-client/crypto-config/peerOrganizations/org1.example.com/users/Admin@org1.example.com/msp/signcerts/cert.pem ./fabric-ca-client/crypto-config/peerOrganizations/org1.example.com/peers/peer0.org1.example.com/msp/admincerts
步骤五:为peer1.org1.example.com准备msp
#fabric-ca-client register --id.name peer1.org1.example.com --id.type peer --id.affiliation "com.example.org1" --id.attrs '"role=peer",ecert=true' --id.secret=123456 -M ./crypto-config/peerOrganizations/org1.example.com/msp -u http://admin2:adminpw2@localhost:7056 --home ./fabric-ca-client
#fabric-ca-client enroll -u http://peer1.org1.example.com:123456@localhost:7056 -M ./crypto-config/peerOrganizations/org1.example.com/peers/peer1.org1.example.com/msp --home ./fabric-ca-client
#mkdir ./fabric-ca-client/crypto-config/peerOrganizations/org1.example.com/peers/peer1.org1.example.com/msp/admincerts
#cp ./fabric-ca-client/crypto-config/peerOrganizations/org1.example.com/users/Admin@org1.example.com/msp/signcerts/cert.pem ./fabric-ca-client/crypto-config/peerOrganizations/org1.example.com/peers/peer1.org1.example.com/msp/admincerts
4. 运行和配置IntermediaCA3
步骤一:启动 ca
#cd /opt/gopath/src/github.com/hyperledger/fabric-ca/bin/ca-server
#fabric-ca-server init -b admin3:adminpw3 -u http://admin:adminpw@localhost:7054 --home ./intermediaca3
#vi ./intermediaca3/fabric-ca-server-config.yaml
修改port为7057
#fabric-ca-server start -b admin3:adminpw3 -u http://admin:adminpw@localhost:7054 --home ./intermediaca3 --cfg.affiliations.allowremove --cfg.identities.allowremove
【docker】方式运行
拷贝文件docker-intermediaca3.yml到ca-server目录
#docker-compose -f docker-intermediaca3.yaml up
#vi ./intermediaca3/fabric-ca-server-config.yaml
修改port为7057
#docker-compose -f docker-intermediaca3.yaml up
步骤二:为org2.example.com准备msp
#fabric-ca-client enroll -M ./crypto-config/peerOrganizations/org2.example.com/msp -u http://admin3:adminpw3@localhost:7057 --home ./fabric-ca-client
#fabric-ca-client affiliation list -M ./crypto-config/peerOrganizations/org2.example.com/msp -u http://admin3:adminpw3@localhost:7057 --home ./fabric-ca-client
#fabric-ca-client affiliation remove --force org1 -M ./crypto-config/peerOrganizations/org2.example.com/msp -u http://admin3:adminpw3@localhost:7057 --home ./fabric-ca-client
#fabric-ca-client affiliation remove --force org2 -M ./crypto-config/peerOrganizations/org2.example.com/msp -u http://admin3:adminpw3@localhost:7057 --home ./fabric-ca-client
#fabric-ca-client affiliation add com -M ./crypto-config/peerOrganizations/org2.example.com/msp -u http://admin3:adminpw3@localhost:7057 --home ./fabric-ca-client
#fabric-ca-client affiliation add com.example -M ./crypto-config/peerOrganizations/org2.example.com/msp -u http://admin3:adminpw3@localhost:7057 --home ./fabric-ca-client
#fabric-ca-client affiliation add com.example.org2 -M ./crypto-config/peerOrganizations/org2.example.com/msp -u http://admin3:adminpw3@localhost:7057 --home ./fabric-ca-client
步骤三:注册org2.example.com的管理员Admin@org2.example.com
#fabric-ca-client register --id.name Admin@org2.example.com --id.type client --id.affiliation "com.example.org2" --id.attrs '"hf.Registrar.Roles=client,orderer,peer,user","hf.Registrar.DelegateRoles=client,orderer,peer,user",hf.Registrar.Attributes=*,hf.GenCRL=true,hf.Revoker=true,hf.AffiliationMgr=true,hf.IntermediateCA=true,role=admin:ecert' --id.secret=123456 -M ./crypto-config/peerOrganizations/org2.example.com/msp -u http://admin3:adminpw3@localhost:7057 --home ./fabric-ca-client
#fabric-ca-client enroll -u http://Admin@org2.example.com:123456@localhost:7057 -M ./crypto-config/peerOrganizations/org2.example.com/users/Admin@org2.example.com/msp --home ./fabric-ca-client
#mkdir ./fabric-ca-client/crypto-config/peerOrganizations/org2.example.com/users/Admin@org2.example.com/msp/admincerts
#cp ./fabric-ca-client/crypto-config/peerOrganizations/org2.example.com/users/Admin@org2.example.com/msp/signcerts/cert.pem ./fabric-ca-client/crypto-config/peerOrganizations/org2.example.com/users/Admin@org2.example.com/msp/admincerts
#mkdir ./fabric-ca-client/crypto-config/peerOrganizations/org2.example.com/msp/admincerts
#cp ./fabric-ca-client/crypto-config/peerOrganizations/org2.example.com/users/Admin@org2.example.com/msp/signcerts/cert.pem ./fabric-ca-client/crypto-config/peerOrganizations/org2.example.com/msp/admincerts
步骤四:为peer0.org2.example.com准备msp
#fabric-ca-client register --id.name peer0.org2.example.com --id.type peer --id.affiliation "com.example.org2" --id.attrs '"role=peer",ecert=true' --id.secret=123456 -M ./crypto-config/peerOrganizations/org2.example.com/msp -u http://admin3:adminpw3@localhost:7057 --home ./fabric-ca-client
#fabric-ca-client enroll -u http://peer0.org2.example.com:123456@localhost:7057 -M ./crypto-config/peerOrganizations/org2.example.com/peers/peer0.org2.example.com/msp --home ./fabric-ca-client
#mkdir ./fabric-ca-client/crypto-config/peerOrganizations/org2.example.com/peers/peer0.org2.example.com/msp/admincerts
#cp ./fabric-ca-client/crypto-config/peerOrganizations/org2.example.com/users/Admin@org2.example.com/msp/signcerts/cert.pem ./fabric-ca-client/crypto-config/peerOrganizations/org2.example.com/peers/peer0.org2.example.com/msp/admincerts
步骤五:为peer1.org2.example.com准备msp
#fabric-ca-client register --id.name peer1.org2.example.com --id.type peer --id.affiliation "com.example.org2" --id.attrs '"role=peer",ecert=true' --id.secret=123456 -M ./crypto-config/peerOrganizations/org2.example.com/msp -u http://admin3:adminpw3@localhost:7057 --home ./fabric-ca-client
#fabric-ca-client enroll -u http://peer1.org2.example.com:123456@localhost:7057 -M ./crypto-config/peerOrganizations/org2.example.com/peers/peer1.org2.example.com/msp --home ./fabric-ca-client
#mkdir ./fabric-ca-client/crypto-config/peerOrganizations/org2.example.com/peers/peer1.org2.example.com/msp/admincerts
#cp ./fabric-ca-client/crypto-config/peerOrganizations/org2.example.com/users/Admin@org2.example.com/msp/signcerts/cert.pem ./fabric-ca-client/crypto-config/peerOrganizations/org2.example.com/peers/peer1.org2.example.com/msp/admincerts