如果觉得不错,请点文章末尾链接去犒劳作者。
什么是并发
并发在生活中随处可见,边走路边说话,边听歌边写代码。计算机术语中的"并发",指的是在单个系统里同时执行多个独立的活动,而不是顺序的一个接一个的执行。对于单核CPU来说,在某个时刻只可能处理一个任务,但它却不是完全执行完一个任务再执行一个下一任务,而是一直在任务间切换,每个任务完成一点就去执行下一个任务,看起来就像任务在并行发生,虽然不是严格的同时执行多个任务,但是我们仍然称之为并发(concurrency)。真正的并发是在在多核CPU上,能够真正的同时执行多个任务,称为硬件并发(hardware concurrency)。
并发并非没有代价,在单核CPU并发执行两个任务需要付出上下文切换的时间代价。如下图:
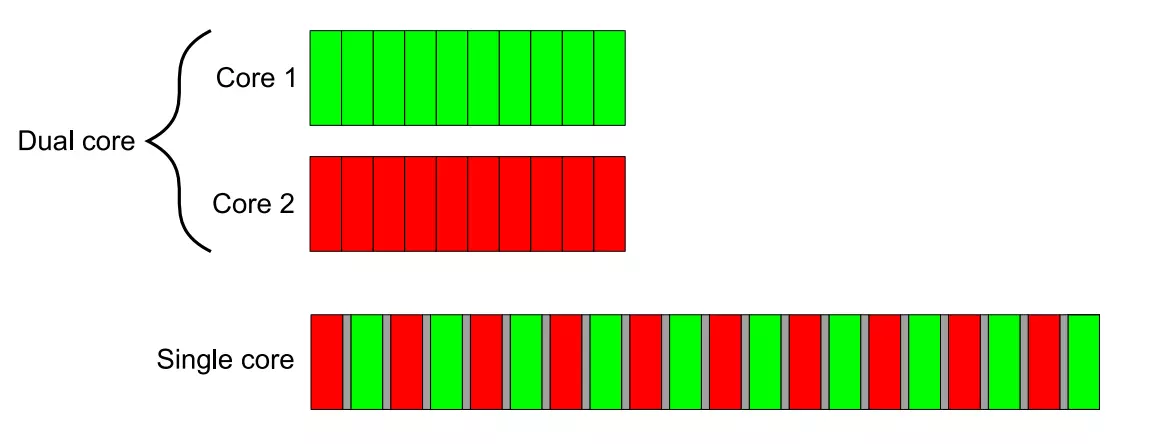
双核机器的并行执行与单核机器对比.png
假设A和B两个任务都被分成10个大小相等的块,单核CPU交替的执行两个任务,每次执行其中一块,其花费的时间并不是先完成A任务再玩成B任务所花费时间的两倍,而是要更多。这是因为系统从一个任务切换到另一个任务需要执行一次上下文切换,这是需要时间的(图中的灰色块)。上下文切换需要操作系统为当前运行的任务保存CPU的状态和指令指针,算出要切换到哪个任务,并为要切换的任务重新加载处理器状态。然后将新任务的指令和数据载入到缓存中。
并发的方式
多进程并发
将应用程序分为多个独立的、单线程的进程,他们可以同时运行。进程内部实现原理比较复杂,这里就不多说了。
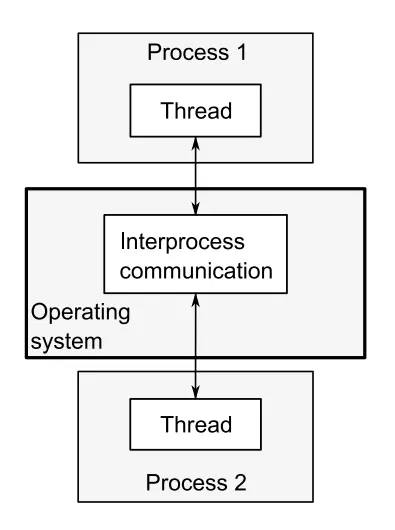
并发运行的进程之间的通信.png
这些独立的进程可以通过常规的进程间通信机制进行通信,如管道、信号、消息队列、共享内存、存储映射I/O、信号量、套接字等。
缺点:
- 进程间通信较为复杂,速度相对线程间的通信更慢。
- 启动进程的开销比线程大,使用的系统资源也更多。
优点:
- 进程间通信的机制相对于线程更加安全。
- 能够很容易的将一台机器上的多进程程序部署在不同的机器上(如果通信机制选取的是套接字的话)。
多线程并发
线程很像轻量级的进程,但是一个进程中的所有线程都共享相同的地址空间,线程间的大部分数据都可以共享。线程间的通信一般都通过共享内存来实现。
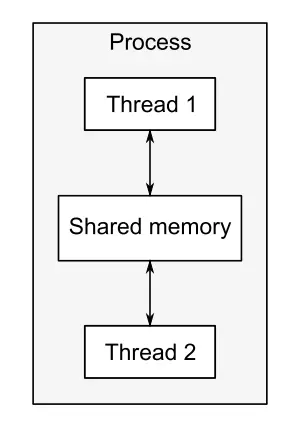
并发运行的线程之间的通信.png
优点:
- 由于可以共享数据,多线程间的通信开销比进程小的多。
- 线程启动的比进程快,占用的资源更少。
缺点:
- 共享数据太过于灵活,为了维护正确的共享,代码写起来比较复杂。
- 无法部署在分布式系统上。
为什么使用并发
主要原因有两个:任务拆分和提高性能。
任务拆分
在编写软件的时候,将相关的代码放在一起,将无关的代码分开,这是一个好主意,这样能够让程序更加容易理解和测试。将程序划分成不同的任务,每个线程执行一个任务或者多个任务,可以将整个程序的逻辑变得更加简单。
提高性能
在两种情况下,并发能够提高性能。
- 任务并行(task parallelism):将一个单个任务分成若干个部分各自并行运行,从而降低运行时间。虽然听起来很简单,但其实是一个相当复杂的过程,设想假如各个部分之间存在很多以来,一个部分的执行需要使用到另一个任务的执行结果,这个时候并不能很好的并行完成。
- 数据并行(data parallelism):每个线程在不同的数据部分上执行相同的操作。
多线程库简介
C++98标准中并没有线程库的存在,而在C++11中终于提供了多线程的标准库,提供了管理线程、保护共享数据、线程间同步操作、原子操作等类。
多线程库对应的头文件是#include <thread>,类名为std::thread。
一个简单的串行程序如下:
#include <iostream>
#include <thread>

void function_1() {
    std::cout << "I'm function_1()" << std::endl;
}

int main() {
    function_1();
    return 0;
}这是一个典型的单线程的单进程程序,任何程序都是一个进程,main()函数就是其中的主线程,单个线程都是顺序执行。
将上面的程序改造成多线程程序其实很简单,让function_1()函数在另外的线程中执行:
#include <iostream>
#include <thread>

void function_1() {
    std::cout << "I'm function_1()" << std::endl;
}

int main() {
    std::thread t1(function_1);
    // do other things
    t1.join();
    return 0;
}
分析:
- 首先,构建一个
std::thread对象t1,构造的时候传递了一个参数,这个参数是一个函数,这个函数就是这个线程的入口函数,函数执行完了,整个线程也就执行完了。 - 线程创建成功后,就会立即启动,并没有一个类似
start的函数来显式的启动线程。 - 一旦线程开始运行, 就需要显式的决定是要等待它完成(join),或者分离它让它自行运行(detach)。注意:只需要在
std::thread对象被销毁之前做出这个决定。这个例子中,对象t1是栈上变量,在main函数执行结束后就会被销毁,所以需要在main函数结束之前做决定。 - 这个例子中选择了使用
t1.join(),主线程会一直阻塞着,直到子线程完成,join()函数的另一个任务是回收该线程中使用的资源。
线程对象和对象内部管理的线程的生命周期并不一样,如果线程执行的快,可能内部的线程已经结束了,但是线程对象还活着,也有可能线程对象已经被析构了,内部的线程还在运行。
假设t1线程是一个执行的很慢的线程,主线程并不想等待子线程结束就想结束整个任务,直接删掉t1.join()是不行的,程序会被终止(析构t1的时候会调用std::terminate,程序会打印terminate called without an active exception)。
与之对应,我们可以调用t1.detach(),从而将t1线程放在后台运行,所有权和控制权被转交给C++运行时库,以确保与线程相关联的资源在线程退出后能被正确的回收。参考UNIX的守护进程(daemon process)的概念,这种被分离的线程被称为守护线程(daemon threads)。线程被分离之后,即使该线程对象被析构了,线程还是能够在后台运行,只是由于对象被析构了,主线程不能够通过对象名与这个线程进行通信。例如:
#include <iostream>
#include <thread>

void function_1() {
    //延时500ms 为了保证test()运行结束之后才打印
    std::this_thread::sleep_for(std::chrono::milliseconds(500));
    std::cout << "I'm function_1()" << std::endl;
}

void test() {
    std::thread t1(function_1);
    t1.detach();
    // t1.join();
    std::cout << "test() finished" << std::endl;
}

int main() {
    test();
    //让主线程晚于子线程结束
    std::this_thread::sleep_for(std::chrono::milliseconds(1000)); //延时1s
    return 0;
}

// 使用 t1.detach()时
// test() finished
// I'm function_1()

// 使用 t1.join()时
// I'm function_1()
// test() finished
分析:
- 由于线程入口函数内部有个
500ms的延时,所以在还没有打印的时候,test()已经执行完成了,t1已经被析构了,但是它负责的那个线程还是能够运行,这就是detach()的作用。 - 如果去掉
main函数中的1s延时,会发现什么都没有打印,因为主线程执行的太快,整个程序已经结束了,那个后台线程被C++运行时库回收了。 - 如果将
t1.detach()换成t1.join(),test函数会在t1线程执行结束之后,才会执行结束。
一旦一个线程被分离了,就不能够再被join了。如果非要调用,程序就会崩溃,可以使用joinable()函数判断一个线程对象能否调用join()。
void test() {
    std::thread t1(function_1);
    t1.detach();

    if(t1.joinable())
        t1.join();

    assert(!t1.joinable());
}
我的SegmentFault链接
参考
- C++并发编程实战
- C++ Threading #1: Introduction
作者:StormZhu
链接:https://www.jianshu.com/p/5d273e4e3cbb
来源:简书
著作权归作者所有。商业转载请联系作者获得授权,非商业转载请注明出处。
join的必要:
举个例子,现在有 A, B, C 三件事情,只有做完 A 和 B 才能去做 C,而 A 和 B 可以并行完成。
int main(){
    thread t = new thread(A);
    B();  // 此时 A 与 B 并行进行
    t.join();  // 确保 A 完成
    C();
}
使用 std::thread 创建线程
C++11 的 std::thread 可以帮助我们方便地写多线程程序,它的使用也是很简单的。
在 code3 目录下新建一个 code1.cpp 文件:
#include <iostream>
#include <functional>
#include <thread>
#include <string>

void test(){
    std::cout<<"hello thread"<<std::endl;
}

struct person{
    void test(){
        std::cout<<"hello thread"<<std::endl;
    }

    void test1(std::string str){
        std::cout<<"hello "<<str<<std::endl;
    }
};

int main() {
    std::thread thd1([]{
        std::cout<<"hello thread"<<std::endl;
    });

    std::thread thd2(test);

    person p;
    std::thread thd3(std::bind(&person::test, &p));
    std::thread thd4(std::bind(&person::test1, &p, "thread"));

    thd1.join();
    thd2.join();
    thd3.join();
    thd4.join();

    return 0;
}
编译和运行代码:在 build 目录下执行
g++ ../code1.cpp -o code1 -lpthread -std=c++11 && ./code1输出结果如下图所示,可以看到由于每次运行的线程调度可能不一样,多次运行未必结果相同。
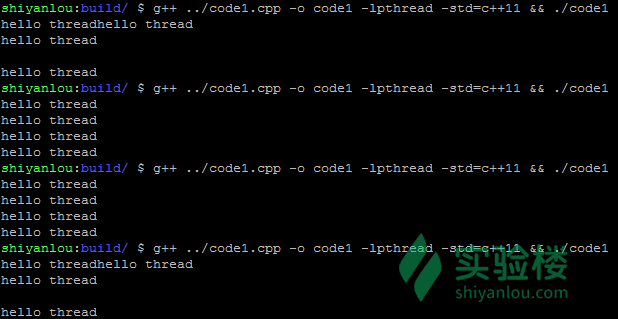
通过 lambda, 普通函数或对象的成员函数就可以创建一个线程了。 这里需要注意的是,构造线程对象并不意味着线程会立即执行,如果不调用 join 方法,那么线程对象就会析构,这时候线程函数执行会出错,所以我们需要调用 join 保证线程函数完整执行,join 是阻塞执行的。如果不希望被阻塞可以采用一些办法,比如调用 detach 或者用一个智能指针来保存 thread 来保证 thread 对象的生命周期。
在 code3 目录下新建一个 code2.cpp 文件:
#include <iostream>
#include <functional>
#include <thread>
#include <memory>

char msg1[10] = "hhh";
char msg2[10] = "aaa";
char msg3[10] = "ooo";

void test(void *msg)
{

    std::cout << "hello thread " << (char *)msg << std::endl;
}

struct person
{
    person() : thd_(std::bind(&person::test, this, (void *)msg2))
    {
        thd_ptr_ = std::make_shared<std::thread>([this]
        {
            test((void *)msg3);
        });
    }

    ~person()
    {
        thd_.join();
        thd_ptr_->join();
    }

    void test(void *msg)
    {
        std::cout << "hello thread " << (char *)msg << std::endl;
    }

    std::thread thd_;
    std::shared_ptr<std::thread> thd_ptr_;
};

int main()
{

    std::thread thd(test, (void *)msg1);
    thd.detach();

    person p;
}
编译和运行代码:在 build 目录下执行
g++ ../code2.cpp -o code2 -std=c++11 -lpthread && ./code2输出结果如下图所示,有时候只输出两个是因为 thd(test) 线程还没有执行,主线程就执行完毕退出了,标准输入输出就不会显示 thd(test) 的输出了。

接下来,我们来用 thread 做一个定时器,让它定时输出一行字。 在 code3 目录下新建一个 code3.cpp 文件:
#include <iostream>
#include <functional>
#include <thread>
#include <memory>
#include <chrono>

struct timer {
    void start() {
        thd_ptr_ = std::make_shared<std::thread>([this]{
            test();
        });
    }

    ~timer(){
        stop_ = true;
        thd_ptr_->join();
    }

    void test(){
        while(!stop_){
            std::cout<<"hello thread"<<std::endl;
            std::this_thread::sleep_for(std::chrono::seconds(1));
        }
    }

    std::shared_ptr<std::thread> thd_ptr_;
    bool stop_ = false;
};

int main(){

    timer t;
    t.start();

    std::this_thread::sleep_for(std::chrono::seconds(15));
}
编译和运行代码:在 build 目录下执行
g++ ../code3.cpp -o code3 -std=c++11 -lpthread && ./code3输出结果:
hello thread
hello thread
hello thread
hello thread
hello thread
hello thread
hello thread
hello thread
hello thread
hello thread
hello thread
hello thread
hello thread
hello thread
hello thread
这个定时器会每隔 1s 打印 hello thread 。这里需要注意如何停止一个线程,停止的方法是通过一个停止标志来控制线程函数的结束,换句话说就是让线程自己退出。主函数执行完之后,需要释放 t 因此调用了 t 的析构函数,导致子线程退出。
线程组的概念与使用
有时候我们有一批任务,这些任务是可以独立执行的,并且比较耗时,如果按照串行方式在主线程内一个一个执行的话会很耗时,这时候用线程组就可以充分并行地执行任务了,可以大幅缩短任务的执行时间。我们可以通过一个容器去管理 std::thread ,把一批任务分解给每个线程让他们独立并行执行。
在 code3 目录下新建一个 code4.cpp 文件:
#include <iostream>
#include <functional>
#include <thread>
#include <memory>
#include <chrono>
#include <vector>

void test1(){
    std::cout<<"hello test1"<<std::endl;
    std::this_thread::sleep_for(std::chrono::seconds(1));
}

void test2(){
    std::cout<<"hello test2"<<std::endl;
    std::this_thread::sleep_for(std::chrono::seconds(2));
}

void test3(){
    std::cout<<"hello test3"<<std::endl;
    std::this_thread::sleep_for(std::chrono::seconds(3));
}

int main(){
    auto begin = std::chrono::high_resolution_clock::now();
    test1();
    test2();
    test3();
    auto end = std::chrono::high_resolution_clock::now();
    std::cout<<std::chrono::duration_cast<std::chrono::seconds>(end-begin).count()<<std::endl;

    std::vector<std::shared_ptr<std::thread>> group;
    group.push_back(std::make_shared<std::thread>([]{ test1(); }));
    group.push_back(std::make_shared<std::thread>([]{ test2(); }));
    group.push_back(std::make_shared<std::thread>([]{ test3(); }));

    begin = std::chrono::high_resolution_clock::now();
    for(auto& thd : group){
        thd->join();
    }
    end = std::chrono::high_resolution_clock::now();
    std::cout<<std::chrono::duration_cast<std::chrono::seconds>(end-begin).count()<<std::endl;
}
编译和运行代码:在 build 目录下执行
g++ ../code4.cpp -o code4 -std=c++11 -lpthread && ./code4输出结果:
hello test1
hello test2
hello test3
6 seconds
hello test1
hello test2
hello test3
3 seconds
每个线程在创建的时候就开始运行,所以在
begin = std::chrono::high_resolution_clock::now();这个语句执行之前,所有的线程已经开始工作。在主线程 join 等待第一个线程执行完毕的时候,其他的线程仍然在并行工作,所以主线程 join 等待的时间等于子线程的最长工作时间。因此主线程输出为 3 seconds 。