Thread类的基本用法
1.线程创建
1.继承Thread类,重写run()方法
class MyThread extends Thread{
    @Override
    public void run() {
        System.out.println("hello thread");
    }
}
public class Demo1 {
    public static void main(String[] args) {
        MyThread t=new MyThread();//把线程和线程要完成的任务耦合在一起
        t.start();//另外启动新线程,执行run中的逻辑,是一个单独执行流,和现有执行流不相关。并发执行
        System.out.println("hello main");
    }
}
2.实现Runnable接口,重写run()方法
class MyRunnable implements Runnable{
    @Override
    public void run() {
        while (true) {
            System.out.println("hello MyRunnable");
            try {
                Thread.sleep(1000);
            } catch (InterruptedException e) {
                throw new RuntimeException(e);
            }
        }
    }
}
public class Demo2 {
    public static void main(String[] args) {
        MyRunnable myRunnable=new MyRunnable();
        Thread t=new Thread(myRunnable);//把线程要干的事和线程分开,使用Runnable专门表示线程要完成的工作
        t.start();
        while (true){
            System.out.println("hello main");
            try {
                Thread.sleep(1000);
            } catch (InterruptedException e) {
                throw new RuntimeException(e);
            }
        }
    }
}
3.继承Thread类,使用匿名内部类
public class Demo3 {
    /**
     *使用匿名内部类,创建thread子类同时实例化出一个thread对象
     * @param args
     */
    public static void main(String[] args) {
        Thread t=new Thread(){
            @Override
            public void run() {
                while(true){
                    System.out.println("hello thread");
                    try {
                        Thread.sleep(1000);
                    } catch (InterruptedException e) {
                        throw new RuntimeException(e);
                    }
                }
            }
        };
        t.start();
        while(true){
            System.out.println("hello main");
            try {
                Thread.sleep(1000);
            } catch (InterruptedException e) {
                throw new RuntimeException(e);
            }
        }
    }
}
4.实现Runnable接口,使用匿名内部类
public class Demo4 {
    /**
     * 使用匿名内部类 实现Runnable接口
     * @param args
     */
    public static void main(String[] args) {
        Thread t=new Thread(new Runnable() {
            @Override
            public void run() {
                while(true){
                    System.out.println("hello thread");
                    try {
                        Thread.sleep(1000);
                    } catch (InterruptedException e) {
                        throw new RuntimeException(e);
                    }
                }
            }
        });
        t.start();
        while(true){
            System.out.println("hello main");
            try {
                Thread.sleep(1000);
            } catch (InterruptedException e) {
                throw new RuntimeException(e);
            }
        }
    }
}
5.使用lambda表达式(推荐)
public class Demo5 {
    /**
     * lambda表达式,推荐写法
     * @param args
     */
    public static void main(String[] args) {
        Thread t=new Thread(()->{
            while (true){
                System.out.println("hello thread");
                try {
                    Thread.sleep(1000);
                } catch (InterruptedException e) {
                    throw new RuntimeException(e);
                }
            }
        });
        t.start();
        while(true){
            System.out.println("hello main");
            try {
                Thread.sleep(1000);
            } catch (InterruptedException e) {
                throw new RuntimeException(e);
            }
        }
    }
}
2.启动线程(start和run的区别)
class MyThread extends Thread{
    @Override
    public void run() {
        while(true) {
            System.out.println("hello thread");
            try {
                Thread.sleep(1000);
            } catch (InterruptedException e) {
                throw new RuntimeException(e);
            }
        }
    }
}
public class Demo1 {
    public static void main(String[] args) {
        MyThread t=new MyThread();
        //t.run();直接调用run
        t.start();
        while (true){
            System.out.println("hello main");
            try {
                Thread.sleep(1000);
            } catch (InterruptedException e) {
                throw new RuntimeException(e);
            }
        }
    }
}
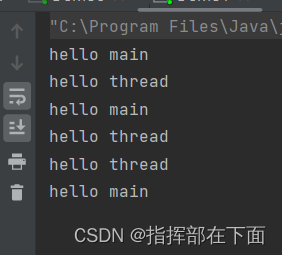
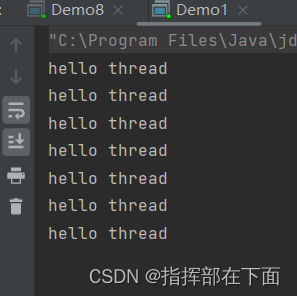
第一个截图是调用start,是创建线程,在新线程里面执行代码,和main线程并发执行。
第二个截图是调用run,没有创建线程,而是在原来的main线程执行代码
线程中断
本质是让run方法快点结束,而不是让run执行一般中止。
方法1:自己定义一个标志位,作为线程是否结束的标志
public class Demo9 {
    public static boolean isQuit=false;//自定义一个标志
    public static void main(String[] args) {
        Thread t=new Thread(()->{
            while (!isQuit) {
                System.out.println("hello thread");
                try {
                    Thread.sleep(1000);
                } catch (InterruptedException e) {
                    throw new RuntimeException(e);
                }
            }
        });
        t.start();

        try {
            Thread.sleep(3000);
        } catch (InterruptedException e) {
            throw new RuntimeException(e);
        }
        isQuit=true;//3秒后线程结束
    }
}
方法2:使用标准库自带的标记
public class Demo10 {
    public static void main(String[] args) {
        Thread t = new Thread(() -> {
            while (!Thread.currentThread().isInterrupted()) {
                //currentThread()是一个静态方法,通过它可以获得当前线程对应的Thread对象
                //isInterrupted()用于判定标志位
                System.out.println("hello thread");
                try {
                    Thread.sleep(1000);
                } catch (InterruptedException e) {
                    //throw new RuntimeException(e);

                    //1.立即结束线程
                    //break;

                    //2.不做处理

                    //3.稍后处理
                    try {
                        Thread.sleep(1000);
                    } catch (InterruptedException ex) {
                        throw new RuntimeException(ex);
                    }
                    break;
                }
            }
        });
        t.start();
        try {
            Thread.sleep(3000);
        } catch (InterruptedException e) {
            throw new RuntimeException(e);
        }
        t.interrupt();//通过他中断线程,设置标志位为true
        /*
        interrupt方法有两种情况
        1.t线程在运行时,会设置标志位为true
        2.t线程在阻塞状态(sleep),不会设置标志位,而是触发InterruptedException,这个异常会把sleep提前唤醒.
        所以处理异常时直接break;
         */
    }
}
线程等待
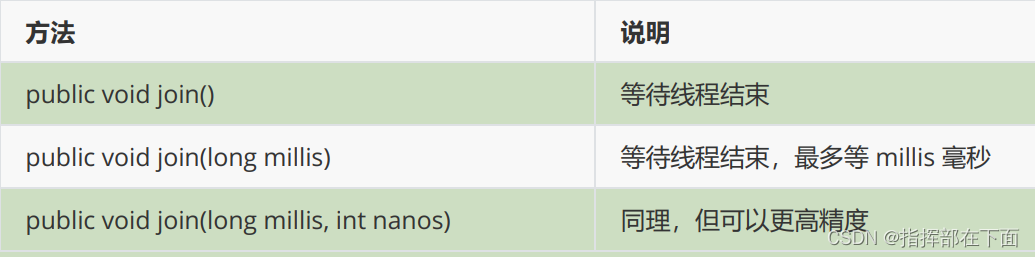
线程之间的调度是不确定的,可以通过join()方法控制线程的结束顺序
public class Demo11 {
    public static void main(String[] args) {
        Thread t=new Thread(()->{
            for (int i = 0; i < 5; i++) {
                System.out.println("hello thread");
                try {
                    Thread.sleep(1000);
                } catch (InterruptedException e) {
                    throw new RuntimeException(e);
                }
            }
        });
        t.start();
        try {
            t.join();//main线程进入阻塞,t线程继续参与调度
        } catch (InterruptedException e) {
            throw new RuntimeException(e);
        }
        System.out.println("hello main");

    }
}
如果调用join方法之前,t线程已经结束,此时join不需要阻塞等待。
线程休眠sleep()
操作系统管理线程PCB的时候,是有多了链表的。其中有阻塞队列,就绪队列,调用sleep()时PCB会从 就绪队列移动 到 阻塞队列。只有就绪队列才会参与cpu调度,当sleep时间到了就会从新回到就绪队列(不代表立即在cpu上执行)