SpringBoot Web开发----Thymeleaf的简单入门
Thymeleaf的入门
- 1.引入thymeleaf的依赖
- 2. 简单页面开发
1.引入thymeleaf的依赖
	<dependency>
          <groupId>org.springframework.boot</groupId>
          <artifactId>spring-boot-starter-thymeleaf</artifactId>
    </dependency>
引入thymeleaf后,SpringBoot已经将thymeleaf自动配置好了
自动配置好的策略:
- 所有thymeleaf的配置值都在ThymeleafProperties
- 配置好了SpringTemplateEngine(模板引擎)
- 配置好了ThymeleafViewResolver(视图解析器)
- 我们只需要直接开发页面就行
- 页面一般都在templates里面放着,都是.html文件

2. 简单页面开发
Hello.html的代码:
<!DOCTYPE html>
<!-- 在这里要引入一个xml:th="http://www.thymeleaf.org的命名空间 -->
<html lang="en" xml:th="http://www.thymeleaf.org">
<head>
    <meta charset="UTF-8">
    <title>Title</title>
</head>
<body>
    <h1 th:text="${msg}">哈哈</h1>
    <h2>
        <a href="www.haha.com" th:href="${link}">去百度</a> <br>
    </h2>
</body>
</html>
controller里面的代码:
@Controller
public class ViewController {
    @GetMapping("/hello")
    public String hello(Model model){
        //model的数据会被放在请求域当中
        model.addAttribute("msg","你好!");
        model.addAttribute("link","http://www.baidu.com");
        return "Hello";
    }
}
最后当我们启动项目,地址栏输入localhost:8080/hello就能访问到我们的前端页面
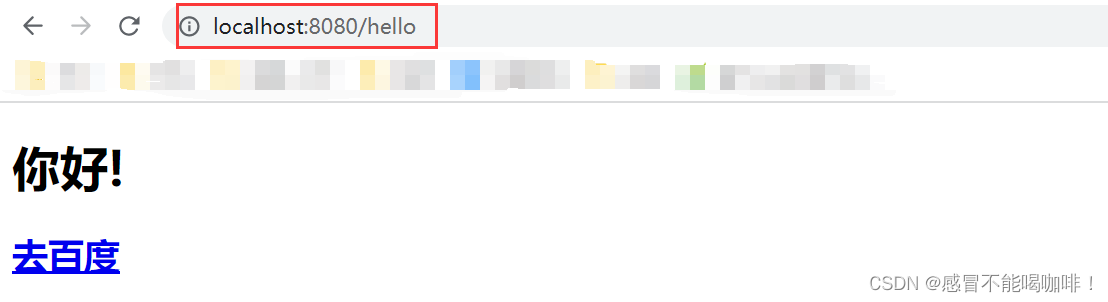
可以发现我们得到的不是前端代码中的 哈哈,而是动态渲染后的 你好,是从th:text="${msg}" 中取出的数据 ${真正的数据}
点击 去百度 会访问到的不是www.haha.com,而是百度的主页,是从th:href="${link}"取出的数据 ${真正访问的网页}
而msg和link的数据来自于后端controller层ViewController类里的代码:
model.addAttribute("msg","你好!");
model.addAttribute("link","http://www.baidu.com");