Centos7下Docker安装Hadoop
Centos7下Docker安装Hadoop
传统的Hadoop开发测试环境通常是用虚拟机搭建的,随着Docker技术的成熟,容器化已经成为了虚拟化业界的标准和发展的趋势,大有替代VMWare的架势。对于开发测试环境,Docker容器的特性(进程级别的虚拟化)会加速部署,随着Hadoop版本的迭代升级,现在最新版本已经升级到了3.3,在工作中不同的项目可能会用到不同的Hadoop版本和对应的组件,我们经常会遇到切换到不同版本和组件的业务需求。当Hadoop不同版本的Docker镜像创建好以后,在之后的工作中创建容器就是很容易的事了,达到了事半功倍的效果。
-
安装Docker
首先在CentosLinux主机上安装Docker,可以参考Docker官方网站。Docker安装完成之后,需要配置一下网络,通过vlan打通Docker容器网络和本地局域网。根据以往的经验,Docker通常都是通过暴露端口方式运行,但是采用暴露端口的方式进行Docker配置对于Hadoop集群比较困难,由于Hadoop不仅端口众多而且很多都是动态端口,暴露端口的方式会带来很大的配置工作,因此这里采用macvlan的方式。#添加vlan, parent是网卡的名字(profile name), 通过ls命令找到网卡名称:ls /etc/sysconfig/network-scripts/
docker network create -d macvlan --subnet=10.91.0.0/16 --gateway=10.91.1.1 --ip-range 10.91.88.0/24 -o parent=enp2s0 vlan -
准备安装包和对应文件
Hadoop/Hive:进入Hadoop官网下载对应版本的压缩包并解压。
Java:下载Oracle JDK8,下载rpm包
Mysql:下载MySQL 5.1 JDBC
hadoop.sh:准备环境变量文件
ssh公钥/私钥:主备ssh免密登录相关文件,hadoop要通过ssh互联集群内的所有机器 -
准备Docker build 文件
Docker镜像是基于centos/systemd,并安装了一些Linux下常用的包FROM centos/systemd
USER root
ENV TZ=Asia/Shanghai
COPY jdk-8u251-linux-x64.rpm /tmp
COPY .ssh /root/.ssh
COPY hadoop /opt/hadoop
COPY hive /opt/hive
COPY mysql-connector-java-5.1.39-bin.jar /opt/hive/lib/
COPY hadoop.sh /etc/profile.d/
RUN yum install epel-release -y && yum clean all
RUN yum -y install which dbus ntp sudo openssh-server openssh-clients iproute
yum-utils yum-plugin-ovl tar git curl bind-utils unzip wget initscripts
nss-pam-ldapd nscd authconfig
&& rpm -ivh /tmp/jdk-8u251-linux-x64.rpm
&& echo $TZ > /etc/timezone
&& systemctl enable ntpd
&& systemctl enable sshd
&& echo “root:root” | chpasswd
&& chmod 700 ~/.ssh
&& chmod 644 ~/.ssh/authorized_keys ~/.ssh/id_rsa.pub ~/.ssh/known_hosts
&& chmod 600 ~/.ssh/id_rsaCMD [ “/usr/sbin/init”]
构建docker image,执行下面的命令构建Image,也可以从hub下载。
docker build --network=host -f Dockerfile.HADOOP -t hadoop .
如果实在本地构建的image,直接用下面的命令启动hadoop container就可以了,如果通过hub下载修改一下image的名字
docker run -d -v /opt/hadoop/conf:/opt/hadoop/etc/hadoop --privileged --network vlan --ip 10.91.88.1 --name a90 --hostname a90 hadoop
docker run -d -v /opt/hadoop/conf:/opt/hadoop/etc/hadoop --privileged --network vlan --ip 10.91.88.2 --name a91 --hostname a91 hadoop
docker run -d -v /opt/hadoop/conf:/opt/hadoop/etc/hadoop --privileged --network vlan --ip 10.91.88.3 --name a92 --hostname a92 hadoop
docker run -d -v /opt/hadoop/conf:/opt/hadoop/etc/hadoop --privileged --network vlan --ip 10.91.88.4 --name a93 --hostname a93 hadoop
-
Haddop 配置文件
进入docker container shell,修改Hadoop相关配置docker exec -ti a90 bash
vi /opt/hadoop/etc/hadoop-env.sh,
修改yarn配置文件:
vi yarn-site.xml
<?xml version="1.0"?>
<!--
  Licensed under the Apache License, Version 2.0 (the "License");
  you may not use this file except in compliance with the License.
  You may obtain a copy of the License at

    http://www.apache.org/licenses/LICENSE-2.0

  Unless required by applicable law or agreed to in writing, software
  distributed under the License is distributed on an "AS IS" BASIS,
  WITHOUT WARRANTIES OR CONDITIONS OF ANY KIND, either express or implied.
  See the License for the specific language governing permissions and
  limitations under the License. See accompanying LICENSE file.
-->
<configuration>
    <!-- rm hostname -->
    <property>
        <name>yarn.resourcemanager.hostname</name>
        <value>a90</value>
    </property>
    <property>
        <name>yarn.nodemanager.aux-services</name>
        <value>mapreduce_shuffle</value>
    </property>
    <property>
        <name>yarn.nodemanager.vmem-check-enabled</name>
        <value>false</value>
    </property>
</configuration>
修改hdfs配置文件
vi core-site.xml
<?xml version="1.0" encoding="UTF-8"?>
<?xml-stylesheet type="text/xsl" href="configuration.xsl"?>
<!--
  Licensed under the Apache License, Version 2.0 (the "License");
  you may not use this file except in compliance with the License.
  You may obtain a copy of the License at

    http://www.apache.org/licenses/LICENSE-2.0

  Unless required by applicable law or agreed to in writing, software
  distributed under the License is distributed on an "AS IS" BASIS,
  WITHOUT WARRANTIES OR CONDITIONS OF ANY KIND, either express or implied.
  See the License for the specific language governing permissions and
  limitations under the License. See accompanying LICENSE file.
-->

<!-- 配置HDFS信息,并添加用户 -->

<configuration>
   <property>
     <name>fs.defaultFS</name>
     <value>hdfs://a90:9000</value>
   </property>
   <property>
     <name>hadoop.tmp.dir</name>
     <value>/opt/hadoop/data</value>
   </property>
   <property>
     <name>hadoop.proxyuser.root.hosts</name>
     <value>*</value>
   </property>
   <property>
     <name>hadoop.proxyuser.root.groups</name>
     <value>*</value>
   </property>
   <property>
     <name>hadoop.proxyuser.hive.hosts</name>
     <value>*</value>
   </property>
   <property>
     <name>hadoop.proxyuser.hive.groups</name>
     <value>*</value>
   </property>
</configuration>
设置JAVA_HOME:直接添加系统变量export JAVA_HOME,或者修改haddop-env.sh
修改JAVA_HOME配置
export JAVA_HOME=/usr/java/default
配置集群节点,Hadoop基于主从结构设计,将从节点加入slaves文件
a90
a91
a92
a93
格式化namenode
hdfs namenode -format
配置完成之后,接下来就可以启动container,container启动成功之后,进入container shell并启动Hadoop集群
start-all.sh
启动成功之后,检查一下服务是否启动成功,进入container shell运行jps,可以看到RM,NM,SNN都启动成功了

进入Yarn、HDFS管理页面查看是否正常, 在客户端的hosts文件中添加 a90到a93的IP地址
Yarn - http://a90:8088/
HDFS - http://a90:50070/
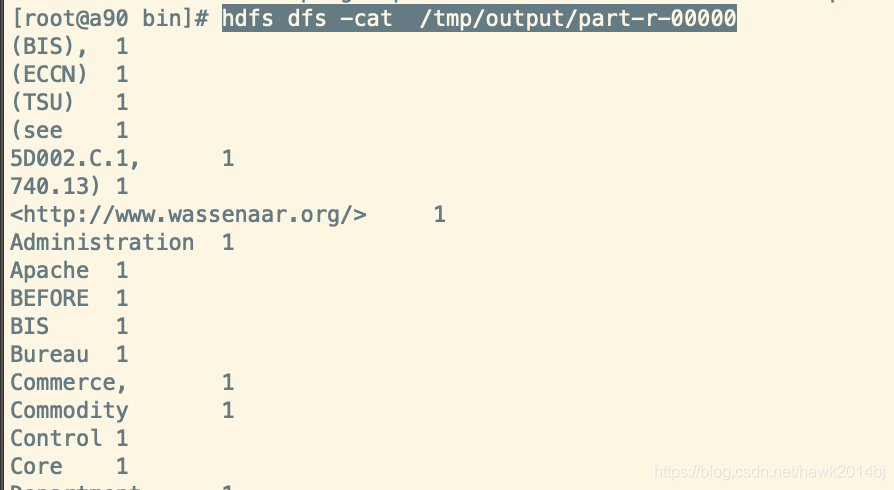
最后运行MR的例子wordcount,wordcount在大数据计算引擎中,就像编程语言helloworld一样,Hadoop默认安装中已经包括wordcount测试程序,下面我们运行一下wordcount验证一下Hadoop集群是否运行正常。
#hdfs创建目录并上传文件
hdfs dfs -mkdir /tmp
#上传测试文件
hdfs dfs -put /opt/hadoop/README.txt /tmp/
#运行word
hadoop jar /opt/hadoop/share/hadoop/mapreduce/hadoop-mapreduce-examples-2.10.1.jar wordcount /tmp/README.txt /tmp/output
#查看运行结果
hdfs dfs -ls /tmp/output
hdfs dfs -cat  /tmp/output/part-r-00000

