C++ Qt / VS2019 +opencv + onnxruntime 部署语义分割模型【经验】
本机环境:
OS:WIN11
CUDA: 11.1
CUDNN:8.0.5
显卡:RTX3080 16G
opencv:3.3.0
onnxruntime:1.8.1
目前C++ 调用onnxruntime的示例主要为图像分类网络,与语义分割网络在后处理部分有很大不同。
- pytorch模型转为onnx格式
1.1 安装onnx, 参考官网https://onnxruntime.ai/
1.2 pytorch->onnx
import torch
from nets.unet import Unet
import numpy as np


use_cuda = torch.cuda.is_available()

device = torch.device('cuda:0' if use_cuda else 'cpu')

checkpoints = torch.load("latest.pth")
model = Unet().to(device)
model.load_state_dict(checkpoints)

model.eval()

img_scale = [64, 64]
input_shape = (1, 3, img_scale[1], img_scale[0])
rng = np.random.RandomState(0)
dummy_input = torch.rand(1, 3, 64, 64).to(device)
imgs = rng.rand(*input_shape)
output_file = "latest.onnx"

dynamic_axes = {
                'input': {
                    0: 'batch',
                    2: 'height',
                    3: 'width'
                },
                'output': {
                    1: 'batch',
                    2: 'height',
                    3: 'width'
                }
            }

with torch.no_grad():
    torch.onnx.export(
        model, dummy_input,
        output_file,
        input_names=['input'],
        output_names=['output'],
        export_params=True,
        keep_initializers_as_inputs=False,
        opset_version=11,
        dynamic_axes=dynamic_axes)
    print(f'Successfully exported ONNX model: {output_file}')
由于网络中包含upsample上采样层,出现以下问题:
TypeError: 'NoneType' object is not subscriptable
(Occurred when translating upsample_bilinear2d).
查到有两种解决方案:
- 重写上采样层
- 【推荐】 修改参数:opset_version=11
torch.onnx.export(model, input, onnx_path, verbose=True, input_names=input_names, output_names=output_names, opset_version=11)
检查模型是否正确
import onnx
# Load the ONNX model
onnx_model = onnx.load("latest.onnx")
try:
    onnx.checker.check_model(onnx_model)
except Exception:
    print("Model incorrect")
else:
    print("Model correct")

# Print a human readable representation of the graph
print(onnx.helper.printable_graph(model.graph))
python 调用onnxruntime
import onnx
import torch
import cv2
import numpy as np
import onnxruntime as ort
import torch.nn.functional as F
import matplotlib.pyplot as plt


def predict_one_img(img_path):
    img = cv2.imdecode(np.fromfile(img_path, dtype=np.uint8), 1)
    img = cv2.resize(img, (64, 64))
    img = cv2.cvtColor(img, cv2.COLOR_BGR2RGB) # 把图片BGR变成RGB
    print(img.shape)

    img = np.transpose(img,(2,0,1))

    img = img.astype(np.float32)
    img /= 255
    # img = (img - 0.5) / 0.5
    mean = [0.485, 0.456, 0.406]
    std = [0.229, 0.224, 0.225]
    for i in range(3):
        img[i,:,:] = (img[i,:,:] - mean[i]) / std[i]
    print(img.shape)

    img = np.expand_dims(img, 0)

    outputs = ort_session.run(
        None,
        {"input": img.astype(np.float32)},
    )
    print(np.max(outputs[0]))
    # print(np.argmax(outputs[0]))


    out = torch.tensor(outputs[0],dtype=torch.float64)
    out = F.softmax(out, dim=1)

    out = torch.squeeze(out).cpu().numpy()

    print(out.shape)
    pr = np.argmax(out, axis=0)

    # # out = out.argmax(axis=-1)
    # pr = F.softmax(out[0].permute(1, 2, 0), dim=-1).cpu().numpy()

    # pr = pr.argmax(axis=-1)
    # img = img.squeeze(0)
    # new_img = np.transpose(img, (1, 2, 0))
    new_img = pr * 255
    plt.imshow(new_img)

    plt.show()

if __name__ == '__main__':

    device = torch.device("cuda" if torch.cuda.is_available() else "cpu")
    img_path = "0007.png"
    model_path = ".latest.onnx"
    ort_session = ort.InferenceSession(model_path, providers=['CUDAExecutionProvider'])
    predict_one_img(img_path)
- 下载Onnxruntime
可以直接下载编译好的文件,我选用的是gpu版本
https://github.com/microsoft/onnxruntime/releases/tag/v1.8.1添加链接描述
尝试使用cmake重新编译onnxruntime,感觉是个弯路
3. vs2019 配置onnxruntime
新建空项目
右击选择属性,
VC++目录 ——包含目录——include文件夹
链接器——常规——附加库目录——lib文件夹
链接器——输入——附加依赖项 llib文件
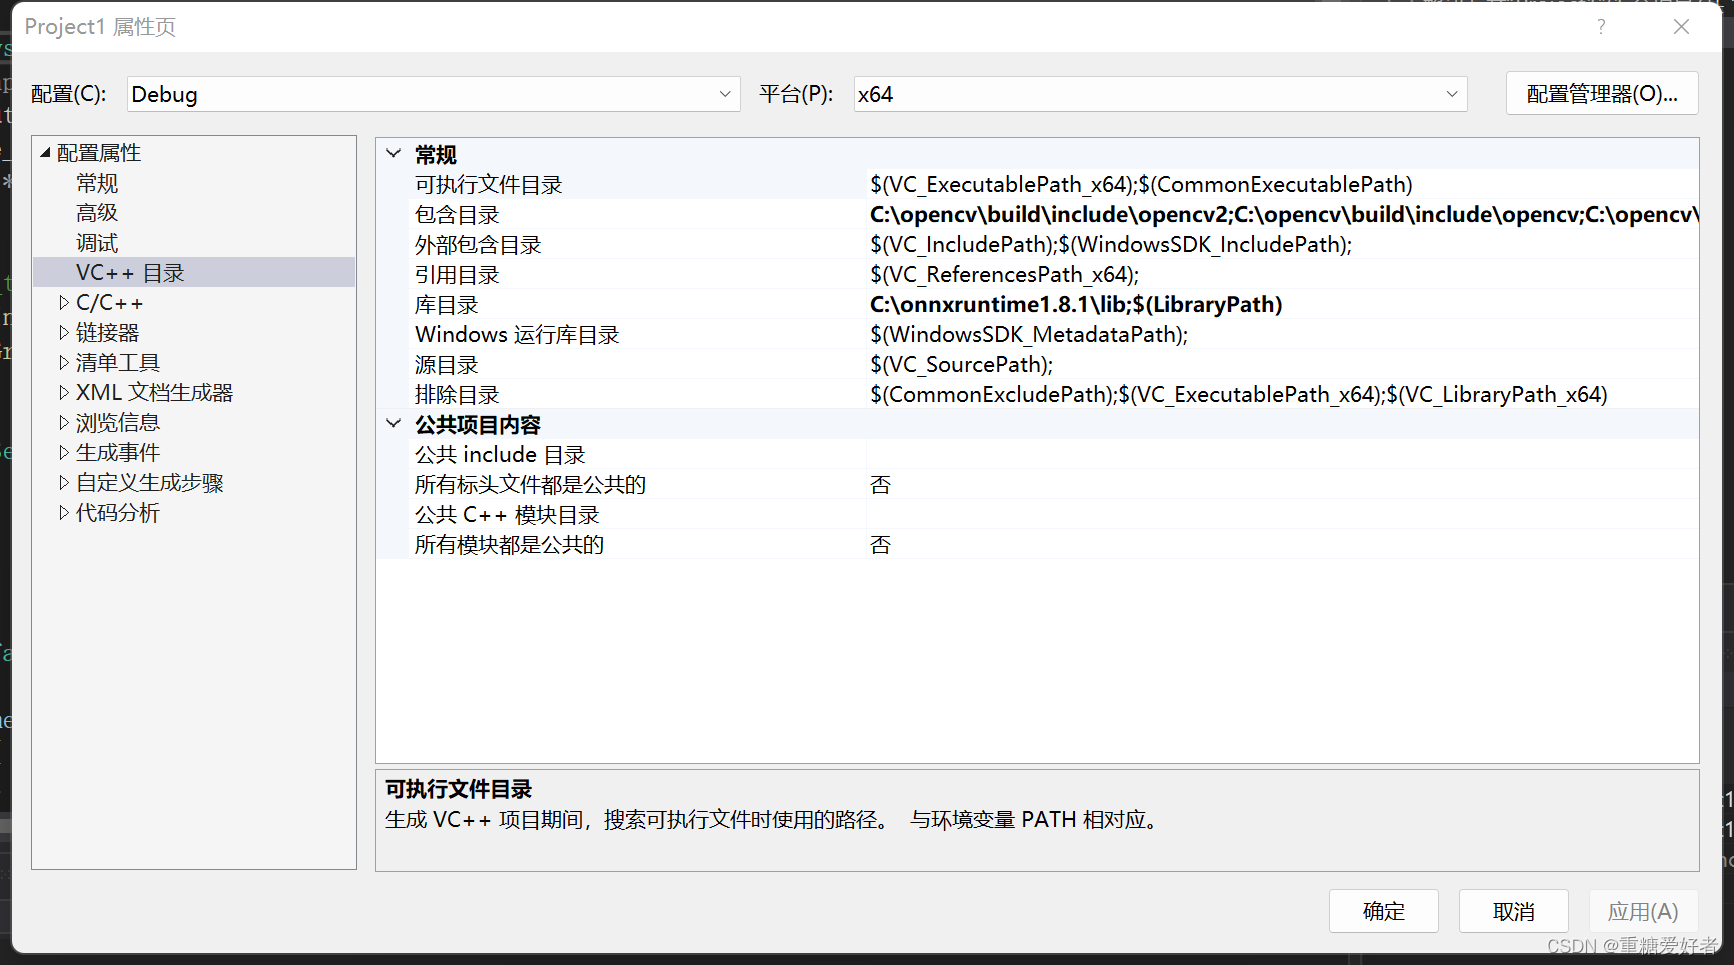
将onnxruntime.dll 复制到debug目录下
- qt配置onnxruntime
在pro文件最后加入
include("opencv.pri")
include("onnx.pri")

DISTFILES += \
    opencv.pri \
    onnx.pri
opencv.pri
INCLUDEPATH += C:/opencv/build/include
INCLUDEPATH += C:/opencv/build/include/opencv2
INCLUDEPATH += C:/opencv/build/include/opencv

LIBS += -L"C:/opencv/build/x64/vc14/lib"\
        -lopencv_world330\
        -lopencv_world330d
onnx.pri
INCLUDEPATH += C:/onnxruntime1.8.1/include


LIBS += -L"C:/onnxruntime1.8.1/lib"\
        -lonnxruntime \
Onnx模型在线查看器:https://netron.app/
Ref
[1] C++/CV/推理部署资料整理