UVM环境中reset复位的处理
文章目录
- 前言
- 一、单独处理reset复位信号
- 1.1 复位agent的实现
- 1.2 复位transaction和interface
- 1.3 environment
- 1.4 复位sequence
- 1.5 Top_env_test
- 1.6 Top_env_tb
- 1.7 Top_env_top
- 1.8 小结
- 二、处理其他驱动接口的复位值
- 2.1 顶层管理复位的sqr和seq
- 2.2 base_test
- 2.3 host_reset_sequence
- 2.4 小结
- 总结
前言
复位存在于每一个验证环境中,简单的同时,也是我们最容易忽略的功能点。在验证环境中,通常复位信号的处理,就是在top顶层产生时钟时,做一个复位的动作。这样做的好处是简单,但是如果我们想在仿真过程中,加入一个复位的动作,实现起来就比较麻烦,对于接口上,复位后驱动的复位值,也难以实现。
本文主要介绍一种通用的方法,专门用来处理复位,具备很好的移植性,复用性,使用起来也非常方便,将复位相关的内容,单独拿出来处理,能够解决常规验证环境中,无法中间加入复位动作的痛点。
本文的思路是,先将复位信号单独拿出来进行处理,再介绍如何处理其他驱动接口上的复位值。
一、单独处理reset复位信号
单独处理reset复位信号的思路是,为复位信号单独建立一个agent,再建立复位信号的sequence,通过将复位信号的sequence,送入复位agent下sequencer中的reset_phase,其他驱动接口的sequence送入main_phase,从而实现系统仿真前的复位。
1.1 复位agent的实现
复位agent中包括driver、monitor、sequencer。这部分代码可以直接复用。
reset_agent.sv
typedef class reset_driver;
typedef class reset_monitor;

class reset_agent extends uvm_agent;
  typedef uvm_sequencer#(reset_tr) reset_sequencer;

  virtual reset_io vif;          // DUT virtual interface
  reset_sequencer  sqr;
  reset_driver     drv;
  reset_monitor    mon;

  `uvm_component_utils(reset_agent)

  function new(string name, uvm_component parent);
    super.new(name, parent);
    `uvm_info("TRACE", $sformatf("%m"), UVM_HIGH);
  endfunction: new

  virtual function void build_phase(uvm_phase phase);
    super.build_phase(phase);
    `uvm_info("TRACE", $sformatf("%m"), UVM_HIGH);
    `uvm_info("RSTCFG", $sformatf("Reset agent %s setting for is_active is: %p", this.get_name(), is_active), UVM_MEDIUM);

    uvm_config_db#(virtual reset_io)::get(this, "", "reset_if", vif);
    uvm_config_db#(virtual reset_io)::set(this, "*", "vif", vif);

    if (is_active == UVM_ACTIVE) begin
      sqr = reset_sequencer::type_id::create("sqr", this);
      drv = reset_driver::type_id::create("drv", this);
    end
    mon = reset_monitor::type_id::create("mon", this);
  endfunction: build_phase

  virtual function void connect_phase(uvm_phase phase);
    super.connect_phase(phase);
    `uvm_info("TRACE", $sformatf("%m"), UVM_HIGH);
    if (is_active == UVM_ACTIVE) begin
      drv.seq_item_port.connect(sqr.seq_item_export);
    end
  endfunction: connect_phase

  virtual function void end_of_elaboration_phase(uvm_phase phase);
    super.end_of_elaboration_phase(phase);
    `uvm_info("TRACE", $sformatf("%m"), UVM_HIGH);
    if (vif == null) begin
      `uvm_fatal("CFGERR", "Interface for reset agent not set");
    end
  endfunction: end_of_elaboration_phase

endclass

/*
class reset_tr extends uvm_sequence_item;
  typedef enum {ASSERT, DEASSERT} kind_e;
  rand kind_e kind;
  rand int unsigned cycles = 1;

  `uvm_object_utils_begin(reset_tr)
    `uvm_field_enum(kind_e, kind, UVM_ALL_ON)
    `uvm_field_int(cycles, UVM_ALL_ON)
  `uvm_object_utils_end

  function new(string name = "reset_tr");
    super.new(name);
    `uvm_info("TRACE", $sformatf("%m"), UVM_HIGH);
  endfunction: new
endclass
*/

class reset_driver extends uvm_driver #(reset_tr);
  virtual reset_io vif;          // DUT virtual interface
  `uvm_component_utils(reset_driver)

  function new(string name, uvm_component parent);
    super.new(name, parent);
    `uvm_info("TRACE", $sformatf("%m"), UVM_HIGH);
  endfunction: new

  virtual function void build_phase(uvm_phase phase);
    super.build_phase(phase);
    `uvm_info("TRACE", $sformatf("%m"), UVM_HIGH);

    uvm_config_db#(virtual reset_io)::get(this, "", "vif", vif);
  endfunction: build_phase

  virtual function void end_of_elaboration_phase(uvm_phase phase);
    super.end_of_elaboration_phase(phase);
    `uvm_info("TRACE", $sformatf("%m"), UVM_HIGH);
    if (vif == null) begin
      `uvm_fatal("CFGERR", "Interface for reset driver not set");
    end
  endfunction: end_of_elaboration_phase

  virtual task run_phase(uvm_phase phase);
    `uvm_info("TRACE", $sformatf("%m"), UVM_HIGH);

    forever begin
      seq_item_port.get_next_item(req);
      drive(req);
      seq_item_port.item_done();
    end
  endtask: run_phase

  virtual task drive(reset_tr tr);
    `uvm_info("TRACE", $sformatf("%m"), UVM_HIGH);
    if (tr.kind == reset_tr::ASSERT) begin
      vif.reset_n = 1'b0;
      repeat(tr.cycles) @(vif.mst);
    end else begin
      vif.reset_n <= '1;
      repeat(tr.cycles) @(vif.mst);
    end
  endtask: drive
endclass

class reset_monitor extends uvm_monitor;
  virtual reset_io vif;          // DUT virtual interface
  uvm_analysis_port #(reset_tr) analysis_port;
  uvm_event reset_event = uvm_event_pool::get_global("reset");
  `uvm_component_utils(reset_monitor)

  function new(string name, uvm_component parent);
    super.new(name, parent);
    `uvm_info("TRACE", $sformatf("%m"), UVM_HIGH);
  endfunction: new

  virtual function void build_phase(uvm_phase phase);
    super.build_phase(phase);
    `uvm_info("TRACE", $sformatf("%m"), UVM_HIGH);

    uvm_config_db#(virtual reset_io)::get(this, "", "vif", vif);
    analysis_port = new("analysis_port", this);
  endfunction: build_phase

  virtual function void end_of_elaboration_phase(uvm_phase phase);
    super.end_of_elaboration_phase(phase);
    `uvm_info("TRACE", $sformatf("%m"), UVM_HIGH);
    if (vif == null) begin
      `uvm_fatal("CFGERR", "Interface for reset monitor not set");
    end
  endfunction: end_of_elaboration_phase

  virtual task run_phase(uvm_phase phase);
    `uvm_info("TRACE", $sformatf("%m"), UVM_HIGH);

    forever begin
      reset_tr tr = reset_tr::type_id::create("tr", this);
      detect(tr);
      analysis_port.write(tr);//此处可以空置,不连没关系
    end
  endtask: run_phase

  virtual task detect(reset_tr tr);
    `uvm_info("TRACE", $sformatf("%m"), UVM_HIGH);
    @(vif.reset_n);
    assert(!$isunknown(vif.reset_n));
    if (vif.reset_n == 1'b0) begin
      tr.kind = reset_tr::ASSERT;
      reset_event.trigger();
    end else begin
      tr.kind = reset_tr::DEASSERT;
      reset_event.reset();
    end
  endtask: detect
endclass
1.2 复位transaction和interface
这部分代码拿过来复用就好了。
reset_tr.sv
class reset_tr extends uvm_sequence_item;
  typedef enum {ASSERT, DEASSERT} kind_e;
  rand kind_e kind;
  rand int unsigned cycles = 1;

  `uvm_object_utils_begin(reset_tr)
    `uvm_field_enum(kind_e, kind, UVM_ALL_ON)
    `uvm_field_int(cycles, UVM_ALL_ON)
  `uvm_object_utils_end

  function new(string name = "reset_tr");
    super.new(name);
    `uvm_info("TRACE", $sformatf("%m"), UVM_HIGH);
  endfunction: new
endclass
reset_io.sv
`ifndef RESET_IO__SV
`define RESET_IO__SV

interface reset_io(input logic clk);
	logic        reset_n;

	clocking mst @(posedge clk);
		output reset_n;
	endclocking

	clocking mon @(posedge clk);
		input reset_n;
	endclocking

	modport dut(input reset_n);
endinterface: reset_io
`endif
1.3 environment
在env中声明和例化1.2节中的复位agent。host_agent用于配置寄存器,这里env只展示了部分代码。
top_env_ral_env.sv
`ifndef TOP_ENV_RAL_ENV__SV
`define TOP_ENV_RAL_ENV__SV
`include "top_env.sv"
class top_env_ral_env extends uvm_env;
   host_agent host_agt;
   reset_agent reset_agt;//1、申明

    `uvm_component_utils(top_env_ral_env)

   extern function new(string name="top_env_ral_env", uvm_component parent=null);
   extern virtual function void build_phase(uvm_phase phase);
   extern function void start_of_simulation_phase(uvm_phase phase);
endclass: top_env_ral_env

function top_env_ral_env::new(string name= "top_env_ral_env",uvm_component parent=null);
   super.new(name,parent);
endfunction:new

function void top_env_ral_env::build_phase(uvm_phase phase);
   super.build_phase(phase);
   host_agt = host_agent::type_id::create("host_agt",this);
   reset_agt = reset_agent::type_id::create("reset_agt",this); //2、例化
endfunction: build_phase

function void top_env_ral_env::start_of_simulation_phase(uvm_phase phase);
   super.start_of_simulation_phase(phase);
   `ifdef UVM_VERSION_1_0
   uvm_top.print_topology();
   factory.print();
   `endif

   `ifdef UVM_VERSION_1_1
	uvm_root::get().print_topology();
    uvm_factory::get().print();
   `endif

   `ifdef UVM_POST_VERSION_1_1
	uvm_root::get().print_topology();
    uvm_factory::get().print();
   `endif
   //ToDo : Implement this phase here
endfunction: start_of_simulation_phase

`endif // TOP_ENV_RAL_ENV__SV
1.4 复位sequence
编写复位的sequence,用于控制复位信号。这部分代码可以直接拿来复用。
reset_sequence.sv
class reset_sequence extends uvm_sequence #(reset_tr);
  `uvm_object_utils(reset_sequence)

  function new(string name = "reset_sequence");
    super.new(name);
    `uvm_info("TRACE", $sformatf("%m"), UVM_HIGH);

    `ifndef UVM_VERSION_1_1
     set_automatic_phase_objection(1);
    `endif
  endfunction: new

  virtual task body();
    `uvm_info("TRACE", $sformatf("%m"), UVM_HIGH);

    // For UVM-1.1 & UVM-1.2
    //
    `ifndef UVM_VERSION
      `uvm_do_with(req, {kind == DEASSERT; cycles == 2;});
      `uvm_do_with(req, {kind == ASSERT; cycles == 1;});
      `uvm_do_with(req, {kind == DEASSERT; cycles == 15;});
    //
    // For IEEE UVM
    //
    `else
      `uvm_do(req,,, {kind == DEASSERT; cycles == 2;});
      `uvm_do(req,,, {kind == ASSERT; cycles == 1;});
      `uvm_do(req,,, {kind == DEASSERT; cycles == 15;});
    `endif

  endtask: body

  `ifdef UVM_VERSION_1_1
  virtual task pre_start();
    `uvm_info("TRACE", $sformatf("%m"), UVM_HIGH);
    if ((get_parent_sequence() == null) && (starting_phase != null)) begin
      starting_phase.raise_objection(this);
    end
  endtask: pre_start

  virtual task post_start();
    `uvm_info("TRACE", $sformatf("%m"), UVM_HIGH);
    if ((get_parent_sequence() == null) && (starting_phase != null)) begin
      starting_phase.drop_objection(this);
    end
  endtask: post_start
  `endif

endclass: reset_sequence
1.5 Top_env_test
在base_test中,将复位的sequence,送入复位agent下sequencer的reset_phase中,而配置寄存器的host_bfm_sequence则送入的是main_phase中,通过UVM phase的执行顺序,来保证复位在前,配置寄存器在后。
`ifndef TEST__SV
`define TEST__SV

typedef class top_env_ral_env;

class base_test extends uvm_test;

  `uvm_component_utils(base_test)

  top_env_ral_env env;

  function new(string name, uvm_component parent);
    super.new(name, parent);
  endfunction

  virtual function void build_phase(uvm_phase phase);
    super.build_phase(phase);
    env = top_env_ral_env::type_id::create("env", this);

	uvm_config_db #(uvm_object_wrapper)::set(this, "env.reset_agt.sqr.reset_phase",
					"default_sequence", reset_sequence::get_type());//reset_phase
    uvm_config_db #(uvm_object_wrapper)::set(this, "env.host_agt.sqr.main_phase",
                    "default_sequence", host_bfm_sequence::get_type()); //main_phase
  endfunction

endclass : base_test

`endif //TEST__SV
1.6 Top_env_tb
在tb中,将top层的interface传递到env中。
`ifndef TOP_ENV_TB_MOD__SV
`define TOP_ENV_TB_MOD__SV

`include "mstr_slv_intfs.incl"
module top_env_tb_mod;

import uvm_pkg::*;

`include "top_env_ral_env.sv"
`include "top_env_test.sv"  //ToDo: Change this name to the testcase file-name

   initial begin
      uvm_config_db #(virtual host_io)::set(null,"","host_if",top_env_top.host_if);
      uvm_config_db #(virtual reset_io)::set(null,"","reset_if",top_env_top.reset_if);//全局set
      run_test();
   end

endmodule: top_env_tb_mod

`endif // TOP_ENV_TB_MOD__SV
1.7 Top_env_top
在top层,分别例化tb和DUT。
`ifndef TOP_ENV_TOP__SV
`define TOP_ENV_TOP__SV

module top_env_top();

   logic clk;
   logic rst;

   // Clock Generation
   parameter sim_cycle = 10;

   // Reset Delay Parameter
   parameter rst_delay = 50;

   always
      begin
         #(sim_cycle/2) clk = ~clk;
      end

   host_io   host_if(clk);
   reset_io  reset_if(clk);

   top_env_tb_mod test(); // 1、例化testbench

   // ToDo: Include Dut instance here
  router    dut(.clk(clk), .reset_n(reset_if.reset_n), .io(router_if), .host(host_if));  // 2、例化DUT

   //Driver reset depending on rst_delay
   initial
      begin
         clk = 0;  //这一条必须要,不然时钟没有初始值,仿真会挂死
      //  rst = 1;
      //#1 rst = 0;
      //   repeat (rst_delay) @(clk);
      //   rst = 1'b1;
      //   @(clk);
   end

    initial begin
	    $fsdbDumpfile("novas.fsdb");
	    $fsdbDumpvars("+all");
	    $fsdbDumpMDA(0, top_env_top);
    end

endmodule: top_env_top

`endif // TOP_ENV_TOP__SV
1.8 小结
到此为止,展示了一个完整的,通过sequence去控制复位信号的处理方法,这其中大部分代码,可以直接在不同的环境中复用。
二、处理其他驱动接口的复位值
第一章中演示了复位信号的处理方法,除了复位信号,环境中还有许多其他的信号,在系统处于复位的时候,需要特定的驱动值。
最简单的一个思路就是,为这些驱动信号,单独创建一个复位值的sequence,然后将这个sequence送入对应agent的reset_phase中。
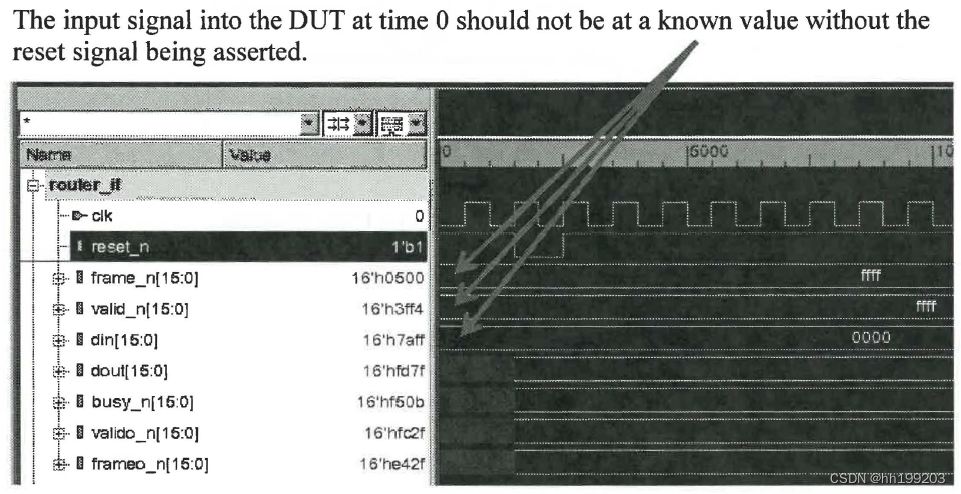
这样做会存在一些问题,由于不同的组件的reset_phase之间,没有严格的执行先后的顺序,会出现驱动信号的复位sequence先执行,造成在仿真的0时刻,在还没有复位信号的情况下,0时刻输入到DUT的信号处于已知值。
处理外部信号的正确方法是让信号在0时刻默认为它们的默认状态(x表示逻辑,z表示连线)。然后,在testbench中,当检测到复位信号时,将这些信号设置为适当的复位值。
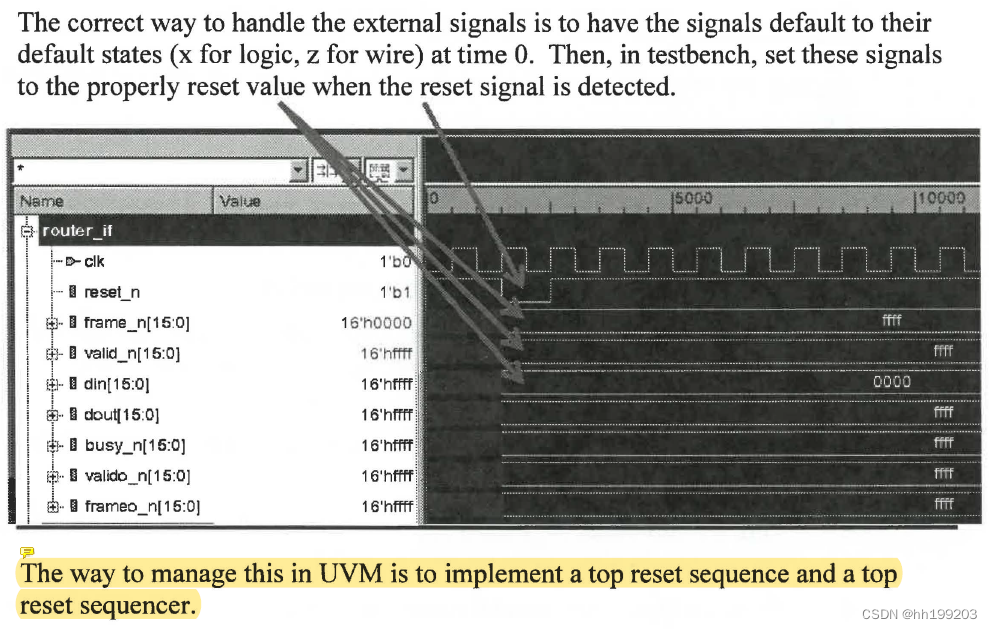
解决方法是加入一个顶层的复位的sqr和seq。
2.1 顶层管理复位的sqr和seq
在顶层管理的sqr中,声明两个sqr,一个reset_sequencer,另一个host_sequencer。
top_reset_sequencer.sv
typedef class host_data;
class top_reset_sequencer extends uvm_sequencer;
  `uvm_component_utils(top_reset_sequencer)

  typedef uvm_sequencer#(reset_tr) reset_sequencer;
  typedef uvm_sequencer#(host_data) host_sequencer;

  reset_sequencer  r_sqr;
  host_sequencer h_sqr;

  function new(string name, uvm_component parent);
    super.new(name, parent);
    `uvm_info("TRACE", $sformatf("%m"), UVM_HIGH);
  endfunction: new
endclass: top_reset_sequencer
顶层管理的seq中的信息含量比较大,通过以下几点来分解:
1、举手和放手通用性处理。对于高于UVM1.1版本,则通过在new函数中,通过set_automatic_phase_objection(1)来实现,对于UVM1.1版本,则在pre_start和post_start中进行举手和放手。这部分代码适用任何sequence。
2、p_sequencer的应用。由于调用了`uvm_declare_p_sequencer(top_reset_sequencer)这个宏,所以所有的seq,都可以通过p_sequencer来下发。
3、reset_event的使用。由于在body任务中,seq通过fork–join的方式并行下发,为了控制复位信号先执行,驱动信号后执行,这里通过利用了一个全局复位的事件reset_event,这个复位事件在复位agent下的monitor中进行触发,从而保证先给复位信号,再给驱动信号。
top_reset_sequence.sv
typedef  class host_reset_sequence ;
class top_reset_sequence extends uvm_sequence;
  `uvm_object_utils(top_reset_sequence)
  `uvm_declare_p_sequencer(top_reset_sequencer)
  uvm_event reset_event = uvm_event_pool::get_global("reset");

  reset_sequence                    r_seq;
  host_reset_sequence    h_seq;

  function new(string name="virtual_reset_sequence");
    super.new(name);
    `uvm_info("TRACE", $sformatf("%m"), UVM_HIGH);

    `ifndef UVM_VERSION_1_1
     set_automatic_phase_objection(1);
    `endif
  endfunction: new

  virtual task body();
    `uvm_info("TRACE", $sformatf("%m"), UVM_HIGH);

    fork
      // For UVM-1.1 & UVM-1.2
      `ifndef UVM_VERSION
        `uvm_do_on(r_seq, p_sequencer.r_sqr);
      // For IEEE UVM
      `else
        `uvm_do(r_seq, p_sequencer.r_sqr);
      `endif

      // For UVM-1.1 & UVM-1.2
      `ifndef UVM_VERSION
        begin
          reset_event.wait_on();
          `uvm_do_on(h_seq, p_sequencer.h_sqr);
        end
      // For IEEE UVM
      `else
        begin
          reset_event.wait_on();
          `uvm_do(h_seq, p_sequencer.h_sqr);
        end
      `endif
    join

  endtask: body

  `ifdef UVM_VERSION_1_1
  virtual task pre_start();
    `uvm_info("TRACE", $sformatf("%m"), UVM_HIGH);
    if ((get_parent_sequence() == null) && (starting_phase != null)) begin
      starting_phase.raise_objection(this);
    end
  endtask: pre_start

  virtual task post_start();
    `uvm_info("TRACE", $sformatf("%m"), UVM_HIGH);
    if ((get_parent_sequence() == null) && (starting_phase != null)) begin
      starting_phase.drop_objection(this);
    end
  endtask: post_start
  `endif

endclass: top_reset_sequence
2.2 base_test
增加的top_reset_sequencer被声明例化在base_test中,同时在connect_phase中,要将其与底层的sqr连接起来。另外,原有组件中reset_phase需要被清空,再将top_reset_sequence送入到top_reset_sqr.reset_phase。
这样做的另外一个好处是,如果顶层需要在仿真过程中,加入一个复位的过程,那么只需要将其他main_phase清空后,再将top_reset_sequence送入top_reset_sqr.main_phase中。
top_env_test.sv
`ifndef TEST__SV
`define TEST__SV

typedef class top_env_ral_env;
class base_test extends uvm_test;
  `uvm_component_utils(base_test)

  top_env_ral_env env;
  top_reset_sequencer top_reset_sqr;// 1、声明

  function new(string name, uvm_component parent);
    super.new(name, parent);
  endfunction

  virtual function void build_phase(uvm_phase phase);
    super.build_phase(phase);
    env = top_env_ral_env::type_id::create("env", this);
	top_reset_sqr = top_reset_sequencer::type_id::create("top_reset_sqr", this);//2、例化

    uvm_config_db #(uvm_object_wrapper)::set(this, "env.host_agt.sqr.main_phase",
                    "default_sequence", host_bfm_sequence::get_type());

	uvm_config_db #(uvm_object_wrapper)::set(this, "env.*.sqr.reset_phase",
					"default_sequence", null);
    uvm_config_db #(uvm_object_wrapper)::set(this, "top_reset_sqr.reset_phase",
	    			"default_sequence", top_reset_sequence::get_type());
  endfunction

    virtual function void connect_phase(uvm_phase phase);
    super.connect_phase(phase);
    `uvm_info("TRACE", $sformatf("%m"), UVM_HIGH);

    top_reset_sqr.r_sqr = env.reset_agt.sqr;//3、连接
    top_reset_sqr.h_sqr = env.host_agt.sqr;

  endfunction: connect_phase
endclass : base_test
`endif //TEST__SV
2.3 host_reset_sequence
这里再介绍一下,top_reset_sequence中host_reset_sequence的实现。实现的主要思路是,通过uvm_config_db去get到host的interface,然后在task body中直接对其进行赋值。
具体的是现实:
1、声明p_sqr。
2、例化。在pre_start中,通过get_sequencer来获取句柄实现例化。
3、获取host的interface。借助p_sqr.get_parent()来获取路径,从而得到interface的句柄,进而可以对其进行赋值。
host_reset_sequence.sv
class host_sequence_base extends uvm_sequence #(host_data);
  `uvm_object_utils(host_sequence_base)

  virtual host_io    vif;
  uvm_sequencer_base p_sqr;// 1、声明

  function new(string name = "host_sequence_base");
    super.new(name);
    `uvm_info("TRACE", $sformatf("%m"), UVM_HIGH);

    `ifndef UVM_VERSION_1_1
     set_automatic_phase_objection(1);
    `endif
  endfunction: new

  virtual task pre_start();
    `uvm_info("TRACE", $sformatf("%m"), UVM_HIGH);
    p_sqr = get_sequencer();// 2、通过获取句柄来例化

    `ifdef UVM_VERSION_1_1
    if ((get_parent_sequence() == null) && (starting_phase != null)) begin
      starting_phase.raise_objection(this);
    end
    `endif

    if (uvm_config_db#(virtual host_io)::get(p_sqr.get_parent(), "", "host_if", vif)) begin// 3、获取host的interface
      `uvm_info("HOST_SEQ_CFG", "Has access to host interface", UVM_HIGH);
    end
    else
	    `uvm_fatal("HOST_SEQ_CFG", "Has not access to host interface")
  endtask: pre_start

  `ifdef UVM_VERSION_1_1
  virtual task post_start();
    `uvm_info("TRACE", $sformatf("%m"), UVM_HIGH);
    if ((get_parent_sequence() == null) && (starting_phase != null)) begin
      starting_phase.drop_objection(this);
    end
  endtask: post_start
  `endif

endclass: host_sequence_base


class host_reset_sequence extends host_sequence_base;
  `uvm_object_utils(host_reset_sequence)

  function new(string name = "host_reset_sequence");
    super.new(name);
    `uvm_info("TRACE", $sformatf("%m"), UVM_HIGH);
  endfunction: new

  virtual task body();
    vif.wr_n = 1'b1;
    vif.rd_n = 1'b1;
    vif.address ='z;
    vif.data = 'z;
  endtask: body
endclass: host_reset_sequence
2.4 小结
这里提供了一种处理驱动信号复位值的方法,类似的方法可以用在其他多组驱动接口上。
总结
本文主要介绍了一种复位信号,以及驱动信号复位值的处理方法,虽然增加了验证组件,实现起来较为复杂,但是能够解决常规方法,无法在仿真过程中加入复位的痛点,具备很好的灵活性,实现的代码具备高度的复用性和可移植性。
附上工程代码链接
https://download.csdn.net/download/hh199203/86512045