使用 TensorFlow.js 在浏览器中进行自定义对象检测
目录
准备数据
训练模型
克隆并安装Tensorflow对象检测API
Testing the trained model
对象检测是检测对象在图像中的位置并对给定图像中的每个感兴趣对象进行分类的任务。在计算机视觉中,该技术用于图片检索、安全摄像头和自动驾驶汽车等应用。
用于对象检测的最著名的深度卷积神经网络 (DNN) 系列之一是 YOLO(You Only Look Once)。
在这篇文章中,我们将使用TensorFlow 开发一个端到端的解决方案,在Python中训练一个自定义对象检测模型,然后将其投入生产,并通过TensorFlow.js在浏览器中运行实时推理。
这篇文章将分为四个步骤,如下:

准备数据
训练一个好的模型的第一步是拥有高质量的数据。在开发这个项目时,我没有找到合适的(并且足够小的)物体检测数据集,所以我决定创建自己的。
我环顾四周,看到卧室里有一个袋鼠标志——这是我买来纪念我在澳大利亚的日子的纪念品。所以我决定做一个袋鼠探测器。
为了构建我的数据集,我从袋鼠的图像搜索中下载了 350 张袋鼠图像,并使用LabelImg应用程序手动标记了所有这些图像。由于每张图像可以有不止一只动物,因此该过程产生了 520 只标记的袋鼠。

在这种情况下,我只选择了一个类,但该软件也可以用来注释多个类。它将为每个图像(Pascal VOC 格式)生成一个 XML 文件,其中包含所有注释和边界框。
<annotation>
    <folder>images</folder>
    <filename>kangaroo-0.jpg</filename>
    <path>/home/hugo/Documents/projects/tfjs/dataset/images/kangaroo-0.jpg</path>
  <source>
    <database>Unknown</database>
  </source>
  <size>
    <width>3872</width>
    <height>2592</height>
    <depth>3</depth>
  </size>
  <segmented>0</segmented>
  <object>
    <name>kangaroo</name>
    <pose>Unspecified</pose>
    <truncated>0</truncated>
    <difficult>0</difficult>
    <bndbox>
      <xmin>60</xmin>
      <ymin>367</ymin>
      <xmax>2872</xmax>
      <ymax>2399</ymax>
    </bndbox>
  </object>
</annotation>
XML 注释示例
为了便于转换为 TF.record 格式(如下),我随后将上述程序的 XML 转换为两个 CSV 文件,其中包含已在训练和测试中拆分的数据(80%-20%)。这些文件有 9 列:
- 文件名:图像名称
- 宽度:图像宽度
- 高度:图像高度
- 类:图像类(袋鼠)
- xmin : 最小边界框 x 坐标值
- ymin : 最小边界框 y 坐标值
- xmax:边界框x坐标的最大值
- ymax : 边界框y坐标的最大值
- 来源:图片来源
使用LabelImg可以轻松创建自己的数据集,但请随意使用我的 kangaroo 数据集,我已将其上传到 Kaggle:
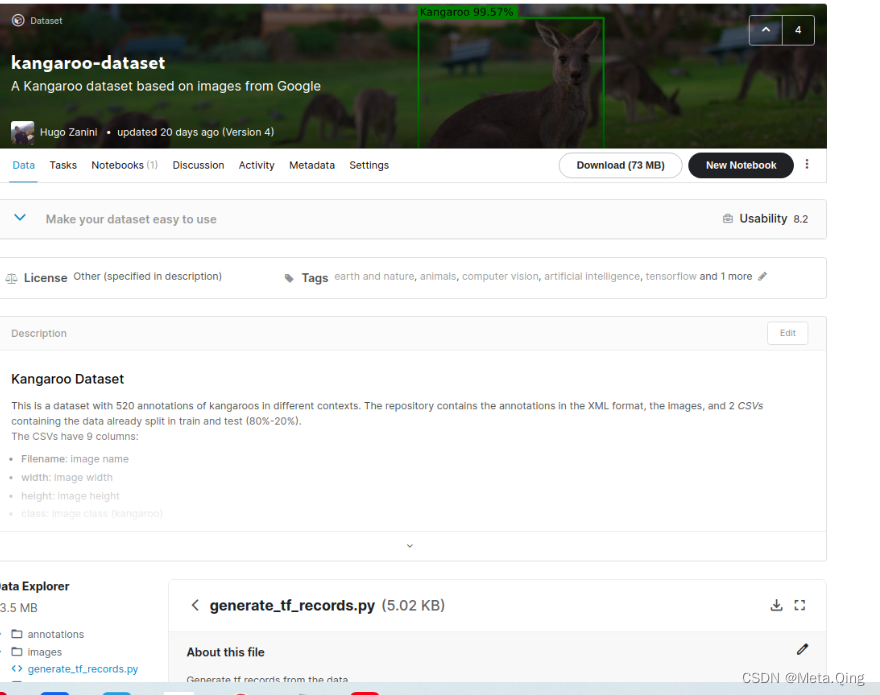
袋鼠数据集
训练模型
有了好的数据集,就该考虑模型了。TensorFlow 2 提供了一个对象检测 API,可以轻松构建、训练和部署对象检测模型。在这个项目中,我们将使用这个 API 并使用Google Colaboratory Notebook训练模型。本节的其余部分解释了如何设置环境、模型选择和训练。
设置环境
创建一个新的 Google Colab 笔记本并选择一个 GPU 作为硬件加速器:
untime > Change runtime type > Hardware accelerator: GPU 克隆、安装和测试 TensorFlow 对象检测 API:
克隆并安装Tensorflow对象检测API
为了使用TensorFlow对象检测API,我们需要克隆它的GitHub Repo。
Dependencies
谷歌Colab中预加载了所需的大部分依赖项。不需要额外的安装
Protocol Buffers
TensorFlow对象检测API依赖于所谓的协议缓冲区(也称为protobufs)。protobuf是描述信息的一种语言中立的方式。这意味着您可以编写一次protobuf,然后编译它以用于其他语言,如Python、Java或C[5]。
下面使用的protoc命令正在编译Python的object_detection/protos文件夹中的所有协议缓冲区。
!git clone https://github.com/tensorflow/models.git
Cloning into 'models'...
remote: Enumerating objects: 12, done.
remote: Counting objects: 100% (12/12), done.
remote: Compressing objects: 100% (12/12), done.
remote: Total 50253 (delta 3), reused 9 (delta 0), pack-reused 50241
Receiving objects: 100% (50253/50253), 559.90 MiB | 20.79 MiB/s, done.
Resolving deltas: 100% (34186/34186), done.
%cd /content/models/research/ !protoc object_detection/protos/*.proto --python_out=. # Install TensorFlow Object Detection API. !cp object_detection/packages/tf2/setup.py . !python -m pip install . /content/models/researchSuccessfully installed apache-beam-2.27.0 avro-python3-1.10.1 dill-0.3.1.1 fastavro-1.2.3 future-0.18.2 hdfs-2.5.8 lvis-0.5.3 mock-2.0.0 object-detection-0.1 opencv-python-headless-4.5.1.48 pbr-5.5.1 py-cpuinfo-7.0.0 pyarrow-2.0.0 pyyaml-5.3.1 requests-2.25.1 sentencepiece-0.1.95 seqeval-1.2.2 tensorflow-model-optimization-0.5.0 tf-models-official-2.4.0 tf-slim-1.1.0
运行模型构建器测试
!python /content/models/research/object_detection/builders/model_builder_tf2_test.pyINFO:tensorflow:time(__main__.ModelBuilderTF2Test.test_unknown_meta_architecture): 0.0s I0113 21:31:21.168457 140501804394368 test_util.py:2076] time(__main__.ModelBuilderTF2Test.test_unknown_meta_architecture): 0.0s [ OK ] ModelBuilderTF2Test.test_unknown_meta_architecture [ RUN ] ModelBuilderTF2Test.test_unknown_ssd_feature_extractor INFO:tensorflow:time(__main__.ModelBuilderTF2Test.test_unknown_ssd_feature_extractor): 0.0s I0113 21:31:21.169473 140501804394368 test_util.py:2076] time(__main__.ModelBuilderTF2Test.test_unknown_ssd_feature_extractor): 0.0s [ OK ] ModelBuilderTF2Test.test_unknown_ssd_feature_extractor ---------------------------------------------------------------------- Ran 20 tests in 35.358s OK (skipped=1)
获取和处理数据
如前所述,该模型将使用Kaggle 上的袋鼠数据集进行训练。如果你也想使用它,则需要创建一个用户,进入 Kaggle 的帐户部分,并获取一个 API Token:
!pip install -q kaggle
!pip install -q kaggle-cli
|████████████████████████████████| 81kB 6.1MB/s |████████████████████████████████| 5.3MB 8.9MB/s |████████████████████████████████| 133kB 47.8MB/s |████████████████████████████████| 51kB 8.3MB/s Building wheel for kaggle-cli (setup.py) ... done Building wheel for PrettyTable (setup.py) ... done Building wheel for pyperclip (setup.py) ... doneimport os os.environ['KAGGLE_USERNAME'] = 'your-username' os.environ['KAGGLE_KEY'] = 'your-key'%%bash mkdir /content/dataset cd /content/dataset kaggle datasets download -d hugozanini1/kangaroodataset --unzipDownloading kangaroodataset.zip to /content/dataset 100%|##########| 72.6M/72.6M [00:01<00:00, 47.1MB/s]
现在,有必要创建一个标签映射文件来定义将要使用的类。Kangaroo 是唯一的,所以在Google Colab上的File部分右键单击并创建一个名为labelmap.pbtxt 的新文件,如下所示:
 item {
    name: "kangaroo"
    id: 1
}
最后一步是将数据转换为二进制记录序列,以便将它们输入到 Tensorflow 的对象检测 API 中。为此,请使用Kangaroo Dataset中的 generate_tf_records.py 脚本将数据转换为 TFRecord 格式:
%cd /content//content!python dataset/generate_tf_records.py -l /content/labelmap.pbtxt -o dataset/train.record -i dataset/images -csv dataset/train_labels.csv !python dataset/generate_tf_records.py -l /content/labelmap.pbtxt -o dataset/test.2020-12-22 18:53:28.918788: I tensorflow/stream_executor/platform/default/dso_loader.cc:49] Successfully opened dynamic library libcudart.so.10.1 INFO:Successfully created the TFRecords: dataset/train.record 2020-12-22 18:53:31.432478: I tensorflow/stream_executor/platform/default/dso_loader.cc:49] Successfully opened dynamic library libcudart.so.10.1 INFO:Successfully created the TFRecords: dataset/test.record
选择型号
我们已准备好选择将成为袋鼠探测器的模型。TensorFlow 2 在COCO 2017 数据集上提供了 40 个预训练的检测模型。该集合是TensorFlow 2 检测模型动物园,可在此处访问。
每个模型都有速度、平均精度(mAP)和输出。通常,较高的 mAP 意味着较低的速度,但由于该项目基于一类对象检测问题,因此更快的模型(SSD MobileNet v2 320x320)应该足够了。
除了 Model Zoo,TensorFlow 还提供了Models Configs Repository。在那里,可以获得在训练之前必须修改的配置文件。让我们下载文件:
%cd /content
!wget http://download.tensorflow.org/models/object_detection/classification/tf2/20200710/mobilenet_v2.tar.gz
!tar -xvf mobilenet_v2.tar.gz
!rm mobilenet_v2.tar.gz
/content mobilenet_v2.tar.gz 100%[===================>] 8.01M 30.8MB/s in 0.3s 2020-12-22 19:20:36 (30.8 MB/s) - ‘mobilenet_v2.tar.gz’ saved [8404070/8404070] mobilenet_v2/ mobilenet_v2/mobilenet_v2.ckpt-1.index mobilenet_v2/checkpoint mobilenet_v2/mobilenet_v2.ckpt-1.data-00001-of-00002 mobilenet_v2/mobilenet_v2.ckpt-1.data-00000-of-00002!wget https://raw.githubusercontent.com/tensorflow/models/master/research/object_detection/configs/tf2/ssd_mobilenet_v2_320x320_coco17_tpu-8.config !mv ssd_mobilenet_v2_320x320_coco17_tpu-8.config mobilenet_v2.configssd_mobilenet_v2_32 100%[===================>] 4.38K --.-KB/s in 0s 2020-12-22 19:20:42 (77.4 MB/s) - ‘ssd_mobilenet_v2_320x320_coco17_tpu-8.config’ saved [4484/4484]
配置训练
如前所述,下载的权重在COCO 2017 数据集上进行了预训练,但这里的重点是训练模型以识别一个类,因此这些权重将仅用于初始化网络——这种技术称为转移learning,它通常用于加快学习过程。
从现在开始,要做的就是设置mobilenet_v2.config文件,并开始训练。我强烈建议阅读MobileNetV2 论文(Sandler, Mark, et al. - 2018)以了解架构的要点。
选择最佳超参数是一项需要进行一些实验的任务。由于 Google Colab 中的资源有限,我将使用与论文相同的批量大小,设置多个步骤以获得合理的低损失,并将所有其他值保留为默认值。如果您想尝试更复杂的方法来查找超参数,我推荐Keras Tuner - 一个易于使用的框架,它应用了贝叶斯优化、超频带和随机搜索算法。
定义训练参数num_classes = 1 batch_size = 96 num_steps = 7500 num_eval_steps = 1000 train_record_path = '/content/dataset/train.record' test_record_path = '/content/dataset/test.record' model_dir = '/content/training/' labelmap_path = '/content/labelmap.pbtxt' pipeline_config_path = 'mobilenet_v2.config' fine_tune_checkpoint = '/content/mobilenet_v2/mobilenet_v2.ckpt-1'编辑配置文件
import re

with open(pipeline_config_path) as f:
    config = f.read()

with open(pipeline_config_path, 'w') as f:

  # Set labelmap path
  config = re.sub('label_map_path: ".*?"',
             'label_map_path: "{}"'.format(labelmap_path), config)

  # Set fine_tune_checkpoint path
  config = re.sub('fine_tune_checkpoint: ".*?"',
                  'fine_tune_checkpoint: "{}"'.format(fine_tune_checkpoint), config)

  # Set train tf-record file path
  config = re.sub('(input_path: ".*?)(PATH_TO_BE_CONFIGURED/train)(.*?")',
                  'input_path: "{}"'.format(train_record_path), config)

  # Set test tf-record file path
  config = re.sub('(input_path: ".*?)(PATH_TO_BE_CONFIGURED/val)(.*?")',
                  'input_path: "{}"'.format(test_record_path), config)

  # Set number of classes.
  config = re.sub('num_classes: [0-9]+',
                  'num_classes: {}'.format(num_classes), config)

  # Set batch size
  config = re.sub('batch_size: [0-9]+',
                  'batch_size: {}'.format(batch_size), config)

  # Set training steps
  config = re.sub('num_steps: [0-9]+',
                  'num_steps: {}'.format(num_steps), config)

  f.write(config)
设置好参数后,开始训练:
!python /content/models/research/object_detection/model_main_tf2.py \
    --pipeline_config_path={pipeline_config_path} \
    --model_dir={model_dir} \
    --alsologtostderr \
    --num_train_steps={num_steps} \
    --sample_1_of_n_eval_examples=1 \
    --num_eval_steps={num_eval_steps}
... I1220 16:47:51.772446 140535951021952 model_lib_v2.py:651] Step 6500 per-step time 2.645s loss=0.328 INFO:tensorflow:Step 6600 per-step time 2.494s loss=0.293 I1220 16:52:02.806725 140535951021952 model_lib_v2.py:651] Step 6600 per-step time 2.494s loss=0.310 INFO:tensorflow:Step 6700 per-step time 2.443s loss=0.268 I1220 16:56:13.485662 140535951021952 model_lib_v2.py:651] Step 6700 per-step time 2.443s loss=0.308 INFO:tensorflow:Step 6800 per-step time 2.363s loss=0.293 I1220 17:00:22.396368 140535951021952 model_lib_v2.py:651] Step 6800 per-step time 2.363s loss=0.294 INFO:tensorflow:Step 6900 per-step time 2.287s loss=0.304 I1220 17:04:32.806847 140535951021952 model_lib_v2.py:651] Step 6900 per-step time 2.287s loss=0.293 INFO:tensorflow:Step 7000 per-step time 2.484s loss=0.284 I1220 17:08:44.175837 140535951021952 model_lib_v2.py:651] Step 7000 per-step time 2.484s loss=0.304 INFO:tensorflow:Step 7100 per-step time 2.257s loss=0.310 I1220 17:12:55.832094 140535951021952 model_lib_v2.py:651] Step 7100 per-step time 2.257s loss=0.293 INFO:tensorflow:Step 7200 per-step time 2.470s loss=0.328 I1220 17:17:06.899618 140535951021952 model_lib_v2.py:651] Step 7200 per-step time 2.470s loss=0.284 INFO:tensorflow:Step 7300 per-step time 2.376s loss=0.281 I1220 17:21:16.386411 140535951021952 model_lib_v2.py:651] Step 7300 per-step time 2.376s loss=0.281 INFO:tensorflow:Step 7400 per-step time 2.312s loss=0.275 I1220 17:25:26.509467 140535951021952 model_lib_v2.py:651] Step 7400 per-step time 2.312s loss=0.275 INFO:tensorflow:Step 7500 per-step time 2.525s loss=0.308 I1220 17:29:36.155840 140535951021952 model_lib_v2.py:651] Step 7500 per-step time 2.525s loss=0.268
为了确定训练的进展情况,我们使用损失值。损失是一个数字,表明模型对训练样本的预测有多糟糕。如果模型的预测是完美的,则损失为零;否则,损失更大。训练模型的目标是在所有示例中找到一组平均具有低损失的权重和偏差(下降到 ML:训练和损失|机器学习速成课程)。
从日志中可以看到数值呈下降趋势,因此我们说“模型正在收敛”。在下一节中,我们将为所有训练步骤绘制这些值,并且趋势会更加清晰。
该模型需要大约 4 小时来训练(使用 Colab GPU),但通过设置不同的参数,您可以使过程更快或更慢。一切都取决于您使用的类数量和您的 Precision/Recall 目标。识别多个类的高度准确的网络将采取更多步骤,并需要更详细的参数调整。
验证模型
现在让我们使用测试数据评估训练好的模型:
在这里,我们将通过一个循环运行代码,等待检查点进行计算。一旦评估完成,您将看到以下消息:
INFO:tensorflow:Waiting for new checkpoint at /content/training/
Then you can stop the cell
!python /content/models/research/object_detection/model_main_tf2.py \
    --pipeline_config_path={pipeline_config_path} \
    --model_dir={model_dir} \
    --checkpoint_dir={model_dir}
INFO:tensorflow:Performing evaluation on 89 images. I1220 17:34:19.304409 139900847355776 coco_evaluation.py:293] Performing evaluation on 89 images. creating index... index created! INFO:tensorflow:Loading and preparing annotation results... I1220 17:34:19.304893 139900847355776 coco_tools.py:116] Loading and preparing annotation results... INFO:tensorflow:DONE (t=0.00s) I1220 17:34:19.308917 139900847355776 coco_tools.py:138] DONE (t=0.00s) creating index... index created! Running per image evaluation... Evaluate annotation type *bbox* DONE (t=0.42s). Accumulating evaluation results... DONE (t=0.05s). Average Precision (AP) @[ IoU=0.50:0.95 | area= all | maxDets=100 ] = 0.222 Average Precision (AP) @[ IoU=0.50 | area= all | maxDets=100 ] = 0.405 Average Precision (AP) @[ IoU=0.75 | area= all | maxDets=100 ] = 0.221 Average Precision (AP) @[ IoU=0.50:0.95 | area= small | maxDets=100 ] = -1.000 Average Precision (AP) @[ IoU=0.50:0.95 | area=medium | maxDets=100 ] = 0.003 Average Precision (AP) @[ IoU=0.50:0.95 | area= large | maxDets=100 ] = 0.239 Average Recall (AR) @[ IoU=0.50:0.95 | area= all | maxDets= 1 ] = 0.293 Average Recall (AR) @[ IoU=0.50:0.95 | area= all | maxDets= 10 ] = 0.414 Average Recall (AR) @[ IoU=0.50:0.95 | area= all | maxDets=100 ] = 0.514 Average Recall (AR) @[ IoU=0.50:0.95 | area= small | maxDets=100 ] = -1.000 Average Recall (AR) @[ IoU=0.50:0.95 | area=medium | maxDets=100 ] = 0.067 Average Recall (AR) @[ IoU=0.50:0.95 | area= large | maxDets=100 ] = 0.543 INFO:tensorflow:Eval metrics at step 7000 I1220 17:34:19.793375 139900847355776 model_lib_v2.py:954] Eval metrics at step 7000 INFO:tensorflow: + Loss/localization_loss: 0.345804 INFO:tensorflow: + Loss/classification_loss: 1.496982 INFO:tensorflow: + Loss/regularization_loss: 0.130125 INFO:tensorflow: + Loss/total_loss: 1.972911 INFO:tensorflow:Waiting for new checkpoint at /content/training/
评估是在 89 张图像中完成的,并基于COCO 检测评估指标提供三个指标:Precision、Recall 和 Loss。
Recall 衡量模型在命中正类方面的好坏,即从正样本中,算法有多少是正确的?

精度定义了您可以在多大程度上依赖正类预测:从模型所说的正样本中,实际有多少?

设置一个实际示例:假设我们有一张包含 10 只袋鼠的图像,我们的模型返回 5 次检测,即 3 只真正的袋鼠(TP = 3,FN =7)和 2 次错误检测(FP = 2)。在这种情况下,我们有 30% 的召回率(模型在图像中检测到 10 只袋鼠中的 3 只)和 60% 的准确率(从 5 次检测中,3 次是正确的)。
精度和召回率除以联合交集 (IoU) 阈值。IoU 定义为交集的面积除以预测边界框 (B) 与真实框 (B) 的并集面积 ( Zeng, N. - 2018 ):

为简单起见,可以考虑使用 IoU 阈值来确定检测是真阳性 (TP)、假阳性 (FP) 还是假阴性 (FN)。请参阅下面的示例:

考虑到这些概念,我们可以分析从评估中获得的一些指标。从TensorFlow 2 Detection Model Zoo来看,SSD MobileNet v2 320x320的 mAP 为 0.202。我们的模型针对不同的 IoU 呈现以下平均精度 (AP):
AP@[IoU=0.50:0.95 | area=all | maxDets=100] = 0.222
AP@[IoU=0.50      | area=all | maxDets=100] = 0.405
AP@[IoU=0.75      | area=all | maxDets=100] = 0.221
这很不错!我们可以将获得的 AP 与来自COCO 数据集文档的SSD MobileNet v2 320x320 mAP 进行比较:
我们不区分 AP 和 mAP(以及 AR 和 mAR),并假设从上下文中可以清楚地看出区别。
平均召回率(AR)被每张图像的最大检测次数(1、10、100)分割。当我们每张图像只有一只袋鼠时,召回率约为 30%,而当我们有多达 100 只袋鼠时,召回率约为 51%。这些值不是那么好,但对于我们试图解决的问题来说是合理的。
(AR)@[ IoU=0.50:0.95 | area=all | maxDets=  1] = 0.293
(AR)@[ IoU=0.50:0.95 | area=all | maxDets= 10] = 0.414
(AR)@[ IoU=0.50:0.95 | area=all | maxDets=100] = 0.514
损失分析非常简单,我们有 4 个值:
INFO:tensorflow: + Loss/localization_loss: 0.345804
INFO:tensorflow: + Loss/classification_loss: 1.496982
INFO:tensorflow: + Loss/regularization_loss: 0.130125
INFO:tensorflow: + Loss/total_loss: 1.972911
定位损失计算预测的边界框和标记的边界框之间的差异。分类损失指示边界框类是否与预测类匹配。正则化损失是由网络的正则化函数产生的,有助于推动优化算法朝着正确的方向发展。最后一项是总损失,是前三个损失的总和。
Tensorflow 提供了一个工具来以一种简单的方式可视化所有这些指标。它被称为TensorBoard,可以通过以下命令进行初始化:
%load_ext tensorboard
%tensorboard --logdir '/content/training/'
这将显示出来,您可以探索所有培训和评估指标。
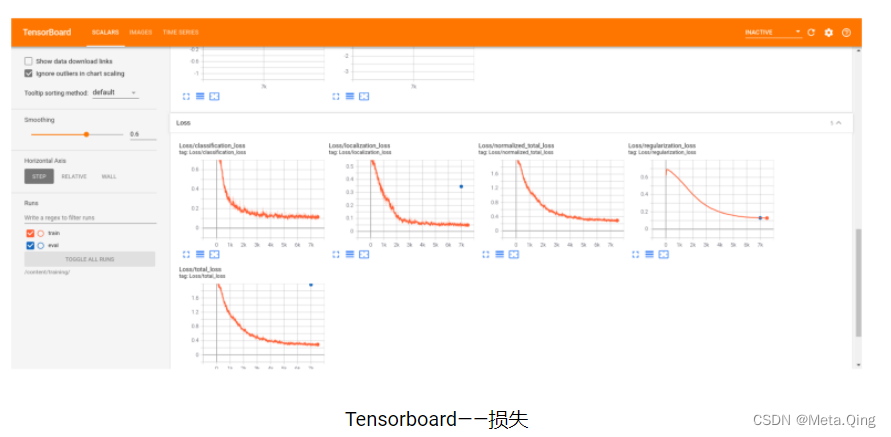
在“图像”选项卡中,可以并排找到预测和基本事实之间的一些比较。在验证过程中也可以探索一个非常有趣的资源。

导出模型
现在训练已经过验证,是时候导出模型了。我们要将训练检查点转换为protobuf (pb) 文件。该文件将包含图形定义和模型的权重。
导出推理图
下面的代码单元格向tf_utils.py文件添加一行。这是对Tensorflow 2使用API时出现的导出问题的临时修复。with open('/usr/local/lib/python3.6/dist-packages/tensorflow/python/keras/utils/tf_utils.py') as f: tf_utils = f.read() with open('/usr/local/lib/python3.6/dist-packages/tensorflow/python/keras/utils/tf_utils.py', 'w') as f: # Set labelmap path throw_statement = "raise TypeError('Expected Operation, Variable, or Tensor, got ' + str(x))" tf_utils = tf_utils.replace(throw_statement, "if not isinstance(x, str):" + throw_statement) f.write(tf_utils)output_directory = 'inference_graph' !python /content/models/research/object_detection/exporter_main_v2.py \ --trained_checkpoint_dir {model_dir} \ --output_directory {output_directory} \ --pipeline_config_path {pipeline_config_path}2020-12-20 17:30:11.903455: I tensorflow/stream_executor/platform/default/dso_loader.cc:49] Successfully opened dynamic library libcudart.so.10.1 2020-12-20 17:30:17.311425: I tensorflow/compiler/jit/xla_cpu_device.cc:41] Not creating XLA devices, tf_xla_enable_xla_devices not set 2020-12-20 17:30:17.325027: I tensorflow/stream_executor/platform/default/dso_loader.cc:49] Successfully opened dynamic library libcuda.so.1 INFO:tensorflow:Assets written to: inference_graph/saved_model/assets I1220 17:30:57.785869 139885737965440 builder_impl.py:775] Assets written to: inference_graph/saved_model/assets INFO:tensorflow:Writing pipeline config file to inference_graph/pipeline.config I1220 17:30:58.405525 139885737965440 config_util.py:254] Writing pipeline config file to inference_graph/pipeline.config
由于我们将使用 TensorFlow.js 部署模型,而 Google Colab 的最大生命周期限制为 12 小时,让我们下载训练好的权重并将它们保存在本地。运行命令 files.download('/content/saved_model.zip") 时,colab 会自动提示文件。
下载权重
!zip -r /content/saved_model.zip /content/inference_graph/saved_model/adding: content/inference_graph/saved_model/ (stored 0%) adding: content/inference_graph/saved_model/saved_model.pb (deflated 93%) adding: content/inference_graph/saved_model/assets/ (stored 0%) adding: content/inference_graph/saved_model/variables/ (stored 0%) adding: content/inference_graph/saved_model/variables/variables.data-00000-of-00001 (deflated 7%) adding: content/inference_graph/saved_model/variables/variables.index (deflated 76%)from google.colab import files files.download("/content/saved_model.zip")
如果要检查模型是否正确保存,请加载并测试它。我创建了一些函数来简化此过程,因此请随意从我的 GitHub克隆 inferenceutils.py 文件以测试一些图像。
Testing the trained model
Based on Object Detection API Demo and Inference from saved model tf2 colab.
!wget https://raw.githubusercontent.com/hugozanini/object-detection/master/inferenceutils.py
from inferenceutils import *
--2020-12-24 15:30:44-- https://raw.githubusercontent.com/hugozanini/object-detection/master/inferenceutils.py Resolving raw.githubusercontent.com (raw.githubusercontent.com)... 151.101.0.133, 151.101.64.133, 151.101.128.133, ... Connecting to raw.githubusercontent.com (raw.githubusercontent.com)|151.101.0.133|:443... connected. HTTP request sent, awaiting response... 200 OK Length: 2219 (2.2K) [text/plain] Saving to: ‘inferenceutils.py’ inferenceutils.py 100%[===================>] 2.17K --.-KB/s in 0s 2020-12-24 15:30:44 (46.5 MB/s) - ‘inferenceutils.py’ saved [2219/2219]加载模型
output_directory = 'inference_graph/'category_index = label_map_util.create_category_index_from_labelmap(labelmap_path, use_display_name=True) tf.keras.backend.clear_session() model = tf.saved_model.load(f'/content/{output_directory}/saved_model')选择一些图像去测试
import pandas as pd
test = pd.read_csv('/content/dataset/test_labels.csv')
#Getting 3 random images to test
images = list(test.sample(n=3)['filename'])
做出推论
for image_name in images:

  image_np = load_image_into_numpy_array('/content/dataset/images/' + image_name)
  output_dict = run_inference_for_single_image(model, image_np)
  vis_util.visualize_boxes_and_labels_on_image_array(
      image_np,
      output_dict['detection_boxes'],
      output_dict['detection_classes'],
      output_dict['detection_scores'],
      category_index,
      instance_masks=output_dict.get('detection_masks_reframed', None),
      use_normalized_coordinates=True,
      line_thickness=8)
  display(Image.fromarray(image_np))


一切运行良好,因此我们已准备好将模型投入生产。
部署模型
该模型将以任何人都可以打开 PC 或移动摄像头并通过 Web 浏览器实时执行推理的方式进行部署。为此,我们将保存的模型转换为 Tensorflow.js 层格式,在 javascript 应用程序中加载模型,并使所有内容在Glitch上可用。
转换模型
此时,您应该在本地保存了类似于此结构的内容:
├── inference-graph
│ ├── saved_model
│ │ ├── assets
│ │ ├── saved_model.pb
│ │ ├── variables
│ │ ├── variables.data-00000-of-00001
│ │ └── variables.index
在开始之前,让我们创建一个隔离的 Python 环境以在空工作区中工作并避免任何库冲突。安装 virtualenv然后在 inference-graph 文件夹中打开一个终端并创建并激活一个新的虚拟环境:
virtualenv -p python3 venv
source venv/bin/activate
安装TensorFlow.js 转换器:
pip install tensorflowjs[wizard]启动转换向导:
tensorflowjs_wizard现在,该工具将指导您完成转换,为您需要做出的每个选择提供解释。下图显示了为转换模型所做的所有选择。其中大多数是标准的,但可以根据您的需要更改分片大小和压缩等选项。
为了使浏览器能够自动缓存权重,建议将它们拆分为大约 4MB 的分片文件。为保证转换能够正常工作,也不要跳过操作验证,并非所有 TensorFlow 操作都受支持,因此某些模型可能与 TensorFlow.js 不兼容 - 请参阅此列表以了解当前支持的操作。

使用 Tensorflow.js 转换器进行模型转换(此处为全分辨率图像
如果一切正常,您将在 web_model 目录中将模型转换为Tensorflow.js层格式。该文件夹包含一个 model.json 文件和一组二进制格式的分片权重文件。model.json 既有模型拓扑(又名“架构”或“图”:对层及其连接方式的描述)和权重文件清单(Lin、Tsung-Yi 等)。
└ web_model
  ├── group1-shard1of5.bin
  ├── group1-shard2of5.bin
  ├── group1-shard3of5.bin
  ├── group1-shard4of5.bin
  ├── group1-shard5of5.bin
  └── model.json
配置应用程序
该模型已准备好在 javascript 中加载。我创建了一个应用程序来直接从浏览器执行推理。让我们克隆存储库以了解如何实时使用转换后的模型。这是项目结构:
├── models
│   └── kangaroo-detector
│       ├── group1-shard1of5.bin
│       ├── group1-shard2of5.bin
│       ├── group1-shard3of5.bin
│       ├── group1-shard4of5.bin
│       ├── group1-shard5of5.bin
│       └── model.json
├── package.json
├── package-lock.json
├── public
│   └── index.html
├── README.MD
└── src
    ├── index.js
    └── styles.css
为了简单起见,我已经在模型文件夹中提供了一个转换后的袋鼠探测器模型。不过,我们还是把上一节生成的web_model放到models文件夹中测试一下。
首先要做的是定义如何在函数 load_model 中加载模型(文件 src>index.js 中的第 10-15 行)。有两种选择。
第一个选项是在本地创建一个 HTTP 服务器,这将使模型在允许请求的 URL 中可用,并被视为 REST API。加载模型时,TensorFlow.js 将执行以下请求:
GET /model.json
GET /group1-shard1of5.bin
GET /group1-shard2of5.bin
GET /group1-shard3of5.bin
GET /group1-shardo4f5.bin
GET /group1-shardo5f5.bin
如果选择此选项,请按如下方式定义 load_model 函数:
 async function load_model() {
    // It's possible to load the model locally or from a repo
    // You can choose whatever IP and PORT you want in the "http://127.0.0.1:8080/model.json"     just set it before in your https server
    const model = await loadGraphModel("http://127.0.0.1:8080/model.json");
    //const model = await loadGraphModel("https://raw.githubusercontent.com/hugozanini/TFJS-object-detection/master/models/web_model/model.json");
    return model;
}
然后安装http-server:
npm install http-server -g转到模型 > web_model 并运行以下命令以使模型在 http://127.0.0.1:8080 可用。当您希望将模型权重保存在安全的地方并控制谁可以请求对其进行推断时,这是一个不错的选择。添加 -c1 参数以禁用缓存,并且 --cors 标志启用跨源资源共享,允许客户端 JavaScript 为给定域使用托管文件。
http-server -c1 --cors .或者,您可以在某处上传模型文件,就我而言,我选择了自己的 Github 存储库并在 load_model 函数中引用了 model.json URL:
async function load_model() {
    // It's possible to load the model locally or from a repo
    //const model = await loadGraphModel("http://127.0.0.1:8080/model.json");
    const model = await loadGraphModel("https://raw.githubusercontent.com/hugozanini/TFJS-object-detection/master/models/web_model/model.json");
    return model;
}
这是一个不错的选择,因为它为应用程序提供了更大的灵活性,并使其更容易像Glitch一样在某些平台上运行。
在本地运行
要在本地运行应用程序,请安装所需的包:
npm install npm start该应用程序将在 http://localhost:3000 上运行,您应该会看到类似以下内容:

本地运行的应用程序
加载模型需要 1 到 2 秒,之后,您可以向相机显示袋鼠图像,应用程序将在它们周围绘制边界框。
在 Glitch 中发布
Glitch是一个用于创建 Web 应用程序的简单工具,我们可以在其中上传代码并使该应用程序可供网络上的每个人使用。在 GitHub 存储库中上传模型文件并在 load_model 函数中引用它们,我们可以简单地登录Glitch,单击 New project > Import from Github 并选择应用程序存储库。
等待几分钟安装软件包,您的应用程序将在公共 URL 中可用。单击“显示”>“在新窗口中”,将打开一个选项卡。复制此 URL 并将其粘贴到任何 Web 浏览器(PC 或移动)中,您的对象检测就可以运行了。请参阅以下视频中的一些示例:
在不同设备上运行模型
首先,我做了一个显示袋鼠标志的测试,以验证应用程序的稳健性。它表明该模型专门关注袋鼠的特征,并没有关注许多图像中存在的不相关特征,例如浅色或灌木。
然后,我在手机上打开了该应用程序,并展示了一些来自测试集的图像。该模型运行平稳,可以识别大部分袋鼠。如果您想测试我的实时应用程序,可以在此处获得(故障需要几分钟才能唤醒)。
除了准确性之外,这些实验的一个有趣部分是推理时间——一切都通过 JavaScript 在浏览器中实时运行。在浏览器中运行并使用少量计算资源的良好对象检测模型在许多应用程序中是必须的,主要是在工业中。将机器学习模型放在客户端意味着降低成本和更安全的应用程序,因为用户隐私得到保护,因为不需要将信息发送到任何服务器来执行推理。
相关github链接:https://gist.github.com/hugozanini