Node.js | 基础完结、综合训练 —— 路由应用实战教程

📑 目录
- 🔽 前言
- 1️⃣ 案例最终效果演示
- 2️⃣ 搭建基础服务器
- 3️⃣ 抽离页面路由
- 4️⃣ 静态资源处理
- 5️⃣ API接口开发
- 🔹 获取请求参数
- 🔹 API路由与页面路由合并
- 🔹 接口调用
- 6️⃣ 业务分层
- 🔼 结语
🔽 前言
经过前面的学习,我们已经对NodeJS的基础内容有了一定的了解,本篇文章将从0开始带大家去创建一个简易的NodeJS路由应用,这个应用中我们会使用/收获到以下知识:
- 内置模块
http、fs、path的使用 NodeJS开发GET、POST请求NodeJS获取请求参数NodeJS静态资源处理NodeJS模块化开发、业务分层- 初步探索
express框架的开发思想
相信通过本篇的综合训练,你一定能收获很多,让我们开始吧!
如果你对
NodeJS之前的基础内容不是很熟悉,可移步我的【Node.js从入门到精通】专栏进行学习
1️⃣ 案例最终效果演示
GIF动画演示:

这个简易的路由应用只有三个页面:
- 登录页:匹配
/login - 首页:匹配
/和/home - 404页面:匹配未定义的路由
其中登录页中引入的CSS文件和JS文件我们需要当成NodeJS的静态资源进行处理,应用的favicon.ico图标我这里引用的是B站的图标。在登录页中能够调用NodeJS的GET和POST请求。
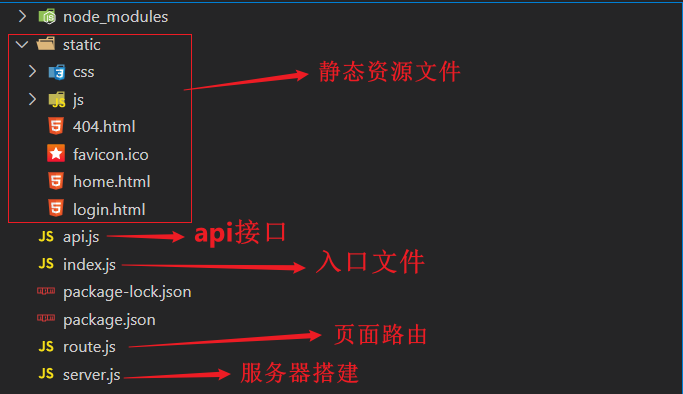
应用最终的目录结构如下:
这个路由应用虽然简单,但是它依旧能让我们收获许多,特别是对基础知识的应用和一些模块化开发、业务分层的思想等。
2️⃣ 搭建基础服务器
先在项目根目录创建一个static文件夹,用来存放我们前端的静态文件,static文件夹下创建好以下文件:

favicon.ico是网页的图标文件,随便找一个就行,我这里是用的B站的ico图标
在login.html中引入外部css和js并添加一个基础表单:
<link rel="stylesheet" href="./css/login.css">
<!-- login.html -->
<body>
    <div class="main">
        <div>
            用户名:<input type="text" id="username">
        </div>
        <div>
            密码:<input type="password" id="password">
        </div>
        <button id="getApi">Get请求</button>
        <button id="postApi">Post请求</button>
    </div>
    <script src="./js/login.js"></script>
</body>
其它的
html页面随便写点东西就行
login.js中先不添加内容,login.css中随便加点样式:
/* login.css */
.main {
    background-color: pink;
}
之后在根目录下创建服务器文件server.js:
const http = require("http");
const fs = require("fs");

http.createServer((req, res) => {
    const url = new URL(req.url, "http://127.0.0.1:3000");
    // 匹配路由
    switch (url.pathname) {
    	// 读取图标
        case "/favicon.ico":
            res.writeHead(200, {
            	// 注意图标的Content-Type
                "Content-Type": "image/x-icon;charset=utf-8",
            });
            res.end(fs.readFileSync("./static/favicon.ico"));
            break;
		// 读取home.html
        case "/":
            res.writeHead(200, {
                "Content-Type": "text/html;charset=utf-8",
            });
            res.end(fs.readFileSync("./static/home.html"));
            break;
        case "/home":
            res.writeHead(200, {
                "Content-Type": "text/html;charset=utf-8",
            });
            res.end(fs.readFileSync("./static/home.html"));
            break;
        // 读取login.html
        case "/login":
            res.writeHead(200, {
                "Content-Type": "text/html;charset=utf-8",
            });
            res.end(fs.readFileSync("./static/login.html"));
            break;
        // 未匹配路径时读取404.html
        default:
            res.writeHead(404, {
                "Content-Type": "text/html;charset=utf-8",
            });
            res.end(fs.readFileSync("./static/404.html"));
            break;
    }
}).listen(3000, () => {
    console.log("服务器启动成功!");
});
上面我们通过http内置模块搭建了一个NodeJS服务器,之后在服务器中通过req来获取路由路径并在switch中进行各个路径的匹配。
通过node指令运行server.js可以看到我们应用的基础骨架就搭建好啦:

3️⃣ 抽离页面路由
上面我们是直接在http服务器中通过switch分支来匹配路由的,这显然不够优雅,所以我们将页面路由以对象的形式抽离出去,创建route.js:
// route.js
const fs = require("fs");

// 定义渲染页面的函数
function render(res, path, state = 200, type = "text/html") {
	// 设置状态码和响应头
    res.writeHead(state, {
    	// 设置请求的Content-Type
        "Content-Type": `${type};charset=utf-8`,
    });
    // 返回页面内容
    res.end(fs.readFileSync(path, "utf-8"));
}

// 页面路由对象
const route = {
    "/favicon.ico": (req, res) => {
        render(res, "./static/favicon.ico", 200, "image/x-icon");
    },
    "/": (req, res) => {
        render(res, "./static/home.html");
    },
    "/home": (req, res) => {
        render(res, "./static/home.html");
    },
    "/login": (req, res) => {
        render(res, "./static/login.html");
    },
    "/404": (req, res) => {
        render(res, "./static/404.html", 404);
    },
};
// 导出
module.exports = route;
这样抽离后代码就比较赏心悦目了,之后修改一下server.js:
// server.js
const http = require("http");

// 引入页面路由
const route = require("./route");

http.createServer((req, res) => {
    const url = new URL(req.url, "http://127.0.0.1:3000");
    // 捕获路由
    try {
        route[url.pathname](req, res);
    } catch (error) {
        route["/404"](req, res);
    }
}).listen(3000, () => {
    console.log("服务器启动成功!");
});
在server.js中我们巧妙的使用try catch来捕获路由,若用户请求的路由路径不在我们定义的route中,则一律执行/404的处理函数。
4️⃣ 静态资源处理
经过上面的操作后,我们访问/login,会发现login.html中的login.css与login.js未被正常引用:
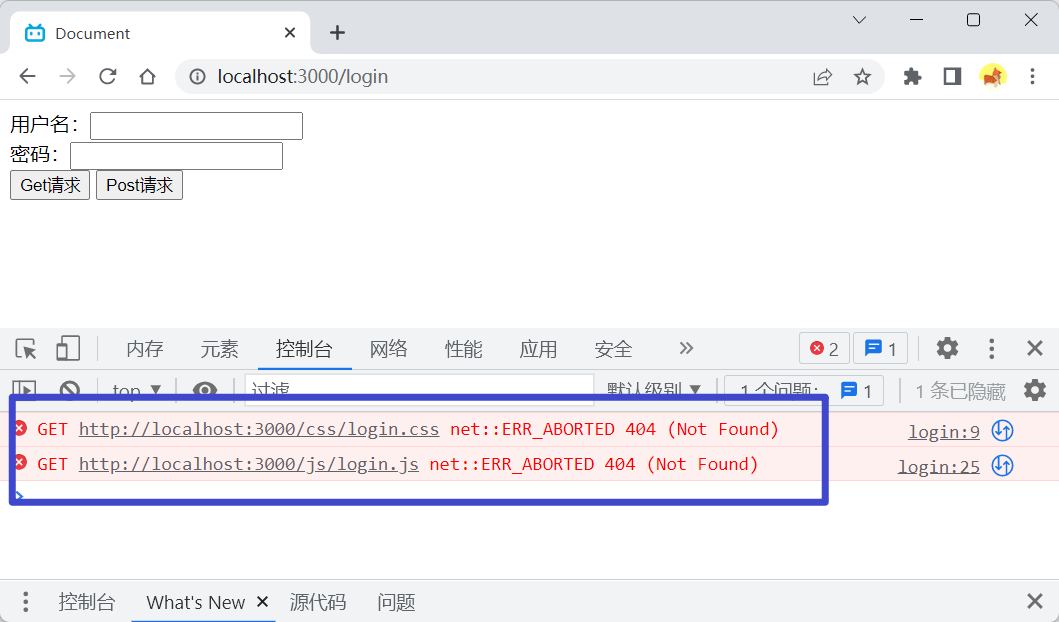
我们要怎么去处理这些静态资源呢? 别急,让我们慢慢来分析:
- 访问
/login时因为login.html文件引用了login.css与login.js,所以会向服务器发起/css/login.css和/js/login.js的请求 - 因为我们并没有手动去定义
/css/login.css和/js/login.js这两个路由,所以在http服务器中try catch的catch分支会捕获这两个路径,最终会进入到/404路由的处理函数中
为了印证我们的分析,我们在/404的处理函数中打印一下:
// route.js
    "/404": (req, res) => {
        console.log(req.url); // 打印
        render(res, "./static/404.html", 404);
    },
浏览器重新访问一下/login:

可以看到这两个请求确实是进入到了 /404路由的处理函 数中,所以我们在这里进行这些静态资源路径的处理就好:
// route.js
    "/404": (req, res) => {
        // 路径拼接
        const url = path.join(__dirname, "static", req.url);
        // 判断请求的是否是静态文件(路径是否存在)
        if (fs.existsSync(url)) {
            // mime.getType(路径或扩展名): 获取对应的Content-Type
            render(res, url, 200, mime.getType(url));
            return;
        }
        render(res, "./static/404.html", 404);
    },
这里用到了mime这个小模块,它的作用就是根据文件扩展名来生成对应请求的
Content-Type,只有这样我们才能同时方便的处理不同文件格式的静态资源,免去了一一判断
安装mime:
npm i mime
在route.js中引入:
// route.js
const mime = require("mime"); // 引入mime
const path = require("path"); // 别忘了引入path
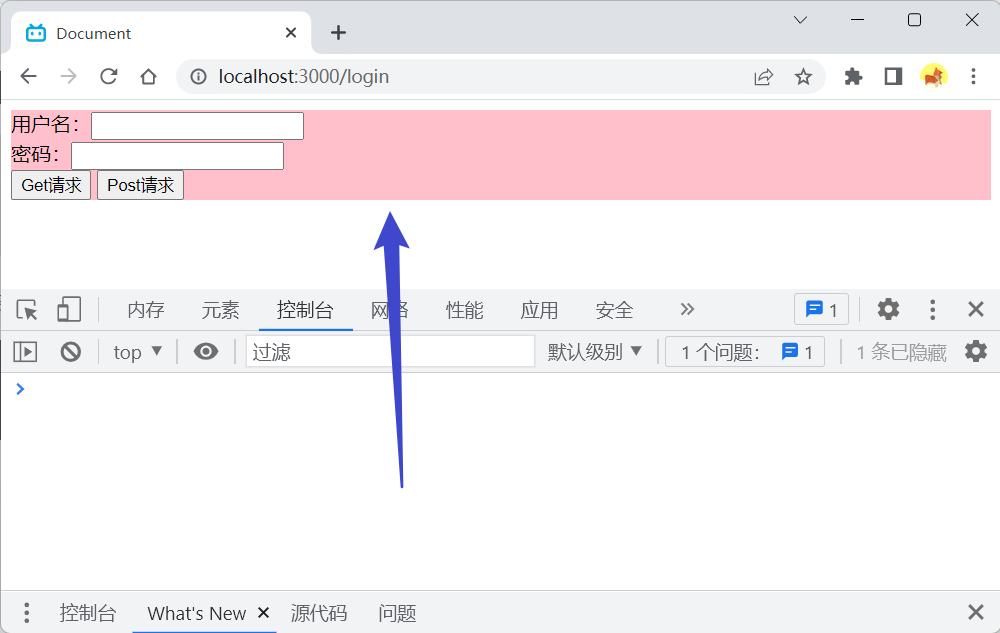
之后重新访问/login可以看到静态资源css和js被成功引入了(不报错且样式生效了就是引入成功了):
到这里之后,我们就不需要在页面路由对象中对/favicon.ico进行单独处理了,因为/favicon.ico也可以被当作是静态资源在 /404的处理函数中被处理掉:
// route.js
const route = {
	// 不需要单独处理 /favicon.ico了
    // "/favicon.ico": (req, res) => {
    //     render(res, "./static/favicon.ico", 200, "image/x-icon");
    // },
    // ....
}
5️⃣ API接口开发
遵循模块化开发的理念,我们的Api接口肯定是需要在一个独立的文件内的,创建api.js:
// api.js
// 定义返回数据的函数
function renderApi(res, data, state = 200, type = "application/json") {
    // 设置状态码和响应头
    res.writeHead(state, {
        "Content-Type": `${type};charset=utf-8`,
    });
    // 返回JSON数据
    res.end(JSON.stringify(data));
}

const apiRoute = {
    // get请求
    "/api/getlogin": (req, res) => {
    },
    // post请求
    "/api/postlogin": (req, res) => {
    },
};

// 导出
module.exports = apiRoute;
这里定义了两个请求,一个代表get请求,一个代表post请求,现在我们去实现这两个请求并获取这两种请求的参数。
🔹 获取请求参数
获取get请求的参数很简单,只需要通过new URL返回实例的searchParams属性即可获取:
全局的
URL构造函数具体可见:Node.js | 搭建后端服务器(含内置模块 http | url | querystring 的使用) 中 URL格式转换
// api.js
    // get请求
    "/api/getlogin": (req, res) => {
        const apiUrlParams = new URL(req.url, "http://127.0.0.1:3000");
        // 获取Get请求参数
        const username = apiUrlParams.searchParams.get("username");
        const password = apiUrlParams.searchParams.get("password");

		// 验证数据
        if (username === "ailjx" && password === "123456") {
            renderApi(res, {
                ok: 1,
            });
        } else {
            renderApi(res,{
                ok: 0,
            });
        }
    },
获取POST请求的参数,需要我们在req参数上监听data事件和end事件,因为POST请求的参数数据并不是一次性全部返回的,而是 “一点一点” 的返回,所以需要我们进行持续接收:
// api.js
    // post请求
    "/api/postlogin": (req, res) => {
        // 获取POST请求参数
        let data = ""; // 存放数据
		// 监听data事件,数据是一点一点返回的,返回一点就会触发这个data事件
        req.on("data", function (chunk) {
            // 数据一点点接收
            data += chunk;
        });
		// 数据全部返回完成后才会触发end事件
        req.on("end", function () {
            // 数据接收完毕后转成对象
            data = JSON.parse(data);
            // 验证数据
            if (data["username"] === "ailjx" && data["password"] === "123456") {
                renderApi(res, {
                    ok: 1,
                });
            } else {
                renderApi(res,{
                    ok: 0,
                });
            }
        });
    },
🔹 API路由与页面路由合并
现在我们的api.js就算是写好了,但现在面临一个问题:我们怎样引用api.js呢?
在server.js中我们可以使用Object.assign合并对象的方法来将api.js导出的对象合并到route中:
// server.js
// 页面路由对象
const route = require("./route");
// api路由对象
const apiRoute = require("./api");
// 对象合并
Object.assign(route, apiRoute);
// 合并之后route对象就是两个对象的集合
Object.assign(route, apiRoute)相当于是将apiRoute中的属性添加到了route中,会改变route,但不会改变apiRoute
🔹 接口调用
之后我们在login.js中调用接口:
// login.js
// get请求
getApi.onclick = () => {
    fetch(`/api/getlogin?username=${username.value}&password=${password.value}`)
        .then((res) => res.json())
        .then((res) => {
            console.log(res);
            if (res.ok) {
                location.href = "/home";
            } else {
                alert("输入错误!");
            }
        });
};
// post请求
postApi.onclick = () => {
    fetch("/api/postlogin", {
        method: "POST",
        body: JSON.stringify({
            username: username.value,
            password: password.value,
        }),
        headers: {
            "Content-Type": "application/json",
        },
    })
        .then((res) => res.json())
        .then((res) => {
            console.log(res);
            if (res.ok) {
                location.href = "/home";
            } else {
                alert("输入错误!");
            }
        });
};
这样后接口功能就完美实现啦,效果演示:

6️⃣ 业务分层
从前面一路走到这里,我们这个路由应用其实已经算是完成了,但上面的代码耦合度有点高,业务分工不够明确。
比如server.js文件本应该只是存放服务器搭建相关逻辑代码的,但它也存放了路由处理(路由合并)的逻辑代码,这显然不太优雅,那我们就尝试按照业务分层的思想去拆分server.js,将各个不同的业务逻辑抽离到一个单独的文件中。
我们先修改一下server.js:
// server.js
const http = require("http");

// const route = require("./route");
// const apiRoute = require("./api");
// // 对象合并
// Object.assign(route, apiRoute);

// 总的路由对象:用来存放路由
const Route = {};

// 注册路由的方法,用于将路由合并到一起
function use(route) {
    // 对象合并
    Object.assign(Route, route);
}

// 启动服务器的方法:将启动服务器封装进一个专门的函数中
function start() {
    http.createServer((req, res) => {
        const url = new URL(req.url, "http://127.0.0.1:3000");
        try {
            Route[url.pathname](req, res);
        } catch (error) {
            Route["/404"](req, res);
        }
    }).listen(3000, () => {
        console.log("服务器启动成功!");
    });
}

// 分别导出注册路由的方法和启动服务器的方法
exports.start = start;
exports.use = use;
上面我们导出了两个函数,一个use用来注册路由,一个start用来启动服务器。
然后我们在项目根目录新建一个index.js代替server.js成为整个项目的入口文件:
// index.js入口文件:使用node指令启动该文件即可
const server = require("./server");

// 导入路由
const route = require("./route");
const apiRoute = require("./api");

// 注册路由
server.use(route);
server.use(apiRoute);

// 启动服务器
server.start();
之后我们使用node指令运行该index.js启动项目即可,到此整个路由应用实战的教程就全部结束啦!
🔼 结语
从开头看到这里,你应该就能明白业务分层的意义和优势所在!
我们最后实现的这个index.js中对use函数的调用像极了express框架的中间件应用,这为我们之后学习NodeJS的express框架奠定了基础,这也就是我说学习这个综合案例能够初步探索到express框架开发思想的原因。
至此NodeJS的基础内容就更新完毕啦!后续我们就将步入NodeJS express框架和mongodb以及koa的学习,关注博主,订阅专栏,学习Node不迷路!
如果本篇文章对你有所帮助,还请客官一件四连!❤️
