谷粒学苑项目后台管理系统
项目分为三篇:
谷粒学苑项目前置知识
谷粒学苑项目前台界面
谷粒学苑后台管理系统
额外增加的功能:
后台 课程 小节的 删改 操作 🆗
课程列表的 分页查询和 条件查询 🆗
前台 banner 图的自动播放 🆗
后台 banner 的增删改 🆗
后台 对 前台轮播图的图片数量做一个设置。比如设置 5 张图片轮播,设置 3张图片轮播 🆗
课程详情
全部按钮的实现 🆗课程评论功能🆗
资料链接:谷粒学苑
提取码:p6er
视频教程: 尚硅谷-谷粒学苑
前端代码:前端代码
后端代码:后端代码
后台管理系统
- 一、后台页面搭建环境
- 二、项目结构介绍
- 三、登录功能的问题
- 四、前端框架开发过程
- 五、讲师管理前端
- 1.讲师列表
- 2.增加分页条
- 3.条件查询
- 4.删除讲师
- 5.增加讲师
- 6.修改讲师
- 7.讲师头像上传 -- 后端
- 8.Nginx 使用
- 9.讲师头像上传 -- 前端
- 六、课程分类管理
- 1.EasyExcel 介绍
- 2.课程分类管理 -- 后端
- 3.课程分类管理 -- 前端
- 七、课程管理模块
- 1.增加课程 -- 后端
- 2.增加课程 -- 前端
- 步骤条的搭建:
- 增加课程基本信息完善一:
- 增加课程基本信息完善二:
- 增加课程基本信息完善三:
- 增加课程基本信息完善四:
- 增加课程基本信息完善五:
- 3.章节列表显示 -- 后端
- 4.章节列表显示 -- 前端
- 5.修改课程信息 -- 后端
- 6.修改课程信息 -- 前端
- 第一个问题:
- 第二个问题:
- 7.章节管理【增删改】 -- 后端
- 8.章节管理【增删改】 -- 前端
- 9.小节管理【增删改】 -- 后端
- 10.小节管理【增删改】 -- 前端
- 11.课程消息确认 -- 后端
- 11.课程消息确认-- 前端
- 12.课程最终发布
- 13.课程列表 -- 后端
- 1.条件查询课程信息,带分页
- 2.删除课程
- 14.课程列表 -- 前端
- 1.条件查询课程信息,带分页
- 2、删除课程
- 3.编辑课程基本,编辑课程大纲
- 八、阿里云视频点播
- 1.管理控制台的使用
- 2.演示视频点播服务
- 3.演示上传视频服务
- 4.小节上传视频 -- 后端
- 5.小节上传视频 -- 前端
- 6.删除视频 -- 后端
- 7.删除视频 -- 前端
- 九、微服务
- 1.完善删除小节功能【OpenFeign + Nacos】
- 2.完善删除课程功能【OpenFeign + Nacos】
- 3.消费端集成Hystrix
一、后台页面搭建环境
使用 vue-admin-template 模板,快速搭建一个后台页面。
下载模板地址:https://gitee.com/yangzhaoguang/vue-admin-template.git
内含 node_modules 依赖包,直接启动项目即可:
npm run dev
成功启动 !

如果报错请按步骤依次执行以下命令:
- 安装cnpm :
npm install cnpm -g - 安装 node-sass:
cnpm install node-sass - 继续安装 :
cnpm i node-sass -D - 根据package.json安装依赖:
cnpm install - 启动项目:
npm run dev
苹果笔记本或者有些电脑有一些问题,可能用不了依赖包,需要自己手动下载,先删除依赖包 node_modules文件夹,执行npm install 命令
二、项目结构介绍
对于前端来说,项目的主入口是: main.js 和 index.html
该项目模板基于 vue + Element-ui 完成。
项目结构目录介绍:
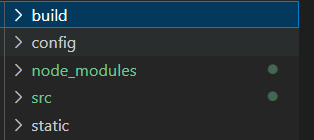
├── build // 构建脚本
├── config // 全局配置
├── node_modules // 项目依赖模块
├── src //项目源代码
├── static // 静态资源
└── package.jspon // 项目信息和依赖配置
修改配置:
这个语法检查很严格,为了不必要的麻烦,关闭它。

src 目录介绍:
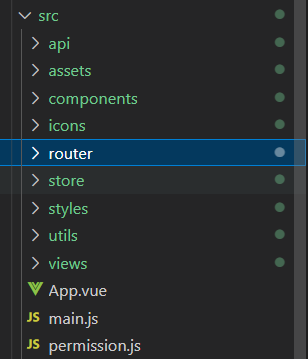
src
├── api // 定义各种接口方法
├── assets // 图片等静态资源
├── components // 各种公共组件,非公共组件在各自view下维护
├── icons // 页面上的图标
├── router // 路由表
├── store // 存储
├── styles // 各种Css样式文件
├── utils // 公共工具,非公共工具,在各自view下维护
├── views // 具体页面
├── App.vue //***项目顶层组件***
├── main.js //***项目入口文件***
└── permission.js //认证入口
因此对于我们后端来说,经常修改的就是 api、router、views
定义接口方法——配置路由映射——页面显示数据
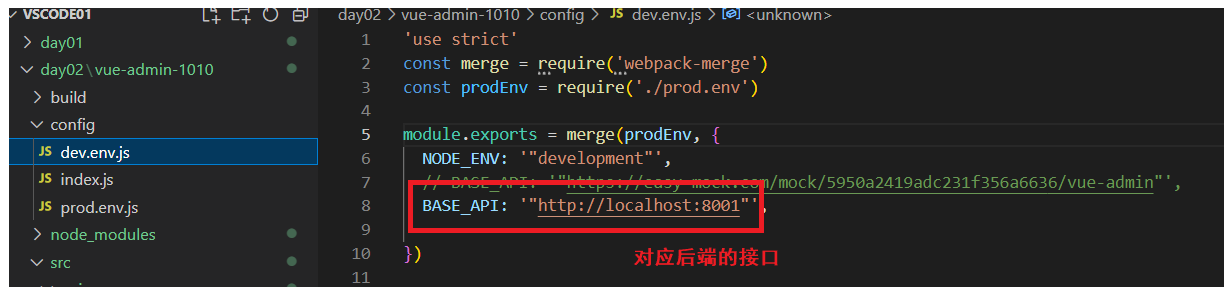
三、登录功能的问题
由于 vue-admin-template 只是一个开发模板,具体的接口还需要我们去编写。
1. 修改 config 文件夹下 dev.env.js 配置文件中的接口地址:
2. 在后端接口中需要提供俩个方法:
- 登录 Login :返回的值时 token
- 登陆之后获取用户信息getUserInfo:返回的值是 roles,name,avatar【头像】
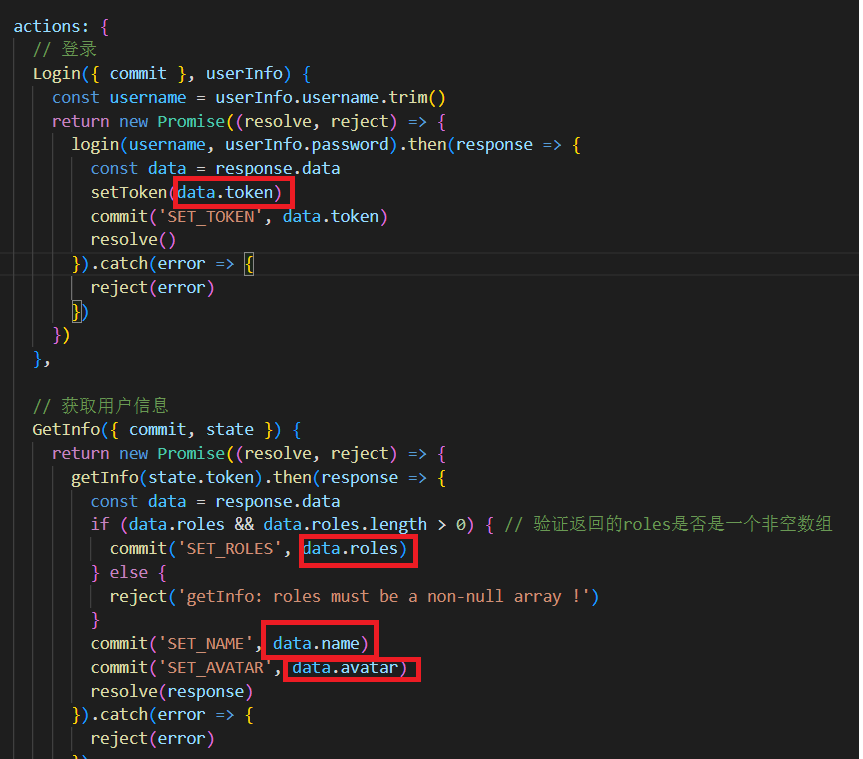
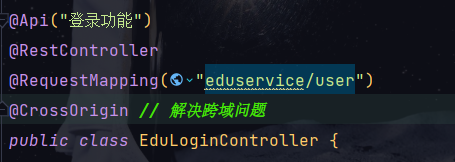
3. 后端接口开发
在 service_edu 模块的 Controller 包下创建 EduLoginController:
简单模拟登录功能,后序使用 SpringSecurity 查询数据库
@Api("登录功能")
@RestController
@RequestMapping("eduservice/user")
public class EduLoginController {

    @ApiOperation("登录")
    @PostMapping("login")
    public R login() {
        return R.ok().data("token", "admin");
    }

    @ApiOperation("登陆之后获取信息")
    @GetMapping("info")
    public R getInfo() {
        return R.ok().data("name", "admin")
                .data("roles", "[admin]")
                .data("adatar", "https://pic4.zhimg.com/80/v2-bd40bafe254de89392bf753cb109f64f_720w.jpg");
    }


}
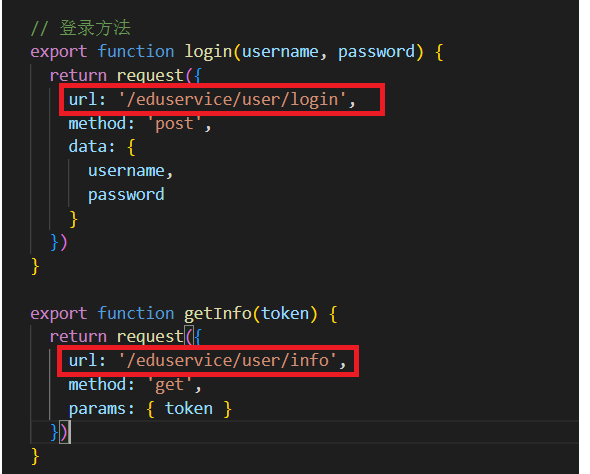
4.修改api文件夹下的 login.js 配置文件
该请求路径对应你后端接口的 路径。
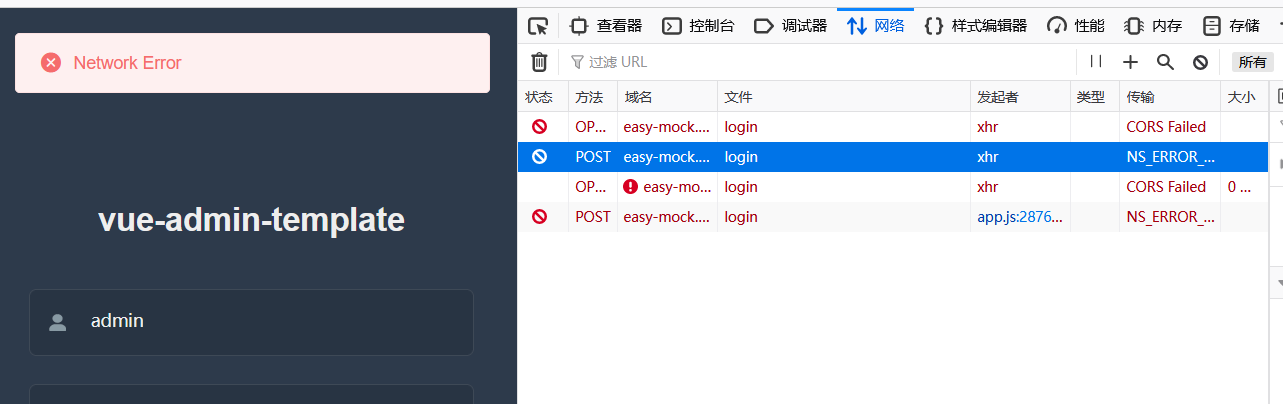
测试登录,请求路径已经变了,但还存在一个问题,就是跨域问题

跨域问题:

如何产生的跨域问题?
一个地址访问另外一个地址,如果
协议,IP 地址,端口号有任何一个不一样就会产生跨域问题。http://localhost:9528
访问
http://localhost:8001
端口号不一样,所以就产生了跨域问题。
解决跨域问题:
- 后端接口上增加 注解
- 使用网关解决
四、前端框架开发过程
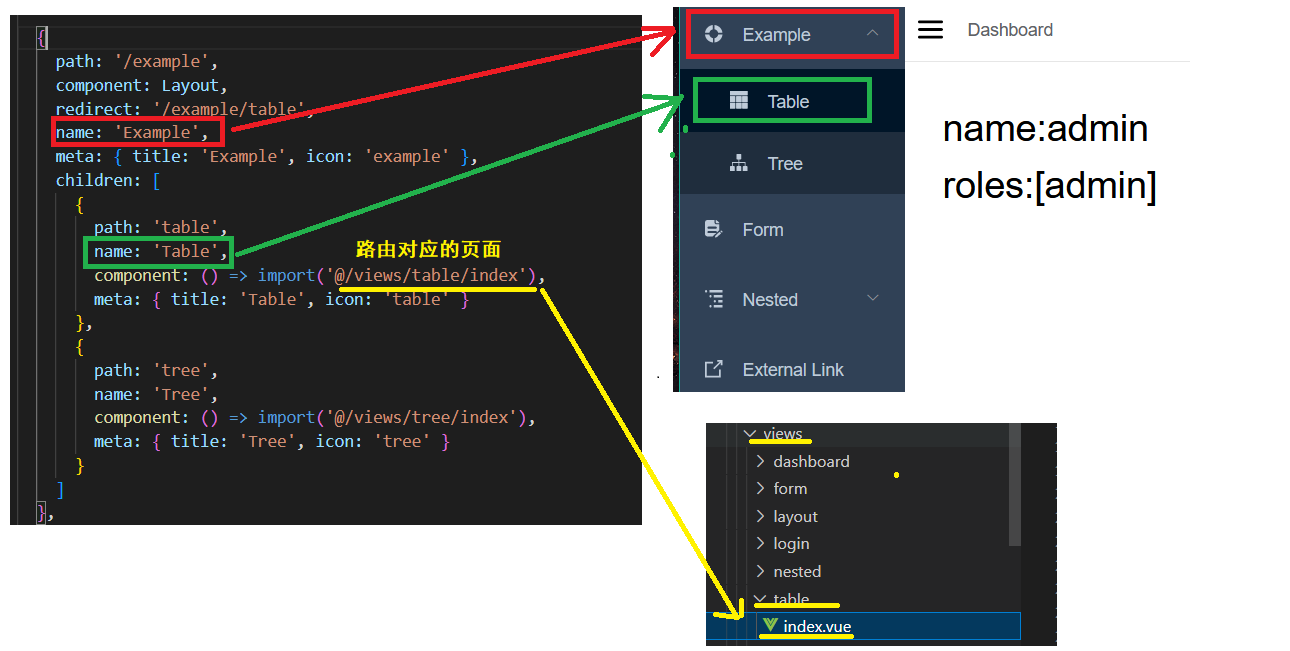
- 因此现在 src 文件夹下 router 下的 index.js 增加一个路由
- 创建 路由对应的 vue 页面
- 在 api 目录下创建 js 文件定义接口地址、参数
- 在 vue 页面中引入 js 文件,调用接口方法实现功能,并使用Element-UI 渲染页面
data:{
	// 初始化数据
},
created(){
	// 调用方法
},
methods:{
	// 定义方法,发送请求,返回数据
}
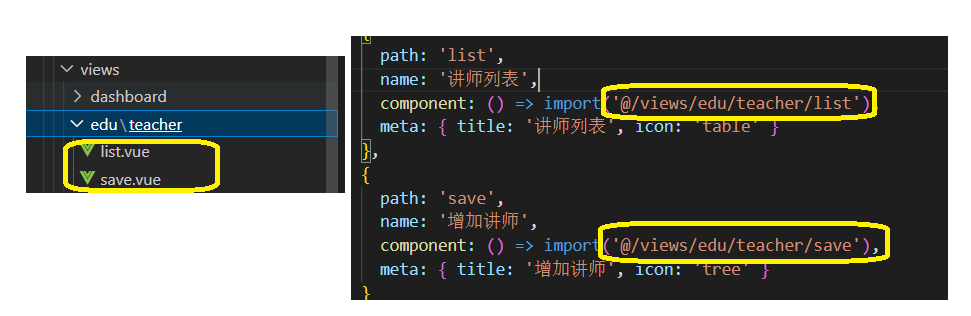
五、讲师管理前端
1.讲师列表
- 增加路由:在 src/router/index.js 中
- 尽量复制然后进行修改
  // 讲师管理路由
  {
    path: '/teacher',
    component: Layout,
    redirect: '/teacher/list',
    name: '讲师管理',
    meta: { title: '讲师管理', icon: 'example' },
    children: [
      {
        path: 'list',
        name: '讲师列表',
        component: () => import('@/views/edu/teacher/list'),
        meta: { title: '讲师列表', icon: 'table' }
      },
      {
        path: 'save',
        name: '增加讲师',
        component: () => import('@/views/edu/teacher/save'),
        meta: { title: '增加讲师', icon: 'tree' }
      }
    ]
  },
- 创建路由对应的 vue 页面
- 在 src/views/edu/teacher/ 目录下创建 list.vue 【讲师列表】, save.vue【增加讲师】 页面
页面效果: 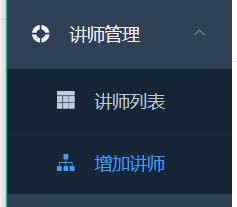
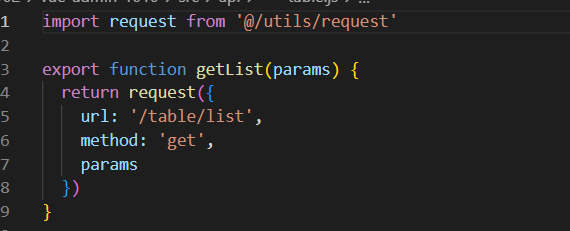
- 在 /api/edu/ 下创建 teacher.js 文件,定义方法 ----- 访问接口地址、请求方式、请求的数据
// request 封装了axios
import request from '@/utils/request'

// ES6 模块化
export default {
    // 1. 查询讲师列表的方法【带条件分页查询】
    getTeacherList(current,limit,teacherQuery) {
        return request({
            // 拼接参数的俩种方法: 建议使用第二种
            // url: 'eduservice/teacher/pageQuery/'+ current + ' / ' + limit,
            url: `eduservice/teacher/pageQuery/${current}/${limit}`,
            method: 'post',
            data: teacherQuery
        })
    }
}
teacherQuery 在后端用 @RequestBody 注解修饰,在前端中就必须使用 :
data: teacherQuery
data:表示会将对象转换成 JSON 传递到后端。
- 在 vue 页面调用 teacher.js 中的方法
<template>
<div class="app-container">
讲师列表
</div>
</template>
<script>
// 引用 定义访问接口方法 的 js 文件
// 在框架中不能写: ./ 必须写:@/
import teacher from '@/api/edu/teacher'
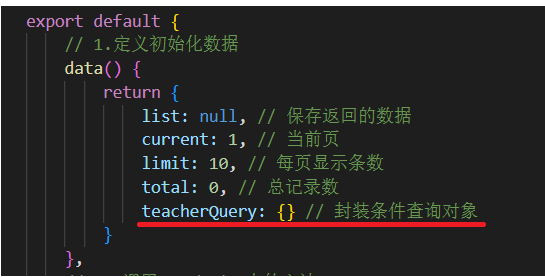
export default {
// 1.定义初始化数据
data() {
return {
list: null, // 保存返回的数据
current: 1, // 当前页
limit: 10, // 每页显示条数
total: 0, // 总记录数
teacherQuery: {} // 封装条件查询对象
}
},
// 2. 调用 methods 中的方法
created() {
this.getList();
},
// 3. 定义方法,一般是调用 api 中访问接口的方法
methods: {
getList() {
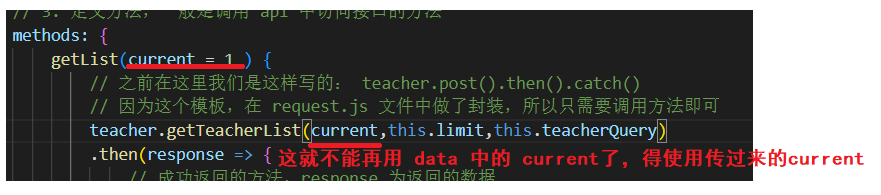
// 之前在这里我们是这样写的: teacher.post().then().catch()
// 因为这个模板,在 request.js 文件中做了封装,所以只需要调用方法即可
teacher.getTeacherList(this.current,this.limit,this.teacherQuery)
.then(response => {
// 成功返回的方法,response 为返回的数据
// console.log(response)
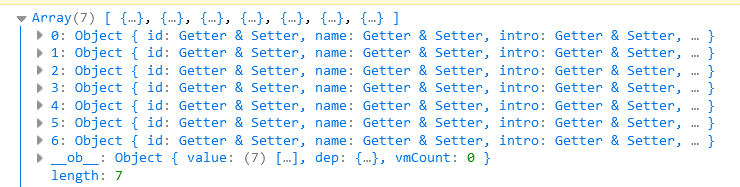
this.list = response.data.rows
this.total = response.data.total
console.log(this.list)
console.log(this.total)
})
}
},
}
</script>
测试: 不要忘记在 EduTeacherController 中加上 @CrossOrigin 注解!! 否则会有跨域问题
-
使用 Element-ui 框架,渲染取出来的数据
网站: https://element.eleme.cn/#/zh-CN/component/table
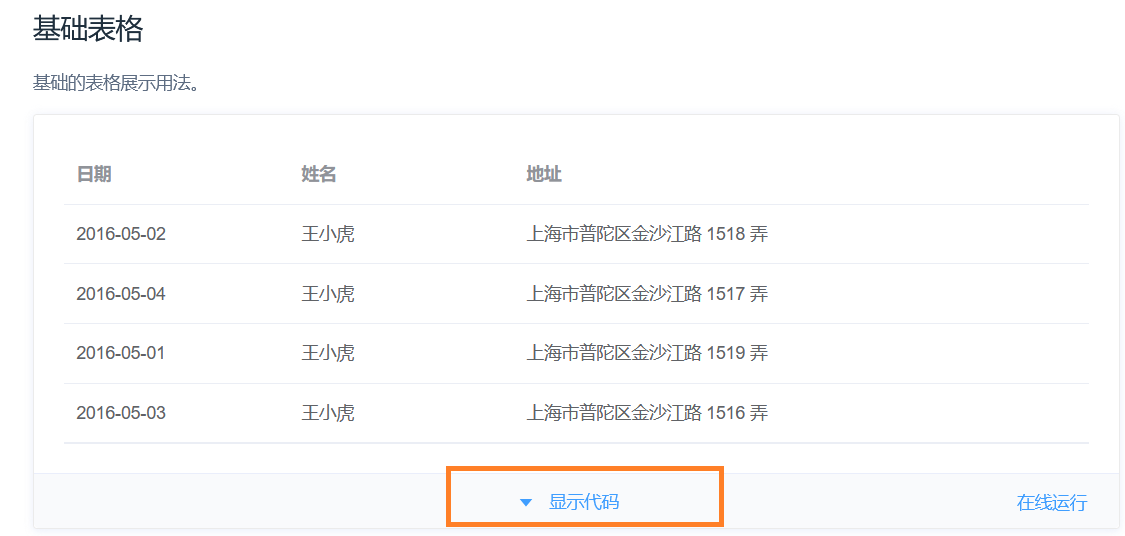
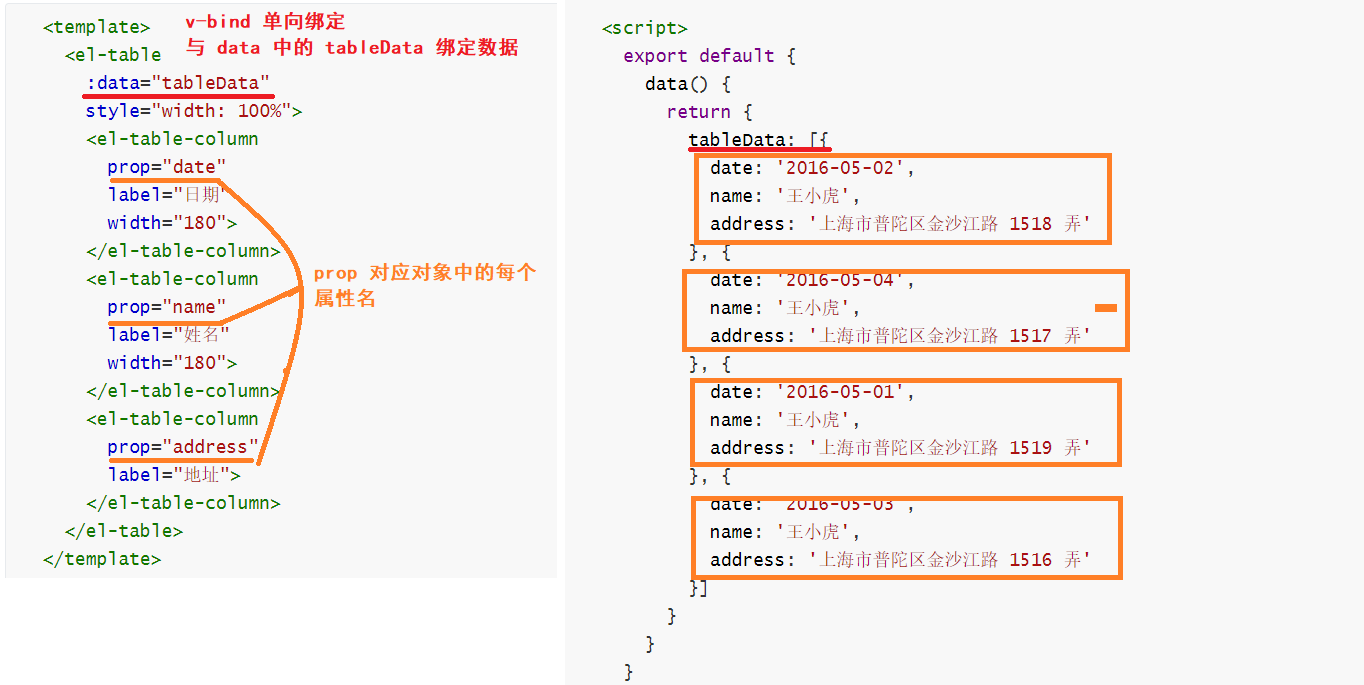
tableData 换成我们自己定义 list 集合
prop 与我们 EduTeacher 实体类中的属性保持一致,也就是返回数据中的属性。
<template>
<div class="app-container">
<!-- 表格 -->
<el-table
:data="list"
border
fit
highlight-current-row>
<el-table-column
label="序号"
width="70"
align="center">
<template slot-scope="scope">
<!-- 计算序号的一个公式 -->
{{ (current - 1) * limit + scope.$index + 1 }}
</template>
</el-table-column>
<el-table-column prop="name" label="名称" width="80" />
<el-table-column label="头衔" width="80">
<!-- 用于判断的一种方法,== 判断值,=== 判断值和类型 -->
<template slot-scope="scope">
{{ scope.row.level===1?'高级讲师':'首席讲师' }}
</template>
</el-table-column>
<el-table-column prop="intro" label="资历" />
<el-table-column prop="gmtCreate" label="添加时间" width="160"/>
<el-table-column prop="sort" label="排序" width="60" />
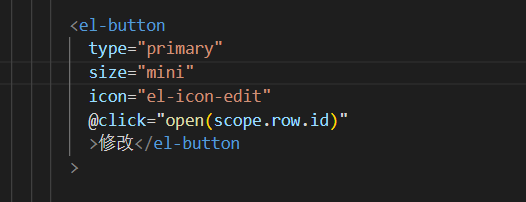
<el-table-column label="操作" width="200" align="center">
<template slot-scope="scope">
<router-link :to="'/edu/teacher/edit/'+scope.row.id">
<el-button type="primary" size="mini" icon="el-icon-edit">修改</el-button>
</router-link>
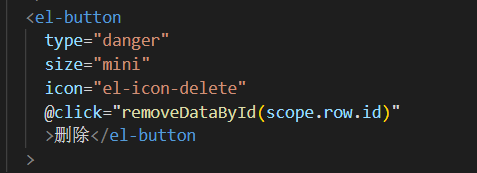
<el-button type="danger" size="mini" icon="el-icon-delete" @click="removeDataById(scope.row.id)">删除</el-button>
</template>
</el-table-column>
</el-table>
</div>
</template>
总结基本的步骤:
-
在
/src/router/index.js文件中增加路由 -
创建路由对应的 vue 页面
-
在
src/api/下 创建 js 文件,里面编辑访问后端接口的方法- 在 js 文件里首先引入 request,因为 这个模板把 axios 为我们做了封装,只需引入即可
- 方法包括:
形参,url,method,以及参数
-
在对应的 vue 页面调用 创建好的 js 文件,调用里面的 访问接口 的方法。
-
一般是这种结构 data:{ // 初始化数据 }, created(){ // 调用方法 }, methods:{ // 定义方法,发送请求,返回数据 } -
在 中使用 ELement-ui 渲染页面。
-
2.增加分页条
使用 ELement-ui 组件封装好的分页条,放在 list.vue 的 table 后边:
     <!-- 分页 -->
     <!-- Element-ui 会自动将这些值封装 -->
    <el-pagination
      :current-page="current"
      :page-size="limit"
      :total="total"
      style="padding: 30px 0; text-align: center;"
      layout="total, prev, pager, next, jumper"
      @current-change="getList"
    />
@current-change=“getList” : 当 current 发生变化时调用 getList 函数
各参数的意义:
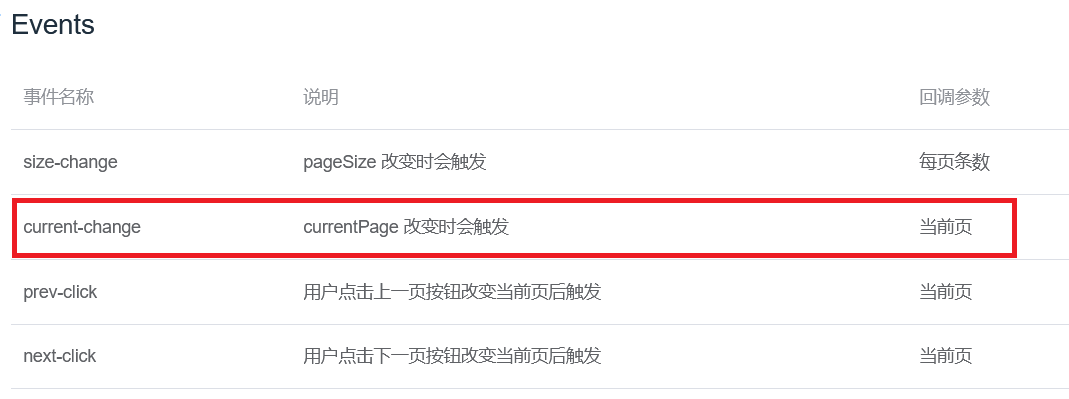

当 current 发生变化时,就会调用 getList 函数,但是每一次调用 current 的值都是 1 ,因此当我们点击不同的页码时,他总会查询第一页的数据
解决方法:
在 getList 函数中增加一个 current =1 的默认值,这是 ES6 的新语法,表示如果没有传入值就使用 默认值 1,如果有传入值,就使用新的传入值。
3.条件查询
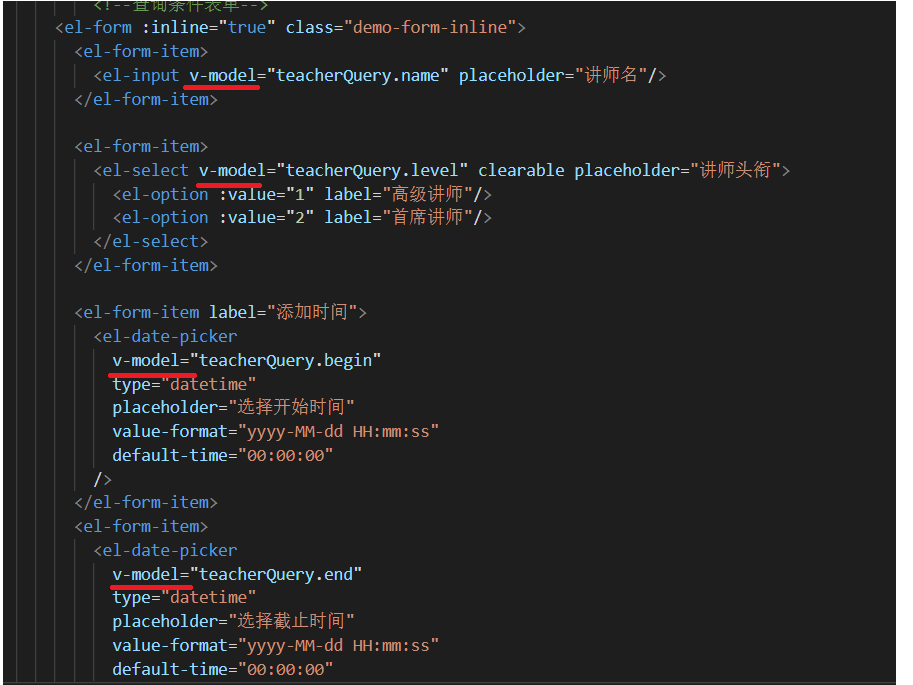
使用 Element-ui 封装好的表单,放到 list.vue 中 table 的前面:
        <!--查询表单-->
    <el-form :inline="true" class="demo-form-inline">
      <el-form-item>
        <el-input v-model="teacherQuery.name" placeholder="讲师名"/>
      </el-form-item>

      <el-form-item>
        <el-select v-model="teacherQuery.level" clearable placeholder="讲师头衔">
          <el-option :value="1" label="高级讲师"/>
          <el-option :value="2" label="首席讲师"/>
        </el-select>
      </el-form-item>

      <el-form-item label="添加时间">
        <el-date-picker
          v-model="teacherQuery.begin"
          type="datetime"
          placeholder="选择开始时间"
          value-format="yyyy-MM-dd HH:mm:ss"
          default-time="00:00:00"
        />
      </el-form-item>
      <el-form-item>
        <el-date-picker
          v-model="teacherQuery.end"
          type="datetime"
          placeholder="选择截止时间"
          value-format="yyyy-MM-dd HH:mm:ss"
          default-time="00:00:00"
        />
      </el-form-item>


      <el-button type="primary" icon="el-icon-search" @click="getList()">查询</el-button>
      <el-button type="default" @click="resetData()">清空</el-button>
    </el-form>
在 Js 中 对象内部没有属性,调用该属性时他也会自动创建出来
标签内部属性的含义:

清空按钮实现的功能:
- 请求表单中的查询条件
- 查询所有的讲师
在 methods 中定义方法:
    resetData(){
      // 清空查询条件
      this.teacherQuery = {}
      //  查询所有讲师
      this.getList()
    }
表单中的属性都是使用 v-model 双向绑定的, 页面和 data 中的 数据相互影响,因此只需要将 data 中的 teacherQuery 对象 置空就可以了。
4.删除讲师
删除按钮:
scop : 表示整个表格table
row : 表示表格中的行
scope.row.id : 表示表格中每一行 ID。
- 在 src/api/edu/teacher.js 中定义 访问后端接口
删除讲师的方法
    // 2. 删除讲师
    removeTeacherById(id){
        return request({
            url: `eduservice/teacher/${id}`,
            method: 'delete'
        })
    }
-
在 list.vue 中调用该方法,实现删除功能
- 首先删除的时候应该有一个提示,
是否删除弹窗,这个可以修改 ELement-ui 中的MessageBox 弹框组件实现。 - 删除成功后,要重新查询 讲师列表。
Element-ui 中封装好的弹窗:
- 首先删除的时候应该有一个提示,
我们可以对以上内容进行修改:
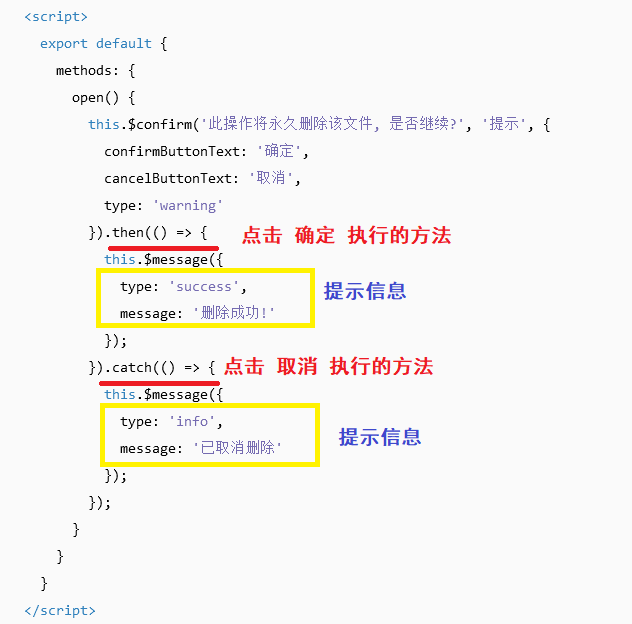
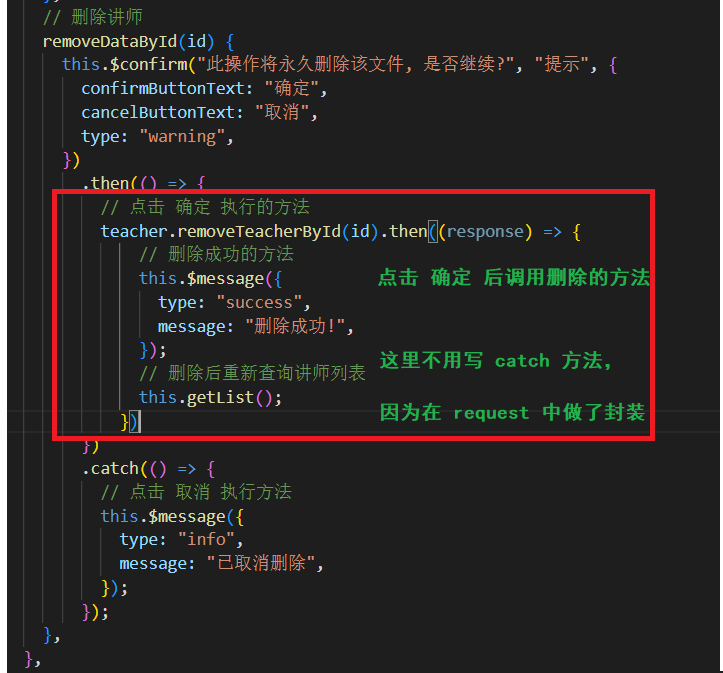
 // 删除讲师
    removeDataById(id) {
      this.$confirm("此操作将永久删除该文件, 是否继续?", "提示", {
        confirmButtonText: "确定",
        cancelButtonText: "取消",
        type: "warning",
      })
        .then(() => {
          // 点击 确定 执行的方法
          teacher.removeTeacherById(id).then((response) => {
              // 删除成功的方法
              this.$message({
                type: "success",
                message: "删除成功!",
              });
              // 删除后重新查询讲师列表
              this.getList();
            })
        })
        .catch(() => {
          // 点击 取消 执行方法
          this.$message({
            type: "info",
            message: "已取消删除",
          });
        });
    },
5.增加讲师
- 在 save.vue 页面 使用 ELement-ui 渲染 增加表单
<template>
  <div class="app-container">
    <el-form label-width="120px">
      <el-form-item label="讲师名称">
        <el-input v-model="teacher.name" />
      </el-form-item>
      <el-form-item label="讲师排序">
        <el-input-number
          v-model="teacher.sort"
          controls-position="right"
          :min="0"
        />
      </el-form-item>
      <el-form-item label="讲师头衔">
        <el-select v-model="teacher.level" clearable placeholder="请选择">
          <!--
            数据类型一定要和取出的json中的一致,否则没法回填
            因此,这里value使用动态绑定的值,保证其数据类型是number
          -->
          <el-option :value="1" label="高级讲师" />
          <el-option :value="2" label="首席讲师" />
        </el-select>
      </el-form-item>
      <el-form-item label="讲师资历">
        <el-input v-model="teacher.career" />
      </el-form-item>
      <el-form-item label="讲师简介">
        <el-input v-model="teacher.intro" :rows="10" type="textarea" />
      </el-form-item>

      <!-- 讲师头像:TODO -->

      <el-form-item>
        <el-button
          :disabled="saveBtnDisabled"
          type="primary"
          @click="saveOrUpdate"
          >保存</el-button
        >
      </el-form-item>
    </el-form>
  </div>
</template>
标签属性含义:


- 在 src/api/teacher.js 文件中定义访问后端
增加讲师的接口方法
    // 3. 增加讲师
    addTeacher(teacher){
        return request({
            url: `eduservice/teacher/addTeacher/`,
            method: 'post',
            data: teacher
        })
    }
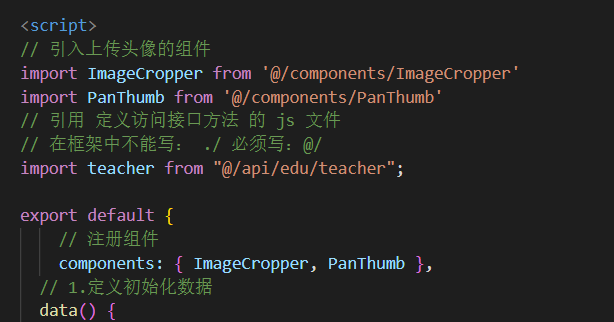
- 在 save.vue 页面引入 teacher.js 模块,并调用 addTeacher 方法。
<script>
import teacherApi from "@/api/edu/teacher";
export default {
  data() {
    return {
      // teacher 里不写属性也可以,会自动创建
      teacher: {},
      // 设置按钮是否为禁用状态,防止重复提交
      saveBtnDisabled: true,
    };
  },
  created() {

  },
  methods: {
    saveOrUpdate() {
      // 调用增加讲师
      this.saveTeacher();
    },

    //  增加讲师
    saveTeacher() {
      teacherApi.addTeacher(this.teacher).then((response) => {
        // 增加成功提示信息
        this.$message({
          type: "success",
          message: "增加成功!",
        });
        //  增加完后回到讲师列表,使用路由导航
        this.$router.push({path: '/edu/teacher/list'})
      });
    },
  },
};
</script>
- 为了能够在 讲师列表中 将 增加的讲师 显示在第一位,在后端接口中 对 查询出来的 讲师列表 根据 创建时间排序。
6.修改讲师
修改讲师需要做的俩件事:
- 回显修改讲师的原数据
- 进行修改
我是使用 Dialog 对话框做的,和 原视频中的做法可能不一样,但是原理都一样,自我感觉这种方法比较简单
- 在
/src/api/edu/teacher.js中定义访问后端接口的方法- url 要对应你自己后端 controller 层的路径。
    // 4. 根据 id 查询教师
    getTeacherByID(id){
        return request({
            url: `eduservice/teacher/getTeacher/${id}`,
            method: 'get',
        })
    },
    // 5. 根据 Id 修改教师
    updateTeacher(EduTeacher){
        return request({
            url: `eduservice/teacher/updateTeacher`,
            method: 'post',
            data: EduTeacher
        })
    }
- 在 list.vue 页面,使用 Element-ui 中的 Dialog 组件 渲染对话框
    <!-- 修改框 -->
    <el-dialog title="修改讲师" :visible.sync="dialogFormVisible" top="2vh">
      <el-form label-width="120px">
        <el-form-item label="讲师名称">
          <el-input v-model="form.name" />
        </el-form-item>

        <el-form-item label="讲师排序">
          <el-input-number
            v-model="form.sort"
            controls-position="right"
            :min="0"
          />
        </el-form-item>

        <el-form-item label="讲师头衔">
          <el-select v-model="form.level" clearable placeholder="请选择">
            <el-option :value="1" label="高级讲师" />
            <el-option :value="2" label="首席讲师" />
          </el-select>
        </el-form-item>

        <el-form-item label="讲师资历">
          <el-input v-model="form.career" />
        </el-form-item>

        <el-form-item label="讲师简介">
          <el-input v-model="form.intro" :rows="10" type="textarea" />
        </el-form-item>
      </el-form>

      <div slot="footer" class="dialog-footer">
        <el-button @click="dialogFormVisible = false">取 消</el-button>
        <el-button type="primary" @click="edit()">确 定</el-button>
      </div>
    </el-dialog>
标签属性含义:
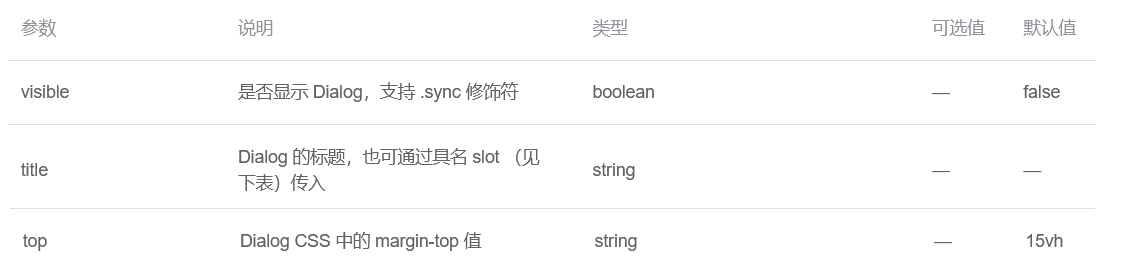
- 在 list.vue 的 data 中增加俩条数据

- 编辑 修改按钮
- list.vue 的 methods 中定义 open,edit 方法
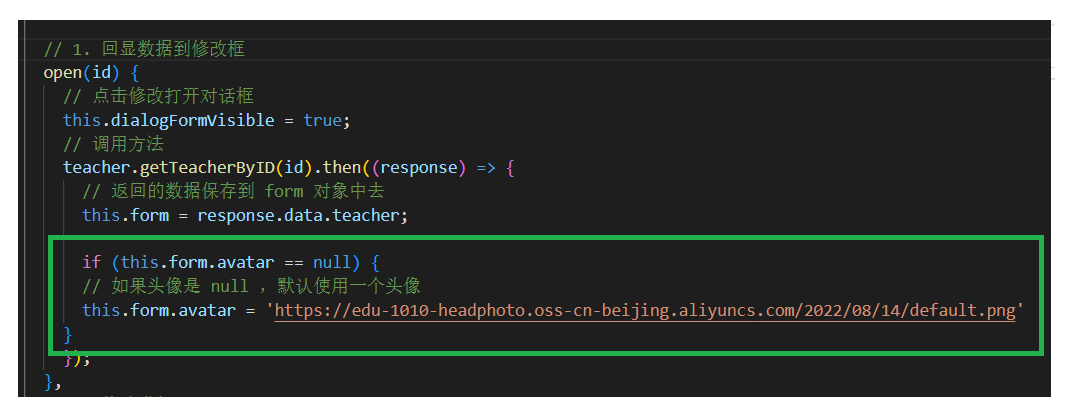
    // 1. 回显数据到修改框
    open(id) {
      // 点击 修改 打开对话框
      this.dialogFormVisible = true;
      teacher.getTeacherByID(id).then((response) => {
        // 返回的数据保存到 form 对象中去
        this.form = response.data.teacher;
        console.log(this.form);
      });
    },
    // 2. 修改讲师
    edit() {
      teacher.updateTeacher(this.form).then((response) => {
          // 提示信息
        this.$message({
          type: "success",
          message: "修改成功!",
        });
        // 修改完关闭对话框
        this.dialogFormVisible = false;
        // 重新查询 讲师列表
        this.getList();
      });
    },
7.讲师头像上传 – 后端
使用 阿里云 oss 对象存储,用来保存上传的头像。
网站:对象存储
- 注册账号 —— 实名认证 —— 立即开通

- 管理控制台 —— 创建Bucket·
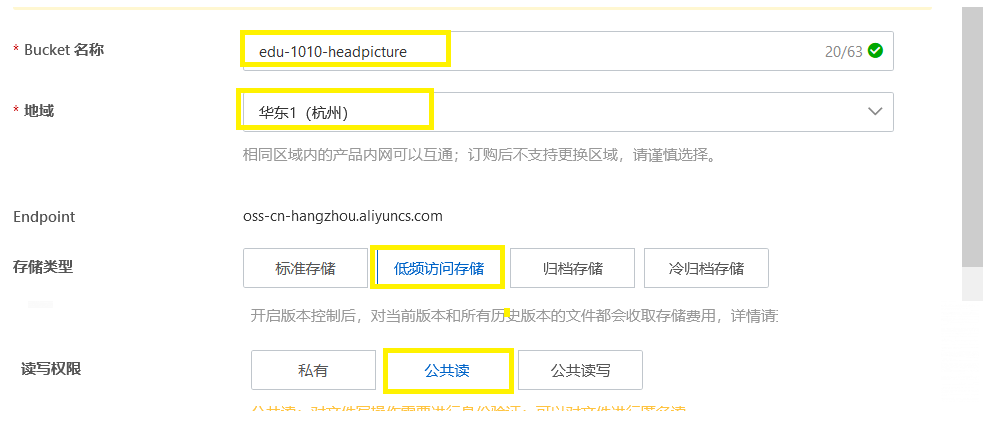
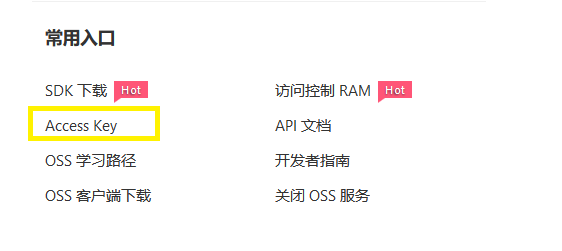
- 创建 阿里云办法的秘钥 —— 创建 Access Key

- 找到帮助文档, 阿里云提供的文档中,代码、使用步骤描述的非常详细
- 使用上传文件流的方式上传头像

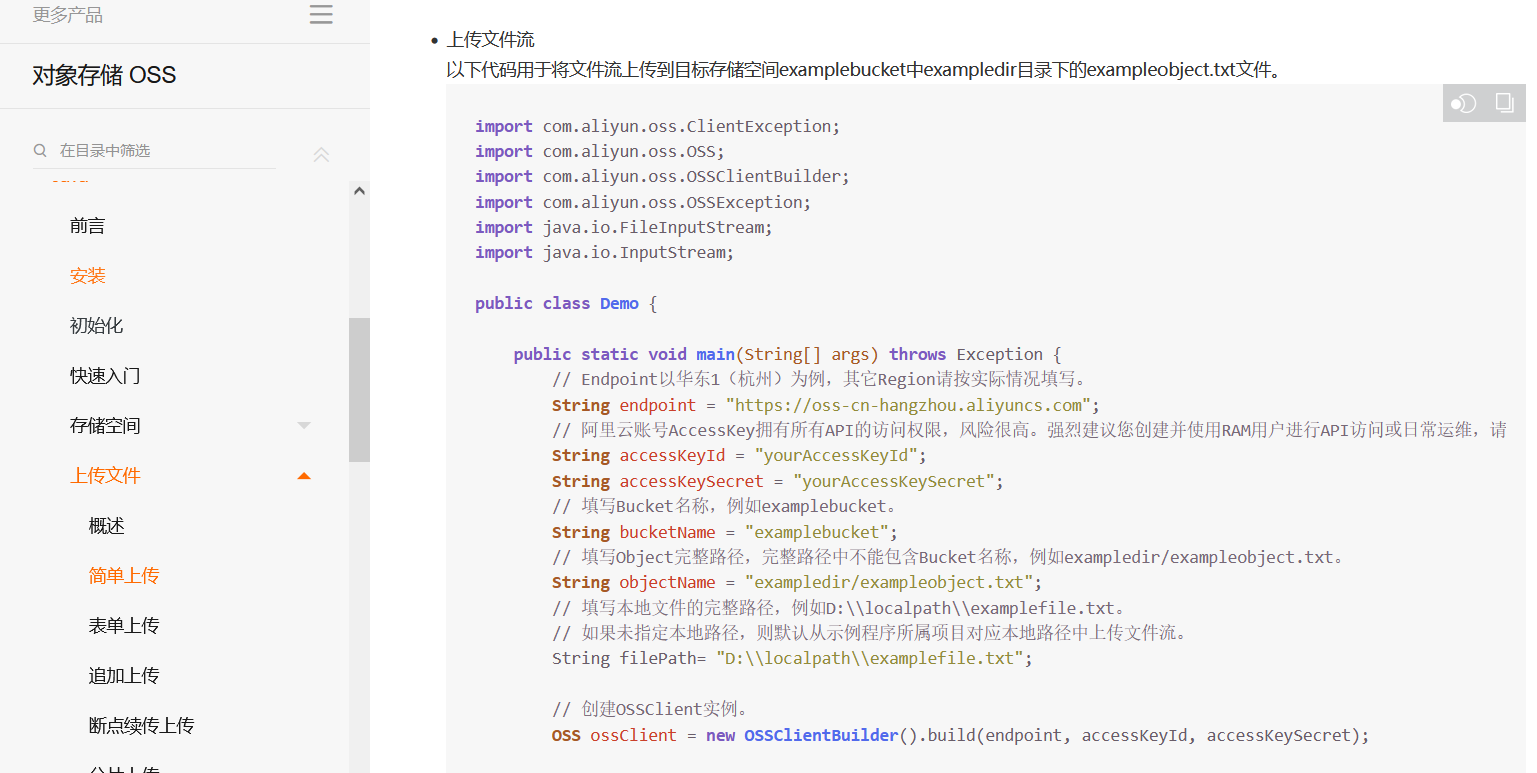
-
在 service 模块下创建 service_oss 模块
POM:
<?xml version="1.0" encoding="UTF-8"?>
<project xmlns="http://maven.apache.org/POM/4.0.0"
         xmlns:xsi="http://www.w3.org/2001/XMLSchema-instance"
         xsi:schemaLocation="http://maven.apache.org/POM/4.0.0 http://maven.apache.org/xsd/maven-4.0.0.xsd">
    <parent>
        <artifactId>service</artifactId>
        <groupId>com.atguigu</groupId>
        <version>0.0.1-SNAPSHOT</version>
    </parent>
    <modelVersion>4.0.0</modelVersion>

    <artifactId>service_oss</artifactId>

    <properties>
        <maven.compiler.source>8</maven.compiler.source>
        <maven.compiler.target>8</maven.compiler.target>
    </properties>
    <dependencies>
        <!-- 阿里云oss依赖 -->
        <dependency>
            <groupId>com.aliyun.oss</groupId>
            <artifactId>aliyun-sdk-oss</artifactId>
            <version>${aliyun-sdk-oss.version}</version>
        </dependency>

        <!-- 日期工具栏依赖 -->
        <dependency>
            <groupId>joda-time</groupId>
            <artifactId>joda-time</artifactId>
        </dependency>
    </dependencies>
</project>
在引入 aliyun.oss 依赖时,手动引用了版本,不知道是不是 bug ,我不手动引入自动使用 2.8 版本的,2.8 版本是没有 OSSClientBuilder 这个对象的。
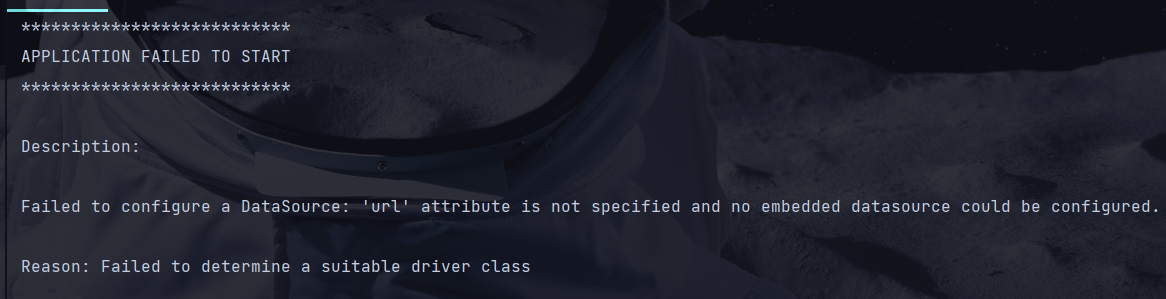
启动类:
@SpringBootApplication(exclude = DataSourceAutoConfiguration.class)
public class OssApplication {
    public static void main(String[] args) {
        SpringApplication.run(OssApplication.class,args);
    }
}
这里需要排除 DataSourceAutoConfiguration 类的加载,因为 在 service 模块中引入了 mysql 依赖,在 service_oss 模块中不需要连接数据库。否则就会报错:
application 配置文件:
#服务端口
server.port=8002
#服务名
spring.application.name=service-oss

#环境设置:dev、test、prod
spring.profiles.active=dev

# 以下内容在上传和下载都需要用到,因此放到配置文件中方便实用
#阿里云 OSS
#不同的服务器,地址不同
aliyun.oss.file.endpoint=your endpoint
aliyun.oss.file.keyid=your accessKeyId
aliyun.oss.file.keysecret=your accessKeySecret
#bucket可以在控制台创建,也可以使用java代码创建
aliyun.oss.file.bucketname=guli-file
- 创建常量类,读取配置文件中的值
@Component
public class ConstantPropertiesUtil implements InitializingBean {

    //使用 Spring 中的 @Value 注解读取配置文件中的内容
    @Value("${aliyun.oss.file.endpoint}")
    private String endpoint;

    @Value("${aliyun.oss.file.keyid}")
    private String keyId ;

    @Value("${aliyun.oss.file.keysecret}")
    private String keySecret ;

    @Value("${liyun.oss.file.bucketname}")
    private String bucketname ;

    //定义常量,因为上面的变量都是 private 访问不到
    public static String END_POINT;
    public static String ACCESS_KEY_ID;
    public static String ACCESS_KEY_SECRET;
    public static String BUCKET_NAME;

    // 该方法是在 上面哪些属性 赋值之后,才会执行
    @Override
    public void afterPropertiesSet() throws Exception {
        END_POINT = endpoint;
        ACCESS_KEY_ID = keyId;
        ACCESS_KEY_SECRET = keySecret;
        BUCKET_NAME = bucketname;
    }
}
InitializingBean 接口 是用来初始化 bean,afterPropertiesSet 方法会在 属性读取到 application 文件中的内容才会执行。
- controller 层
MultipartFile 会自动封装文件
@RestController
@RequestMapping("/oss/file")
@CrossOrigin // 解决跨域问题
public class OssController {

    @Autowired
    private FileService fileService;

    @ApiOperation("文件上传")
    @PostMapping("upload")
    private R uploadFile(MultipartFile file) {
        // 返回一个 头像的地址
        String url = fileService.uploadFileAvatar(file);
        return R.ok().data("url", url);
    }

}
- service 层实现图片上传逻辑,代码在 阿里云 Oss 帮助文档中都有提供,稍微修改一下即可。
接口:
public interface FileService {

 String uploadFileAvatar(MultipartFile file);
}
实现类:
@Service
public class FileServiceImpl implements FileService {

 @Override
 public String uploadFileAvatar(MultipartFile file) {
     // 地域节点
     String endpoint = ConstantPropertiesUtil.END_POINT;
     // 秘钥 ID
     String accessKeyId = ConstantPropertiesUtil.ACCESS_KEY_ID;
     // 秘钥密码
     String accessKeySecret = ConstantPropertiesUtil.ACCESS_KEY_SECRET;
     // 存储桶名称
     String bucketName = ConstantPropertiesUtil.BUCKET_NAME;

     // 创建OSSClient实例。
     OSS ossClient = new OSSClientBuilder().build(endpoint, accessKeyId, accessKeySecret);
     // 获取文件名,使用 uuid 拼接以下,防止文件名重复
     String fileName = file.getOriginalFilename();
     String uuid = UUID.randomUUID().toString().replaceAll("-", "");

     if (fileName != null) {
         String[] strings = fileName.split("\\.");
         fileName = strings[0] + "-" + uuid + "." + strings[1];
     }

     // 根据日期进行分类
     // joda-time 依赖提供的工具
     String timePath = new DateTime().toString("yyyy/MM/dd");
     fileName = timePath + "/" + fileName;

     try {
         // 获取文件输入流
         InputStream inputStream = file.getInputStream();
         // 创建PutObject请求。
         // 第二个参数: 文件上传的路径,比如: /a/b/1.png 如果存储桶中没有 a、b 文件夹会自动创建
         ossClient.putObject(bucketName, fileName, inputStream);
         // 返回文件的 url
         // https://edu-1010-headpicture.oss-cn-hangzhou.aliyuncs.com/1.png
         return "https://" + bucketName + "." + endpoint + "/" + fileName;
     } catch (Exception e) {
         e.printStackTrace();
         return null;
     } finally {
         if (ossClient != null) {
             // 关闭连接
             ossClient.shutdown();
         }
     }

 }
}
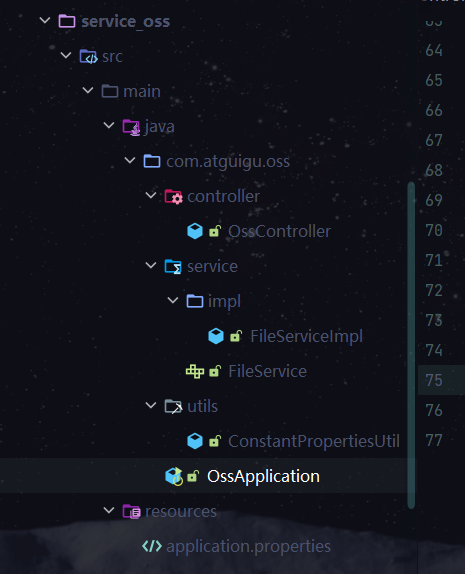
- service_oss 目录结构
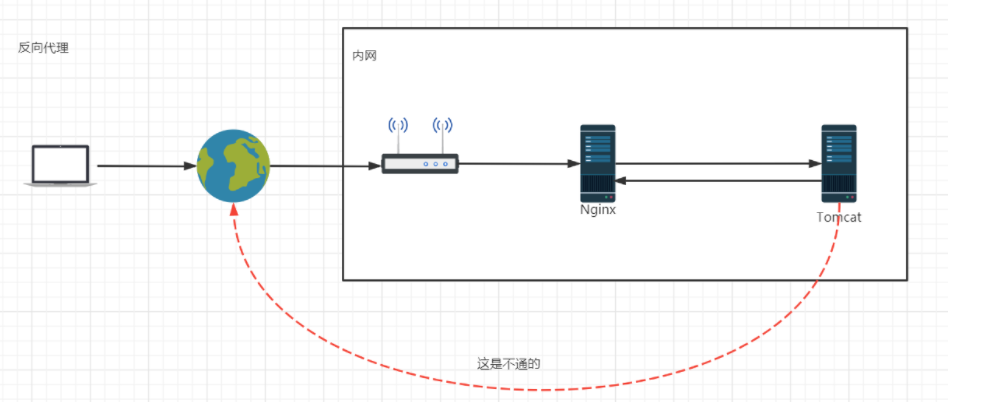
8.Nginx 使用
Nginx: 反向代理服务器
常见的使用:
- 请求转发【反向代理】
- 在大型的项目中,因为服务器在后端较多,访问端口不同,此时就会造成请求每个服务器路径的端口号不一致,这样不方便跳转增加代码整体复杂程度,此时就需要 nginx,所有的访问路径使用一个请求端口,由nginx将请求转发到具体的服务器(根据地址中包含的唯一标识)
- 负载均衡
- 动静分离
Nginx 配置文件 nginx.conf 介绍:
删去了注释的部分
# 开启的进程数,默认就是 1
worker_processes  1;

events {
	# 每个进程可以连接数
    worker_connections  1024;
}

http {
	# 引入外部配置文件
	# mime.types 文件里,保存了文件后缀和类型的对应关系
	# 其实在浏览器区分文件的类型,并不是根据后缀名来区分的
	# 而是根据文件后缀对应的类型
    include       mime.types;
    # mime中没有的类型。默认使用 application/octet-stream;
    default_type  application/octet-stream;

	# Nginx 在进行数据传输时,会有更少的数据拷贝动作
    sendfile        on;


    keepalive_timeout  65;

	# 一个 server 代表一个虚拟主机,可以配置多个主机
    server {
    	# 80 : 监听的端口,一般会修改其他的端口,避免冲突
        listen       9001;
        # 域名-主机名
        server_name  localhost;

        # / : 访问的路径,可通过正则表达式设置路径
        location / {
        	# 根目录
            root   html;
            # 默认页名称
            index  index.html index.htm;
        }
        # 服务器内部的错误,跳转到的错误页面
        error_page   500 502 503 504  /50x.html;
        location = /50x.html {
            root   html;
        }

    }

}
请求转发配置:
我是用的是 Linux中的Nginx
worker_processes  1;

events {
    worker_connections  1024;
}

http {
    include       mime.types;
    default_type  application/octet-stream;

    sendfile        on;


    keepalive_timeout  65;

    server {

        listen       9001;
        server_name  localhost;

        location /{
             # proxy_pas: 配置反向代理,访问 http://192.168.200.132:9001/
             # Nginx 会转发到 http://www.baidu.com
             proxy_pass http://www.baidu.com;
        }
        error_page   500 502 503 504  /50x.html;
        location = /50x.html {
            root   html;
        }

    }

}
负载均衡基本配置:
worker_processes  1;

events {
    worker_connections  1024;
}

http {
    include       mime.types;
    default_type  application/octet-stream;

    sendfile        on;


    keepalive_timeout  65;

    # 配置负载均衡
    upstream balanceload{
      server 192.168.200.133;
      server 192.168.200.134;
    }

    server {

        listen       9001;
        server_name  localhost;

        location /{
        	# 反向代理
             proxy_pass http://balanceload;
        }
        error_page   500 502 503 504  /50x.html;
        location = /50x.html {
            root   html;
        }

    }

}
基于本项目的 Nginx 请求转发配置:
worker_processes  1;

events {
    worker_connections  1024;
}

http {
    include       mime.types;
    default_type  application/octet-stream;

    sendfile        on;


    keepalive_timeout  65;

    server {

        listen       9003;
        server_name  localhost;
        # 根据访问的不同路径,访问不同的端口
        location  ~ /eduservice/ {
             proxy_pass  http://localhost:8001;
        }
        location  ~ /oss/{
             proxy_pass  http://localhost:8002;
        }
        error_page   500 502 503 504  /50x.html;
        location = /50x.html {
            root   html;
        }

    }

}
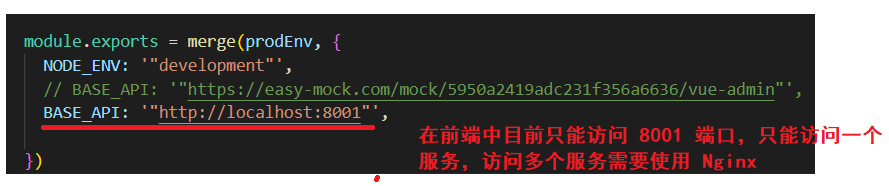
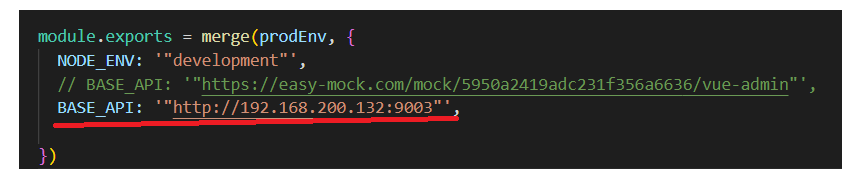
在 VSCOde 中修改 /config/dev.env.js 文件 中的 url 路径:
IP 地址修改成自己 Linux 的地址
9.讲师头像上传 – 前端
添加头像上传组件:
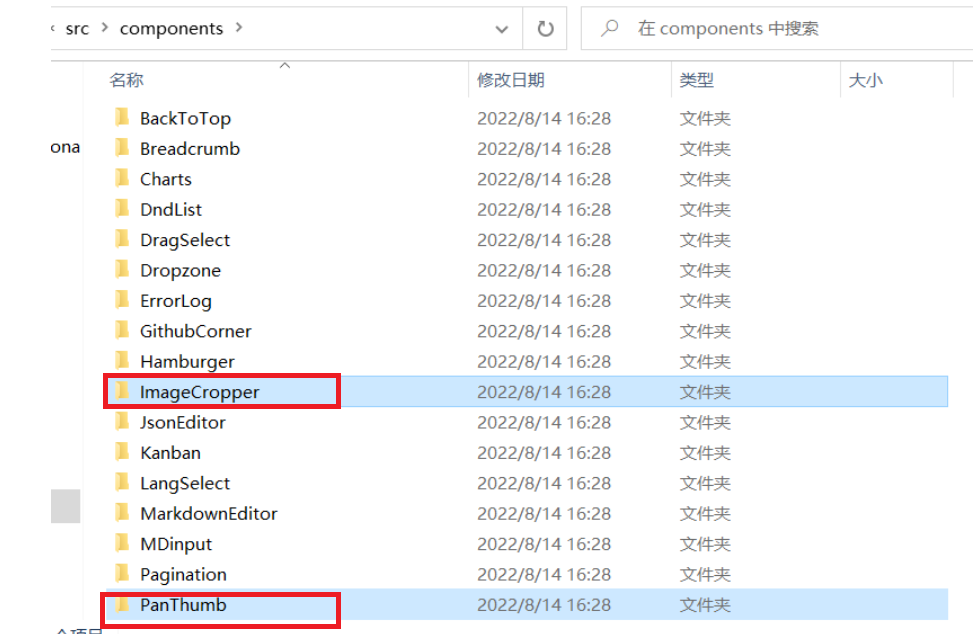
- 从 另一个 Vue 模板中
src/components目录下拷贝头像上传的组件 到 本项目中src/components下

主要在俩个页面增加组件:
一个是增加讲师的地方,一个是修改讲师的地方。
方法都是一样的,可能有一些细节不一样。
增加讲师 页面 增加头像上传组件:
-
拷贝进俩个组件之后,需要
引入组件,和注册组件// 引入上传头像的组件 import ImageCropper from '@/components/ImageCropper' import PanThumb from '@/components/PanThumb'// 注册组件 components: { ImageCropper, PanThumb },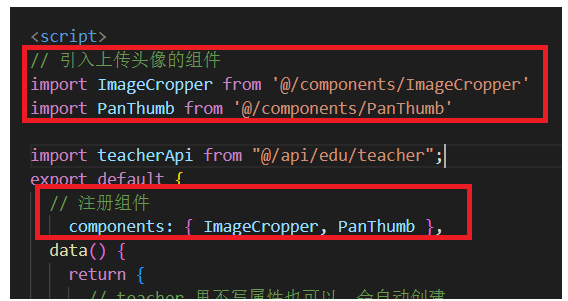
- 头像上传组件代码
      <!-- 讲师头像:TODO -->
<el-form-item label="讲师头像">

    <!-- 头衔缩略图 -->
    <pan-thumb :image="teacher.avatar"/>
    <!-- 文件上传按钮 -->
    <el-button type="primary" icon="el-icon-upload" @click="imagecropperShow=true">更换头像
    </el-button>

    <!--
      v-show:是否显示上传组件
      :key:类似于id,如果一个页面多个图片上传控件,可以做区分
      :url:后台上传的url地址
      @close:关闭上传组件的回调
      @crop-upload-success:上传成功后的回调
      -->
    <image-cropper
                   v-show="imagecropperShow"
                   :width="300"
                   :height="300"
                   :key="imagecropperKey"
                   :url="BASE_API+'/oss/file/upload'"
                   field="file"
                   @close="close"
                   @crop-upload-success="cropSuccess"/>

</el-form-item>
:url : 要与你后端的 路径对应上。
- 在 data 中增加所需要的数据
  data() {
    return {
      // teacher 里不写属性也可以,会自动创建
      teacher: {
         // 设置一个默认的头像
        avatar: 'https://edu-1010-headphoto.oss-cn-beijing.aliyuncs.com/2022/08/14/default.png'
      },
       BASE_API: process.env.BASE_API, // 接口API地址
      //  上传头像的 key
      imagecropperKey: 0,
      // 是否显示上传头像的弹框
      imagecropperShow: false,
      // 设置按钮是否为禁用状态,防止重复提交
      saveBtnDisabled: false,
    };
  },
- 实现 close、cropSuccess 方法
// 关闭弹窗执行的回调
close() {
// 关闭弹窗
this.imagecropperShow = false;
},
// 上传成功执行的回调
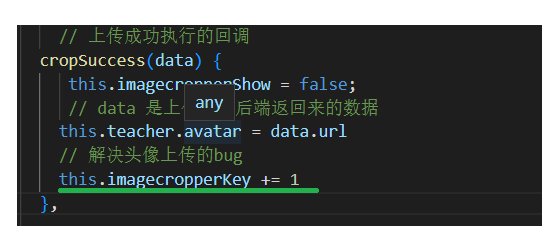
cropSuccess(data) {
this.imagecropperShow = false;
// data 是上传成功后端返回来的数据
this.teacher.avatar = data.url
},
- 最终测试即可
修改讲师 增加 头像上传组件:
-
第一步还是注册组件和引用组件
-
拷贝头像上传代码
注意放的位置: 要放在 表单里面,讲师简介 下边。。。
form 对象是保存 讲师 信息的,不要修改错。
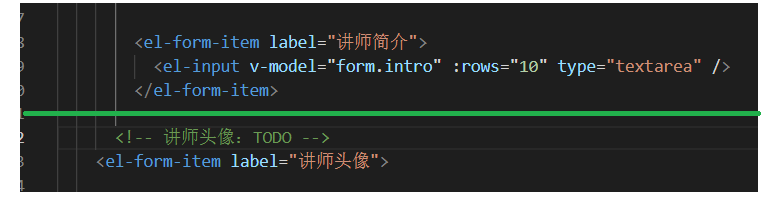
      <!-- 讲师头像:TODO -->
<el-form-item label="讲师头像">

    <!-- 头衔缩略图 -->
    <pan-thumb :image="teacher.avatar"/>
    <!-- 文件上传按钮 -->
    <el-button type="primary" icon="el-icon-upload" @click="imagecropperShow=true">更换头像
    </el-button>

    <!--
      v-show:是否显示上传组件
      :key:类似于id,如果一个页面多个图片上传控件,可以做区分
      :url:后台上传的url地址
      @close:关闭上传组件的回调
      @crop-upload-success:上传成功后的回调
      -->
    <image-cropper
                   v-show="imagecropperShow"
                   :width="300"
                   :height="300"
                   :key="imagecropperKey"
                   :url="BASE_API+'/oss/file/upload'"
                   field="file"
                   @close="close"
                   @crop-upload-success="cropSuccess"/>

</el-form-item>
- 在 data 中增加所需要的数据
  data() {
    return {
      // 用于查询讲师的数据
      list: null, // 保存返回的数据
      current: 1, // 当前页
      limit: 10, // 每页显示条数
      total: 0, // 总记录数
      teacherQuery: {}, // 封装条件查询对象

      // 用于修改讲师的数据
      form: {
        avatar: '',
      }, // 回显的数据
      dialogFormVisible: false, // 是否关闭对话框,false 关闭,true 打开
      BASE_API: process.env.BASE_API, // 接口API地址
      imagecropperKey: 0,//  上传头像的 key
      imagecropperShow: false, // 是否显示上传头像的弹框
    };
  },
- 定义 close,cropSuccess 方法
        // 关闭弹窗执行的回调
    close() {
      // 关闭弹窗
      this.imagecropperShow = false;
    },
      // 上传成功执行的回调
    cropSuccess(data) {
       this.imagecropperShow = false;
       // data 是上传成功后端返回来的数据
      this.form.avatar = data.url

    },
- 在回显数据时,由于有的讲师头像是 null 的,所以给增加一个默认头像。
- 测试视频
这个上传头像有一个 小 bug ,就是当上传成功后,想要修改头像,它显示的是上传成功页面。需要重新打开弹窗才能在修改
演示视频:
解决方法:
上传完修改 key 的值,只要有变化就行
六、课程分类管理
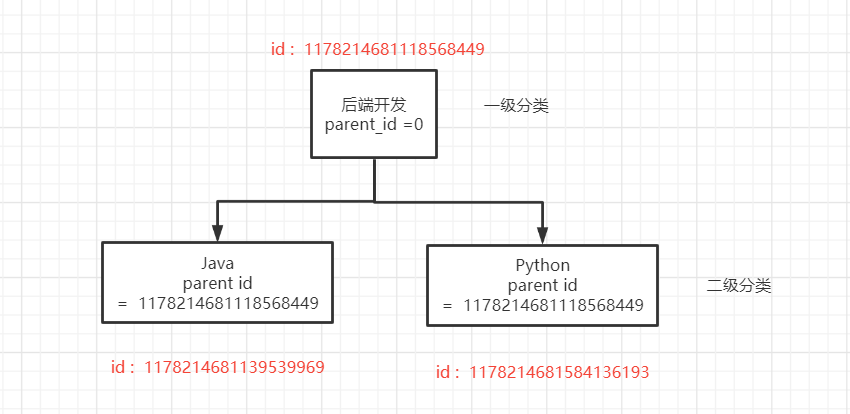
对课程采用多级分类管理:
对应数据库表: edu_subject
parent_id 等于0 表示 一级分类
二级分类的 pid 是对应 一级分类的 ID :
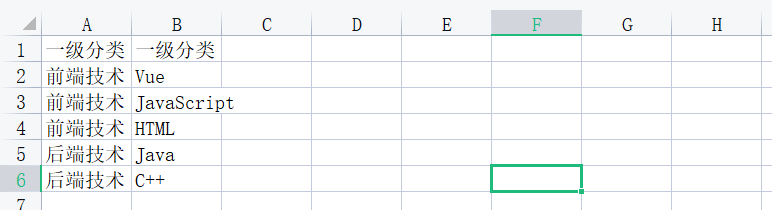
读取 Excel 中的 分类管理 增加到数据库中

1.EasyExcel 介绍
EasyExcel 的作用:
1、数据导入:减轻录入工作量
2、数据导出:统计信息归档
3、数据传输:异构系统之间数据传输
- EasyExcel 是阿里巴巴开源的一个excel处理框架,以使用简单、节省内存著称。EasyExcel能大大减少占用内存的主要原因是在解析Excel时没有将文件数据一次性全部加载到内存中,而是从磁盘上一行行读取数据,逐个解析。
- EasyExcel 采用一行一行的解析模式,并将一行的解析结果以观察者的模式通知处理(AnalysisEventListener)。
演示 EasyExcel 的写功能:
- Pom 中增加依赖
<dependencies>
    <!-- https://mvnrepository.com/artifact/com.alibaba/easyexcel -->
    <dependency>
        <groupId>com.alibaba</groupId>
        <artifactId>easyexcel</artifactId>
        <version>2.1.1</version>
    </dependency>
</dependencies>
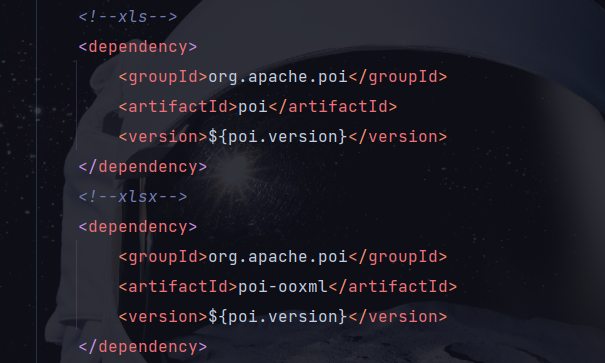
EasyExcel 还需要 poi 的依赖,在 guli_parent 模块中已经引入过了
- 创建与表格对应的实体类,设置表头和对应的字段
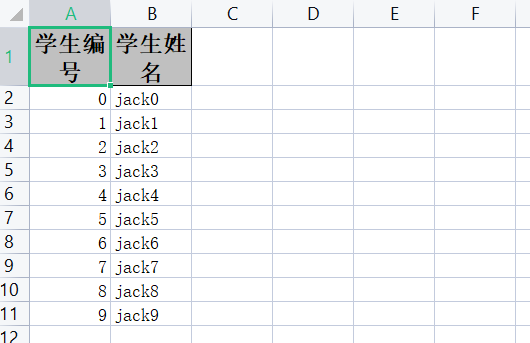
@Data
public class DataEntity {
    // 设置表头,如果不写 @ExcelProperty 默认是属性名
    @ExcelProperty("学生编号")
    private Integer sno ;


    @ExcelProperty("学生姓名")
    private String sname ;
}
- 实现写操作
public class EasyExcelTest {
    public static void main(String[] args) {

        // 文件路径
        String fileName = "C:\\18_gulixueyuan\\write.xlsx";
        // 实现写操作
        EasyExcel.write(fileName,DataEntity.class).sheet("学生列表").doWrite(getList());
    }

    public static List<DataEntity> getList(){
        List<DataEntity> list = new ArrayList<>();
        for (int i = 0; i < 10; i++) {
            DataEntity data = new DataEntity();
            data.setSno(i);
            data.setSname("jack" + i);
            list.add(data);
        }
        return  list ;
    }
}
演示结果:
演示 EasyExcel 读功能:
- 创建对应的实体类,和写操作一样,但是需要增加一个 index 属性
@Data
public class DataEntity {
    // 设置表头,如果不写 @ExcelProperty 默认是属性名
    // index 表示对应表格中的第几列
    @ExcelProperty(value = "学生编号", index = 0)
    private Integer sno ;


    @ExcelProperty(value = "学生姓名", index = 1)
    private String sname ;
}
- 创建监听器,EasyExcel 会根据监听器读取 Excel 中的内容
public class ExcelListener extends AnalysisEventListener<DataEntity> {

    // 读取 Excel 中的内容,不读取表头
    @Override
    public void invoke(DataEntity dataEntity, AnalysisContext analysisContext) {
        System.out.println(dataEntity);
    }

    // 读取表头的方法
    public void invokeHeadMap(Map<Integer, String> headMap, AnalysisContext context) {
        System.out.println("表头数据" + headMap);
    }

    // 读取完之后执行的方法
    @Override
    public void doAfterAllAnalysed(AnalysisContext analysisContext) {
        System.out.println("已经读取完数据了");
    }
}
- 读取内容
    @Test
   public  void readExcel(){
        // 文件路径
        String fileName = "C:\\18_gulixueyuan\\write.xlsx";
        // 读取内容
        EasyExcel.read(fileName,DataEntity.class,new ExcelListener()).sheet().doRead();
    }
测试结果:
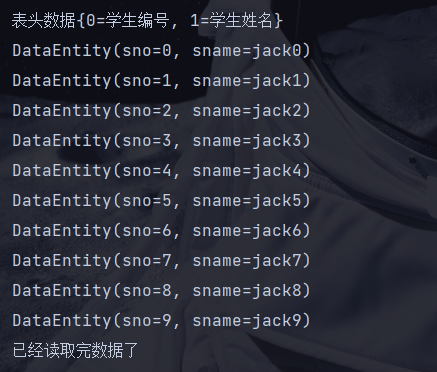
EasyExcel 的读和写操作类似,读操作多了一个 监听器的 配置。
2.课程分类管理 – 后端
- 课程分类列表【树形结构显示】
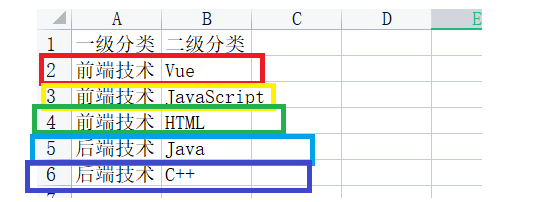
- 根据 Excel 表格 增加课程分类
在 service_edu 模块中实现这俩个功能
根据 Excel 表格 增加课程分类 :
- 使用 MyBatisX 插件快捷生成 mapper,service…
- 创建与 表格对应的实体类
@Data
public class ExcelSubjectData {

    @ExcelProperty(index = 0)
    private String oneSubjectName;

    @ExcelProperty(index = 1)
    private String twoSubjectName;
}
- 创建监听器,EasyExcel 会根据这个监听器 一行一行 的读取 Excel 中的内容。
public class ExcelSubjectListener extends AnalysisEventListener<ExcelSubjectData> {
private EduSubjectService eduSubjectService;
// 因为该监听器无法交给 Spring 管理,因为在读取的时候需要 new 这个监听器。 因此不能注入其他对象
// 可以通过 有参构造方法 将 EduSubjectService 传过来,操作数据库
public ExcelSubjectListener(EduSubjectService eduSubjectService) {
this.eduSubjectService = eduSubjectService;
}
public ExcelSubjectListener() {
}
// EasyExcel 一行一行的读取数据
@Override
public void invoke(ExcelSubjectData excelSubjectData, AnalysisContext analysisContext) {
// 读取不到数据
if (excelSubjectData == null) {
throw new GuliException(20001, "空文件");
}
// 判断一级分类是否重复
EduSubject oneSubject = this.existOneSubject(excelSubjectData.getOneSubjectName(), eduSubjectService);
if (oneSubject == null) {
// 增加一级标分类
// oneSubject 是null ,手动 new 出来一个,增加 一级分类 和 parent_id
oneSubject = new EduSubject();
oneSubject.setTitle(excelSubjectData.getOneSubjectName());
oneSubject.setParentId("0");
eduSubjectService.save(oneSubject);
}
// 判断二级分类是否重复
// 二级分类的pid 是一级分类的 ID
String pid = oneSubject.getId();
EduSubject twoSubject = this.existTwoSubject(excelSubjectData.getTwoSubjectName(), eduSubjectService, pid);
if (twoSubject == null) {
// 增加二级标分类
twoSubject = new EduSubject();
twoSubject.setTitle(excelSubjectData.getTwoSubjectName());
twoSubject.setParentId(pid);
eduSubjectService.save(twoSubject);
}
}
/**
* 判断一级分类名称是否重复条件
* 1. 名称一致
* 2. 并且都是一级分类;title = 0
*
* @param name 一级分类名称
* @param eduSubjectService 操作数据库使用
*/
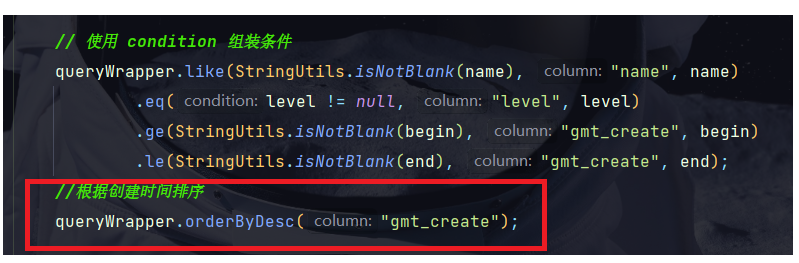
public EduSubject existOneSubject(String name, EduSubjectService eduSubjectService) {
QueryWrapper<EduSubject> wrapper = new QueryWrapper<>();
wrapper.like("title", name).eq("parent_id", 0);
return eduSubjectService.getOne(wrapper);
}
/**
* 判断二级分类名称是否重复
* 1. 名称一致
* 2. 父分类一样; parent_id 相等
*
* @param name 二级分类名称
* @param eduSubjectService 操作数据库使用
* @param pid parent_id
* @return
*/
public EduSubject existTwoSubject(String name, EduSubjectService eduSubjectService, String pid) {
QueryWrapper<EduSubject> wrapper = new QueryWrapper<>();
wrapper.like("title", name).eq("parent_id", pid);
return eduSubjectService.getOne(wrapper);
}
// 读取完执行的方法
@Override
public void doAfterAllAnalysed(AnalysisContext analysisContext) {
}
}
在配置监听器的时候:
- 需要在 read 方法中 new 监听器,这也就导致了 new 的对象无法交给 Spring 管理,也就无法增加
@Component....这些注解,无法@AutoWired注入对象,因此需要我们创建构造方法,在 Controller 层一直将eduSubjectService参数传到 监听器中来操作数据库。- 在 invoke 方法中读取 Excel 数据时,先判断 表格是否为 空, excelSubjectData 就是读取的数据
- 在表格中,一级分类对应多个二级分类,而 EasyExcel 是一行一行读取的,因此需要对一级、二级分类判断去重
- service 层
@Service
public class EduSubjectServiceImpl extends ServiceImpl<EduSubjectMapper, EduSubject>
implements EduSubjectService{

    @Override
    public void importSubjectInfo(MultipartFile file,EduSubjectService eduSubjectService) {
        try {
            // 读取内容
            // 文件流、实体类、监听器
            EasyExcel.read(file.getInputStream(), ExcelSubjectData.class,new ExcelSubjectListener(eduSubjectService)).sheet().doRead();
        } catch (IOException e) {
            e.printStackTrace();
        }
    }
}
- controller 层
@Api("课程分类管理")
@RestController
@RequestMapping("/eduservice/subject")
@CrossOrigin
public class EduSubjectController {

    @Autowired
    private EduSubjectService eduSubjectService ;

    @ApiOperation("增加课程分类")
    @PostMapping("addSubject")
    private R addSubject(MultipartFile file){

        // 根据文件,导入课程分类信息
        eduSubjectService.importSubjectInfo(file,eduSubjectService);

        return R.ok();
    }

}
最终使用 Swagger 测试:

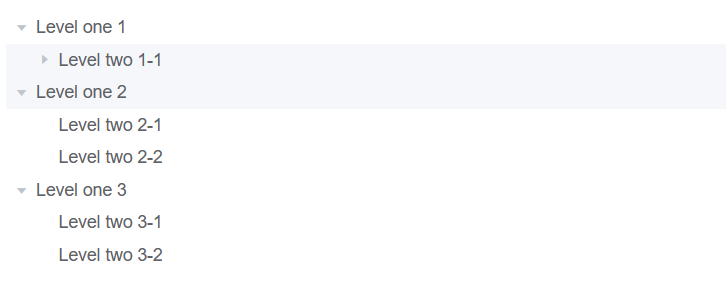
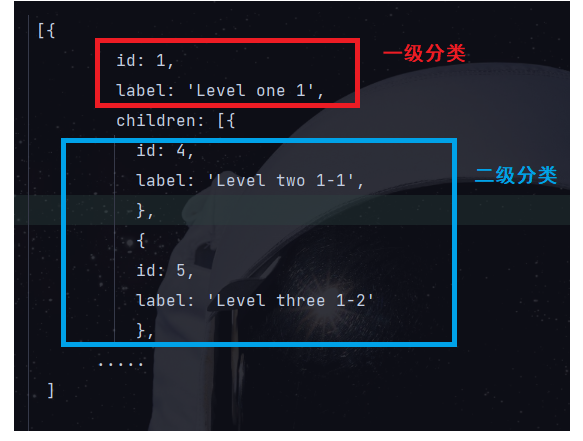
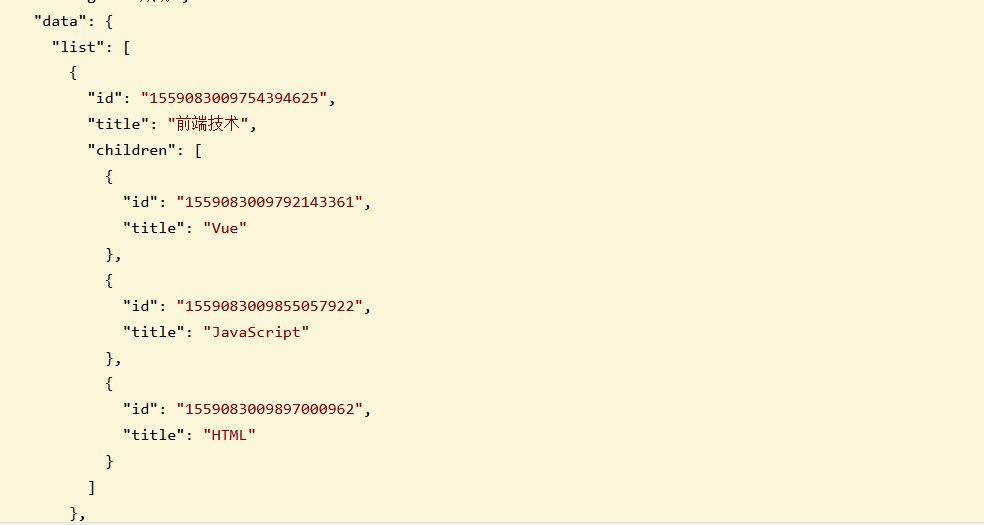
课程分类列表【树形结构显示】:
页面显示效果:
树形结构显示的数据形式:
- 所有的课程分类都保存在一个
Json 数组中- Json 数组中包含若干个 一级分类,一级分类中的 children 集合包含若干个二级分类,…以此类推
- 每个分类都是一个对象
后端中想要返回这个格式数据的解决方法:
- 创建实体类 =》 一级分类,二级分类
- 在 service 层实现查询数据库,数据封装
- 实体类创建
// 一级分类
@Data
public class OneSubject {
    private String id ;
    private String title;

    // 一级分类包含多个二级分类
    private List<TwoSubject> children = new ArrayList<>();
}
// 二级分类
@Data
public class TwoSubject {
    private String id ;
    private String title;
}
- service 层 实现
- 首先查询所有的 一级分类 和 二级分类
- 将一级分类封装到 树形结构的集合中,二级分类封装到一级分类的 children 集合中
- 在封装二级分类时,要判断它属于哪个一级分类,条件就是:
parent_id = 一级分类的 ID
接口:
    /**
     * 获取所有课程分类 —— 用树形结构显示
     * @return
     */
    List<OneSubject> getAllSubject();
实现类:
    /**
     *
     * @return 获取所有课程分类 —— 用树形结构显示
     */
    @Override
    public List<OneSubject> getAllSubject() {

        // 1.查询所有的一级分类 => parent_id = 0
        QueryWrapper<EduSubject> wrapperOne = new QueryWrapper<>();
        wrapperOne.eq("parent_id",0);
        List<EduSubject> oneSubjectsList = baseMapper.selectList(wrapperOne);

        // 2.查询所有的二级分类 => parent_id != 0
        QueryWrapper<EduSubject> wrapperTwo = new QueryWrapper<>();
        wrapperTwo.ne("parent_id",0);
        List<EduSubject> twoSubjectsList = baseMapper.selectList(wrapperTwo);

        // 3.封装一级分类
        // 保存树形结构
        ArrayList<OneSubject> finalList = new ArrayList<>();

        for (EduSubject eduSubject : oneSubjectsList) {
            // 创建树形结构中一级分类对象
            OneSubject oneSubject = new OneSubject();
            // 将 eduSubject 拷贝到 oneSubject , 自动拷贝、有相同属性的值。
            BeanUtils.copyProperties(eduSubject,oneSubject);


            // 4.封装二级分类到一级分类对象中的 children 中
            for (EduSubject subject : twoSubjectsList) {
                TwoSubject twoSubject = new TwoSubject();
                // 拷贝到二级分类对象中
                BeanUtils.copyProperties(subject,twoSubject);

                // 将二级分类对象保存到对应的一级分类的 children 集合中
                // 保存条件就是: 二级分类的 parent_id == 一级分类的 ID
                if (subject.getParentId().equals(oneSubject.getId())){
                    oneSubject.getChildren().add(twoSubject);
                }

            }
            // 最终将一级分类保存到 树形结构 集合中
            finalList.add(oneSubject);
        }
        return finalList;
    }
- controller 层调用
    @ApiOperation("显示课程分类列表")
    @GetMapping("getAllSubject")
    private R selectAllSubject(){

       //  获取树形结构,包含多个一级分类
       List<OneSubject> list =  eduSubjectService.getAllSubject();
       return R.ok().data("list",list);
    }
使用 Swagger 测试:
3.课程分类管理 – 前端
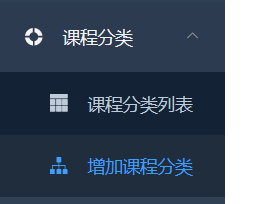
- 课程分类列表【树形结构显示】
- 增加课程分类
实现这俩个功能
- 在
/src/router/index.js增加一个课程分类路由
//  课程分类管理路由
  {
    path: '/subject',
    component: Layout,
    redirect: '/subject/list',
    name: '课程分类',
    meta: { title: '课程分类', icon: 'example' },
    children: [
      {
        path: 'list',
        name: '课程分类列表',
        component: () => import('@/views/edu/subject/list'),
        meta: { title: '课程分类列表', icon: 'table' }
      },
      {
        path: 'save',
        name: '增加课程分类',
        component: () => import('@/views/edu/subject/save'),
        meta: { title: '增加课程分类', icon: 'tree' }
      }
    ]
  },
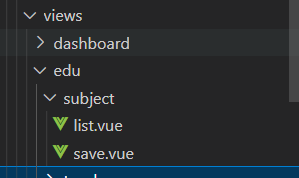
- 在
/src/views/edu/下创建 subject 文件夹, 文件夹里创建 list.vue 、save.vue 页面
增加课程分类:
- 在 save.vue 中 增加 Element-UI 组件,
<template>
  <div class="app-container">
    <el-form label-width="120px">
      <el-form-item label="信息描述">
        <el-tag type="info">excel模版说明</el-tag>
        <el-tag>
          <i class="el-icon-download"/>
          <!-- 为用户提供的Excel 模板,放在了 static 文件夹下 -->
          <a :href="'/static/test.xls'">点击下载模版</a>
        </el-tag>

      </el-form-item>

      <el-form-item label="选择Excel">
        <el-upload
          ref="upload"
          :auto-upload="false"
          :on-success="fileUploadSuccess"
          :on-error="fileUploadError"
          :disabled="importBtnDisabled"
          :limit="1"
          :action="BASE_API+'/eduservice/subject/addSubject'"
          name="file"
          accept="application/vnd.ms-excel">
          <el-button slot="trigger" size="small" type="primary">选取文件</el-button>
          <el-button
            :loading="loading"
            style="margin-left: 10px;"
            size="small"
            type="success"
            @click="submitUpload">上传到服务器</el-button>
        </el-upload>
      </el-form-item>
    </el-form>
  </div>
</template>
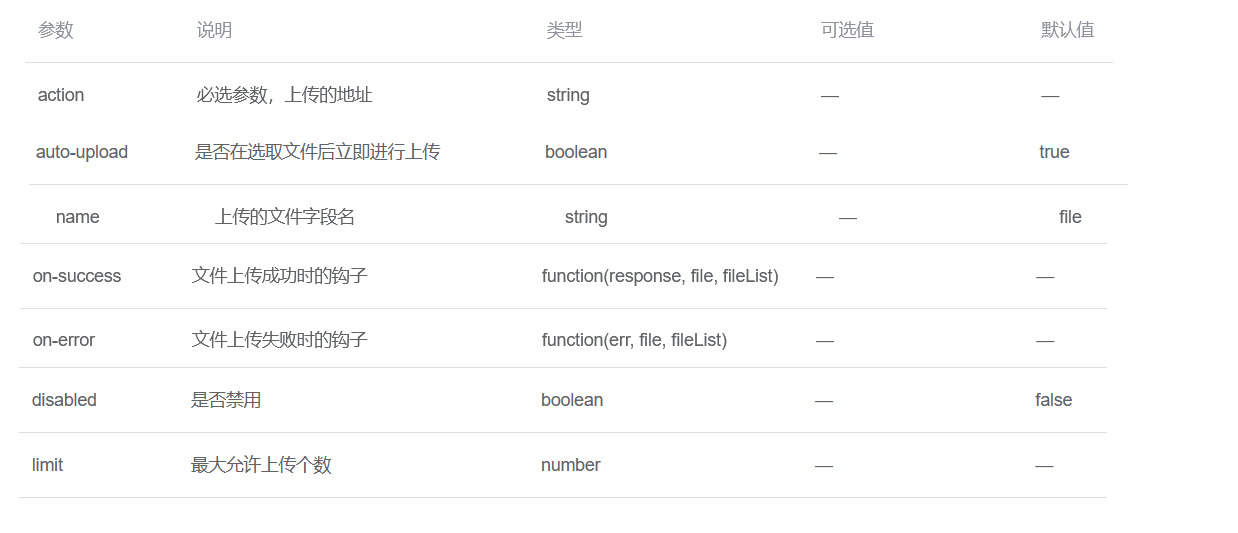
- 上传的地址 与你后端接口路径对应上
- 增加课程分类的模板放在 static 文件夹下,也可以放到 阿里云OSS 上
- name 的值要与后端接口方法的形参保持一致

- Js 代码
- 上传文件是提交表单上传,没有用到 Ajax 请求,需要使用 框架的语法提交
<script>
export default {
    data() {
        return {
            BASE_API: process.env.BASE_API, // 接口API地址
            importBtnDisabled: false, // 按钮是否禁用,
            loading: false  // 上传文件时不可点击 上传按钮
        }
    },
    created() {

    },
    methods: {
        //  上传成功执行的回调
        fileUploadSuccess(){
            this.loading = false
            this.$message({
                type: 'success',
                message: '课程分类增加成功'
            })
            // 路由跳转到 课程分类列表
            this.$router.push({path:'/edu/subject/list'})
        },
        // 上传失败执行的回调
        fileUploadError() {
            this.loading = false
            this.$message({
                type: 'error',
                message: '课程分类增加失败'
            })
        },
        // 上传文件
        submitUpload() {
            this.importBtnDisabled = true
            this.loading = true
            // 提交表单,JS写法:document.getByElementById().submit()
            this.$refs.upload.submit()
        }

    },
}
</script>
课程分类列表【树形结构显示】:
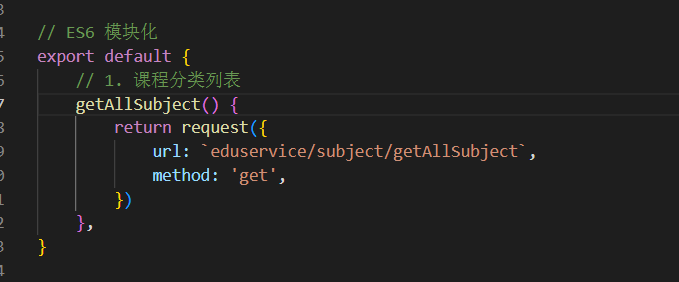
- 在 /src/api/edu/ 下创建 subject.js 文件,定义访问后端接口的方法
// request 封装了axios
import request from '@/utils/request'

// ES6 模块化
export default {
    // 1. 查询讲师列表的方法【带条件分页查询】
    getAllSubject() {
        return request({
            url: `eduservice/subject/getAllSubject`,
            method: 'get',
        })
    },
}
- list.vue 页面调用 该方法,实现 课程分类列表显示
<template>
  <div class="app-container">
    <el-input v-model="filterText" placeholder="Filter keyword" style="margin-bottom:30px;" />

<!--
    data : 遍历的数据
    props: 配置信息,子节点、节点名
    filter-node-method :搜索的方法
 -->
    <el-tree
      ref="tree2"
      :data="data2"
      :props="defaultProps"
      :filter-node-method="filterNode"
      class="filter-tree"
      default-expand-all
    />

  </div>
</template>

<script>
import subjectApi from '@/api/edu/subject'

export default {

  data() {
    return {
      filterText: '',
      data2: [],
      defaultProps: {
        children: 'children',
         // 换成分类对象中对应的属性
        label: 'title'
      }
    }
  },
  watch: {
    filterText(val) {
      this.$refs.tree2.filter(val)
    }
  },
  created() {
    this.getSubjectList()
  },
  methods: {
    //  显示课程分类列表
    getSubjectList() {
        subjectApi.getAllSubject().then((response) => {
            this.data2 = response.data.list
        })
    },
     // 搜索框
    filterNode(value, data) {
      if (!value) return true
      return data.title.toLowerCase().indexOf(value.toLowerCase()) !== -1
    }
  }
}
</script>
七、课程管理模块
课程发布的流程:
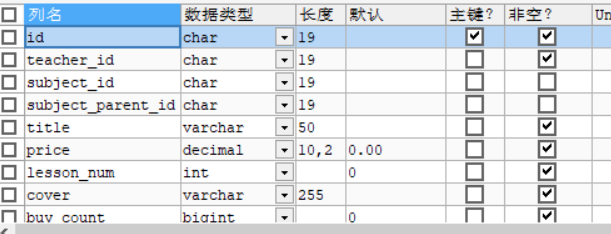
数据库表介绍:
edu_course: 保存课程的基本信息
edu_course_description : 课程的简介表
edu_chapter: 课程的章节表
edu_video: 课程的小节表
edu_teacher: 课程的教师
edu_subject : 课程分类
课程表相关关系:
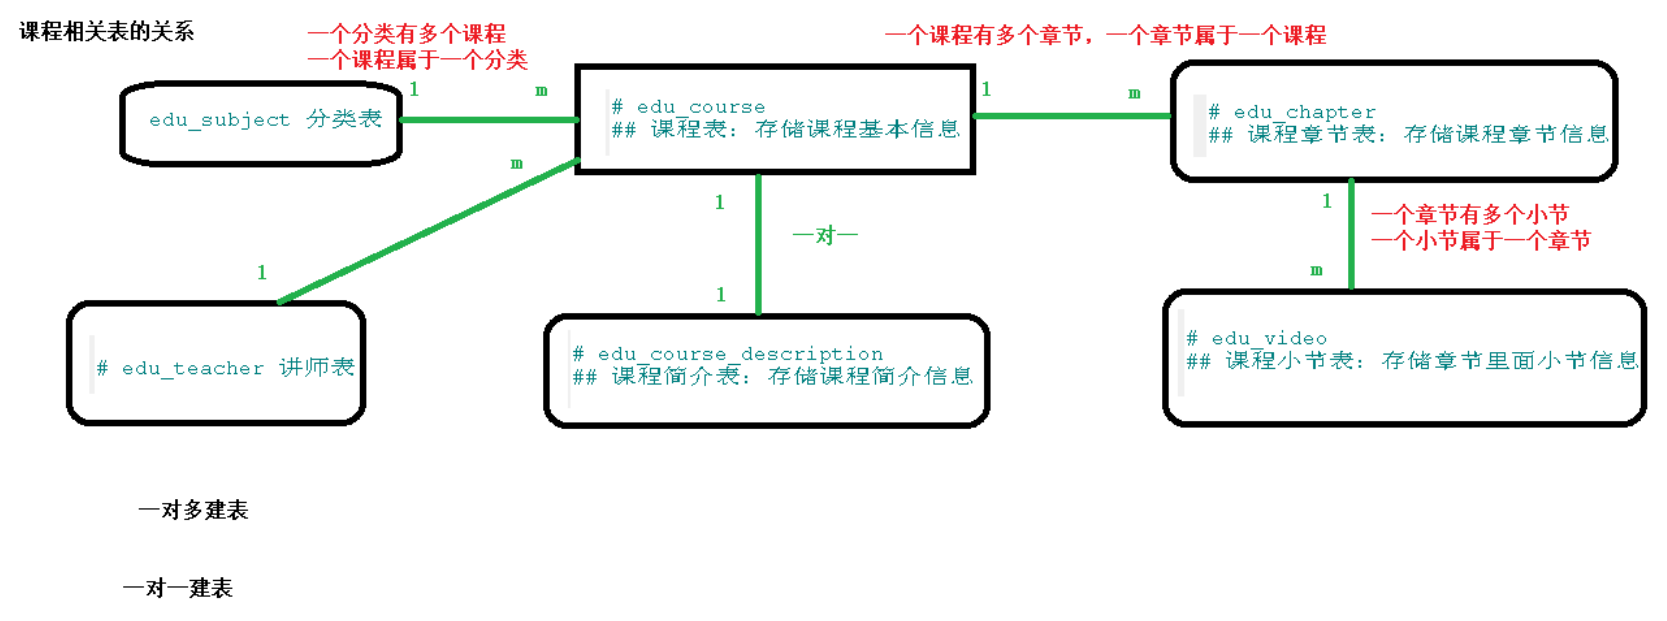
使用 代码生成工具,将这些 表的entity, service,mapper,controller 层 都生成出来。
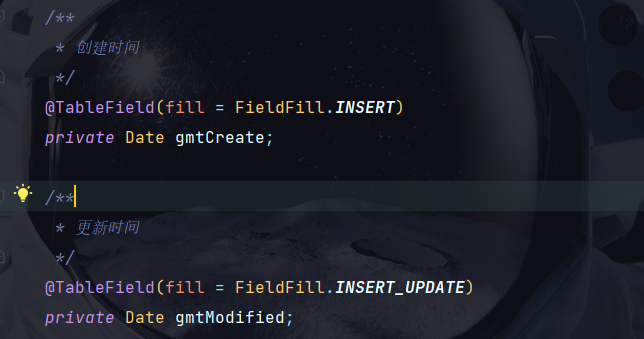
将实体类的 创建时间、更新时间字段都增加上自动填充功能:
1.增加课程 – 后端
- 增加课程,需要创建一个 vo 实体类,用于封装前端向后端返回的数据
- 由于增加课程的信息,不仅仅是一张表,需要保存到: edu_course 表、edu_course_description 表
- 对教师,分类进行选择时,采用下拉列表的方式选择。
- 创建 Course vo 实体类
@Data
public class CourseInfoVo {

    private static final long serialVersionUID = 1L;

    @ApiModelProperty(value = "课程ID")
    private String id;

    @ApiModelProperty(value = "课程讲师ID")
    private String teacherId;

    @ApiModelProperty(value = "课程专业ID")
    private String subjectId;

    @ApiModelProperty(value = "课程标题")
    private String title;

    @ApiModelProperty(value = "课程销售价格,设置为0则可免费观看")
    private BigDecimal price;

    @ApiModelProperty(value = "总课时")
    private Integer lessonNum;

    @ApiModelProperty(value = "课程封面图片路径")
    private String cover;

    @ApiModelProperty(value = "课程简介")
    private String description;
}
- service 层实现增加课程信息
EduCourseService 接口:
    /**
     * TODO
     * @date 2022/8/16 16:36
     * @param courseInfoVo 封装前端传过来的课程信息
     * @return void 返回值
     */
    void saveCourse(CourseInfoVo courseInfoVo);
}
EduCourseServiceImpl 实现类:
@Service
public class EduCourseServiceImpl extends ServiceImpl<EduCourseMapper, EduCourse>
implements EduCourseService {
@Autowired
private EduCourseDescriptionService eduCourseDescriptionService;
/**
*
* @param courseInfoVo 封装前端传过来的课程信息
*/
@Override
public void saveCourse(CourseInfoVo courseInfoVo) {
EduCourse eduCourse = new EduCourse();
// 1. 保存课程信息到数据库
BeanUtils.copyProperties(courseInfoVo, eduCourse);
// 保存失败跑一个异常
if (!this.save(eduCourse)) {
throw new GuliException(20001, "保存失败");
}
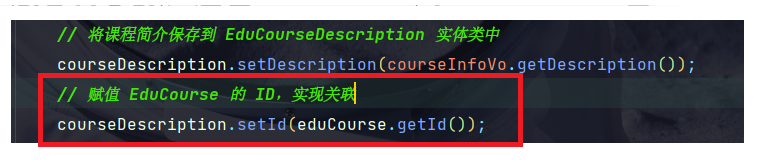
// 2. 保存课程简介到数据库
EduCourseDescription courseDescription = new EduCourseDescription();
// 将课程简介保存到 EduCourseDescription 实体类中
courseDescription.setDescription(courseInfoVo.getDescription());
eduCourseDescriptionService.save(courseDescription);
}
}
- controller 层
@Api("课程管理")
@RestController
@RequestMapping("/eduservice/course")
@CrossOrigin
public class EduCourseController {

    @Autowired
    private EduCourseServiceImpl eduCourseService;


    @ApiOperation("增加课程信息")
    @PostMapping("addCourse")
    private R addCourse(@RequestBody CourseInfoVo courseInfoVo) {
        // 增加课程基本信息
        eduCourseService.saveCourse(courseInfoVo);
        return R.ok();
    }
}
测试:
在测试的时候可能会报有:xxxx 字段没有默认值 错误
俩种方法:
- 哪个字段没有默认值,就将哪个字段增加到 CourseInfoVo 实体类中
- 或者修改数据库表对应的字段为 非空
到这里还有一个小问题,edu_course 和 edu_course_description 是一对一关系,通过 id 关联,也就是说对应的关系 ID 值应该是一样的,目前并没有实现这种关联
解决方法:
- 修改 edu_course_description 实体类中的 id 字段为 INPUT 模式
- 修改 service 实现层,赋值 ID
- 测试成功


2.增加课程 – 前端
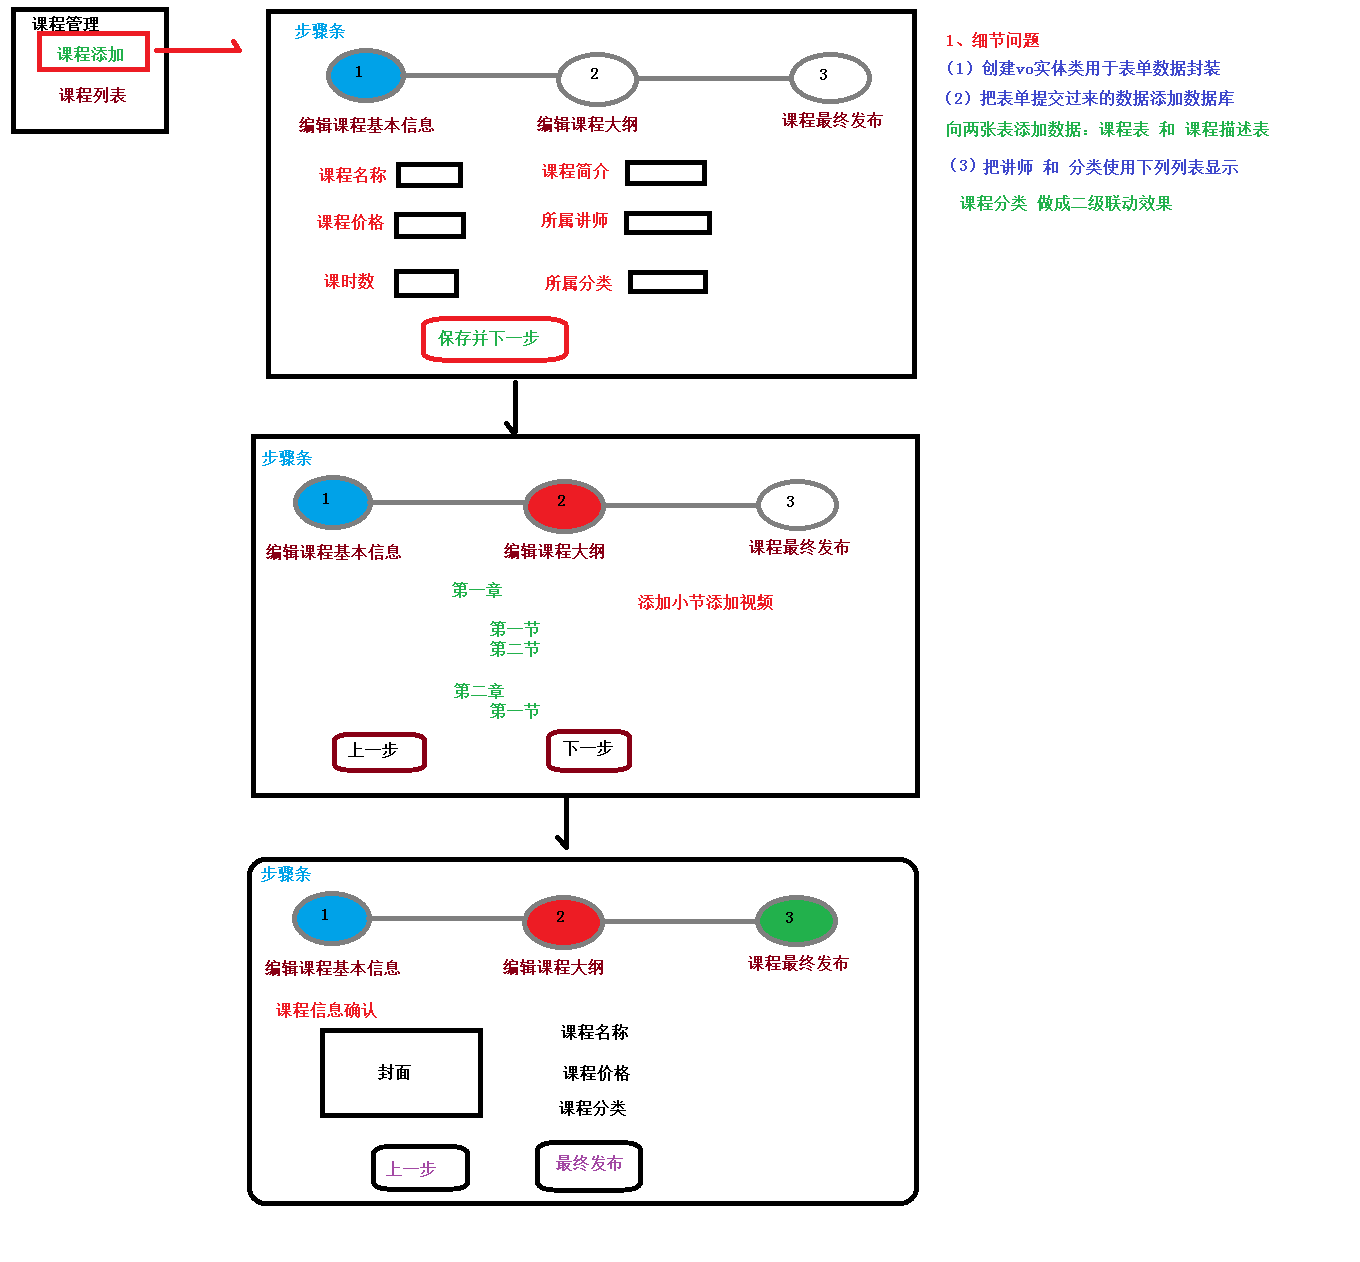
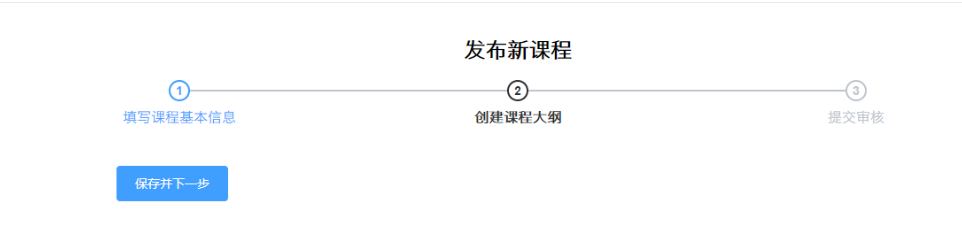
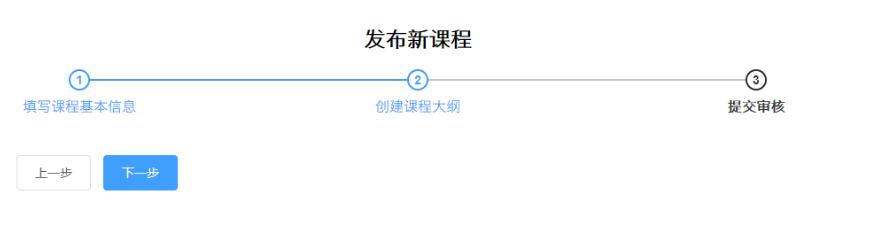
首先点击添加课程后,首先跳转到
编辑课程基本信息界面
点击保存并下一步,跳转到
创建课程大纲
最终提交审核并
发布课程
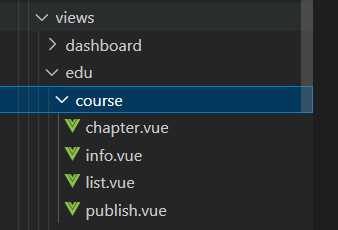
因此在 增加课程中,需要 三个 vue 页面,对应三步,另外还有一个 list.vue 课程列表页面。一个四个
- 在 /src/router/index.js 中增加路由
//  课程管理路由
  {
    path: '/course',
    component: Layout,
    redirect: '/course/list',
    name: '课程管理',
    meta: { title: '课程管理', icon: 'example' },
    children: [
      {
        path: 'list',
        name: '课程列表',
        component: () => import('@/views/edu/course/list'),
        meta: { title: '课程列表', icon: 'table' }
      },
      {
        path: 'info',
        name: '增加课程',
        component: () => import('@/views/edu/course/info'),
        meta: { title: '增加课程', icon: 'tree' }
      },
      {
        // 编辑课程基本信息
        path: 'info/:id',
        name: 'EduCourseInfoEdit',
        component: () => import('@/views/edu/course/info'),
        meta: { title: '编辑课程基本信息', noCache: true },
        hidden: true
      },
      {
        //  课程大纲
        path: 'chapter/:id',
        name: 'EduCourseChapterEdit',
        component: () => import('@/views/edu/course/chapter'),
        meta: { title: '编辑课程大纲', noCache: true },
        hidden: true
      },
      {
        // 最终发布
        path: 'publish/:id',
        name: 'EduCoursePublishEdit',
        component: () => import('@/views/edu/course/publish'),
        meta: { title: '发布课程', noCache: true },
        hidden: true
      }
    ]
  },
:id 表示路由跳转时携带的参数
步骤条的搭建:
- 在 /src/views/edu/course/ 下 创建对应的 vue 页面
- 编辑课程基本信息页面模板
- 步骤条使用 Element-UI 提供的
<template>

  <div class="app-container">

    <h2 style="text-align: center;">发布新课程</h2>

    <el-steps :active="1" process-status="wait" align-center style="margin-bottom: 40px;">
      <el-step title="编辑课程基本信息"/>
      <el-step title="创建课程大纲"/>
      <el-step title="最终发布"/>
    </el-steps>

    <el-form label-width="120px">

      <el-form-item>
        <el-button :disabled="saveBtnDisabled" type="primary" @click="next">保存并下一步</el-button>
      </el-form-item>
    </el-form>
  </div>
</template>
JS 代码:
<script>
export default {
  data() {
    return {
      saveBtnDisabled: false // 保存按钮是否禁用
    }
  },

  created() {

  },

  methods: {

    next() {

    //   跳转到课程大纲页面
      this.$router.push({ path: ' /edu/edu/course/chapter/1' })
    }
  }
}
</script>
- 课程大纲页面
<template>

  <div class="app-container">

    <h2 style="text-align: center;">发布新课程</h2>

    <el-steps :active="2" process-status="wait" align-center style="margin-bottom: 40px;">
      <el-step title="编辑课程基本信息"/>
      <el-step title="创建课程大纲"/>
      <el-step title="最终发布"/>
    </el-steps>

    <el-form label-width="120px">

      <el-form-item>
        <el-button @click="previous">上一步</el-button>
        <el-button :disabled="saveBtnDisabled" type="primary" @click="next">下一步</el-button>
      </el-form-item>
    </el-form>
  </div>
</template>
Js 代码:
<script>

export default {
  data() {
    return {
      saveBtnDisabled: false // 保存按钮是否禁用
    }
  },

  created() {
  },

  methods: {
    // 上一步
    previous() {
      this.$router.push({ path: ' /edu/edu/course/info/1' })
    },
    // 下一步
    next() {
      this.$router.push({ path: ' /edu/edu/course/publish/1' })
    }
  }
}
</script>
- 发布课程页面
<template>
<div class="app-container">
<h2 style="text-align: center;">发布新课程</h2>
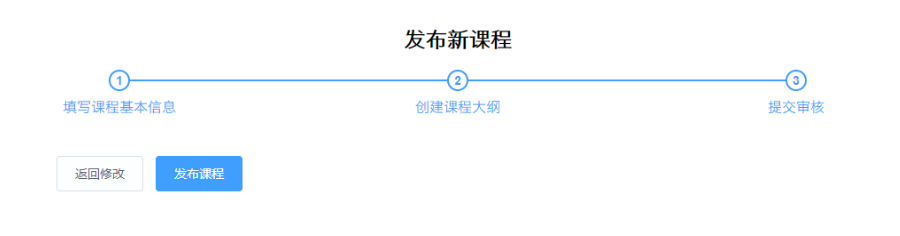
<el-steps :active="3" process-status="wait" align-center style="margin-bottom: 40px;">
<el-step title="编辑课程基本信息"/>
<el-step title="创建课程大纲"/>
<el-step title="最终"/>
</el-steps>
<el-form label-width="120px">
<el-form-item>
<el-button @click="previous">返回修改</el-button>
<el-button :disabled="saveBtnDisabled" type="primary" @click="publish">发布课程</el-button>
</el-form-item>
</el-form>
</div>
</template>
Js 代码:
<script>

export default {
  data() {
    return {
      saveBtnDisabled: false // 保存按钮是否禁用
    }
  },

  created() {
  },

  methods: {
    // 上一步
    previous() {
      this.$router.push({ path: ' /edu/course/chapter/1' })
    },
    // 发布
    publish() {
        //  跳转到课程列表
      this.$router.push({ path: ' /edu/course/list' })
    }
  }
}
</script>
最终效果:

增加课程基本信息完善一:
增加课程基本信息:
- 课程讲师使用下拉列表显示
- 课程分类使用 二级联动
- 在 /src/api/edu/ 下创建 course.js 文件,定义 api,访问接口方法
// request 封装了axios
import request from '@/utils/request'

// ES6 模块化
export default {
    // 1. 增加课程基本信息
    addCourseInfo(courseInfo) {
        return request({
            url: `eduservice/course/addCourse`,
            method: 'post',
            data: courseInfo
        })
    },
}
- 在 info.vue 页面,增加 编辑课程信息的 表单
    <!-- 编辑课程基本信息 -->
    <el-form label-width="120px">
      <el-form-item label="课程标题">
        <el-input
          v-model="courseInfo.title"
          placeholder=" 示例:机器学习项目课:从基础到搭建项目视频课程。专业名称注意大小写"
        />
      </el-form-item>

      <!-- 所属分类 TODO -->

      <!-- 课程讲师 TODO -->

      <!-- 总课时 -->
      <el-form-item label="总课时">
        <el-input-number
          :min="0"
          v-model="courseInfo.lessonNum"
          controls-position="right"
          placeholder="请填写课程的总课时数"
        />
      </el-form-item>

      <!-- 课程简介 TODO -->
      <el-form-item label="课程简介">
        <el-input v-model="courseInfo.description" placeholder="" />
      </el-form-item>
      <!-- 课程封面 TODO -->

      <el-form-item label="课程价格">
        <el-input-number
          :min="0"
          v-model="courseInfo.price"
          controls-position="right"
          placeholder="免费课程请设置为0元"
        />
        元
      </el-form-item>

      <el-form-item>
        <el-button :disabled="saveBtnDisabled" type="primary" @click="next"
          >保存并下一步</el-button
        >
      </el-form-item>
    </el-form>
TODO 表示 待改善 的意思。
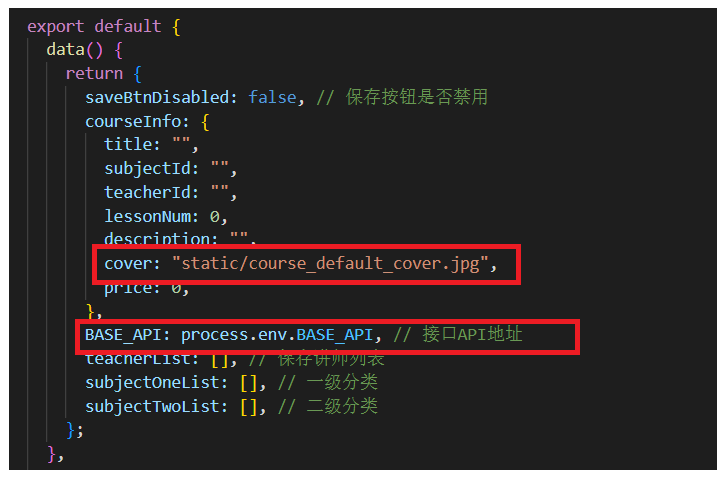
- data 中定义所提交的对象,以及调用 api 方法
<script>
import course from "@/api/edu/course";
export default {
  data() {
    return {
      saveBtnDisabled: false, // 保存按钮是否禁用
       // 对象里不写属性也可以,会自动创建
      courseInfo: {
        title: "",
        subjectId: "",
        teacherId: "",
        lessonNum: 0,
        description: "",
        cover: "",
        price: 0,
      },
    };
  },

  created() {},

  methods: {
    next() {
      // 调用接口方法
      course.addCourseInfo(this.courseInfo).then((response) => {
        // 提示信息
        this.$message({
          type: "success",
          message: "课程基本信息增加成功",
        });
        //   跳转到课程大纲页面
        this.$router.push({ path: "/course/chapter/" + response.data.courseId });
      });
    },
  },
};
</script>
- 修改 EduCourseController 中增加课程的返回值,让它返回 课程ID,方便后序修改以及确认。

增加课程基本信息完善二:
编辑课程信息页面,增加
课程讲师选项 :
- 在后端获取讲师列表
- 前端使用下拉列表选择讲师,依旧使用 Element—UI 组件
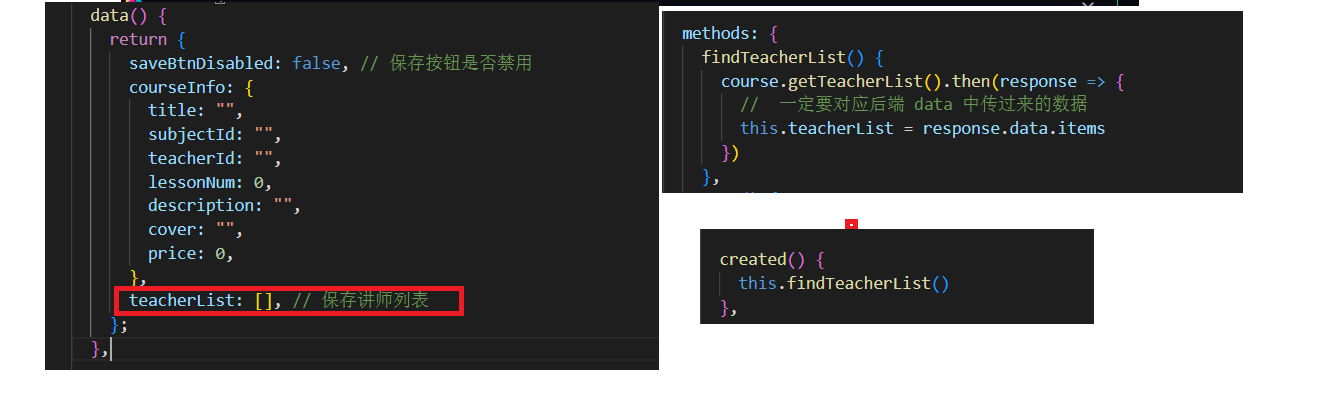
- info.vue 页面增加课程讲师下拉列表
      <!-- 课程讲师 TODO -->
      <el-form-item label="课程讲师">
        <el-select v-model="courseInfo.teacherId" placeholder="请选择">
          <el-option
            v-for="teacher in teacherList"
            :key="teacher.id"
            :label="teacher.name"
            :value="teacher.id"
          />
        </el-select>
      </el-form-item>
label : 标签文本
: 下拉选项,使用 v-for 遍历讲师列表
:value 绑定值,表单提交的值。
- course.js 中定义
查询所有讲师的 api , 访问 EduTeacherControler
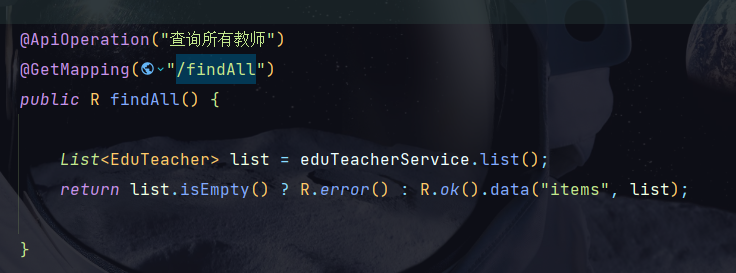
    getTeacherList() {
        return request({
            url: `eduservice/teacher/findAll`,
            method: 'get',
        })
    },
- info.vue 页面中调用 api ,data 中设置 teacherList

增加课程基本信息完善三:
增加课程信息的
所属分类使用二级联动的效果:
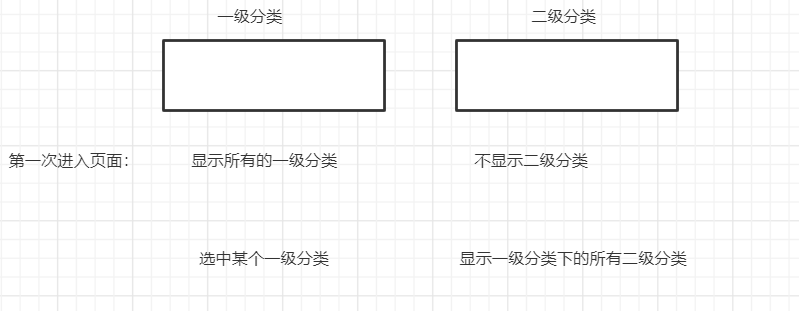
**显示一级分类:**和 显示 讲师列表一样。
- 由于 在 subject.js 中已经定义 查询课程分类的 api,因此无需在从 course.js 中在定义了,只需要在 info.vue 页面引入即可
- 一级分类下拉列表
      <!-- 所属分类 TODO -->
      <el-form-item label="课程分类">
        <el-select v-model="courseInfo.subjectParentId" placeholder="一级分类">
          <el-option
            v-for="subject in subjectOneList"
            :key="subject.id"
            :label="subject.title"
            :value="subject.id"
          />
        </el-select>
      </el-form-item>
-
data 中定义所需要的属性,调用 api 方法,引用 js
引入 subject.js api 文件

import subject from "@/api/edu/subject";
定义属性:
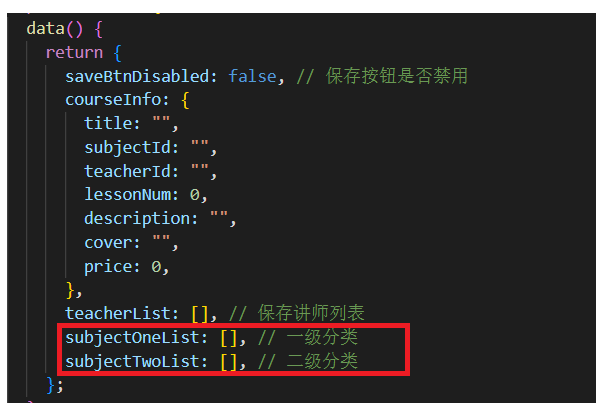
      subjectOneList: [], // 一级分类
      subjectTwoList: [], // 二级分类
调用 api 方法:
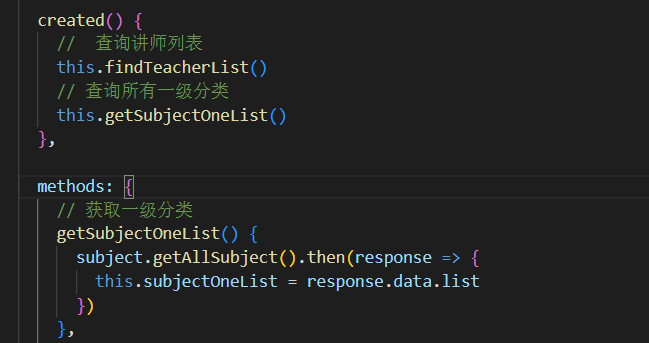
    // 获取一级分类
    getSubjectOneList() {
      subject.getAllSubject().then(response => {
        this.subjectOneList = response.data.list
      })
    },
    // 查询所有一级分类
    this.getSubjectOneList()
显示二级分类:
- 下拉列表
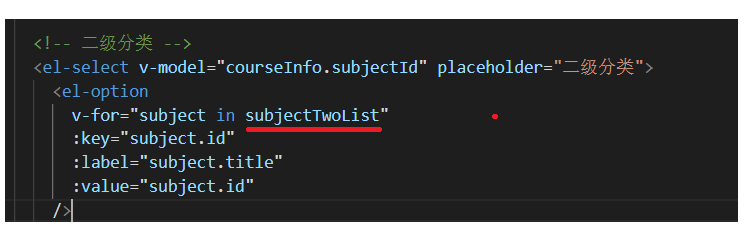
        <!-- 二级分类 -->
        <el-select v-model="courseInfo.subjectId" placeholder="二级分类">
          <el-option
            v-for="subject in subjectTwoList"
            :key="subject.id"
            :label="subject.title"
            :value="subject.id"
          />
        </el-select>
- 如果想让二级分类和一级分类进行联动显示,目前有俩个方法:
- 为 一级分类 绑定 change 时间,将 一级分类的 ID ,传到后端,后端定义一个方法根据 一级分类的 Id 查询二级分类并返回,但是这样太麻烦
- subjectOneList 中已经保存了所有的 一级分类,并且 children 里面保存了所有的二级分类,只需要 将选中的一级分类的 Id 和 subjectOneList 中一级分类的 ID 匹配上,然后将里面的 children 赋值给subjectTwoList 就 OK 了
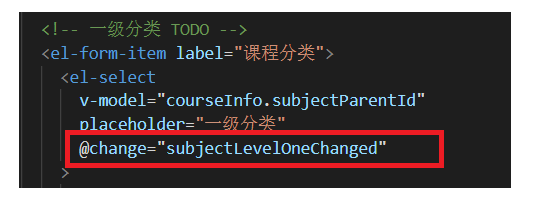
为一级分类绑上 change 事件
Js 代码:
    // value是一级分类的 Id
    subjectLevelOneChanged(value) {

      for(let i = 0; i< this.subjectOneList.length; i++){
        if (value == this.subjectOneList[i].id) {
           this.subjectTwoList = this.subjectOneList[i].children
           this.courseInfo.subjectId=''
        }
      }
    },
this.courseInfo.subjectId=‘’ : 表示每次选中不同的一级分类,都先将二级分类的选项清空。
注意:
在 data 中必须要有 subjectId,不然二级分类会选中不了
增加课程基本信息完善四:
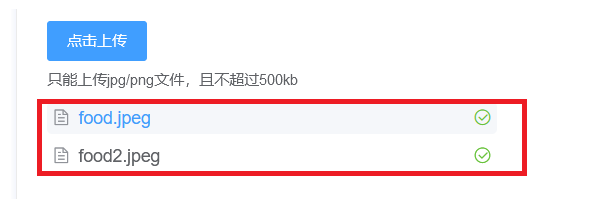
增加上传课程封面功能
- Element—UI 模板
      <!-- 课程封面 TODO -->
      <el-form-item label="课程封面">
        <el-upload
          :show-file-list="false"
          :on-success="handleAvatarSuccess"
          :before-upload="beforeAvatarUpload"
          :action="BASE_API + '/oss/file/upload'"
          class="avatar-uploader"
        >
        <!-- 默认图片 -->
          <img :src="courseInfo.cover" />
        </el-upload>
      </el-form-item>
show-file-list : 是否显示上传列表
on-success: 上传成功执行的方法
before-upload : 上传前执行的方法
- 修改 data 数据
- cover : 课程封面,设置默认图片,放在 static目录下
- 定义 handleAvatarSuccess、beforeAvatarUpload 方法
 // 上传成功
    handleAvatarSuccess(res) {
      this.courseInfo.cover = res.data.url;
    },
    // 上传之前
    beforeAvatarUpload(file) {
      // 对图片进行校验
      const isJPG = file.type === "image/jpeg";
      const isLt2M = file.size / 1024 / 1024 < 2;

      if (!isJPG) {
        this.$message.error("上传头像图片只能是 JPG 格式!");
      }
      if (!isLt2M) {
        this.$message.error("上传头像图片大小不能超过 2MB!");
      }
      return isJPG && isLt2M;
    },
增加课程基本信息完善五:
为 课程简介 增加 富文本编辑器
案列演示:https://panjiachen.gitee.io/vue-element-admin/#/example/create
- 复制 以下 俩个文件夹 到 本地项目中
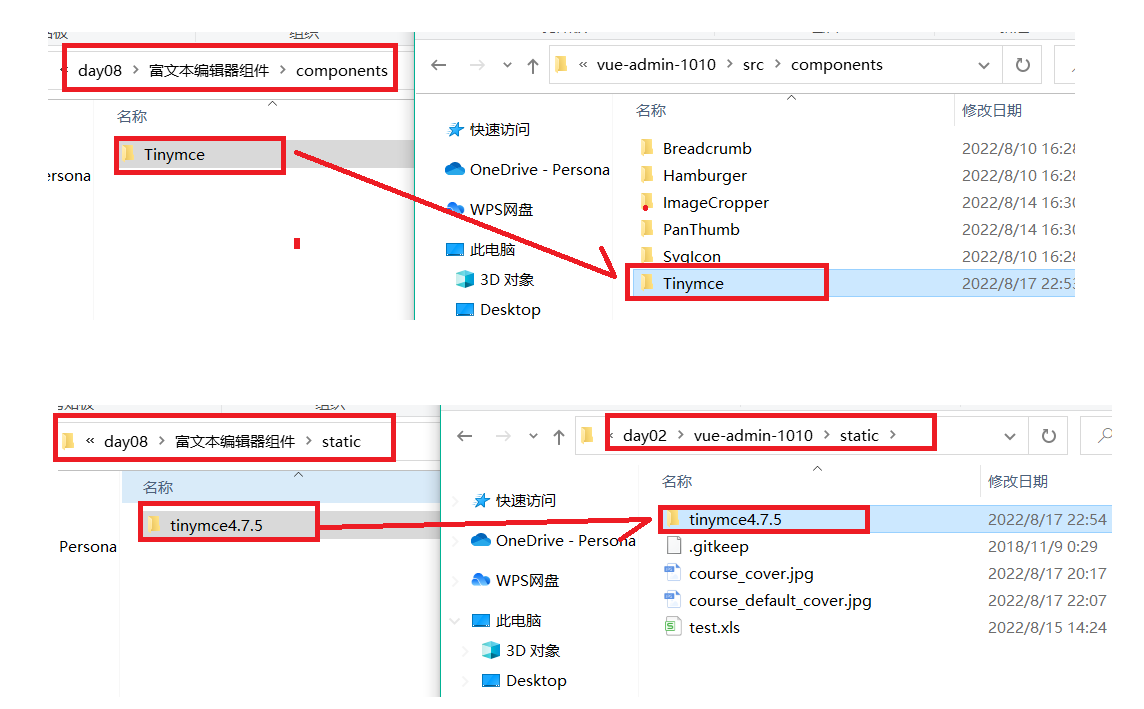
- 配置 HTML 变量
在 build/webpack.dev.conf.js 中添加配置
    templateParameters: {
        BASE_URL: config.dev.assetsPublicPath + config.dev.assetsSubDirectory
    }
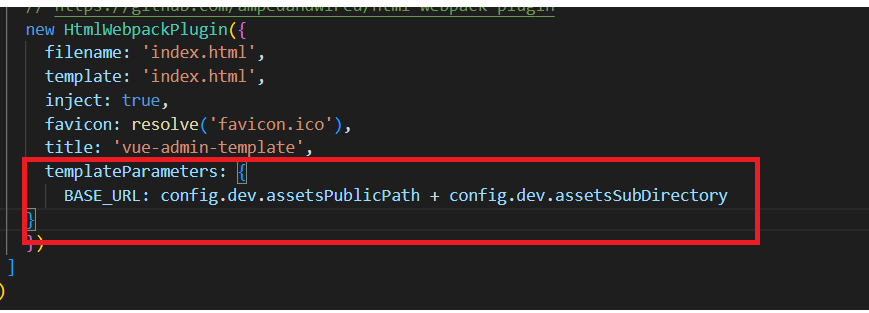
- 找到 index.html 页面引入 js 文件
<script src=<%= BASE_URL %>/tinymce4.7.5/tinymce.min.js></script>
<script src=<%= BASE_URL %>/tinymce4.7.5/langs/zh_CN.js></script>

这里会报红线,没有关系,可以使用
- 在 info.vue 页面引入Tinymce 组件,并注册
import Tinymce from '@/components/Tinymce'
export default {
  components: { Tinymce },
  ......
}
- 在 课程简介 处使用模板
<!-- 课程简介-->
<el-form-item label="课程简介">
    <tinymce :height="300" v-model="courseInfo.description"/>
</el-form-item>
编辑器样式:
<style scoped>
.tinymce-container {
  line-height: 29px;
}
</style>
如果编辑器是英文的,检查一下 在 index.html 中引入的 js 文件是否有空格
3.章节列表显示 – 后端
参考课程分类列表,和那个逻辑一致
- 每一个课程 包括 章节,每个章节里包括若干个小节
- 依旧封装成树形结构的数据
- 创建实体类 ChapterVo【保存章】、VideoVo【保存小节】
@Data
public class ChapterVo {

    private String id ;
    private String title ;

    // 每一章里保存若干个小节
    List<VideoVo> list = new ArrayList<>();
}
@Data
public class VideoVo {
    private String id ;
    private String title ;
}
- service 层封装成树形结构
  /**
     * TODO 查询某个课程的所有章节 和小节
     * @date 2022/8/18 13:14
     * @param courseId
     * @return java.util.List<com.atguigu.demo.entity.chapter.ChapterVo>
     */
    @Override
    public List<ChapterVo> getAllChapterVideo(String courseId) {
        // 1. 根据课程ID查询所有的章节
        QueryWrapper<EduChapter> chapterVoQueryWrapper = new QueryWrapper<>();
        chapterVoQueryWrapper.eq("course_id", courseId);
        List<EduChapter> eduChapters = baseMapper.selectList(chapterVoQueryWrapper);

        // 2. 根据课程 Id 查询所有的小节
        QueryWrapper<EduVideo> videoQueryWrapper = new QueryWrapper<>();
        videoQueryWrapper.eq("course_id", courseId);
        List<EduVideo> eduVideos = eduVideoMapper.selectList(videoQueryWrapper);

        // 保存树形结构的集合
        List<ChapterVo> finalList = new ArrayList<>();
        // 3. 封装章节
        for (EduChapter eduChapter : eduChapters) {
            ChapterVo chapterVo = new ChapterVo();
            // 遍历章节集合,把每yi章节都保存在 chapterVo 对象里
            BeanUtils.copyProperties(eduChapter,chapterVo);

            // 4。 封装小节
            for (EduVideo eduVideo : eduVideos) {
                // 判断该小节是否属于同一个章节
                if (eduVideo.getChapterId().equals(eduChapter.getId())){
                    VideoVo videoVo = new VideoVo();
                    // 将小节复制到  树形结构的实体类对象中
                    BeanUtils.copyProperties(eduVideo,videoVo);
                    // Chapter 中的 Children 集合是用来保存 小节信息的
                    chapterVo.getChildren().add(videoVo);
                }
            }
            // 增加每一章节到树形结构集合中
            finalList.add(chapterVo);
        }
        return finalList;
    }
- controller 层
    @ApiOperation("查询所有章节")
    @GetMapping("/getAllChapter/{courseId}")
    private R getAllChapterVideo(@PathVariable String courseId){

        // 章节适合课程相关联的,因此根据 课程 Id 查询所有的章节信息
        List<ChapterVo> list = chapterService.getAllChapterVideo(courseId);
        return R.ok().data("ChaptersAndVideos",list);
    }
4.章节列表显示 – 前端
- 在 /src/api/edu/ 创建 chapter.js,定义api,调用接口方法
// request 封装了axios
import request from '@/utils/request'

// ES6 模块化
export default {
    // 1. 增加课程基本信息
    getChaptersVideos(courseId) {
        return request({
            url: `eduservice/chapter/getAllChapter/` + courseId,
            method: 'get',
        })
    },
}
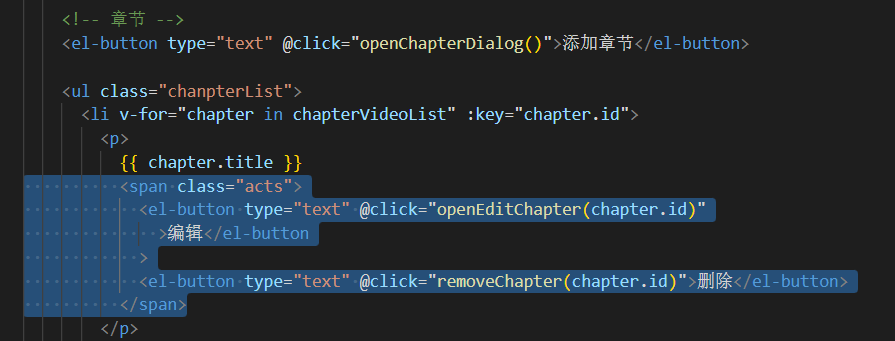
- chapter.vue 页面中,课程大纲列表模板
    <!-- 章节 -->
    <ul class="chanpterList">
      <li v-for="chapter in chapterVideoList" :key="chapter.id">
        <p>
          {{ chapter.title }}
        </p>

        <!-- 视频 -->
        <ul class="chanpterList videoList">
          <li v-for="video in chapter.children" :key="video.id">
            <p>{{ video.title }}</p>
          </li>
        </ul>
      </li>
    </ul>
    <div>
      <el-button @click="previous">上一步</el-button>
      <el-button :disabled="saveBtnDisabled" type="primary" @click="next"
        >下一步</el-button
      >
    </div>
样式:
<style scoped>
.chanpterList{
    position: relative;
    list-style: none;
    margin: 0;
    padding: 0;
}
.chanpterList li{
  position: relative;
}
.chanpterList p{
  float: left;
  font-size: 20px;
  margin: 10px 0;
  padding: 10px;
  height: 70px;
  line-height: 50px;
  width: 100%;
  border: 1px solid #DDD;
}
.chanpterList .acts {
    float: right;
    font-size: 14px;
}

.videoList{
  padding-left: 50px;
}
.videoList p{
  float: left;
  font-size: 14px;
  margin: 10px 0;
  padding: 10px;
  height: 50px;
  line-height: 30px;
  width: 100%;
  border: 1px dotted #DDD;
}

</style>
-
js 代码:
-
引入 chapter.js 文件
import chapter from "@/api/edu/chapter"; -
data中定义所需要的数据
chapterVideoList: [], // 保存章节小节 courseId: "", -
定义方法
// 获取所有章节小节 getAllChapter() { chapter.getChaptersVideos(this.courseId).then((response) => { this.chapterVideoList = response.data.ChaptersAndVideos; }); }, -
created 中执行方法,并获取 courseId 参数
  created() {
    //  获取地址栏上的 Id
    if (this.$route.params && this.$route.params.id) {
      this.courseId = this.$route.params.id;
      console.log(this.courseId);
      this.getAllChapter();
    }
  },
-
this.$route.params.id : 是获取路径地址栏中的 参数

5.修改课程信息 – 后端
点击
上一步返回到 编辑课程基本信息界面,数据回显,进行修改,保存到数据库
- 根据 courseId 查询课程基本信息
- 修改 课程基本信息
- service 层
接口:
    /**
     * TODO 根据 courseId 查询课程信息
     * @date 2022/8/18 17:30
     * @param courseId
     * @return com.atguigu.demo.entity.vo.CourseInfoVo
     */
    CourseInfoVo getCourseInfoById(String courseId);

    /**
     * TODO 修改课程信息
     * @date 2022/8/18 17:34
     * @param courseInfoVo
     * @return void
     */
    void updateCourse(CourseInfoVo courseInfoVo);
实现类:
    /**
     * TODO 根据 courseId 查询课程信息
     * @date 2022/8/18 17:32
     * @param courseId
     * @return com.atguigu.demo.entity.vo.CourseInfoVo
     */
    @Override
    public CourseInfoVo getCourseInfoById(String courseId) {
        CourseInfoVo courseInfoVo = new CourseInfoVo();
        // 1. 根据 courseId 查询课程信息
        EduCourse eduCourse = baseMapper.selectById(courseId);
        BeanUtils.copyProperties(eduCourse, courseInfoVo);

        // 2. 根据 courseId 查询课程简介
        EduCourseDescription eduCourseDescription = eduCourseDescriptionService.getById(courseId);
        // 判断一下简介是否为空
        String description = "";
        if (null == eduCourseDescription) {
            description = "无简介";
        }else{
            description = eduCourseDescription.getDescription();
        }
        courseInfoVo.setDescription(description);

        return courseInfoVo;
    }
    /**
     * TODO 修改课程信息
     * @date 2022/8/18 17:34
     * @param courseInfoVo
     * @return void
     */
    @Override
    public void updateCourse(CourseInfoVo courseInfoVo) {
        // 1.修改课程信息
        EduCourse eduCourse = new EduCourse();
        BeanUtils.copyProperties(courseInfoVo,eduCourse);
        int i = baseMapper.updateById(eduCourse);
        // 2. 修改课程简介
        EduCourseDescription description = new EduCourseDescription();
        description.setId(courseInfoVo.getId());
        description.setDescription(courseInfoVo.getDescription());
        boolean b = eduCourseDescriptionService.updateById(description);

        if (i == 0 || !b) {
            throw new GuliException(20001, "修改失败");
        }
    }
- controller 层
    @ApiOperation("根据courseId 查询课程信息")
    @GetMapping("getCourseInfoById/{courseId}")
    private R getCourseInfo(@PathVariable String courseId) {
        CourseInfoVo courseInfoVo = eduCourseService.getCourseInfoById(courseId);
        return R.ok().data("courseInfo",courseInfoVo);
    }

    @ApiOperation("修改课程信息")
    @PostMapping("updateCourse")
    private R getCourseInfo(@RequestBody CourseInfoVo courseInfoVo) {
         eduCourseService.updateCourse(courseInfoVo);
        return R.ok();
    }
6.修改课程信息 – 前端
回显数据:
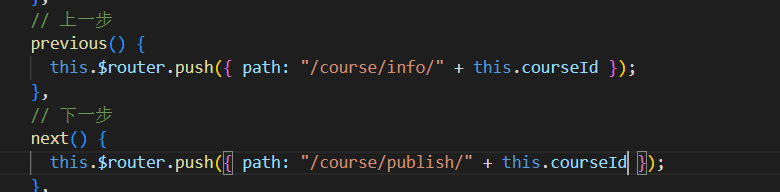
- 在 chapter .vue 中修改
上一步、下一步按钮,加上 courseId 参数
- 在 course.js 中定义 api
        // 2. 根据 courseid 查询课程信息
        getCourseInfoById(courseId) {
            return request({
                url: `eduservice/course/getCourseInfoById/` + courseId,
                method: 'get',
            })
        },
        // 3. 修改课程信息
        updateCourse(courseInfo) {
            return request({
                url: `eduservice/course/updateCourse/`,
                method: 'post',
                data: courseInfo,
            })
        },
- 在 info.vue 中获取 courseId 参数,并进行数据回显
首先提供 courseId 属性:
courseId: "", // 课程 Id
methods 中定义方法:
    // 回显课程信息
    getCourseInfoId() {
      course.getCourseInfoById(this.courseId).then((response) => {
        this.courseInfo = response.data.courseInfoVo;
      });
    },
created 中调用:
    // 获取 courseId
    if (this.$route.params && this.$route.params.id) {
      this.courseId = this.$route.params.id;
      this.getCourseInfoId();
    }
$route 和 $router 的区别:
$router为 VueRouter,实例,想要导航到不同URL,则使用$router.push方法。$route为当前router 跳转对象里面可以获取name.path.query.params等。
第一个问题:
测试中发现二级分类回显的并不是 title ,而是 Id,

因为在 数据回显时,subjectTwoList 数组中是 null 的,默认会显示 v-model 绑定的值,因此就会显示 二级分类到的 Id。
**解决方法:**修改 getCourseInfoId() 方法
courseInfo 里面保存了 subjectParentId【一级分类 ID】,可以在回显数据时 再次获取所有分类。
将 courseInfo 里面保存的 subjectParentId 和 查询出来的 一级分类 ID 作对比。
如果能匹配上,就将一级分类中的 children 集合 赋值给 subjectTwoList 。
    // 回显课程信息
    getCourseInfoId() {
      course.getCourseInfoById(this.courseId).then((response) => {
        this.courseInfo = response.data.courseInfoVo;
        subject.getAllSubject().then((response) => {
          // 获取所有一级分类
          this.subjectOneList = response.data.list;
          this.subjectOneList.forEach((element) => {
              // courseInfo  里面保存的 subjectParentId 和 查询出来的 一级分类 ID 作对比
            if (this.courseInfo.subjectParentId == element.id) {
              this.subjectTwoList = element.children;
            }
          });
        });
      });
    },
回显数据成功:

修改 created 方法:

将查询和 数据回显 分开来,参数带 ID 的是数据回显
第二个问题:
当我们 点击
上一步, 回显数据时,这个时候在去点击增加课程, 发现表单没有变化,正常应该是 点击 增加课程, 回显的数据应该清空。
这是因为 vue-router导航切换 时**,如果两个路由都渲染同个组件,组件会重(chong)用,**
组件的生命周期钩子(created)不会再被调用, 使得组件的一些数据无法根据 path的改变得到更新
因此:
1、我们可以在watch中监听路由的变化,当路由变化时,重新调用created中的内容
2、在init方法中我们判断路由的变化,如果是修改路由,则从api获取表单数据,
如果是新增路由,则重新初始化表单数据
- 增加 watch 监听器
  watch: {
    $route(to, from) {
      console.log("watch $route");
      this.init();
    },
  },
- 修改 created 方法
  created() {
    this.init()
  },
- 编写 init 方法,进行判断
    init() {
      if (this.$route.params && this.$route.params.id) {
          //判断路径有id值,做修改
          this.courseId = this.$route.params.id;
          this.getCourseInfoId();
          //  查询讲师列表
          this.findTeacherList();
        }else {
        //路径没有id值,做添加
        //清空表单
        this.courseInfo = {
          cover: "static/course_default_cover.jpg",
          subjectId: ''
        };
          //  查询讲师列表
          this.findTeacherList();
          // 查询所有一级分类
          this.getSubjectOneList();
      }
    },
千万不要把 courseInfo 中的数据都清空,都清空的话你会发现俩个问题:
- 上传头像时没有默认值
- 选不中二级分类
修改数据:
- 修改 info.vue
保存并下一步按钮
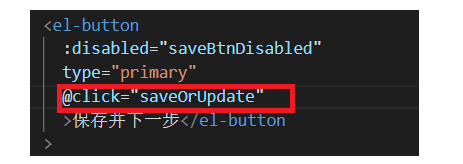
- 定义方法
    // 修改课程信息
    updateCourseInfo() {
      course.updateCourse(this.courseInfo).then((response) => {
        this.$message({
          type: "success",
          message: "课程基本信息修改成功",
        });
        //   跳转到课程大纲页面
        this.$router.push({
          path: "/course/chapter/" + this.courseId,
        });
      });
    },
- 判断 路径中有无参数,有参数是修改,没有参数是增加课程
    // 判断是修改还是增加
    saveOrUpdate() {
      if (this.$route.params.id) {
        this.updateCourseInfo();
      } else {
        this.addCourse();
      }
    },
7.章节管理【增删改】 – 后端
-
EduChaptercontroller 层
在删除章节时:如果该章节下有小节则不允许删除,如果没有则允许删除
    /**
     * TODO 增加章节
     * @date 2022/8/20 17:35
     * @param chapter
     * @return com.atguigu.commonutils.R
     */
    @ApiOperation("增加章节")
    @PostMapping("addChapter")
    private R addChapter(@RequestBody EduChapter chapter) {
        boolean save = chapterService.save(chapter);
        return save ? R.ok() : R.error();
    }

    /**
     * TODO 根据 ID 查询章节
     * @date 2022/8/20 17:39
     * @param id
     * @return com.atguigu.commonutils.R
     */
    @ApiOperation("根据Id查询章节")
    @GetMapping("/getChapterById/{id}")
    private R getChapterById(@PathVariable String id) {
        EduChapter chapter = chapterService.getById(id);
        return R.ok().data("chapter", chapter);
    }

    /**
     * TODO 修改章节
     * @date 2022/8/20 17:42
     * @param chapter
     * @return com.atguigu.commonutils.R
     */
    @ApiOperation("修改章节")
    @PostMapping("updateChapter")
    private R updateChapter(@RequestBody EduChapter chapter) {
        boolean b = chapterService.updateById(chapter);
        return b ? R.ok() : R.error();
    }

    /**
     * TODO 删除章节,若章节下有小节不允许删除
     * @date 2022/8/20 17:53
     * @param id
     * @return com.atguigu.commonutils.R
     */
    @ApiOperation("删除章节")
    @DeleteMapping("deleteChapter/{id}")
    private R deleteChapter(@PathVariable String id) {
        boolean result = chapterService.deleteChapter(id);
        return result ? R.ok() : R.error().message("删除失败");
    }
2、 EduChapterService 层
接口
    /**
     * TODO 删除章节
     * @date 2022/8/20 17:43
     * @param id
     * @return boolean
     */
    boolean deleteChapter(String id);
实现类:
    /**
     * TODO 删除章节
     * @date 2022/8/20 17:43
     * @param id
     * @return boolean
     */
    @Override
    public boolean deleteChapter(String id) {
        // 1.根据id查询章节所对应的小节
        QueryWrapper<EduVideo> videoQueryWrapper = new QueryWrapper<>();
        videoQueryWrapper.eq("chapter_id",id);
        Long count = eduVideoMapper.selectCount(videoQueryWrapper);
        // 2. 如果没有小节删除章节
        if (count == 0){
           return this.removeById(id);
        }else{
            throw new GuliException(20001,"请确保该章节下没有小节");
        }
8.章节管理【增删改】 – 前端
- 在 chapter.js 中定义 api
    // 2.增加章节
    addChapter(chapter) {
        return request({
            url: `eduservice/chapter/addChapter/`,
            method: 'post',
            data: chapter
        })
    },

    // 3.根据 id 查询章节
    getChapterbyId(chapterId) {
        return request({
            url: `eduservice/chapter/getChapterById/` + chapterId,
            method: 'get',
        })
    },

    // 4.修改章节
    updateChapter(chapter) {
        return request({
            url: `eduservice/chapter/updateChapter/`,
            method: 'post',
            data: chapter
        })
    },

    // 5.删除章节
    deleteChapter(id) {
        return request({
            url: `eduservice/chapter/deleteChapter/` + id,
            method: 'delete',
        })
    },
- 在 chapter.vue 页面增加
编辑、删除按钮
          <span class="acts">
            <el-button type="text" @click="openEditChapter(chapter.id)"
              >编辑</el-button
            >
            <el-button type="text" @click="removeChapter(chapter.id)">删除</el-button>
          </span>
- 使用 dialog 表单,进行增加、编辑表单
    <!-- 添加和修改章节表单 -->
    <el-dialog :visible.sync="dialogChapterFormVisible" title="章节信息" id="dialog">
      <el-form :model="chapter" label-width="120px">
        <el-form-item label="章节标题">
          <el-input v-model="chapter.title" />
        </el-form-item>
        <el-form-item label="章节排序">
          <el-input-number
            v-model="chapter.sort"
            :min="0"
            controls-position="right"
          />
        </el-form-item>
      </el-form>
      <div slot="footer" class="dialog-footer">
        <el-button @click="dialogChapterFormVisible = false">取 消</el-button>
        <el-button type="primary" @click="saveOrUpdate">确 定</el-button>
      </div>
    </el-dialog>
- methods 中调用 api 方法
    // ========================================================================= 删除章节
    removeChapter(chapterId) {
      this.$confirm("此操作将永久删除章节信息, 是否继续?", "提示", {
        confirmButtonText: "确定",
        cancelButtonText: "取消",
        type: "warning",
      })
        .then(() => {
          // 点击 确定 执行的方法
          chapter.deleteChapter(chapterId).then((response) => {
            // 删除成功的方法
            this.$message({
              type: "success",
              message: "删除成功!",
            });
        // 刷新页面
        this.getAllChapter();
          });
        })
        .catch(() => {
          // 点击 取消 执行方法
          this.$message({
            type: "info",
            message: "已取消删除",
          });
        });
    },
    // ========================================================================= x修改章节
    // 回显章节信息
    openEditChapter(chapterId) {
      // 打开对话框
      this.dialogChapterFormVisible = true;
      //  回显数据
      chapter.getChapterbyId(chapterId).then((response) => {
        this.chapter = response.data.chapter;
      });
    },
    // 修改章节
    EditChapter() {
      chapter.updateChapter(this.chapter).then((response) => {
        // 关闭对话框
        this.dialogChapterFormVisible = false;

        // 提示信息
        this.$message({
          type: "success",
          message: "修改章节成功!",
        });
        // 刷新页面
        this.getAllChapter();
      });
    },
    // ========================================================================= 增加章节
    openChapterDialog() {
      //  打开对话框
      this.dialogChapterFormVisible = true;
      // 每次打开对话框都清空表单
      this.chapter.title = "";
      this.chapter.sort = 0;
      this.chapter.id = "";
    },
    saveChapter() {
      this.chapter.courseId = this.courseId;
      chapter.addChapter(this.chapter).then((response) => {
        // 关闭对话框
        this.dialogChapterFormVisible = false;

        // 提示信息
        this.$message({
          type: "success",
          message: "增加章节成功!",
        });
        // 刷新页面
        this.getAllChapter();
      });
    },

    // 判断是修改还是增加
    saveOrUpdate() {
      if (!this.chapter.id) {
        this.saveChapter();
      } else {
        this.EditChapter();
      }
    },
在 增加章节 清空数据时,有一个细节:
就是每次打开对话框 都必须将 id 清空,
this.chapter.id = "";否则 在你增加之后,在修改,就一直是修改,增加无法用
9.小节管理【增删改】 – 后端
package com.atguigu.demo.controller;
import com.atguigu.commonutils.R;
import com.atguigu.demo.entity.EduVideo;
import com.atguigu.demo.service.EduVideoService;
import io.swagger.annotations.Api;
import io.swagger.annotations.ApiOperation;
import org.springframework.beans.factory.annotation.Autowired;
import org.springframework.web.bind.annotation.*;
/**
* Handsome Man.
* <p>
* Author: YZG
* Date: 2022/8/16 14:09
* Description:
*/
@Api("小节管理")
@RestController
@RequestMapping("/eduservice/video")
@CrossOrigin
public class EduVideoController {
@Autowired
private EduVideoService videoService;
@ApiOperation("增加小节")
@PostMapping("addVideo")
private R addVideo(@RequestBody EduVideo eduVideo) {
videoService.save(eduVideo);
return R.ok();
}
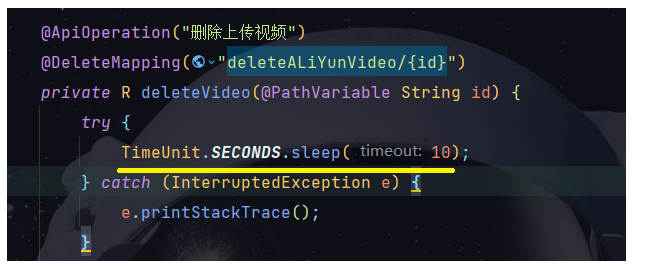
// TODO : 删除功能有待完善,后面小节下面有视频,删除小节同时删除视频
@ApiOperation("删除小节")
@DeleteMapping("deleteVideo/{id}")
private R deleteVideo(@PathVariable String id) {
videoService.removeById(id);
return R.ok();
}
@ApiOperation("根据 id 查询小节")
@GetMapping("getVideoById/id")
private R getVideoById(@PathVariable String id) {
EduVideo eduVideo = videoService.getById(id);
return R.ok().data("video",eduVideo);
}
@ApiOperation("修改小节")
@PostMapping("updateVideo")
private R getVideoById(@RequestBody EduVideo eduVideo) {
boolean update = videoService.updateById(eduVideo);
return update ? R.ok() : R.error().message("修改失败");
}
}
10.小节管理【增删改】 – 前端
(1)增加小节
- 增加
增加小节按钮
            <el-button type="text" @click="openVideo(chapter.id)"
              >添加小节</el-button
            >
- 增加 小节 的弹框
    <!-- 添加和修改小节表单 -->
    <el-dialog :visible.sync="dialogVideoFormVisible" title="添加课时">
      <el-form :model="video" label-width="120px">
        <el-form-item label="课时标题">
          <el-input v-model="video.title" />
        </el-form-item>
        <el-form-item label="课时排序">
          <el-input-number
            v-model="video.sort"
            :min="0"
            controls-position="right"
          />
        </el-form-item>
        <el-form-item label="是否免费">
          <el-radio-group v-model="video.free">
            <el-radio :label="true">免费</el-radio>
            <el-radio :label="false">默认</el-radio>
          </el-radio-group>
        </el-form-item>
        <el-form-item label="上传视频">
          <!-- TODO -->
        </el-form-item>
      </el-form>
      <div slot="footer" class="dialog-footer">
        <el-button @click="dialogVideoFormVisible = false">取 消</el-button>
        <el-button
          :disabled="saveVideoBtnDisabled"
          type="primary"
          @click="saveOrUpdateVideo"
          >确 定</el-button
        >
      </div>
    </el-dialog>
- data 中定义所需要的数据
     dialogVideoFormVisible: false, // 小节弹框
      saveVideoBtnDisabled: false,
      video: {
        // 保存小节信息
        title: "",
        sort: 0,
        free: 0,
        videoSourceId: "",
      },
- 创建 video.js ,定义 api 方法,并在 页面中 引入 该 js
    // 2.增加小节
    addVideo(video) {
        return request({
            url: `/eduservice/video/addVideo/`,
            method: 'post',
            data: video
        })
    },
import video from "@/api/edu/video";
-
methods 定义方法
打开弹窗的方法:
清空数据是为了防止打开对话框时,还显示上次增加小节的信息。
一定要 清空 id,
this.video.id = "",否则在修改过后,增加无效
    // 打开小节弹框
    openVideoDialog(chapterId) {
      this.dialogVideoFormVisible = true;
      // 清空一下数据
       this.video.title = "",
        this.video.sort = "",
        this.video.free = "",
        this.video.videoSourceId = "",
        // 一定要清一下 id ,。不然修改后,就一直是修改
        this.video.id = ""
          // 设置 chapterId
        this.video.chapterId = chapterId

    },
增加小节的方法:
    save() {
      video.addVideo(this.video).then((response) => {
        // 关闭对话框
        this.dialogVideoFormVisible = false;

        // 提示信息
        this.$message({
          type: "success",
          message: "增加小节成功!",
        });
        // 刷新页面
        this.getAllChapter();
      });
    },
    saveOrUpdateVideo() {
      this.save();
    },
(2)删除小节
- 增加
删除按钮
          <span class="acts">

            <el-button type="text" @click="removeVideo(video.id)"
              >删除</el-button
            >
          </span>
- video.js 中定义 api
    // 5.删除小节
    deleteVideo(id) {
        return request({
            url: `/eduservice/video/deleteVideo/` + id,
            method: 'delete',
        })
    },
- methods 中定义方法
    removeChapter(chapterId) {
      this.$confirm("此操作将永久删除章节信息, 是否继续?", "提示", {
        confirmButtonText: "确定",
        cancelButtonText: "取消",
        type: "warning",
      })
        .then(() => {
          // 点击 确定 执行的方法
          chapter.deleteChapter(chapterId).then((response) => {
            // 删除成功的方法
            this.$message({
              type: "success",
              message: "删除成功!",
            });
            // 刷新页面
            this.getAllChapter();
          });
        })
        .catch(() => {
          // 点击 取消 执行方法
          this.$message({
            type: "info",
            message: "已取消删除",
          });
        });
    },
(3)修改小节
- 在 video.js 中定义 api
    // 3.根据 id 查询小节
    getVideoById(videoId) {
        return request({
            url: `/eduservice/video/getVideoById/` + videoId,
            method: 'get',
        })
    },

    // 4.修改小节
    updateVideo(video) {
        return request({
            url: `/eduservice/video/updateVideo/`,
            method: 'post',
            data: video
        })
    },
- 增加
编辑按钮
              <span class="acts">
                <el-button type="text" @click="openEditVideo(video.id)"
                  >编辑</el-button
                >
- methods 中定义方法
    // 修改小节
    EditVideo() {
      video.updateVideo(this.video).then((response) => {

        // 关闭对话框
        this.dialogVideoFormVisible = false;

        // 提示信息
        this.$message({
          type: "success",
          message: "修改小节成功!",
        });
        // 刷新页面
        this.getAllChapter();
      });
    },
    // 回显数据
    openEditVideo(videoId) {
      // 打开对话框
      this.dialogVideoFormVisible = true;
      //  回显数据
      video.getVideoById(videoId).then((response) => {
        this.video = response.data.video;
      });
    },
- 区分,弹框是修改还是增加小节
- 修改:有id
- 增加 :没有 id
    // 区分增加还是修改
    saveOrUpdateVideo() {
      if (this.video.id) {
        this.EditVideo();
      } else {
        this.saveVideo();
      }
    },
11.课程消息确认 – 后端
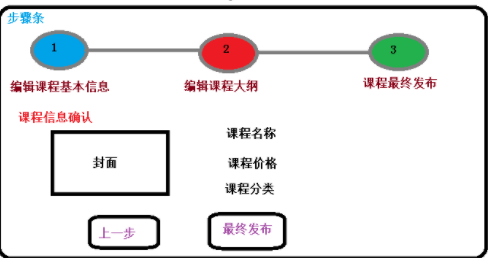
最终发布要查询多张表,因此一般使用 多表联查 【内连接,左外连接,右外连接】
最终查询语句:
SELECT ec.`id`,
	ec.`title`,
	ec.`cover`,
	ec.`price`,
	ec.`lesson_num` AS lessonNum,
	et.name AS teacherName,
	es1.title AS subjectLevelOne,
	es2.title AS subjectLevelTwo
FROM edu_course ec LEFT JOIN edu_course_description ecd ON ec.`id` = ecd.id
		   LEFT JOIN edu_teacher	et ON ec.`teacher_id` = et.id
		   LEFT JOIN edu_subject es1 ON ec.`subject_parent_id` = es1.id
		   LEFT JOIN edu_subject es2 ON ec.`subject_id` = es2.id
 WHERE ec.id='1561691342533349377'
- 创建 公共返回对象,封装 课程确认消息
@Data
public class CoursePublishVo {
    private String title;
    private String cover;
    private Integer lessonNum;
    private String subjectLevelOne;
    private String subjectLevelTwo;
    private String teacherName;
    private String price;//只用于显示
}
- EduCourseMapper 接口
    /**
     * TODO 发布课程消息确认
     * @date 2022/8/22 21:20
     * @param courseId
     * @return com.atguigu.demo.entity.vo.CoursePublishVo
     */
    CoursePublishVo getCoursePublishInfo(@Param("courseId") String courseId);
- mapper 文件
    <select id="getCoursePublishInfo" resultType="com.atguigu.demo.entity.vo.CoursePublishVo">
        SELECT ec.`id`,
               ec.`title`,
               ec.`cover`,
               ec.`price`,
               ec.`lesson_num` AS lessonNum,
               et.name         AS teacherName,
               es1.title       AS subjectLevelOne,
               es2.title       AS subjectLevelTwo
        FROM edu_course ec
                 LEFT JOIN edu_course_description ecd ON ec.`id` = ecd.id
                 LEFT JOIN edu_teacher et ON ec.`teacher_id` = et.id
                 LEFT JOIN edu_subject es1 ON ec.`subject_parent_id` = es1.id
                 LEFT JOIN edu_subject es2 ON ec.`subject_id` = es2.id
        WHERE ec.id = #{courseId}
    </select>
id : mapper 接口方法名
resultType :返回值类型全类名
- service 层
接口:
CoursePublishVo getPublishCourseInfo(String id);
实现类:
    @Override
    public CoursePublishVo getPublishCourseInfo(String id) {
        return baseMapper.getCoursePublishInfo(id);
    }
- controller 层
    @ApiOperation("课程消息确认")
    @GetMapping("getPublishCourseInfo/{id}")
    private R getPublishCourseInfo(@PathVariable String id) {
        CoursePublishVo vo = eduCourseService.getPublishCourseInfo(id);
        return R.ok().data("coursePublish",vo);
    }
11.课程消息确认-- 前端
从 chapter.vue 页面跳转时,确保将 courseId 传过来

- 在 course.js 中定义 api
        // 4. 课程发布确认
        getPublishCourseInfo(courseId) {
            return request({
                url: `eduservice/course/getPublishCourseInfo/` +  courseId,
                method: 'get',
            })
        },
- publish.vue 页面模板
<template>

  <div class="app-container">

    <h2 style="text-align: center;">发布新课程</h2>

    <el-steps :active="3" process-status="wait" align-center style="margin-bottom: 40px;">
      <el-step title="填写课程基本信息"/>
      <el-step title="创建课程大纲"/>
      <el-step title="发布课程"/>
    </el-steps>

    <div class="ccInfo">
      <img :src="coursePublish.cover">
      <div class="main">
        <h2>{{ coursePublish.title }}</h2>
        <p class="gray"><span>共{{ coursePublish.lessonNum }}课时</span></p>
        <p><span>所属分类:{{ coursePublish.subjectLevelOne }} — {{ coursePublish.subjectLevelTwo }}</span></p>
        <p>课程讲师:{{ coursePublish.teacherName }}</p>
        <h3 class="red">¥{{ coursePublish.price }}</h3>
      </div>
    </div>

    <div>
      <el-button @click="previous">返回修改</el-button>
      <el-button :disabled="saveBtnDisabled" type="primary" @click="publish">发布课程</el-button>
    </div>
  </div>
</template>
- 样式
<style scoped>
.ccInfo {
    background: #f5f5f5;
    padding: 20px;
    overflow: hidden;
    border: 1px dashed #DDD;
    margin-bottom: 40px;
    position: relative;
}
.ccInfo img {
    background: #d6d6d6;
    width: 500px;
    height: 278px;
    display: block;
    float: left;
    border: none;
}
.ccInfo .main {
    margin-left: 520px;
}

.ccInfo .main h2 {
    font-size: 28px;
    margin-bottom: 30px;
    line-height: 1;
    font-weight: normal;
}
.ccInfo .main p {
    margin-bottom: 10px;
    word-wrap: break-word;
    line-height: 24px;
    max-height: 48px;
    overflow: hidden;
}

.ccInfo .main p {
    margin-bottom: 10px;
    word-wrap: break-word;
    line-height: 24px;
    max-height: 48px;
    overflow: hidden;
}
.ccInfo .main h3 {
    left: 540px;
    bottom: 20px;
    line-height: 1;
    font-size: 28px;
    color: #d32f24;
    font-weight: normal;
    position: absolute;
}
</style>
- data中定义需要的数据
  data() {
    return {
      saveBtnDisabled: false, // 保存按钮是否禁用
      courseId: '',
      coursePublish: {}

    };
  },
- 获取路径中的 courseId
  created() {
    // 获取路径中的 id 参数
    if (this.$route.params && this.$route.params.id) {
      this.courseId = this.$route.params.id;
      this.getPublishCourseInfo();
    }
  },
- methods 中定义方法
    // 课程消息确认
    getPublishCourseInfo() {
      course.getPublishCourseInfo(this.courseId).then((response) => {
        this.coursePublish = response.data.coursePublish;
      });
    },
12.课程最终发布
在 edu_course 表中有一个 status 字段,该字段表示课程是否是发布状态
Normal : 表示发布状态
Draft : 表示未发布状态
课程最终发布只需要修改该字段啊即可

后端:
controller 层
    @ApiOperation("课程最终发布")
    @PostMapping("coursePublish/{courseId}")
    private R coursePublish(@PathVariable String courseId) {
        EduCourse eduCourse = new EduCourse();
        eduCourse.setId(courseId);
        // 设置发布状态
        eduCourse.setStatus("Normal");
        // 修改
        eduCourseService.updateById(eduCourse);
        return R.ok();
    }
前端:
- course.js 中定义 api
    // 5. 课程发布确认
    coursePublish() {
        return request({
            url: `eduservice/course/coursePublish/`,
            method: 'post',
        })
    },
- methods 中定义方法
    // 发布
    publish() {
      this.$confirm("确认发布此课程吗 ?", "提示", {
        confirmButtonText: "确定",
        cancelButtonText: "取消",
        type: "warning",
      })
        .then(() => {
          // 点击 确定 执行的方法
          course.coursePublish(this.courseId).then((response) => {
            // 删除成功的方法
            this.$message({
              type: "success",
              message: "发布成功!",
            });

            //  跳转到课程列表
            this.$router.push({ path: "/course/list" });
          });
        })
        .catch(() => {
          // 点击 取消 执行方法
          this.$message({
            type: "info",
            message: "已取消发布",
         });
        });
    },
13.课程列表 – 后端
页面的效果如下图:
- 条件查询课程信息带分页
- 编辑课程信息,编辑课程大纲,删除课程信息
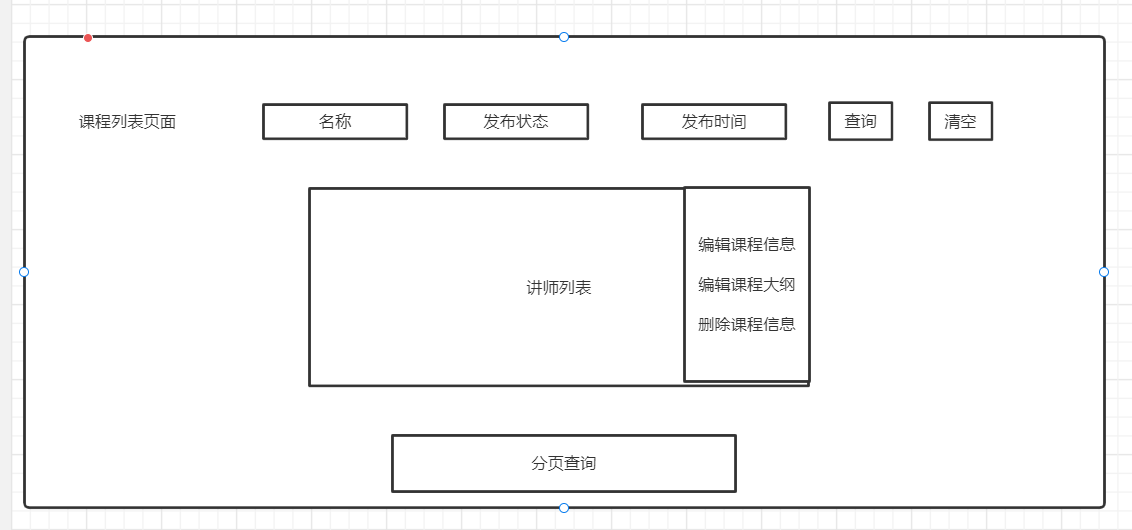
1.条件查询课程信息,带分页
- 将三个条件条件封装成对象,由前端传给 接口
@Data
public class CourseQuery {

    @ApiModelProperty(value = "课程名称")
    private String title;

    @ApiModelProperty(value = "课程发布状态")
    private String status;

    @ApiModelProperty(value = "课程发布时间")
    private String gmtCreate;

}
- controller 层
    /**
     * TODO 分页查询带条件
     * @date 2022/8/24 15:02
     * @param current 当前页
     * @param size 每页显示数据条数
     * @param courseQuery 查询条件
     * @return com.atguigu.commonutils.R
     */
    @ApiOperation("条件查询带分页")
    @PostMapping("pageQuery/{current}/{size}")
    private R pageQuery(@PathVariable(required = false) long current,
                        @PathVariable(required = false) long size,
                        @RequestBody(required = false) CourseQuery courseQuery) {

        Page<EduCourse> page = eduCourseService.pageQueryCourse(current,size,courseQuery);

        return R.ok().data("rows",page.getRecords()).data("total",page.getTotal());
    }
-
service 层
- 接口
Page<EduCourse> pageQueryCourse(long current, long size, CourseQuery courseQuery);- 实现类
    @Override
    public Page<EduCourse> pageQueryCourse(long current, long size, CourseQuery courseQuery) {

        Page<EduCourse> page = new Page<EduCourse>(current, size);
        QueryWrapper<EduCourse> queryWrapper = new QueryWrapper<>();
        // 取出查询条件
        String status = courseQuery.getStatus();
        String title = courseQuery.getTitle();
        String gmtCreate = courseQuery.getGmtCreate();
        // 开始组装条件
        // 如果 status != null , 就判断传过来的是 已发布 还是 未发布
        queryWrapper.like( null != status,"status",status)
                .like(null != title, "title", title)
                .ge(null != gmtCreate, "gmt_create", gmtCreate);
        this.page(page, queryWrapper);

        return page;
    }
2.删除课程
删除课程需要先 删除小节,章节,描述,最后删除课程信息
- controller 层
    @ApiOperation("删除课程信息")
    @DeleteMapping("deleteCourse/{courseId}")
    private R deleteCourse(@PathVariable String courseId){
        eduCourseService.deleteCourse(courseId);
        return  R.ok();
    }
-
service 层
- 接口
void deleteCourse(String courseId);- 实现类
    @Override
    public void deleteCourse(String courseId) {
        //1.删除小节
        QueryWrapper<EduVideo> videoQueryWrapper = new QueryWrapper<>();
        videoQueryWrapper.eq("course_id",courseId);
        eduVideoService.remove(videoQueryWrapper);
        //2.删除章节
        QueryWrapper<EduChapter> chapterQueryWrapper = new QueryWrapper<>();
        videoQueryWrapper.eq("course_id",courseId);
        eduChapterService.remove(chapterQueryWrapper);
        //3.删除描述信息
        eduCourseDescriptionService.removeById(courseId);
        //4.删除课程信息
        this.removeById(courseId);
    }
14.课程列表 – 前端
1.条件查询课程信息,带分页
- list.vue 页面模板
<template>
  <div class="app-container">
    <!--查询条件表单-->
    <el-form :inline="true" class="demo-form-inline">
      <el-form-item>
        <el-input v-model="courseQuery.title" placeholder="课程名称" />
      </el-form-item>

      <el-form-item>
        <el-select
          v-model="courseQuery.status"
          clearable
          placeholder="发布状态"
        >
          <el-option :value="'Normal'" label="已发布" />
          <el-option :value="'Draft'" label="未发布" />
        </el-select>
      </el-form-item>

      <el-form-item label="选择时间">
        <el-date-picker
          v-model="courseQuery.gmtCreate"
          type="datetime"
          placeholder="选择开始时间"
          value-format="yyyy-MM-dd HH:mm:ss"
          default-time="00:00:00"
        />
      </el-form-item>

      <el-button type="primary" icon="el-icon-search" @click="getList()"
        >查询</el-button
      >
      <el-button type="default" @click="resetData()">清空</el-button>
    </el-form>
    <!--查询条件表单结束-->

    <!-- 讲师列表表格 -->
    <el-table :data="list" border fit highlight-current-row>
      <el-table-column label="序号" width="70" align="center" >
        <template slot-scope="scope">
          <!-- 计算序号的一个公式 -->
          {{ (current - 1) * limit + scope.$index + 1 }}
        </template>
      </el-table-column>

      <el-table-column prop="title" label="课程名称" width="300" />

      <el-table-column label="发布状态" width="80">
        <!-- 用于判断的一种方法,== 判断值,=== 判断值和类型 -->
        <template slot-scope="scope">
          {{ scope.row.status === "Normal" ? "已发布" : "未发布" }}
        </template>
      </el-table-column>

      <el-table-column prop="lessonNum" label="课时数" width="50" />

      <el-table-column prop="gmtCreate" label="发布时间" width="160" />

      <el-table-column prop="viewCount" label="浏览数量" width="60" />

      <el-table-column label="操作" align="center">
        <template slot-scope="scope">
          <el-button
            type="primary"
            size="mini"
            icon="el-icon-edit"
            @click="open(scope.row.id)"
            >编辑课程信息</el-button
          >

          <el-button
            type="primary"
            size="mini"
            icon="el-icon-edit"
            @click="open(scope.row.id)"
            >编辑课程大纲</el-button
          >

          <el-button
            type="danger"
            size="mini"
            icon="el-icon-delete"
            @click="removeDataById(scope.row.id)"
            >删除课程信息</el-button
          >
        </template>
      </el-table-column>
    </el-table>
    <!-- 讲师列表表格结束 -->

    <!-- 分页 -->
    <!-- Element-ui 会自动将这些值封装 -->
    <el-pagination
      :current-page="current"
      :page-size="limit"
      :total="total"
      style="padding: 30px 0; text-align: center"
      layout="total, prev, pager, next, jumper"
      @current-change="getList"
    />
  </div>
</template>
一个小坑:
在我调用methods方法时【该方法调用了 api 的方法】,如果方法名不加上 () 就会报跨域请求错误,调用别的方法没有问题。

- js 代码
<script>
import course from "@/api/edu/course";
export default {
  data() {
    return {
      total: 0,
      current: 1,
      limit: 10,
      courseQuery: {
      },
      list: null,
    };
  },
  created() {
    this.getList()
  },
  methods: {
    // 查询讲师列表
    getList(current = 1) {
      course.pageQuery(current,this.limit,this.courseQuery).then((response) => {
        this.list = response.data.rows;
        this.total = response.data.total
      });
    },
    //  清空查询条件
    resetData() {
        this.courseQuery = {}
        this.getList()
    },
  },
};
</script>
current =1 参数的作用 :是为了点击分页的时候能够将 当前页 传过去,否则就一直在第一页。
2、删除课程
删除按钮:
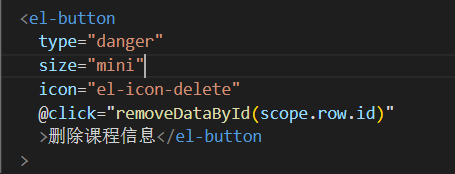
- 在 course.js 中定义 api 方法
    // 7. 删除课程信息
    deleteCourse(courseId) {
        return request({
            url: `eduservice/course/deleteCourse/` + courseId,
            method: 'delete',
        })
    },
}
- methods 中定义方法
 removeDataById(id) {
      this.$confirm("此操作将永久删除课程信息, 是否继续?", "提示", {
        confirmButtonText: "确定",
        cancelButtonText: "取消",
        type: "warning",
      })
        .then(() => {
          // 点击 确定 执行的方法
          course.deleteCourse(id).then((response) => {
            // 删除成功的方法
            this.$message({
              type: "success",
              message: "删除成功!",
            });
            // 刷新
            this.getList();
          });
        })
        .catch(() => {
          // 点击 取消 执行方法
          this.$message({
            type: "info",
            message: "已取消删除",
          });
        });
    },
3.编辑课程基本,编辑课程大纲
编辑按钮:

点击 编辑课程信息 跳转到 /course/info 页面
点击 编辑课程大纲 跳转到 /course/chapter 页面
methods中定义方法:
    // 编辑课程信息
    editCourseInfo(id) {
      this.$router.push({ path: "/course/info/" + id });
    },
    //  编辑课程大纲
    editCourseChapter(id) {
      this.$router.push({ path: "/course/chapter/" + id });
    },
八、阿里云视频点播
视频点播(ApsaraVideo VoD,简称VoD)是集视频采集、编辑、上传、媒体资源管理、自动化转码处理(窄带高清TM)、视频审核分析、分发加速于一体的一站式音视频点播解决方案。
开通视频点播服务
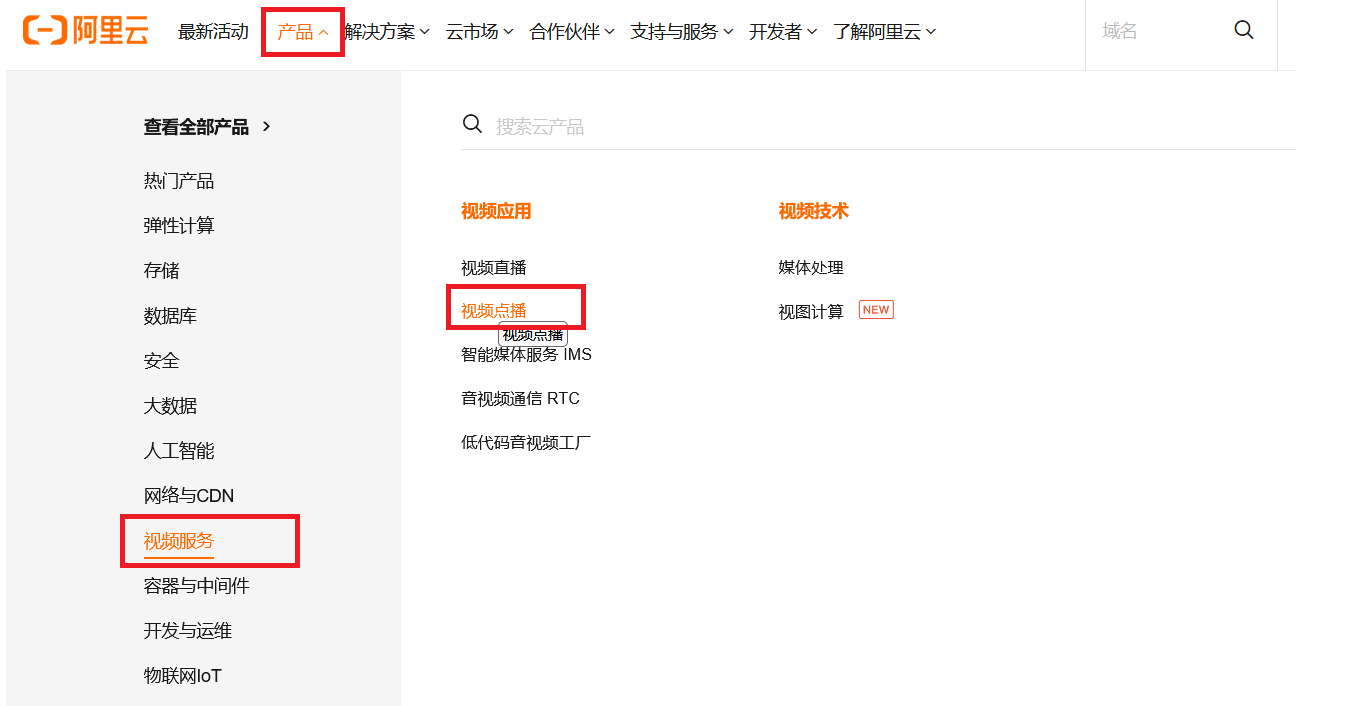
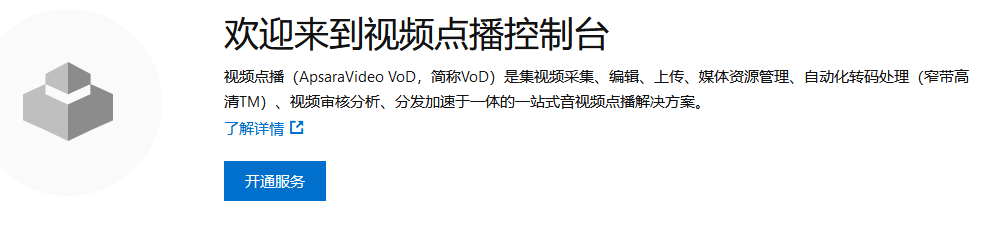
1.管理控制台的使用
- 开启存储管理:
开启成功后,会获得一个存储地址,上传的视频都会存储到这个地址中

- 分类管理
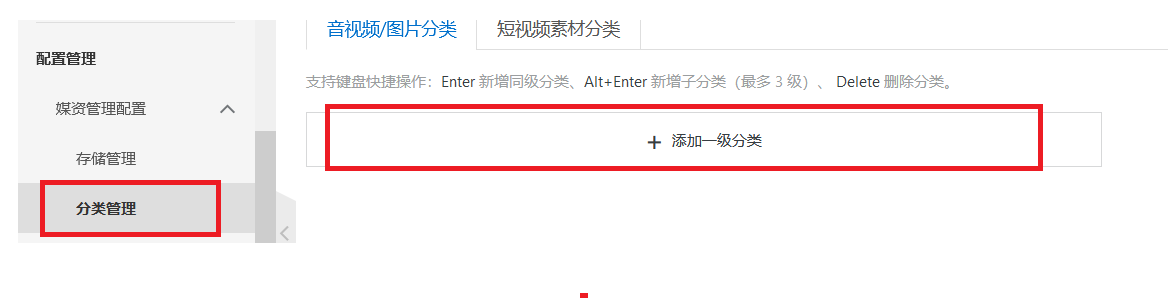
- 创建转码模板
可对上传的视频进行转码处理。切换清晰度,帧率 等等
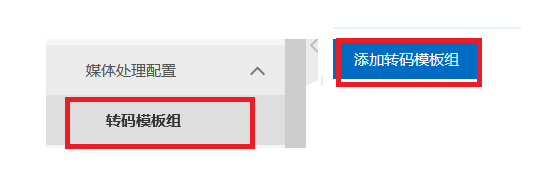
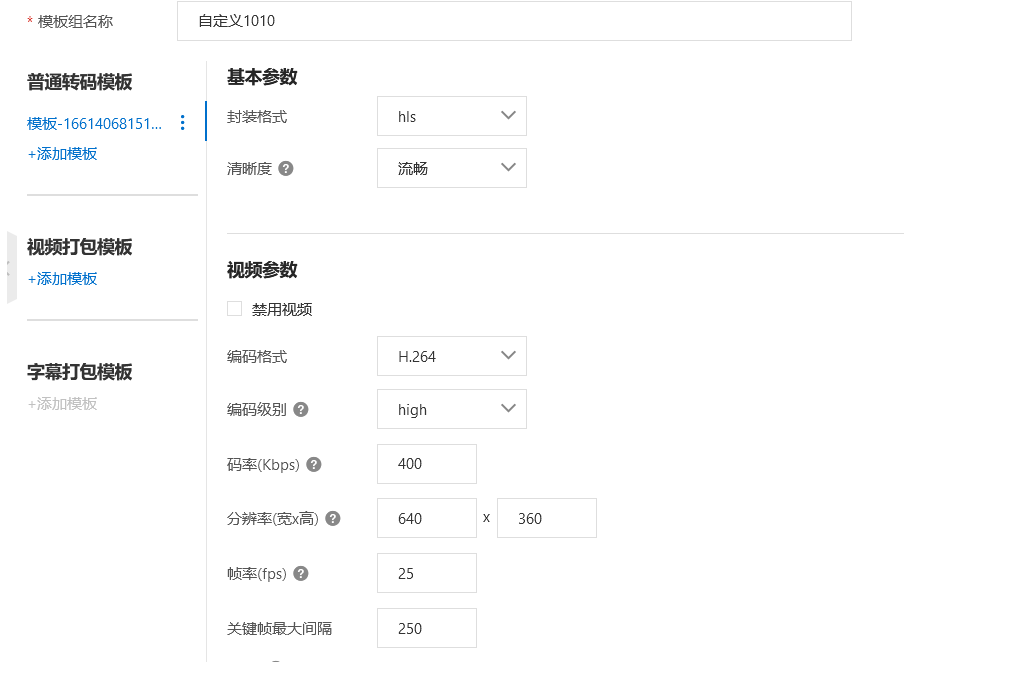
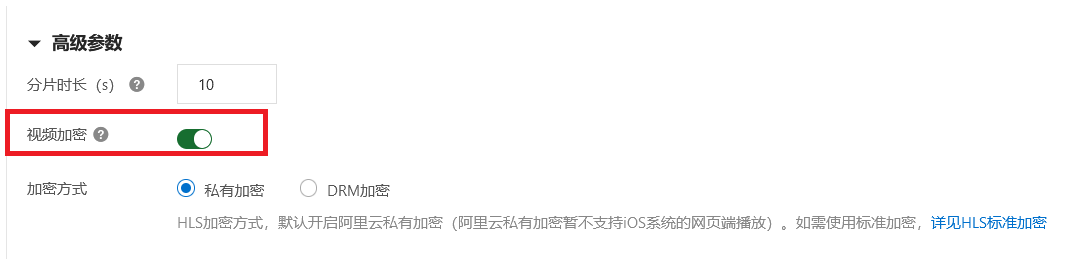
进行视频加密,加密过后就无法通过 视频地址播放视频,并且,点播加密视频需要增加域名
- 上传视频:
上传的视频地址已加密
2.演示视频点播服务
服务端 Api :阿里云提供固定的地址,只需要调用这个地址,向地址传递参数,实现功能
服务端 SDK :sdk 对 api 方式的封装,更方便使用
阿里云提供的 服务端SDK文档:https://help.aliyun.com/document_detail/57756.html
音视频播放分为三步:
由于视频可以进行加密,加密之后视频地址不能进行视频播放,因此需要将
视频 id存入数据库中,通过视频iD,可以获得到视频播放地址以及视频播放凭证对应 edu_video 表中的
字段
- 获取视频播放地址
- 获取视频播放凭证
- 可以播放加密视频
- 上传 到阿里云点播服务
实例演示:
- 新建模块:
service_vod模块 - 引入 pom 文件
  <dependencies>
        <dependency>
            <groupId>com.aliyun</groupId>
            <artifactId>aliyun-java-sdk-core</artifactId>
        </dependency>
        <dependency>
            <groupId>com.aliyun.oss</groupId>
            <artifactId>aliyun-sdk-oss</artifactId>
        </dependency>
        <dependency>
            <groupId>com.aliyun</groupId>
            <artifactId>aliyun-java-sdk-vod</artifactId>
        </dependency>
        <dependency>
            <groupId>com.aliyun</groupId>
            <artifactId>aliyun-sdk-vod-upload</artifactId>
        </dependency>
        <dependency>
            <groupId>com.alibaba</groupId>
            <artifactId>fastjson</artifactId>
        </dependency>
        <dependency>
            <groupId>org.json</groupId>
            <artifactId>json</artifactId>
        </dependency>
        <dependency>
            <groupId>com.google.code.gson</groupId>
            <artifactId>gson</artifactId>
        </dependency>

        <dependency>
            <groupId>joda-time</groupId>
            <artifactId>joda-time</artifactId>
        </dependency>
    </dependencies>
- 通过 Accesskey 初始化,Accesskey 可在 oss 管理控制台中查看
//填入AccessKey信息
public static DefaultAcsClient initVodClient(String accessKeyId, String accessKeySecret) throws ClientException {
    String regionId = "cn-shanghai";  // 点播服务接入地域
    DefaultProfile profile = DefaultProfile.getProfile(regionId, accessKeyId, accessKeySecret);
    DefaultAcsClient client = new DefaultAcsClient(profile);
    return client;
}
- 获取视频播放地址
public class VodTest {
    public static void main(String[] args) throws ClientException {
        // 1.创建初始化对象
        DefaultAcsClient client = InitObject.initVodClient("accessKeyId", "accessKeySecret");
        // 2. 创建 request 对象
        GetPlayInfoRequest request = new GetPlayInfoRequest();

        // 3.视频Id
        request.setVideoId("视频id");

        // 4. 获取响应信息,response 里面保存了视频的相关信息
        GetPlayInfoResponse response = client.getAcsResponse(request);
        // 5. 获取视频相关信息集合
        List<GetPlayInfoResponse.PlayInfo> playInfoList = response.getPlayInfoList();
        for (GetPlayInfoResponse.PlayInfo playInfo : playInfoList) {
            // 获取视频播放地址
            System.out.println("获取视频地址:" +playInfo.getPlayURL());
        }
        // 获取视频名字
        System.out.println("获取视频名字:" +response.getVideoBase().getTitle());

    }
}

- 获取视频播放凭证
由于现在视频大多数都处于加密的,获取普通播放地址无法播放,因此需要获取视频播放凭证,无论是加密还是不加密都可以播放
public class VodTest {
    public static void main(String[] args) throws ClientException {

        // 1. 创建初始化对象
        DefaultAcsClient client = InitObject.initVodClient(" your accessKeySecret", " your accessKeySecret");
        //    2. 获取 request 对象
        GetVideoPlayAuthRequest request = new GetVideoPlayAuthRequest();
        //    3. 设置视频 ID
        request.setVideoId("视频id");
        //   4. 获取响应信息 response
        GetVideoPlayAuthResponse response = client.getAcsResponse(request);
        // 获取视频播放凭证
        System.out.println("获取视频播放凭证: " + response.getPlayAuth());

    }
注意:
获取视频播放地址的 request,response 对象是: GetPlayInfoRequest、GetPlayInfoResponse
获取视频播放凭证的 request,response 对象是:GetVideoPlayAuthRequest、GetVideoPlayAuthResponse
3.演示上传视频服务
本地上传服务:
 public  void testUploadVideo() {
        // AccessKey 秘钥
        String accessKeyId = "your accessKeyId";
        String accessKeySecret = "your accessKeySecret";
        // 上传之后的视频名
        String title = "事件修饰符演示.mp4";
        // 本地视频路径
        String fileName = "C:/谷粒学苑演示视频/事件修饰符演示.mp4";
        UploadVideoRequest request = new UploadVideoRequest(accessKeyId, accessKeySecret, title, fileName);
        /* 可指定分片上传时每个分片的大小,默认为2M字节 */
        request.setPartSize(2 * 1024 * 1024L);
        /* 可指定分片上传时的并发线程数,默认为1,(注:该配置会占用服务器CPU资源,需根据服务器情况指定)*/
        request.setTaskNum(1);

        UploadVideoImpl uploader = new UploadVideoImpl();
        UploadVideoResponse response = uploader.uploadVideo(request);

        System.out.print("RequestId=" + response.getRequestId() + "\n");  //请求视频点播服务的请求ID
        if (response.isSuccess()) {
            System.out.print("VideoId=" + response.getVideoId() + "\n");
        } else {
            /* 如果设置回调URL无效,不影响视频上传,可以返回VideoId同时会返回错误码。其他情况上传失败时,VideoId为空,此时需要根据返回错误码分析具体错误原因 */
            System.out.print("VideoId=" + response.getVideoId() + "\n");
            System.out.print("ErrorCode=" + response.getCode() + "\n");
            System.out.print("ErrorMessage=" + response.getMessage() + "\n");
        }
    }
测试之后发现报 NoClassDefFoundError 类找不到错误,代码没问题,说明 依赖的版本肯定有问题。
因此按照官方提供的依赖版本重新引入依赖:
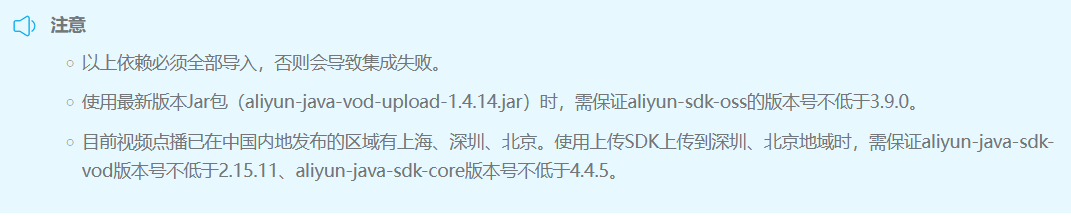
   <dependency>
        <groupId>com.aliyun</groupId>
        <artifactId>aliyun-java-sdk-core</artifactId>
        <version>4.5.1</version>
    </dependency>
    <dependency>
        <groupId>com.aliyun.oss</groupId>
        <artifactId>aliyun-sdk-oss</artifactId>
        <version>3.10.2</version>
    </dependency>
     <dependency>
        <groupId>com.aliyun</groupId>
        <artifactId>aliyun-java-sdk-vod</artifactId>
        <version>2.15.11</version>
    </dependency>
    <dependency>
        <groupId>com.alibaba</groupId>
        <artifactId>fastjson</artifactId>
        <version>1.2.28</version>
    </dependency>
    <dependency>
        <groupId>org.json</groupId>
        <artifactId>json</artifactId>
        <version>20170516</version>
    </dependency>
    <dependency>
        <groupId>com.google.code.gson</groupId>
        <artifactId>gson</artifactId>
        <version>2.8.2</version>
    </dependency>
    <dependency>
        <groupId>com.aliyun.vod</groupId>
        <artifactId>upload</artifactId>
        <version>1.4.14</version>
    </dependency>
其中 upload 依赖并没有开源,需要手动下载 jar 包
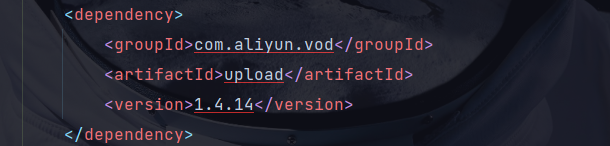
下载地址:
https://alivc-demo-cms.alicdn.com/versionProduct/sourceCode/upload/java/VODUploadDemo-java-1.4.14.zip?spm=a2c4g.11186623.0.0.437b4150lWuykZ&file=VODUploadDemo-java-1.4.14.zip
下载之后解压,在 lib 目录下 打开 cmd 命令行输入以下命令安装 依赖到本地仓库:
mvn install:install-file -DgroupId=com.aliyun.vod -DartifactId=upload -Dversion=1.4.14 -Dpackaging=jar -Dfile=aliyun-java-vod-upload-1.4.14.jar
刷新一下maven工程,成功解决。
测试上传视频成功:

4.小节上传视频 – 后端
service_vod 模块:
配置文件:
# 服务端口
server.port=8003
# 服务名
spring.application.name=service-vod

# 环境设置:dev、test、prod
spring.profiles.active=dev

#阿里云 vod
#不同的服务器,地址不同
aliyun.vod.file.keyid=youraccessKeyId
aliyun.vod.file.keysecret=your accessKeySecret

# 最大上传单个文件大小:默认1M
spring.servlet.multipart.max-file-size=1024MB
# 最大置总上传的数据大小 :默认10M
spring.servlet.multipart.max-request-size=1024MB
启动类:
@SpringBootApplication(exclude = {DataSourceAutoConfiguration.class})
@ComponentScan("com.atguigu")
public class VodMainApplication {
 public static void main(String[] args) {
     SpringApplication.run(VodMainApplication.class,args);
 }
}
目录结构:
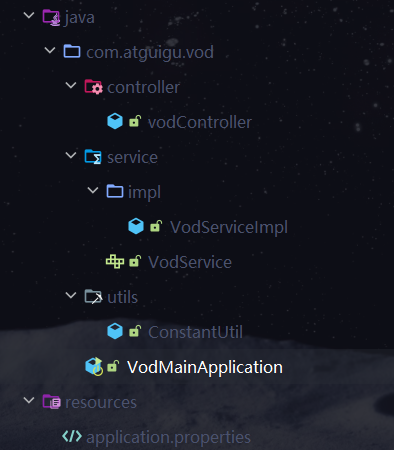
-
增加常量类,获取到配置文件中的 AccessKey 秘钥
@Component public class ConstantUtil implements InitializingBean { @Value("${aliyun.vod.file.keyid}") private String keyId; @Value("${aliyun.vod.file.keysecret}") private String keySecret; public static String ACCESS_KEY_ID; public static String ACCESS_KEY_SECRET; // 该方法会在 变量获取到值之后执行 @Override public void afterPropertiesSet() throws Exception { ACCESS_KEY_ID = keyId; ACCESS_KEY_SECRET = keySecret; } }- ccontroller 层
@RestController @CrossOrigin @RequestMapping("vodservice/vod") public class vodController { @Autowired VodService vodService; @ApiOperation("视频上传") @PostMapping("uploadVideo") private R uploadVideo(MultipartFile file) { // 返回上传视频的 Id String videoId = vodService.uploadVideo(file); return R.ok().data("videoId",videoId); } }-
service 层
- 接口
String uploadVideo(MultipartFile file);- 实现类
- 实现视频上传,使用的是流上传方式
    @Override
    public String uploadVideo(MultipartFile file) {
        // 获取 AccessKey
        String accessKeyId = ConstantUtil.ACCESS_KEY_ID;
        String accessKeySecret = ConstantUtil.ACCESS_KEY_SECRET;
        // 视频的初始名字
        String fileName = file.getOriginalFilename();
        assert fileName != null;
        // 视频上传后的名字
        // 只保留视频名前缀
        String title = fileName.substring(0, fileName.lastIndexOf("."));
        // 获取视频输入流
        InputStream inputStream = null;
        try {
            inputStream = file.getInputStream();
            UploadStreamRequest request = new UploadStreamRequest(accessKeyId, accessKeySecret, title, fileName, inputStream);
            UploadVideoImpl uploader = new UploadVideoImpl();
            UploadStreamResponse response = uploader.uploadStream(request);
            // 视频 ID
            String VideoId = null;
            if (response.isSuccess()) {
                VideoId = response.getVideoId();
            } else {
                //如果设置回调URL无效,不影响视频上传,可以返回VideoId同时会返回错误码。其他情况上传失败时,VideoId为空,此时需要根据返回错误码分析具体错误原因
                VideoId = response.getVideoId();
                System.out.print("ErrorCode=" + response.getCode() + "\n");
                System.out.print("ErrorMessage=" + response.getMessage() + "\n");
            }
            return VideoId;
        } catch (IOException e) {
            e.printStackTrace();
            return null;
        }
    }
5.小节上传视频 – 前端
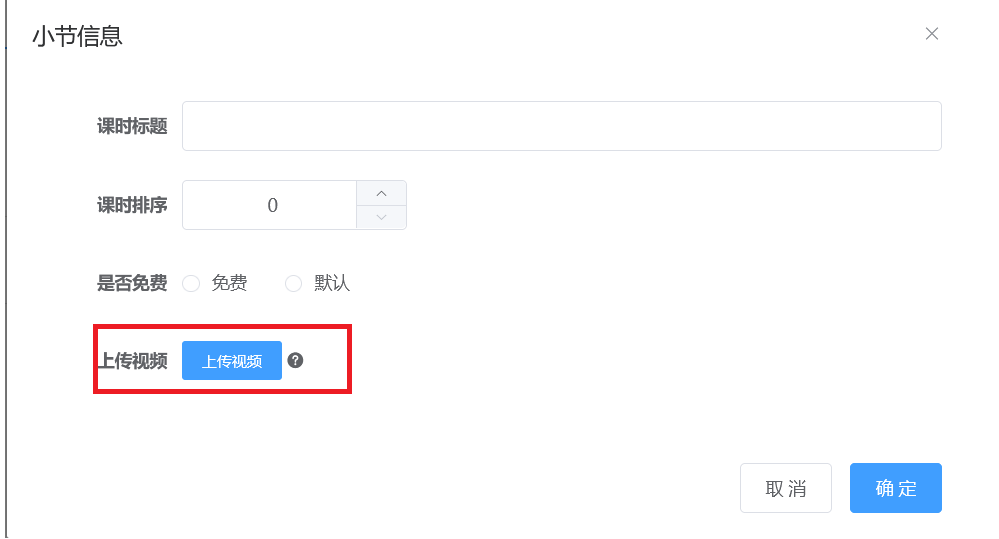
- 上传视频模板
        <!-- 上传视频 -->
        <el-form-item label="上传视频">
          <el-upload
            :on-success="handleVodUploadSuccess"
            :on-remove="handleVodRemove"
            :before-remove="beforeVodRemove"
            :on-exceed="handleUploadExceed"
            :file-list="fileList"
            :action="BASE_API + '/vodservice/vod/uploadVideo'"
            :limit="1"
            class="upload-demo"
          >
            <el-button size="small" type="primary">上传视频</el-button>
            <el-tooltip placement="right-end">
              <div slot="content">
                最大支持1G,<br />
                支持3GP、ASF、AVI、DAT、DV、FLV、F4V、<br />
                GIF、M2T、M4V、MJ2、MJPEG、MKV、MOV、MP4、<br />
                MPE、MPG、MPEG、MTS、OGG、QT、RM、RMVB、<br />
                SWF、TS、VOB、WMV、WEBM 等视频格式上传
              </div>
              <i class="el-icon-question" />
            </el-tooltip>
          </el-upload>
        </el-form-item>
handleVodUploadSuccess : 上传成功执行的方法
handleUploadExceed : 上传之前执行的方法
handleVodRemove: 上传列表删除视频执行的方法
beforeVodRemove:上传列表删除视频之前执行的方法
fileList :上传列表
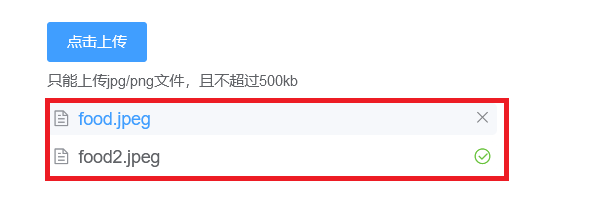
- data 中定义数据
      fileList: [], //上传文件列表
      BASE_API: process.env.BASE_API, // 接口API地址
- methods 方法定义
    // 上传视频成功执行的方法
    handleVodUploadSuccess(response,file) {
      this.video.videoSourceId = response.data.videoId;
      // file表示当时上传的文件,file.name 获取文件名字
      this.video.videoOriginalName = file.name;
    },
    // 上传视频之前执行的方法
    handleUploadExceed() {
      this.$message.warning("想要重新上传视频,请先删除已上传的视频");
    },
- 测试之前还需要重新配置 Nginx,因为增加了一个服务,需要增加一个 请求转发,并且 Nginx 中上传文件也是有限制的,如果超出文件限制浏览器会报错:
413 请求体太大
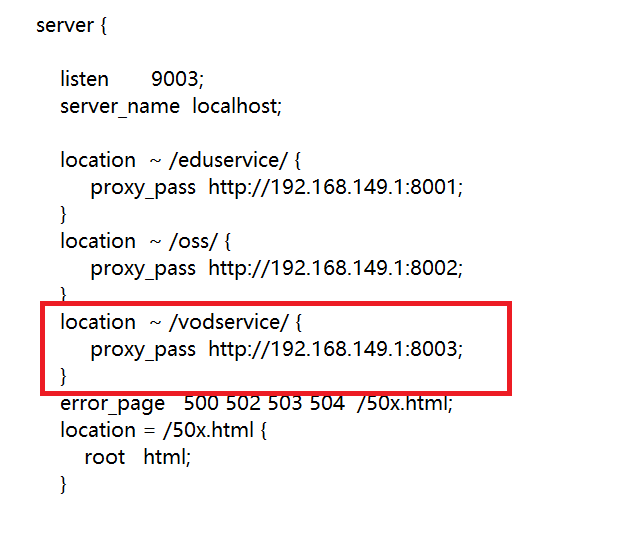
        location  ~ /vodservice/ {
             proxy_pass  http://192.168.149.1:8003;
        }
设置文件大小限制:
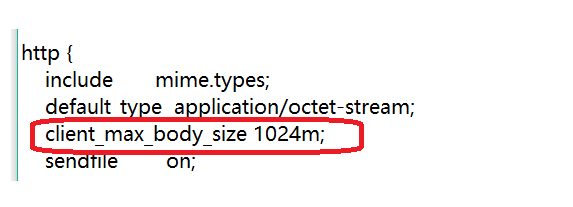
client_max_body_size 1024m;
重启服务:systemctl restart nginx
测试成功:
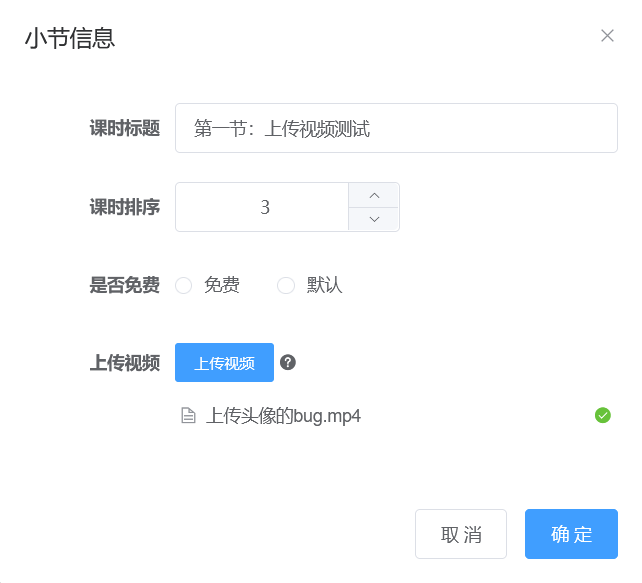
6.删除视频 – 后端
删除视频阿里云 帮助文档:https://help.aliyun.com/document_detail/61065.html
- 初始化 client
public class InitVodClient {
    //填入AccessKey信息
    public static DefaultAcsClient initVodClient(String accessKeyId, String accessKeySecret) throws ClientException {
        String regionId = "cn-shanghai";  // 点播服务接入地域
        DefaultProfile profile = DefaultProfile.getProfile(regionId, accessKeyId, accessKeySecret);
        DefaultAcsClient client = new DefaultAcsClient(profile);
        return client;
    }
}
- 使用 SDK 删除视频
    @ApiOperation("删除上传视频")
    @DeleteMapping("deleteALiYunVideo/{id}")
    private R deleteVideo(@PathVariable String id) {

        try {
            //    1.初始化 client对象
            DefaultAcsClient client = InitVodClient.initVodClient(ConstantUtil.ACCESS_KEY_ID, ConstantUtil.ACCESS_KEY_SECRET);
            //    2.c创建 request 对象
            DeleteVideoRequest request = new DeleteVideoRequest();
            request.setVideoIds(id);
            client.getAcsResponse(request);
            return R.ok();
        } catch (ClientException e) {
            e.printStackTrace();
            return R.error();
        }

    }
、
7.删除视频 – 前端
点击 × 删除上传的视频,并给出提示
handleVodRemove: 执行删除的方法
beforeVodRemove:点击 × 执行的方法

- api 中定义访问接口的路径
    // 6.删除视频
    deleteALiYunVideo(id) {
        return request({
            url: `/vodservice/vod/deleteALiYunVideo/` + id,
            method: 'delete',
        })
    },
- methods 中调用
    // 删除视频执行的方法
    handleVodRemove() {
      video.deleteALiYunVideo(this.video.videoSourceId).then((response) => {
        this.$message({
          type: "success",
          message: "删除视频成功!",
        });
        // 清空文件列表
        this.fileList = [];
        // 清空视频 id 和 视频名称
        this.video.videoSourceId = '';
        this.video.videoOriginalName = '';
      });
    },
    // 点击 × 执行 的方法
    beforeVodRemove(file) {
      return this.$confirm(`确定移除 ${file.name}?`);
    },
再删除视频时如果不把
视频 id和视频名称清空,删除视频的数据仍然会保存到数据库
九、微服务
Nacos安装以及 OpenFeign 的使用方法、流程:https://blog.csdn.net/aetawt/article/details/126568999
1.完善删除小节功能【OpenFeign + Nacos】
在 EduVideoController 中删除小节时,还有一个功能未完善,那就是
删除小节时同时删除视频而删除视频的 方法 在
service_vod模块中,这就涉及到了 服务之间的调用。服务之间的调用俩种方式: Ribbon、OpenFeign,我们采用 OpenFeign ,比 Ribbon 更方便,优雅…
大概流程:
- 将 service_vod 和 service_edu 俩个服务注册进 Nacos 注册中心
- 使用 OpenFeign 通过 Nacos 的服务名称实现调用的过程
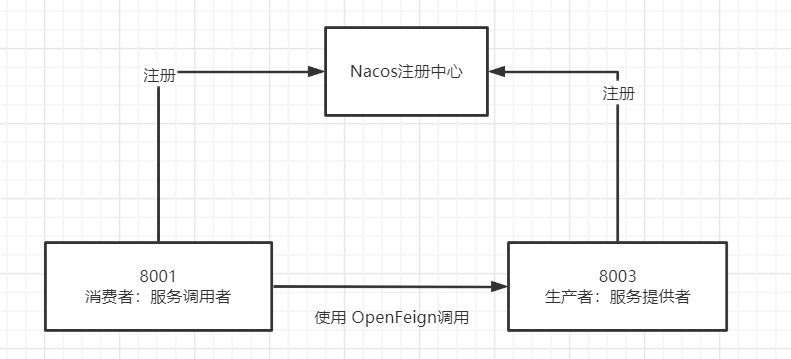
- 启动 Nacos,安装好后,bin目录下打开 cmd 命令行,输入以下命令
# 单机版,默认是集群版启动
startup.cmd -m standalone
- 访问:http://localhost:8848/nacos 默认用户名密码:nacos
1.将俩个服务注册到 Nacos 中:
- service 的 pom 中增加依赖
        <!--SpringCloud ailibaba nacos -->
        <dependency>
            <groupId>com.alibaba.cloud</groupId>
            <artifactId>spring-cloud-starter-alibaba-nacos-discovery</artifactId>
        </dependency>
-
启动类增加
@EnableDiscoveryClient -
配置类中增加配置
# 注册进nacos
spring.cloud.nacos.discovery.server-addr=localhost:8848
启动服务:

2.整合 OpenFeign,实现远程调用:
- service 的 pom 中增加依赖
        <dependency>
            <groupId>org.springframework.cloud</groupId>
            <artifactId>spring-cloud-starter-openfeign</artifactId>
        </dependency>
- 启动类上增加注解
@EnableFeignClients,开启 OpenFeign。 - 消费端,也就是 service_edu 模块中,增加 接口
@Component
// 服务提供者的服务名称
@FeignClient("service-vod")
public interface VodFeignService {

    // 向服务提供端发送请求
    @DeleteMapping("/vodservice/vod/deleteALiYunVideo/{id}")
     R deleteVideo(@PathVariable("id") String id);
}
- EduVideoController 实现远程调用
注入:
  @Autowired
    private VodFeignService vodFeignService;
    // 删除小节,同时删除 阿里云视频
    @ApiOperation("删除小节")
    @DeleteMapping("deleteVideo/{id}")
    private R deleteVideo(@PathVariable String id) {
        // 通过小节 Id ,获取视频 ID
        EduVideo video = videoService.getById(id);
        String videoSourceId = video.getVideoSourceId();
        if (!StringUtils.isEmpty(videoSourceId)){
            // 删除视频
            vodFeignService.deleteVideo(videoSourceId);
        }
        videoService.removeById(id);
        return R.ok();
    }
接口的要求:
- 增加
@Component注解,注册进 IOC 容器- 增加
@FeignClient注解,指定调用服务- 请求方式、路径、参数 一定要和 被调用方 保持一致
- 如果有路径参数 ,参数名称一定要指定。
@PathVariable("xxxx")
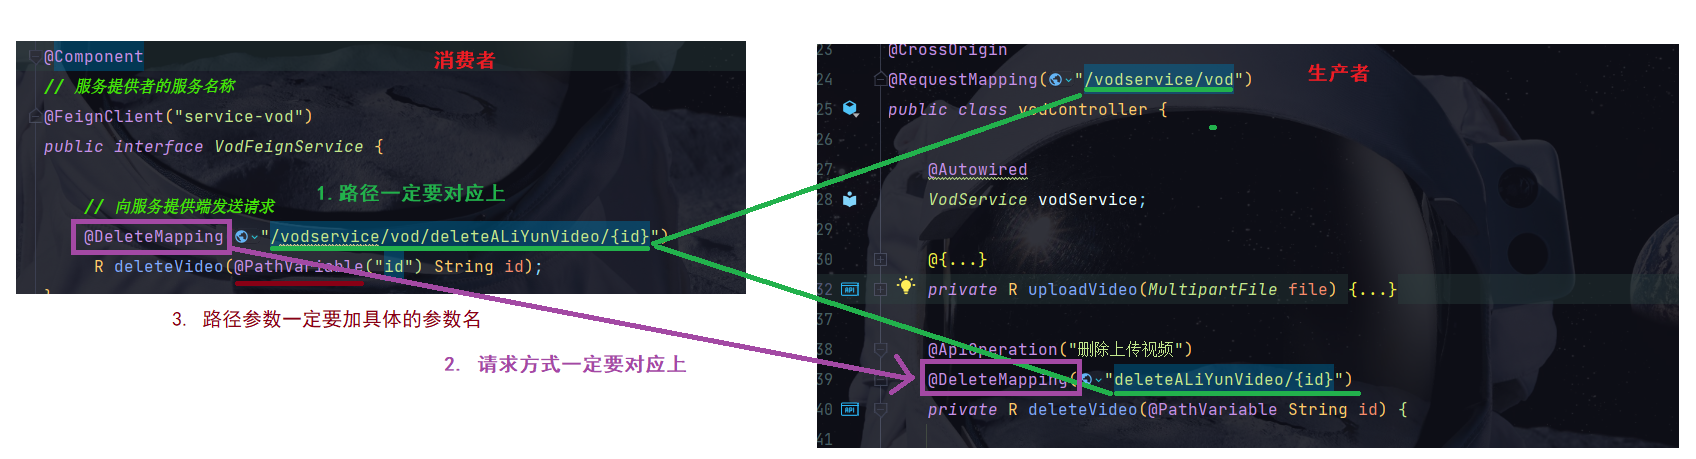
2.完善删除课程功能【OpenFeign + Nacos】
删除课程 和 删除小节 原理类似,只不过有一点:
课程中有多个章节,章节里又有小节,小节里又有视频。删除课程需要删除多个视频
- 在 服务端 VodController 中提供 批量删除视频的方法
    @ApiOperation("删除多个视频")
    @DeleteMapping("deleteBatch")
    private R deleteBatch(@RequestParam("videoIds") List<String> videoIds) {
        try {
            //    1.初始化 client对象
            DefaultAcsClient client = InitVodClient.initVodClient(ConstantUtil.ACCESS_KEY_ID, ConstantUtil.ACCESS_KEY_SECRET);
            //    2.c创建 request 对象
            DeleteVideoRequest request = new DeleteVideoRequest();

            // StringUtils 工具包是org.apache.commons.lang3包下的
            // join:将数组中的元素用指定的分隔符分开,返回一个字符串
            String ids = StringUtils.join(videoIds.toArray(), ",");
            // 可以删除多个视频,视频 Id 用 ,号隔开
            request.setVideoIds(ids);
            client.getAcsResponse(request);
            return R.ok();
        } catch (ClientException e) {
            e.printStackTrace();
            return R.error();
        }
    }
- 调用端 VodFeignService 接口中 向服务端 发送请求
    // 删除多个视频
    @DeleteMapping("/vodservice/vod/deleteBatch")
     R deleteBatch(@RequestParam("videoIds") List<String> videoIds) ;
- EduCourseServiceImpl 层实现远程调用
 @Override
    public void deleteCourse(String courseId) {

        //1.删除小节 以及 视频
        QueryWrapper<EduVideo> videoQueryWrapper = new QueryWrapper<>();
        videoQueryWrapper.eq("course_id", courseId);
        // 获取课程下的所有小节
        List<EduVideo> videos = eduVideoService.list(videoQueryWrapper);
        // 保存视频 Id
        List<String> videoIds = new ArrayList<>();
        for (EduVideo video : videos) {
            if (!StringUtils.isEmpty(video.getVideoSourceId())) {
                // 取出每小节的视频 ID 放入集合
                videoIds.add(video.getVideoSourceId());
            }
        }
        // 删除视频
        vodFeignService.deleteBatch(videoIds);
        // 删除小节
        eduVideoService.remove(videoQueryWrapper);

        //2.删除章节
        QueryWrapper<EduChapter> chapterQueryWrapper = new QueryWrapper<>();
        videoQueryWrapper.eq("course_id", courseId);
        eduChapterService.remove(chapterQueryWrapper);
        //3.删除描述信息
        eduCourseDescriptionService.removeById(courseId);
        //4.删除课程信息
        this.removeById(courseId);
    }
一定要先删除 视频 在删除小节,不然删除小节后,视频 ID 查不到
目前存在的小bug:
- 在增加一个视频之后,再次增加视频时,上传列表没有被清空,导致无法再次上传视频
解决方法:
只需要在打开 弹窗的 时候清空上传列表即可
- 在上传视频时,如果视频没有上传完,点击确定,会导致数据库没有保存视频相关信息,并且也没有报任何错误。
解决方法:
在执行 接口方法 之前,判断视频 ID 是否为 空,不为空再去执行 接口方法
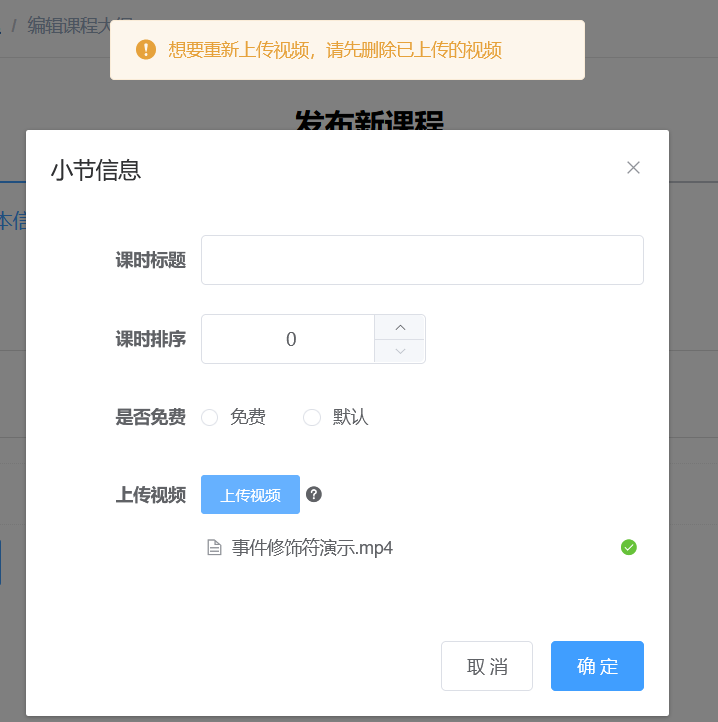
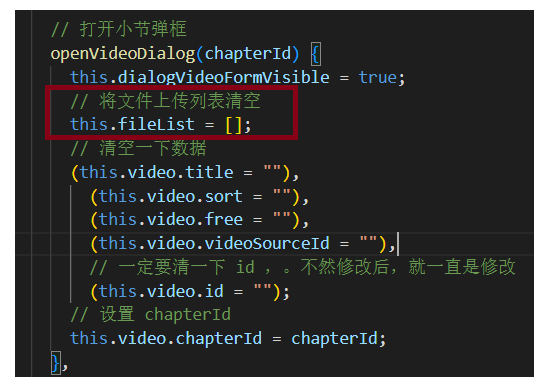
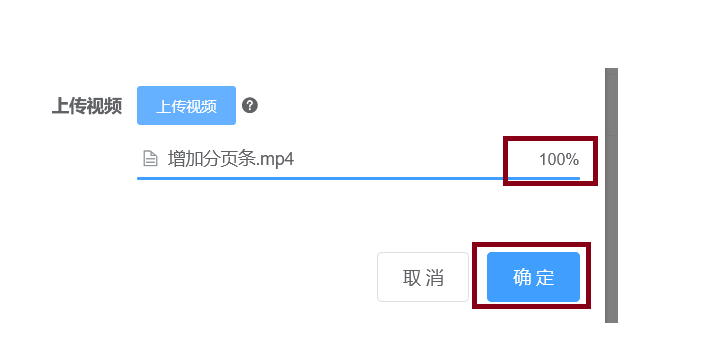
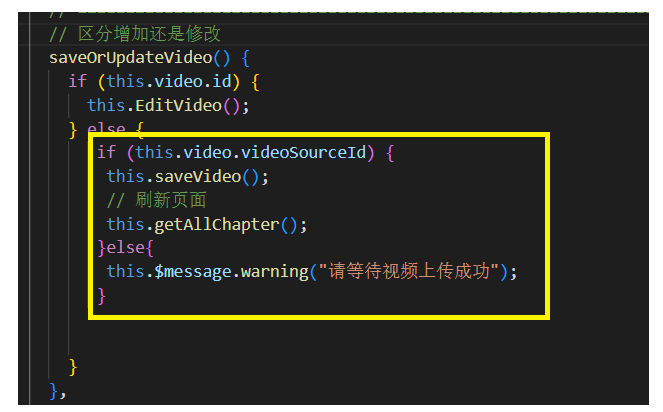
3.消费端集成Hystrix
有关 Hystrix 学习笔记:https://blog.csdn.net/aetawt/article/details/126568999
微服务之间调用流程:
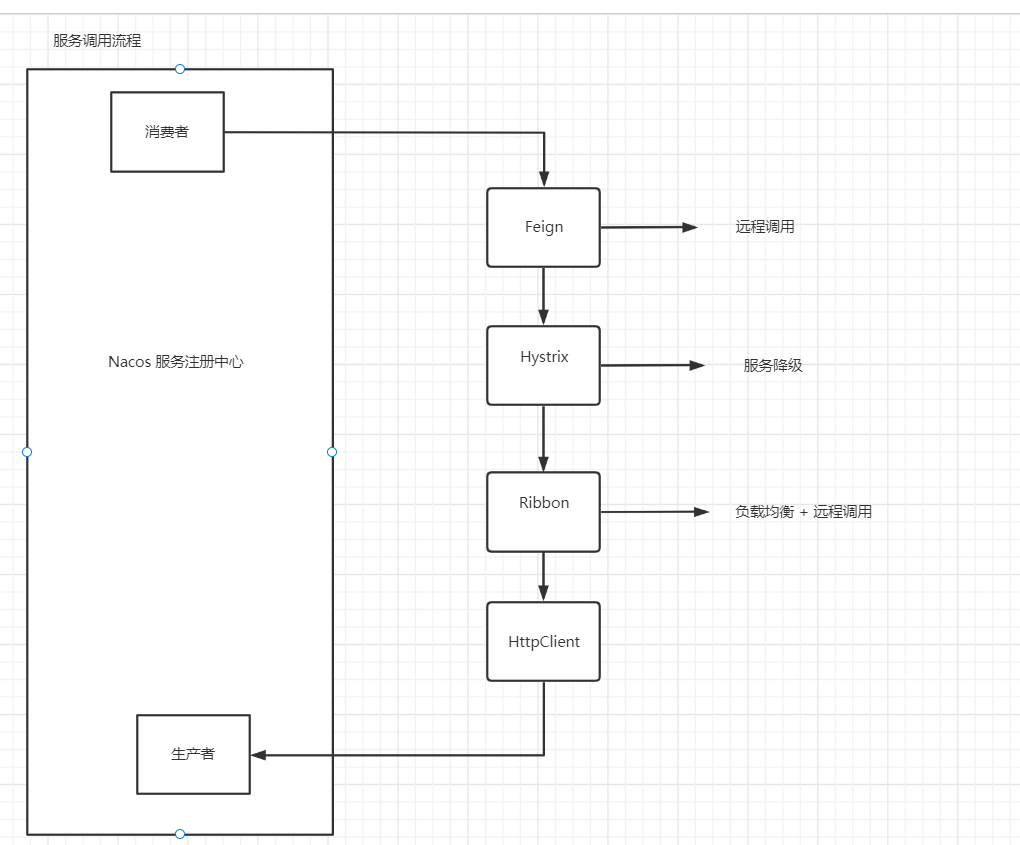
为什么使用 Hytrix ?
在复杂的分布式系统中,各种微服务之间的调用,形成
扇出链路, 在链路中如果其中一个 服务 出现 宕机 或者 延迟,那么在调用方会堆积大量的请求,甚至会造成雪崩。因此 Spring Cloud 提供了 Hystrix ,主要是为了解决服务延迟和容错。
Hystrix 一共有三种功能:
- 服务降级
- 服务熔断
- 服务限流
服务熔断也会造成 服务降级,俩个的区别就是:服务熔断可以恢复链路调用,服务降级不会,只执行本地的 fallback 方法
OpenFeign 中默认集成了 Ribbon 和 Hystrix,因此不需要额外引入依赖。

service_edu 中使用 Hystrix :
使用 Hystrix 一共有三种方式,只演示一种,具体的方法参考我的博客:https://blog.csdn.net/aetawt/article/details/126568999
- 配置文件中开启 Hystrix
# 开启 Hystrix
feign.hystrix.enabled=true
- 创建 远程调用接口VodFeignService 的实现类
@Component
public class VodFeignServiceImpl implements VodFeignService {
    @Override
    public R deleteVideo(String id) {
        return R.error().message("删除单个视频出错");
    }

    @Override
    public R deleteBatch(List<String> videoIds) {
        return R.error().message("删除多个视频出错");
    }
}
- VodFeignService 接口中声明自定义的兜底方法

只要 service_edu 在远程调用 service_vod 时,出现 宕机,超时 … 都会执行自定义的兜底方法 。
测试:
在 VodController 删除视频的方法中,睡眠几秒,在 Hystrix 中默认超过 1s 就会服务降级
在删除视频时查看 公共返回对象 R 中的 message 信息: