Spring/IoC、DI、Bean
最近在学习SpringBoot,但是发现自己对Spring的一些基础知识不太了解,于是决定先学习Spring相关的一些知识再去了解SpringBoot,此类博客相当于是学习笔记,笔记源自黑马程序员2022新版SSM框架教程
文章目录
- IoC
- Bean
- DI
- 实操案例IoC(xml实现)
- 1.导入Spring坐标
- 2.定义Spring管理的类
- 3.创建Spring配置文件,配置Bean
- 4.初始化IoC容器,获取Bean
- 运行结果:
- 实操案例DI(XML)
- 2.配置service与dao之间的关系
- 运行结果
- Bean的配置
- 1.Bean的别名
- 2.Bean的创建模式
- Bean的实例化方式
- 无参构造器实例化
- FactoryBean实例化
- 1.创建工厂类
- 2.设置配置文件
- 测试运行
- Bean的生命周期
- 初始化容器
- 使用Bean
- 关闭/销毁容器
IoC
Inversion of Control,控制反转
使用对象时,由主动new产生对象转换成外部提供对象,对象创建的控制权交给外部,而这个"外部"在Spring里面被称为IoC容器
Bean
被创建或被管理的对象在IoC容器中统称为Bean
DI
Dependency Injection,依赖注入
在IoC容器中建立Bean和Bean之间的依赖关系的整个过程称为依赖注入
实操案例IoC(xml实现)
1.导入Spring坐标
<dependency>
    <groupId>org.springframework</groupId>
    <artifactId>spring-context</artifactId>
    <version>5.3.22</version>
</dependency>
2.定义Spring管理的类
Dao
public interface TestDao {
  void test();
}
public class TestDaoImpl implements TestDao {

  @Override
  public void test() {
    System.out.println("This is an implementation of TestDao");
  }
}
Service
public interface TestService {
  void test();
}
public class TestServiceImpl implements TestService {

  TestDao dao;
  @Override
  public void test() {
    System.out.println("This is an implementation of TestService");
    dao.test();
  }

  public void setDao(TestDao dao){
    this.dao = dao;
  }
}
3.创建Spring配置文件,配置Bean
创建文件
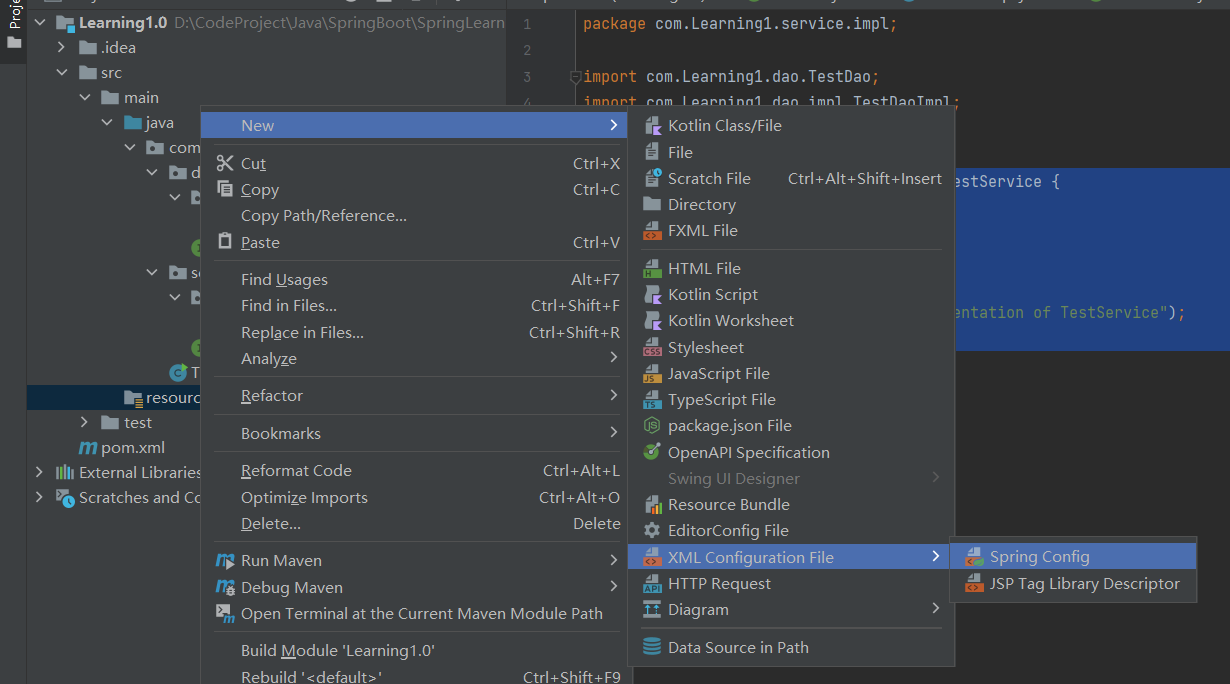
配置Bean
<?xml version="1.0" encoding="UTF-8"?>
<beans xmlns="http://www.springframework.org/schema/beans"
  xmlns:xsi="http://www.w3.org/2001/XMLSchema-instance"
  xsi:schemaLocation="http://www.springframework.org/schema/beans http://www.springframework.org/schema/beans/spring-beans.xsd">

  <!--配置bean,id,class路径-->
  <bean id="dao" class="com.Learning1.dao.impl.TestDaoImpl"/>
  <bean id="service" class="com.Learning1.service.impl.TestServiceImpl"/>
</beans>
4.初始化IoC容器,获取Bean
public class Test {

  public static void main(String[] args) {
    //加载配置文件得到上下文容器对象
    ApplicationContext ctx = new ClassPathXmlApplicationContext("applicationContext.xml");
    //获取资源
    TestService testService = (TestService) ctx.getBean("service");
    testService.test();
  }
}
运行结果:
This is an implementation of TestService
This is an implementation of TestDao

Process finished with exit code 0
实操案例DI(XML)
##1.删除使用new形式创建对象的代码,并设置setter方法
public class TestServiceImpl implements TestService {

  TestDao dao;
  @Override
  public void Test() {
    System.out.println("This is an implementation of TestService");
  }

  private void setDao(TestDao dao){
    this.dao = dao;
  }
}
2.配置service与dao之间的关系
<bean id="service" class="com.Learning1.service.impl.TestServiceImpl">
  <!--name指引用属性的名称,ref指id名-->
  <property name="dao" ref="dao"/>
</bean>
运行结果
This is an implementation of TestService
This is an implementation of TestDao

Process finished with exit code 0
Bean的配置
1.Bean的别名
可以在配置中添加name指定Bean的别名,可以有多个别名,别名之间可用空格,分号,逗号分隔
<bean id="dao" name="testDao testDao1" class="com.Learning1.dao.impl.TestDaoImpl"/>
2.Bean的创建模式
Bean的默认创建模式为单例模式,每次引用同一个类的对象都是同一个对象,以提高效率。
如以下程序
public class Test2 {

  public static void main(String[] args) {
    ApplicationContext ctx = new ClassPathXmlApplicationContext("applicationContext.xml");
    TestService testService1 = (TestService) ctx.getBean("service");
    TestService testService2 = (TestService) ctx.getBean("service");
    System.out.println(testService1);
    System.out.println(testService2);
  }
}
输出结果为
com.Learning1.service.impl.TestServiceImpl@6b09bb57
com.Learning1.service.impl.TestServiceImpl@6b09bb57

Process finished with exit code 0
这个创建模式可以在配置文件中修改,将scope修改为prototype可以使同一个类创建不同的对象
<bean id="service" class="com.Learning1.service.impl.TestServiceImpl" scope="prototype">
再次运行上一个程序
com.Learning1.service.impl.TestServiceImpl@6b09bb57
com.Learning1.service.impl.TestServiceImpl@6536e911

Process finished with exit code 0
Bean的实例化方式
无参构造器实例化
Spring默认会调用Bean的无参构造器实例化Bean,如果没有无参构造器,将会报错
给TestServiceImpl重写一个无参构造器
public class TestServiceImpl implements TestService {

  public TestServiceImpl() {
    System.out.println("Generator is Running....");
  }

  TestDao dao;
  @Override
  public void test() {
    System.out.println("This is an implementation of TestService");
    dao.test();
  }

  public void setDao(TestDao dao){
    this.dao = dao;
  }
}
public class Test3 {

  public static void main(String[] args) {
    ApplicationContext ctx = new ClassPathXmlApplicationContext("applicationContext.xml");
    TestService testService = (TestService) ctx.getBean("service");
  }
}
运行结果
Generator is Running....

Process finished with exit code 0
FactoryBean实例化
通过工厂的方式来实例化Bean也是比较实用的方式
1.创建工厂类
public class TestDaoFactory implements FactoryBean<TestDao> {

  @Override
  public TestDao getObject() throws Exception {
    return new TestDaoImpl();
  }

  @Override
  public Class<?> getObjectType() {
    return TestDao.class;
  }

  @Override
  public boolean isSingleton() {
    return true;
  }
}
其中isSingleton()方法用来设置是否创建单例
2.设置配置文件
<bean id="dao" name="testDao" class="com.Learning1.factory.TestDaoFactoryBean"/>
测试运行
public class Test4 {

  public static void main(String[] args) {
    ApplicationContext ctx = new ClassPathXmlApplicationContext("applicationContext.xml");
    TestDao dao = (TestDao) ctx.getBean("dao");
    System.out.println(dao);
  }
}
运行结果
com.Learning1.dao.impl.TestDaoImpl@192b07fd

Process finished with exit code 0
Bean的生命周期
初始化容器
1.创建对象(内存分配)
2.执行构造方法
3.执行属性注入(set操作)
4.执行bean初始化方法
使用Bean
执行业务逻辑操作
关闭/销毁容器
执行Bean销毁方法
我叫Kallen,一名快乐且有梦的程序员,欢迎访问我的个人博客