OpenHD改造实现廉价高清数字图传(树莓派+PC)—(六)OSD和视频画面整合显示
这个OpenHD改造移植系列的最后一篇文章,这篇文章主要讲如何讲前面说到的全部内容串接起来,讲OSD画面显示和视频画面整合到一起,形成完整的图传地面显示,真正实现PC上直接接收显示图传视频和数据。
OpenHD改造实现廉价高清数字图传(树莓派+PC)—(一)概述_hoopertsau的博客-CSDN博客_openhd
OpenHD改造实现廉价高清数字图传(树莓派+PC)—(二)Wifibroadcast Wifi广播通信_hoopertsau的博客-CSDN博客
OpenHD改造实现廉价高清数字图传(树莓派+PC )—(三)OpenVG和libshapes在PC上的移植_hoopertsau的博客-CSDN博客
OpenHD改造实现廉价高清数字图传(树莓派+PC )—(四)OSD数据传输和画面显示_hoopertsau的博客-CSDN博客
OpenHD改造实现廉价高清数字图传(树莓派+PC)—(五)gstreamer视频采集、传输和显示_hoopertsau的博客-CSDN博客
一、OSD和视频整合显示改造
整合OSD和视频显示核心思路:
在X11window上创建两个窗口,一个用OpenVG来绘制OSD画面,一个用gstreamer来显示视频画面。将OSD画面的背景要设置为透明,并叠加显示在视频窗口上,这样就有浮在视频画面上的效果了。这里主要就在于怎么将OSD的背景设置为透明显示。
这里主要修改的还是openvg目录下的oglinit.c文件,主要是创建窗口这里要修改。
直接看一下代码,如何创建这样的两个窗口。
// 创建X11窗口
VGboolean windowCreate(STATE_T * state, const char* title,
                              const VGuint width,
                              const VGuint height)
{
    VGint screen, screenWidth, screenHeight;
    XSetWindowAttributes windowAttributes;
    XSizeHints windowSizeHints;

    XVisualInfo* visualInfo;
    MY_PFNGLXSWAPINTERVALSGIPROC sgiSwapInterval;
    MY_PFNGLXSWAPINTERVALEXTPROC extSwapInterval;
    // OpenGL surface configuration
	GLXFBConfig fbconfig;
    VGint fbConfigsCount = 0;

	static int glAttributes[] = {
		GLX_RENDER_TYPE, GLX_RGBA_BIT,
		GLX_DRAWABLE_TYPE, GLX_WINDOW_BIT,
		GLX_DOUBLEBUFFER, True,
		GLX_RED_SIZE, 1,
		GLX_GREEN_SIZE, 1,
		GLX_BLUE_SIZE, 1,
		GLX_ALPHA_SIZE, 1,
		GLX_DEPTH_SIZE, 1,
		None
	};

    // open a display on the current root window
    display = XOpenDisplay(NULL);
    if (display == NULL) {
        fprintf(stderr, "Unable to open display.\n");
        return VG_FALSE;
    }

    // get the default screen associated with the previously opened display
    screen = DefaultScreen(display);
	// 根窗口
	rootWindow = RootWindow(display, screen);

    // get screen bitdepth
    screenDepth = DefaultDepth(display, screen);

    // run only on a 32bpp display
    if ((screenDepth != 24) && (screenDepth != 32)) {
        fprintf(stderr, "Cannot find 32bit pixel format on the current display.\n");
        XCloseDisplay(display);
        return VG_FALSE;
    }

    // get screen dimensions
    screenWidth = DisplayWidth(display, screen);
    screenHeight = DisplayHeight(display, screen);
	state->screen_width = screenWidth;
	state->screen_height = screenHeight;
	printf("screen width=%d height=%d\r\n",screenWidth,screenHeight);

	unsigned long white = WhitePixel(display,screen);
	unsigned long black = BlackPixel(display,screen);


	// 再创建透明的OSD显示,在上层
	// 找到合适的配置
	GLXFBConfig* fbconfigs = glXChooseFBConfig(display, screen, glAttributes, &fbConfigsCount);
	int i = 0;
	static XRenderPictFormat *pictFormat;
    for(i = 0; i<fbConfigsCount; i++) {
        visualInfo = (XVisualInfo_CPP*) glXGetVisualFromFBConfig(display, fbconfigs[i]);
        if(!visualInfo)
            continue;

        pictFormat = XRenderFindVisualFormat(display, visualInfo->visual);
        if(!pictFormat)
            continue;

        if(pictFormat->direct.alphaMask > 0) {
            fbconfig = fbconfigs[i];
            break;
        }
    }

	// initialize window's attribute structure
    windowAttributes.colormap = XCreateColormap(display, rootWindow, visualInfo->visual, AllocNone);
	windowAttributes.border_pixel = 0;
	windowAttributes.background_pixmap = None;
	printf("None=%d\r\n",None);
	int attr_mask =
        CWBackPixmap|
        CWColormap|
        CWBorderPixel;    /* What's in the attr data */

    // create the window centered on the screen
	state->window_width = width;
	state->window_height = height;

	// 先创建视频窗口,在底层
	video_window =  XCreateSimpleWindow(display,
									   rootWindow,
									   0, 0, // origin
									   width, height, // size
									   1, black, // border
									   white );  // backgd

	// 创建OSD窗口
    window = XCreateWindow(display, rootWindow, 0,0, width, height, 1, visualInfo->depth, InputOutput, visualInfo->visual, 						attr_mask, &windowAttributes);
    //if ( window == None )
	if (window == None || video_window == None)
	{
        fprintf(stderr, "Unable to create the window.\n");
        XCloseDisplay(display);
        return VG_FALSE;
    }

    // set the window's name
    XStoreName(display, window, title);
	XStoreName(display, video_window, "video window");

    // tell the server to report mouse and key-related events
    XSelectInput(display, window, KeyPressMask | KeyReleaseMask | ButtonPressMask | Button1MotionMask | Button2MotionMask | Button3MotionMask | StructureNotifyMask | ExposureMask);

    // initialize window's sizehint definition structure
    windowSizeHints.flags = PPosition | PMinSize | PMaxSize;
    windowSizeHints.x = 0;
    windowSizeHints.y = 0;
    windowSizeHints.min_width = 1;
    // clamp window dimensions according to the maximum surface dimension supported by the OpenVG backend
    windowSizeHints.max_width = vgPrivSurfaceMaxDimensionGetMZT();
    if (screenWidth < windowSizeHints.max_width) {
        windowSizeHints.max_width = screenWidth;
    }
    windowSizeHints.min_height = 1;
    windowSizeHints.max_height = windowSizeHints.max_width;
    if (screenHeight < windowSizeHints.max_height) {
        windowSizeHints.max_height = screenHeight;
    }
    // set the window's sizehint 不加这一句话,窗口的位置就不能正确设置
    XSetWMNormalHints(display, video_window, &windowSizeHints);
    // clear the window
    XClearWindow(display, video_window);

	// set the window's sizehint
    XSetWMNormalHints(display, window, &windowSizeHints);
    // clear the window
    XClearWindow(display, window);

    // create a GLX context for OpenGL rendering
    glContext = glXCreateNewContext(display, fbconfig, GLX_RGBA_TYPE, NULL, True);
    if (!glContext) {
        fprintf(stderr, "Unable to create the GLX context.\n");
		XDestroyWindow(display, video_window);
        XDestroyWindow(display, window);
        XCloseDisplay(display);
        return VG_FALSE;
    }
    // create a GLX window to associate the frame buffer configuration with the created X window
    glWindow = glXCreateWindow(display, fbconfig, window, NULL);
    // bind the GLX context to the Window
    glXMakeContextCurrent(display, glWindow, glWindow, glContext);
    // GLX_EXT_swap_control
    extSwapInterval = (MY_PFNGLXSWAPINTERVALEXTPROC)glXGetProcAddressARB((const GLubyte *)"glXSwapIntervalEXT");
    if (extSwapInterval) {
        extSwapInterval(display, glWindow, 0);
    }
    else {
        // GLX_SGI_swap_control
        sgiSwapInterval = (MY_PFNGLXSWAPINTERVALSGIPROC)glXGetProcAddressARB((const GLubyte *)"glXSwapIntervalSGI");
        if (sgiSwapInterval) {
            sgiSwapInterval(0);
        }
    }

    // put the window on top of the others
	XMapRaised(display, video_window);
    XMapRaised(display, window);

    // clear event queue
    XFlush(display);
    XFree(visualInfo);

/*
	// 无边框的效果
	Atom window_type = XInternAtom(display, "_NET_WM_WINDOW_TYPE", False);
	long value = XInternAtom(display, "_NET_WM_WINDOW_TYPE_DOCK", False);
	XChangeProperty(display, window, window_type, XA_ATOM, 32, PropModeReplace, (unsigned char *) &value,1 );
*/

	// 初始化视频显示
	gst_init (NULL,NULL);
	printf("gst inited\r\n");
	initGst(video_window);

    return VG_TRUE;
}
分析一下这个窗口创建的代码,有几个关键的地方。
1、找到合适的显示配置
	// 找到合适的配置
	GLXFBConfig* fbconfigs = glXChooseFBConfig(display, screen, glAttributes, &fbConfigsCount);
	int i = 0;
	static XRenderPictFormat *pictFormat;
    for(i = 0; i<fbConfigsCount; i++) {
        visualInfo = (XVisualInfo_CPP*) glXGetVisualFromFBConfig(display, fbconfigs[i]);
        if(!visualInfo)
            continue;

        pictFormat = XRenderFindVisualFormat(display, visualInfo->visual);
        if(!pictFormat)
            continue;

        if(pictFormat->direct.alphaMask > 0) {
            fbconfig = fbconfigs[i];
            break;
        }
    }
2、窗口的属性设置
    // initialize window's attribute structure
    windowAttributes.colormap = XCreateColormap(display, rootWindow, visualInfo->visual, AllocNone);
	windowAttributes.border_pixel = 0;
	windowAttributes.background_pixmap = None;
    int attr_mask =
        CWBackPixmap|
        CWColormap|
        CWBorderPixel;    /* What's in the attr data */
要将背景设置为None,并且mask中要设置背景标志
3、创建两个窗口
// 先创建视频窗口,在底层
	video_window =  XCreateSimpleWindow(display,
									   rootWindow,
									   0, 0, // origin
									   width, height, // size
									   1, black, // border
									   white );  // backgd

	// 创建OSD窗口
    window = XCreateWindow(display, rootWindow, 0,0, width, height, 1, visualInfo->depth, InputOutput, visualInfo->visual,attr_mask, &windowAttributes);
一个是用于显示视频的video_window ,一个是用于显示osd的
注意:
这两个的父窗口都是rootWindow,我尝试将osd的父窗口设置为视频,这样背景就不透明了。但是如果将视频窗口也设置为透明,gstreamer就显示不正常了,相互之间有影响。所以就干脆分开两个窗口,互不影响。
4、设置窗口的位置
    // set the window's sizehint, 不加这一句话,窗口的位置就不能正确设置
    XSetWMNormalHints(display, video_window, &windowSizeHints);
    // clear the window
    XClearWindow(display, video_window);
如果不设置的话,窗口的初始位置可能会有错位,导致两个窗口不能叠加在一起。
5、初始化gstreamer并绑定GUI
	// 初始化gstreamer库
	gst_init (NULL,NULL);
    // 创建视频处理的管道,并绑定到视频显示窗口video_window
	initGst(video_window);
这个与上一篇文章的内容类似,就不再详细描述了,直接看之前的代码。
看一下最终效果,叠在一起显示 
二、总结
通过将OpenHD深度的剥离改造,可以实现在普通的PC上显示图传,大大降低我们的成本,不需要再买地面端的树莓派了。同时,OpenHD里面有大量“无用”的脚本和代码,过于复杂。
其实用到的主要就是四个软件:
1、wifibroadcast,提供底层的通信
2、openvg,提供osd绘图的支撑
3、gstreamer,osd调用并用来解析视频用的
4、osd,接收解析并绘制视频和叠加显示信息
当然OpenHD提供的是一揽子解决方案,直接烧写镜像即可开机使用,比较适合不会开发的航模玩家,可以直接上手使用。
三、后续
考虑到天空端的树莓派Zero也开始涨价了,当前价格大概在500块左右(2022年9月30日),为了进一步降低成本,我还考虑将天空端移植到国产的PI上。
这里有几个可选的PI,后续再讲如何往这些国产化的PI上进行迁移,进一步降低成本。
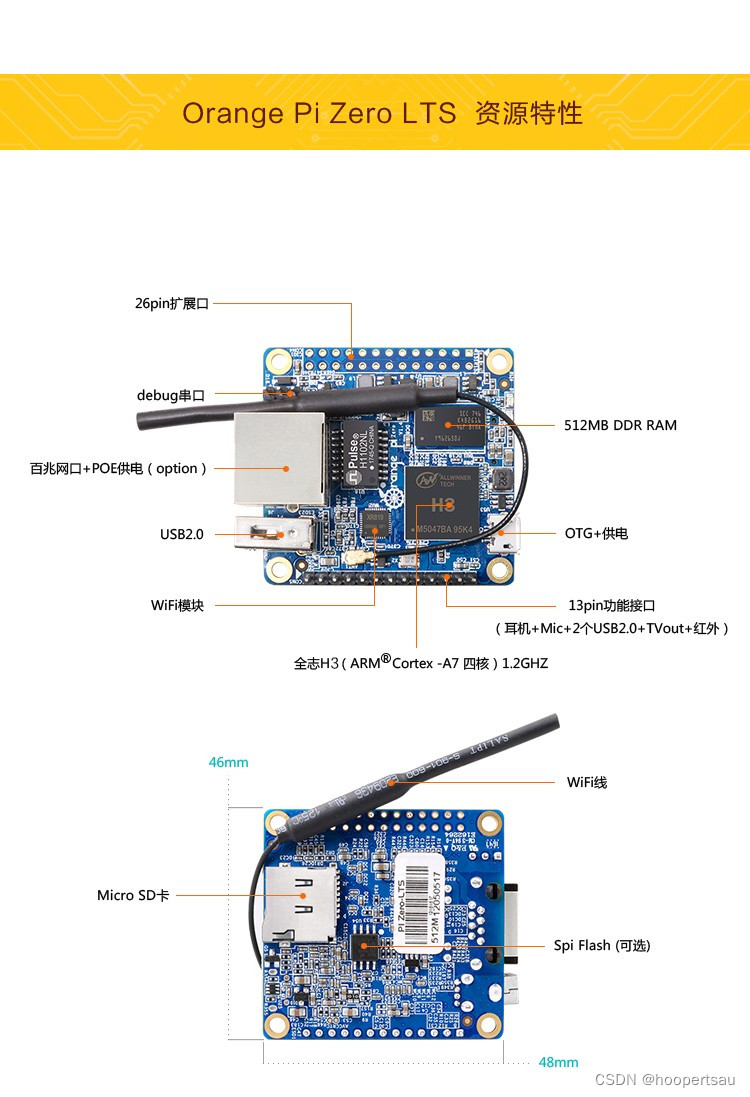
1、OrangePi Zero
全志的H3处理器,只要大概120块钱。但是没有CSI接口的摄像头,需要外接使用USB摄像头。
2、OrangePi i96
RDA8810PL处理器,非常便宜,开发板只要39块钱!摄像头32块。当然,性能不是太好,而且CPU也很老了,也很难找到技术支持,而且坑也比较多。但是架不住它便宜啊,哈哈。

3、Banana pi-M2 Zero
使用的也是全志H3处理器,价格140左右,但是摄像头贵了,要60块钱。
