labelme目标检测数据类型转换
1. labelme数据类型
LabelMe是一个开源的在线图像标注工具,旨在帮助用户创建和标记图像数据集。它提供了一个用户友好的界面,让用户可以直观地在图像上绘制标记框、多边形、线条等,以标识和注释图像中的对象或区域。
GitHub:https://github.com/wkentaro/labelme
labelme格式
经过labelme标注工具对图像中的目标进行标注之后,可以得到如下的标注json文件。
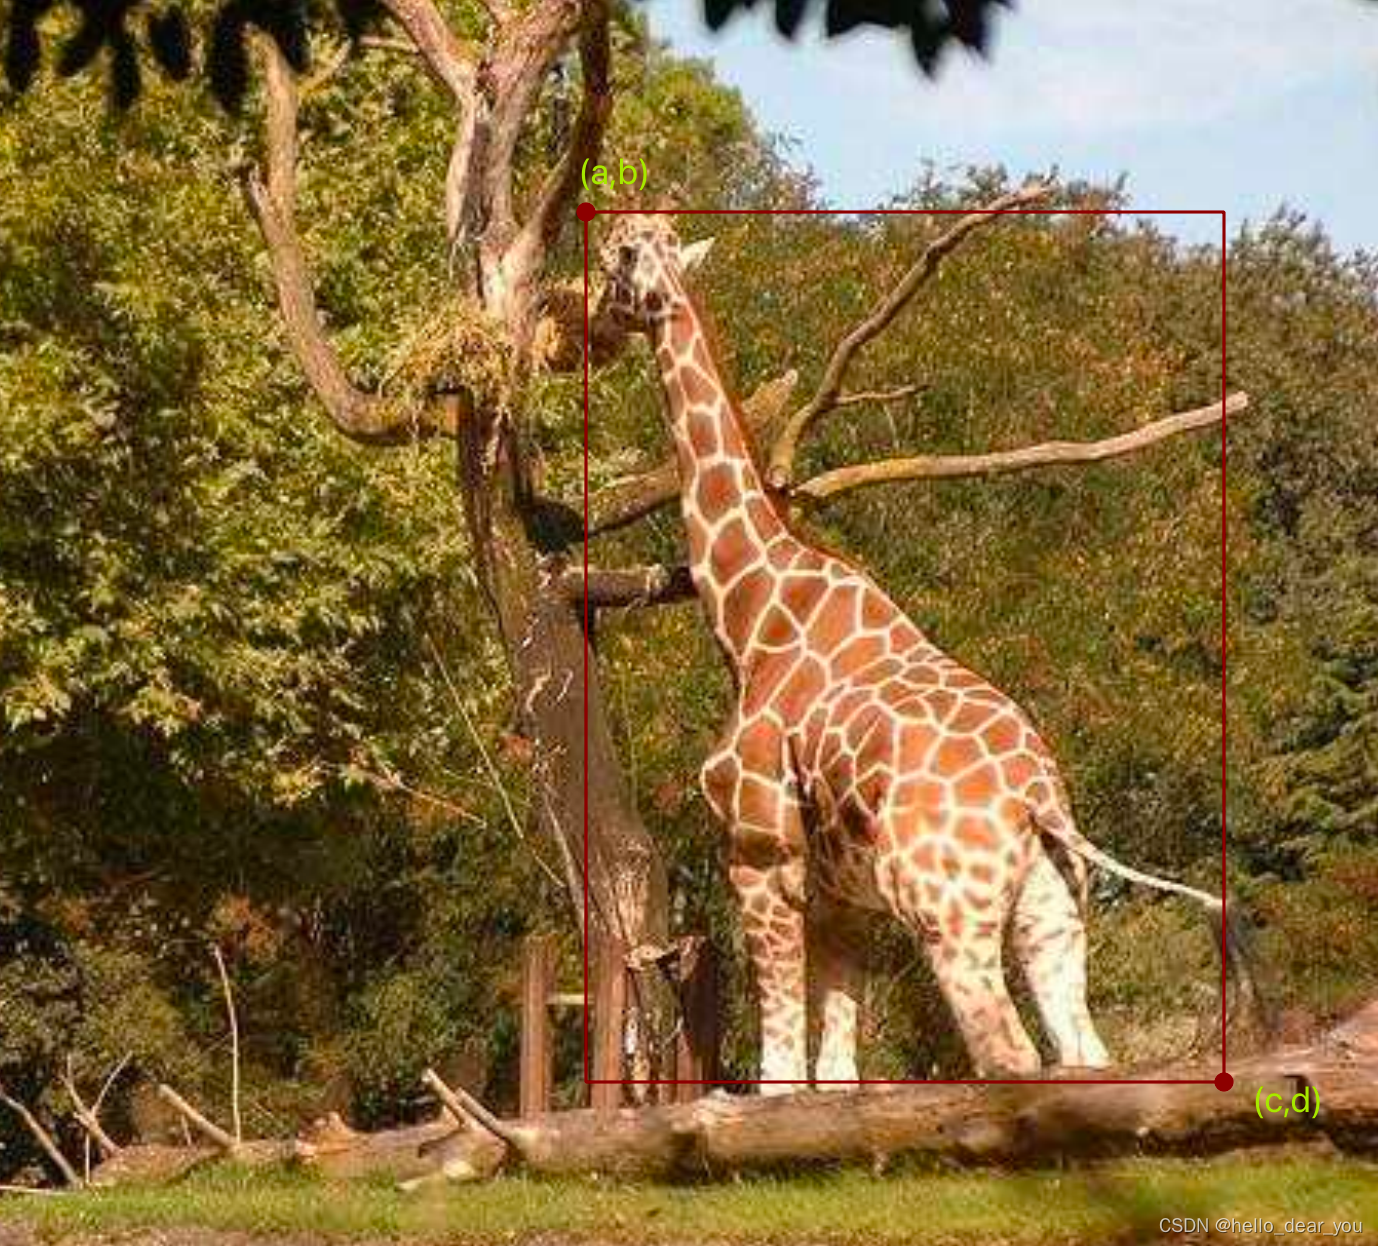
在这里我们主要关注目标框的格式,其中shapes字段中包含所有的目标内容,每个目标框的位置信息可以通过points字段进行获取,是一个两行两列的二维数组,如同:
[[a,b],[c,d]
]
其中a,b代表左上角点位置,c,d表示右下角点位置,如下图所示。
目标框可视化
对于labelme格式的数据,可以直接使用labelme标注工具打开进行查看,同样这里也给出python的可视化代码,方便大家直接画图进行查看。
import numpy as np
import os
import cv2
import jsondef display(img_path, bboxes, save_path,opencv=True):"""_summary_Args:img_path (str): 图像路径bboxes (numpy): 二维数组,其中每一行表示一个目标框,顺序为(xmin, ymin, xmax, ymax)opencv (bool): 是否使用opencv"""if opencv:color = (0, 0, 255)img_data = cv2.imread(img_path)for box in bboxes:xmin, ymin, xmax, ymax = np.array(box, dtype=np.int32)cv2.rectangle(img_data, (xmin, ymin), (xmax, ymax),color, 2)cv2.imwrite(save_path, img_data)else:from PIL import Image, ImageDrawcolor = (255, 0, 0)img_data = Image.open(img_path).convert("RGB")draw = ImageDraw.Draw(img_data)for box in bboxes:xmin, ymin, xmax, ymax = np.array(box, dtype=np.int32)draw.rectangle([xmin, ymin, xmax, ymax], outline=color)img_data.save(save_path)def vis_labelme(img_root, json_root, save_root):"""_summary_Args:img_root (str): 图像数据的主路径json_root (str): 标签数据的主路径save_root (str): 可视化图像保存路径"""from pathlib import Pathjson_files = Path(json_root).glob("./*.json")for json_path in json_files:anno= json.load(open(str(json_path), "r", encoding="utf-8"))shapes = anno['shapes']name = json_path.stemimg_path = Path(img_root) / f"{name}.jpg"if img_path.is_file():bboxes = list()for s in shapes:pts = s['points']x1, y1 = pts[0]x2, y2 = pts[1]bboxes.append([x1, y1, x2, y2])save_path = os.path.join(save_root, img_path.name)display(str(img_path), bboxes, save_path)if __name__ == "__main__":img_root = "labelme"json_root = "labelme"save_root = "vis_labelme"vis_labelme(img_root, json_root, save_root)
2. 与yolo之间的转换
YOLO(You Only Look Once)是一种流行的目标检测算法,其特点是能够实时地识别图像中的目标物体。YOLO格式是指用于标注目标检测数据集的标签格式。
在YOLO格式中,每个图像的标签数据通常存储在一个单独的文本文件中,与图像文件具有相同的名称。
yolo格式
每个标签文件包含一行或多行文本,每行描述一个目标物体的位置和类别。每行的格式如下:
<class> <x_center> <y_center> <width> <height>
<class>表示目标物体的类别,通常是一个整数。例如,如果数据集包含车辆、行人和自行车三个类别,可以用0表示车辆,1表示行人,2表示自行车。<x_center>和<y_center>是目标物体边界框的中心坐标,相对于图像的宽度和高度。这些值的范围是0到1之间,表示相对位置。<width>和<height>是目标物体边界框的宽度和高度,相对于图像的宽度和高度。同样,这些值的范围也是0到1之间。
例如,假设我们有一个图像中包含一辆车的标签数据,车辆在图像中的位置为(100,200),宽度为50,高度为30。如果图像的宽度是500,高度是400,那么对应的YOLO格式标签数据将是:
0 0.25 0.5 0.1 0.075
使用YOLO格式的标签数据可以方便地与YOLO模型进行训练和推断,从而实现目标检测任务。
labelme转yolo
以下是labelme转换yolo格式的脚本,需要制定labelme和yolo数据集的主路径,此外还需要一个数据集类别的txt文件。
import os
import json
import shutil
import numpy as np
from pathlib import Pathdef get_categories(cls_path):assert(os.path.exists(cls_path)), f"cannot find classes file"with open(cls_path) as f:data = f.readlines()name2idx = dict()for idx, cls in enumerate(data):name2idx[cls.strip()] = idxreturn name2idxdef labelme2yolo_single(label_file, cls2id):anno= json.load(open(label_file, "r", encoding="utf-8"))shapes = anno['shapes']w0, h0 = anno['imageWidth'], anno['imageHeight']image_path = os.path.basename(anno['imagePath'])labels = []for s in shapes:pts = s['points']x1, y1 = pts[0]x2, y2 = pts[1]x = (x1 + x2) / 2 / w0 y = (y1 + y2) / 2 / h0w  = abs(x2 - x1) / w0h  = abs(y2 - y1) / h0cid = cls2id[s['label']]        labels.append([cid, x, y, w, h])return labels, image_pathdef labelme2yolo(labelme_dir, yolo_dir, cls_path):labelme_img_dir = Path(labelme_dir) labelme_label_dir = Path(labelme_dir)yolo_img_dir = Path(yolo_dir) / "images/"yolo_label_dir = Path(yolo_dir) / 'labels/'if not yolo_img_dir.exists():yolo_img_dir.mkdir(parents=True, exist_ok=True)if not yolo_label_dir.exists():yolo_label_dir.mkdir(parents=True, exist_ok=True)json_files = labelme_label_dir.glob("./*.json")cls2id = get_categories(cls_path)for ijf, jf in enumerate(json_files):filename = jf.stemlabels, image_path = labelme2yolo_single(jf, cls2id)# if len(labels) > 0:# np.savetxt(yolo_label_dir + filename + '.txt', labels)shutil.copy(str(labelme_img_dir / image_path), str(yolo_img_dir / image_path))txt_path = str(yolo_label_dir / f"{filename}.txt")with open(txt_path, 'w') as f:for cls, *xywhn in reversed(labels):line = (cls, *xywhn)f.write(('%g ' * len(line)).rstrip() % line + '\n')print(f" {ijf} {str(jf)}")print('Completed!')if __name__ == '__main__':labelme_root = r'labelme'yolo_root = r'yolo'cls_path = "yolo/classes.txt"labelme2yolo(labelme_root, yolo_root, cls_path)
yolo转labelme
同样,有时候我们可以以labelme数据格式作为中间格式,然后把labelme格式转换为其他格式,或者我们需要对yolo目标检测算法的结果进行微调,因此,这里也提供了yolo转labelme的脚本。
import cv2
import os
import json
import shutil
import numpy as npdef get_categories(cls_path):assert(os.path.exists(cls_path)), f"cannot find classes file"with open(cls_path) as f:data = f.readlines()idx2name = dict()for idx, cls in enumerate(data):idx2name[idx] = cls.strip()return idx2namedef xyxy2labelme(labels, w, h, image_path, save_dir, id2cls):if not os.path.exists(save_dir):os.makedirs(save_dir)label_dict = {}label_dict['version'] = '5.0.1'label_dict['flags'] = {}label_dict['imageData'] = Nonelabel_dict['imagePath'] = image_pathlabel_dict['imageHeight'] = hlabel_dict['imageWidth'] = wlabel_dict['shapes'] = []for l in labels:tmp = {}tmp['label'] = id2cls[int(l[0])]tmp['points'] =[[l[1], l[2]], [l[3], l[4]]]tmp['group_id']= Nonetmp['shape_type'] = 'rectangle'tmp['flags'] = {}label_dict['shapes'].append(tmp)    fn = os.path.join(save_dir,image_path.rsplit('.', 1)[0]+'.json')with open(fn, 'w') as f:json.dump(label_dict, f, ensure_ascii=False, indent=2)def yolo2labelme(yolo_dir, save_dir, cls_path):yolo_image_dir = os.path.join(yolo_dir, "images")yolo_label_dir = os.path.join(yolo_dir, "labels")id2cls = get_categories(cls_path)image_files = os.listdir(yolo_image_dir)for iimgf, imgf in enumerate(image_files):print(iimgf+1, '/', len(image_files), imgf)fn = imgf.rsplit('.', 1)[0]image = cv2.imread(os.path.join(yolo_image_dir, imgf))h,w = image.shape[:2]shutil.copyfile(os.path.join(yolo_image_dir, imgf), os.path.join(save_dir, imgf))if not os.path.exists(os.path.join(yolo_label_dir, fn + '.txt')):continuelabels = np.loadtxt(os.path.join(yolo_label_dir, fn + '.txt')).reshape(-1, 5)if len(labels) < 1:passelse:labels[:,1::2] = w * labels[:, 1::2]labels[:,2::2] = h * labels[:, 2::2]labels_xyxy = np.zeros(labels.shape)labels_xyxy[:, 1] = np.clip(labels[:, 1] - labels[:, 3]/2, 0, w)labels_xyxy[:, 2] = np.clip(labels[:, 2] - labels[:, 4]/2, 0, h)labels_xyxy[:, 3] = np.clip(labels[:, 1] + labels[:, 3]/2, 0, w)labels_xyxy[:, 4] = np.clip(labels[:, 2] + labels[:, 4]/2, 0, h)xyxy2labelme(labels_xyxy, w, h, imgf, save_dir, id2cls)print('Completed!')if __name__ == '__main__':yolo_dir = "yolo"save_dir = "labelme"cls_path = "yolo/classes.txt"yolo2labelme(yolo_dir, save_dir, cls_path)
可视化
与labelme可视化一样,只需要解析yolo格式的标签文件,然后传入到display函数中即可。
import numpy as np
import os
import cv2
from pathlib import Path
import copydef display(img_path, bboxes, save_path,opencv=True):"""_summary_Args:img_path (str): 图像路径bboxes (numpy): 二维数组,其中每一行表示一个目标框,顺序为(xmin, ymin, xmax, ymax)opencv (bool): 是否使用opencv"""if opencv:color = (0, 0, 255)img_data = cv2.imread(img_path)for box in bboxes:xmin, ymin, xmax, ymax = np.array(box, dtype=np.int32)cv2.rectangle(img_data, (xmin, ymin), (xmax, ymax),color, 2)cv2.imwrite(save_path, img_data)else:from PIL import Image, ImageDrawcolor = (255, 0, 0)img_data = Image.open(img_path).convert("RGB")draw = ImageDraw.Draw(img_data)for box in bboxes:xmin, ymin, xmax, ymax = np.array(box, dtype=np.int32)draw.rectangle([xmin, ymin, xmax, ymax], outline=color)img_data.save(save_path)def xywhn2xyxy(x, w=640, h=640, padw=0, padh=0):# Convert nx4 boxes from [x, y, w, h] normalized to [x1, y1, x2, y2] where xy1=top-left, xy2=bottom-righty = copy.deepcopy(x)y[0] = w * (x[0] - x[2] / 2) + padw  # top left xy[1] = h * (x[1] - x[3] / 2) + padh  # top left yy[2] = w * (x[0] + x[2] / 2) + padw  # bottom right xy[3] = h * (x[1] + x[3] / 2) + padh  # bottom right yreturn y        def vis_yolo(yolo_dir, save_root):"""_summary_Args:yolo_dir (str): yolo数据集路径save_root (str): 图像保存路径"""yolo_img_dir = Path(yolo_dir) / "images/"yolo_label_dir = Path(yolo_dir) / 'labels/'txt_files = yolo_label_dir.glob("./*.txt")for txt_path in txt_files:with open(txt_path, "r") as f:label_data = f.readlines()name = txt_path.stemimg_path = yolo_img_dir / f"{name}.jpg"if img_path.is_file():img_data = cv2.imread(str(img_path))h0, w0, _ = img_data.shapebboxes = list()for bbox in label_data:bbox = bbox.split(" ")xywh = [float(x) for x in bbox[1:]]xyxy = xywhn2xyxy(xywh, w=w0, h=h0)bboxes.append(xyxy)save_path = os.path.join(save_root, img_path.name)display(str(img_path), bboxes, save_path)if __name__ == "__main__":yolo_root = "yolo"save_root = "vis_yolo"vis_yolo(yolo_root, save_root)
3. 与coco之间的转换
COCO(Common Objects in Context)是一个常用的目标检测、语义分割和图像标注任务的数据集格式。COCO数据集是一个大规模的图像数据集,包含了多个类别的目标物体和对应的标注信息。
COCO数据集的标注信息以JSON格式存储,其中包含了图像的信息、目标物体的类别、边界框的位置、分割掩码等。
coco格式
COCO数据集的每个图像对应一个JSON文件,其中的主要字段包括:
- “info”: 数据集的相关信息,如版本、作者等。
- “licenses”: 数据集的许可证信息。
- “images”: 图像的信息,包括图像ID、文件名、宽度、高度等。
- “annotations”: 目标物体的标注信息,包括目标ID、类别ID、边界框位置、分割掩码等。
- “categories”: 目标类别的信息,包括类别ID和类别名称。
具体而言,每个标注信息的格式如下:
{"id": <annotation_id>,"image_id": <image_id>,"category_id": <category_id>,"bbox": [x, y, width, height],"segmentation": <segmentation_data>,"area": <area>,"iscrowd": <iscrowd>
}
- "id" 表示标注的唯一ID。
- "image_id" 表示对应图像的ID。
- "category_id" 表示目标物体所属的类别ID。
- "bbox" 表示目标物体的边界框位置,由左上角顶点的坐标 (x, y) 和宽度、高度 (width, height) 组成。
- "segmentation" 表示目标物体的分割掩码,可以是多边形或二进制掩码。
- "area" 表示目标物体的面积。
- "iscrowd" 表示目标物体是否是密集分布的群体。
COCO数据集提供了丰富的目标检测和分割任务所需的信息,使得研究者和开发者能够更好地进行算法的训练和评估。
labelme转coco
labelme和coco之间的转换脚本如下:
import os
import json
from tqdm import tqdm
from pathlib import Path
import shutildef read_json(json_path):with open(json_path) as f:json_data = json.load(f)return json_datadef get_categories(cls_path):assert(os.path.exists(cls_path)), f"cannot find classes file"with open(cls_path) as f:data = f.readlines()res = list()name2idx = dict()for idx, cls in enumerate(data):res.append({"id":idx + 1, "name": cls.strip()})name2idx[cls.strip()] = idx + 1return res, name2idxdef get_image(json_data, image_id):image_dict = {}image_dict['height'] = json_data["imageHeight"]image_dict['width'] = json_data["imageWidth"]image_dict['id'] = image_idimage_dict['file_name'] = json_data["imagePath"]return image_dictdef construct_annotation(img_id, ann_id, category_id, bbox, area, iscrowd=0):annotation = {}annotation['id'] = ann_idannotation['image_id'] = img_idannotation['category_id'] = category_idannotation['bbox'] = bboxannotation['area'] = areaannotation['iscrowd'] = iscrowdannotation['segmentation'] = []return annotationdef get_annotation(objects, image_id, annotation_id, name2idx):annotation_list = []for item in objects:points = item["points"]# points = [round(x, 2) for x in points]      # [x1, y1, x2, y2]x1, y1 = points[0]x2, y2 = points[1]box_w = abs(x2 - x1)box_h = abs(y2 - y1)points = [x1, y1, box_w, box_h]tagtype = item["label"]   category_id = name2idx[tagtype]area = box_w * box_h   annotation_list.append(construct_annotation(image_id, annotation_id, category_id, points, area))annotation_id += 1return annotation_list, annotation_iddef save_coco_json(instance, save_path):import iowith io.open(save_path, 'w', encoding="utf-8") as outfile:my_json_str = json.dumps(instance, ensure_ascii=False, indent=1)outfile.write(my_json_str)def construct_coco(labelme_root, coco_img_root, coco_anno_root, cls_path):# 1. 构建COCO格式结构instance = {}instance['info'] = 'spytensor created'instance['license'] = ['license']# 2. 获取类别信息instance['categories'], name2idx =  get_categories(cls_path)images_all = []image_id = 1annotations_all = []annotation_id = 1json_files = Path(labelme_root).glob("./*.json")for json_path in tqdm(json_files):   json_data = read_json(json_path)img_name = json_data["imagePath"]objects = json_data['shapes']if not os.path.exists(os.path.join(labelme_root, img_name)): continueif len(objects)==0 :print(f"no object existed in {img_name}")# continueelse:# 处理标注数据内容annotation_list, annotation_id = get_annotation(objects, image_id, annotation_id, name2idx)annotations_all.extend(annotation_list)img_dict = get_image(json_data, image_id)images_all.append(img_dict)image_id += 1shutil.copyfile(os.path.join(labelme_root, img_name), os.path.join(coco_img_root, img_name))instance['images'] = images_allinstance['annotations'] = annotations_allsave_coco_json(instance, coco_anno_root)if __name__ == "__main__":labelme_root = "labelme"coco_img_root = "coco/train"coco_anno_path = "coco/annotations/train.json"cls_path  = "coco/classes.txt"construct_coco(labelme_root, coco_img_root, coco_anno_path, cls_path)
可视化
coco格式数据可视化需要安装pycocotools库,脚本需要指定coco数据集的图像位置和json位置,以及最后可视化结果保存位置。
from pycocotools.coco import COCO
from PIL import Image, ImageDraw
import osdef display(coco, img_id, img_root, save_root, cat_ids=None):"""基于给定的img_id, 可视化其标注内容"""# 获取images字段内容images = coco.loadImgs(ids=[img_id])[0]# 获取到annotation结构体annotation_id = coco.getAnnIds(imgIds=images['id'], catIds=cat_ids, iscrowd=None)# 加载对应的annotation结构体内容annotations = coco.loadAnns(annotation_id)print(annotations)file_path = os.path.join(img_root, images["file_name"])# print(file_path)img_data = Image.open(file_path).convert("RGB")draw = ImageDraw.Draw(img_data)for anno in annotations:bbox = anno["bbox"]x1, y1, box_w, box_h = bboxx2, y2 = x1 + box_w, y1 + box_hx1, y1, x2, y2 = int(x1), int(y1), int(x2), int(y2)draw.rectangle([x1,y1,x2,y2], outline=(255, 0,0 ))img_data.save(os.path.join(save_root, os.path.basename(images["file_name"])))if __name__ == "__main__":annFile="coco/annotations/train.json"# 初始化标注数据的 COCO api coco=COCO(annFile)# 获取COCO数据集所有的类别IDclass_ids = coco.getCatIds()# 获取catIds对应的所有image_idimgIds = coco.getImgIds(catIds=class_ids )img_ids = imgIdsfor id in img_ids:display(coco, img_id=id, cat_ids=[1], img_root="coco/train", save_root="vis_coco/")
总结
本文中,主要介绍了labelme在目标检测任务中的用法,以及对应的数据格式。重点在于给出了labelme与常见目标检测数据格式yolo和coco之间相互转换的脚本,并提供各自的可视化脚本用于检查转换后格式是否正确。