springboot综合案例(一)
文章目录
- 前言
- 项目开发流程
- 需求分析
- 库表设计
- 编码环节
- 环境搭建
- mybatis的配置
- jsp模版引擎的配置
- 日志的配置
- 基本项目工程的配置
- 功能实现
- 用户注册
- 实现验证码功能
- 实现用户注册
- 用户登录功能
- 员工列表实现
- 员工信息增删查改
- 员工增加信息
- 员工修改信息
- 删除员工信息
前言
我具体用一个小案例来带大家熟悉springboot框架
项目开发流程
需求分析: 分析用户主要需求 提取出项目核心功能 根据核心功能构建页面原型
库表设计(概要设计): 1.分析整个系统有哪些表 2.分析出表之间关联关系 3.确定字段
详细设计(流程图,伪代码): 用来验证库表准确性
功能实现(编码): 环境搭建 具体功能实现
功能测试 功能测试
部署
上线 运维
维护
全栈式: 前端 + 后端 + 运维
需求分析
系统中含有哪些模块?
每个模块功能有哪些?
a.用户模块登录注册验证码生成
b.员工模块查询删除更新添加
库表设计
系统需要2张表: 用户表 user 员工表: employee
表与表之间关系: user employee 独立两张表
确定字段:
user: id 、username、password、realname、gender
employee: id 、 name、birthday、salary、gender
我们这里设计好数据表以后,我们就开始创建数据表和数据库
如下:
创建employee
CREATE TABLE `employee` (`id` int(11) unsigned NOT NULL AUTO_INCREMENT COMMENT 'id',`name` varchar(60) DEFAULT NULL COMMENT '姓名',`birthday` datetime DEFAULT NULL COMMENT '生日',`salary` double(10,2) DEFAULT NULL COMMENT '工资',`gender` tinyint(3) unsigned DEFAULT NULL COMMENT '性别',PRIMARY KEY (`id`)
) ENGINE=InnoDB DEFAULT CHARSET=utf8mb4;
CREATE TABLE `user` (`id` int(11) unsigned NOT NULL AUTO_INCREMENT,`username` varchar(40) DEFAULT NULL COMMENT '用户名',`realname` varchar(60) DEFAULT NULL COMMENT '真实姓名',`password` varchar(40) DEFAULT NULL COMMENT '密码',`gender` tinyint(3) unsigned DEFAULT NULL COMMENT '性别',PRIMARY KEY (`id`)
) ENGINE=InnoDB DEFAULT CHARSET=utf8mb4;
编码环节
环境搭建
技术选型: springboot + mybatis + jsp + mysql
环境搭建: springboot + jsp + mybatis
mybatis的配置
引入依赖
<!--mybatis-spring-boot--><dependency><groupId>org.mybatis.spring.boot</groupId><artifactId>mybatis-spring-boot-starter</artifactId><version>2.1.4</version></dependency><!--druid--><dependency><groupId>com.alibaba</groupId><artifactId>druid</artifactId><version>1.2.4</version></dependency><!--mysql--><dependency><groupId>mysql</groupId><artifactId>mysql-connector-java</artifactId><version>5.1.38</version></dependency>写mybatis的配置文件
#配置数据库连接
datasource:type: com.alibaba.druid.pool.DruidDataSourcedriver-class-name: com.mysql.jdbc.Driverurl: jdbc:mysql://localhost:3306/ems-jsp?characterEncoding=UTF-8username: rootpassword: 123456
#配置mybatis
mybatis:mapper-locations: classpath:mapper/**Mapper.xmltype-aliases-package: com.demo.entity
jsp模版引擎的配置
引入jsp依赖
<!--jsp解析依赖--><dependency><groupId>org.apache.tomcat.embed</groupId><artifactId>tomcat-embed-jasper</artifactId></dependency>在application.yml加入以下配置
# 配置jsp模板
spring:mvc:view:prefix: /suffix: .jsp
日志的配置
在application下面加入logging配置
#配置日志使用
logging:level:root: infocom.demo: debug #指定包日志
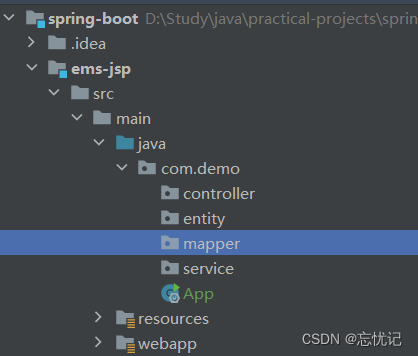
基本项目工程的配置
功能实现
我们开始实现具体的功能
用户注册
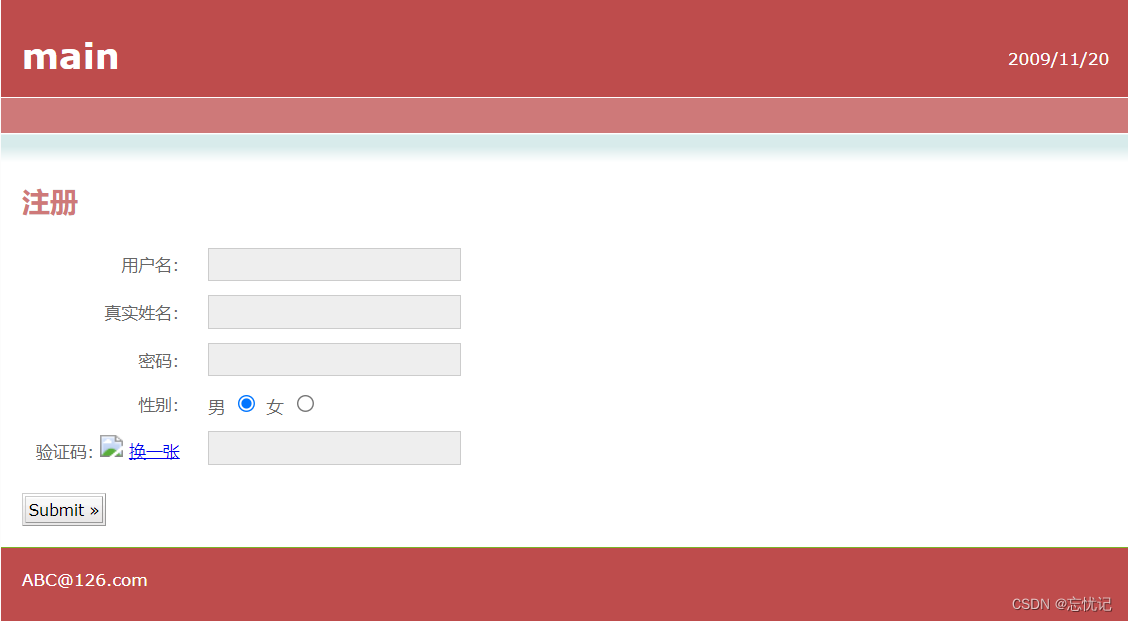
现来看一下具体的注册页面
实现验证码功能
具体的思路:
验证码生成功能实现:
1.生成随机字符
2.放入session中
3.将随机数写入图片
4.将图片响应回去
首先我先提供一个生成随机字符的工具类
package com.demo.utils;import javax.imageio.ImageIO;
import java.awt.*;
import java.awt.geom.AffineTransform;
import java.awt.image.BufferedImage;
import java.io.File;
import java.io.FileOutputStream;
import java.io.IOException;
import java.io.OutputStream;
import java.util.Arrays;
import java.util.Random;/***@创建人  c*@创建时间  2023*@描述   验证码生成*/
public class VerifyCodeUtils{//使用到Algerian字体,系统里没有的话需要安装字体,字体只显示大写,去掉了1,0,i,o几个容易混淆的字符public static final String VERIFY_CODES = "23456789ABCDEFGHJKLMNPQRSTUVWXYZ";private static Random random = new Random();/*** 使用系统默认字符源生成验证码* @param verifySize    验证码长度* @return*/public static String generateVerifyCode(int verifySize){return generateVerifyCode(verifySize, VERIFY_CODES);}/*** 使用指定源生成验证码* @param verifySize    验证码长度* @param sources   验证码字符源* @return*/public static String generateVerifyCode(int verifySize, String sources){if(sources == null || sources.length() == 0){sources = VERIFY_CODES;}int codesLen = sources.length();Random rand = new Random(System.currentTimeMillis());StringBuilder verifyCode = new StringBuilder(verifySize);for(int i = 0; i < verifySize; i++){verifyCode.append(sources.charAt(rand.nextInt(codesLen-1)));}return verifyCode.toString();}/*** 生成随机验证码文件,并返回验证码值* @param w* @param h* @param outputFile* @param verifySize* @return* @throws IOException*/public static String outputVerifyImage(int w, int h, File outputFile, int verifySize) throws IOException{String verifyCode = generateVerifyCode(verifySize);outputImage(w, h, outputFile, verifyCode);return verifyCode;}/*** 输出随机验证码图片流,并返回验证码值* @param w* @param h* @param os* @param verifySize* @return* @throws IOException*/public static String outputVerifyImage(int w, int h, OutputStream os, int verifySize) throws IOException{String verifyCode = generateVerifyCode(verifySize);outputImage(w, h, os, verifyCode);return verifyCode;}/*** 生成指定验证码图像文件* @param w* @param h* @param outputFile* @param code* @throws IOException*/public static void outputImage(int w, int h, File outputFile, String code) throws IOException{if(outputFile == null){return;}File dir = outputFile.getParentFile();if(!dir.exists()){dir.mkdirs();}try{outputFile.createNewFile();FileOutputStream fos = new FileOutputStream(outputFile);outputImage(w, h, fos, code);fos.close();} catch(IOException e){throw e;}}/*** 输出指定验证码图片流* @param w* @param h* @param os* @param code* @throws IOException*/public static void outputImage(int w, int h, OutputStream os, String code) throws IOException{int verifySize = code.length();BufferedImage image = new BufferedImage(w, h, BufferedImage.TYPE_INT_RGB);Random rand = new Random();Graphics2D g2 = image.createGraphics();g2.setRenderingHint(RenderingHints.KEY_ANTIALIASING,RenderingHints.VALUE_ANTIALIAS_ON);Color[] colors = new Color[5];Color[] colorSpaces = new Color[] { Color.WHITE, Color.CYAN,Color.GRAY, Color.LIGHT_GRAY, Color.MAGENTA, Color.ORANGE,Color.PINK, Color.YELLOW };float[] fractions = new float[colors.length];for(int i = 0; i < colors.length; i++){colors[i] = colorSpaces[rand.nextInt(colorSpaces.length)];fractions[i] = rand.nextFloat();}Arrays.sort(fractions);g2.setColor(Color.GRAY);// 设置边框色g2.fillRect(0, 0, w, h);Color c = getRandColor(200, 250);g2.setColor(c);// 设置背景色g2.fillRect(0, 2, w, h-4);//绘制干扰线Random random = new Random();g2.setColor(getRandColor(160, 200));// 设置线条的颜色for (int i = 0; i < 20; i++) {int x = random.nextInt(w - 1);int y = random.nextInt(h - 1);int xl = random.nextInt(6) + 1;int yl = random.nextInt(12) + 1;g2.drawLine(x, y, x + xl + 40, y + yl + 20);}// 添加噪点float yawpRate = 0.05f;// 噪声率int area = (int) (yawpRate * w * h);for (int i = 0; i < area; i++) {int x = random.nextInt(w);int y = random.nextInt(h);int rgb = getRandomIntColor();image.setRGB(x, y, rgb);}shear(g2, w, h, c);// 使图片扭曲g2.setColor(getRandColor(100, 160));int fontSize = h-4;Font font = new Font("Algerian", Font.ITALIC, fontSize);g2.setFont(font);char[] chars = code.toCharArray();for(int i = 0; i < verifySize; i++){AffineTransform affine = new AffineTransform();affine.setToRotation(Math.PI / 4 * rand.nextDouble() * (rand.nextBoolean() ? 1 : -1), (w / verifySize) * i + fontSize/2, h/2);g2.setTransform(affine);g2.drawChars(chars, i, 1, ((w-10) / verifySize) * i + 5, h/2 + fontSize/2 - 10);}g2.dispose();ImageIO.write(image, "jpg", os);}private static Color getRandColor(int fc, int bc) {if (fc > 255)fc = 255;if (bc > 255)bc = 255;int r = fc + random.nextInt(bc - fc);int g = fc + random.nextInt(bc - fc);int b = fc + random.nextInt(bc - fc);return new Color(r, g, b);}private static int getRandomIntColor() {int[] rgb = getRandomRgb();int color = 0;for (int c : rgb) {color = color << 8;color = color | c;}return color;}private static int[] getRandomRgb() {int[] rgb = new int[3];for (int i = 0; i < 3; i++) {rgb[i] = random.nextInt(255);}return rgb;}private static void shear(Graphics g, int w1, int h1, Color color) {shearX(g, w1, h1, color);shearY(g, w1, h1, color);}private static void shearX(Graphics g, int w1, int h1, Color color) {int period = random.nextInt(2);boolean borderGap = true;int frames = 1;int phase = random.nextInt(2);for (int i = 0; i < h1; i++) {double d = (double) (period >> 1)* Math.sin((double) i / (double) period+ (6.2831853071795862D * (double) phase)/ (double) frames);g.copyArea(0, i, w1, 1, (int) d, 0);if (borderGap) {g.setColor(color);g.drawLine((int) d, i, 0, i);g.drawLine((int) d + w1, i, w1, i);}}}private static void shearY(Graphics g, int w1, int h1, Color color) {int period = random.nextInt(40) + 10; // 50;boolean borderGap = true;int frames = 20;int phase = 7;for (int i = 0; i < w1; i++) {double d = (double) (period >> 1)* Math.sin((double) i / (double) period+ (6.2831853071795862D * (double) phase)/ (double) frames);g.copyArea(i, 0, 1, h1, 0, (int) d);if (borderGap) {g.setColor(color);g.drawLine(i, (int) d, i, 0);g.drawLine(i, (int) d + h1, i, h1);}}}public static void main(String[] args) throws IOException {//获取验证码String s = generateVerifyCode(4);//将验证码放入图片中outputImage(260,60,new File("/Users/chenyannan/Desktop/安工资料/aa.jpg"),s);System.out.println(s);}
}
然后建一个测试类,我们测试一下
package com.demo.utils;import org.junit.jupiter.api.Test;import java.io.File;
import java.io.FileOutputStream;
import java.io.IOException;import static org.junit.jupiter.api.Assertions.*;class VerifyCodeUtilsTest {@Testpublic void TestGet() throws IOException {//生成验证码String s=VerifyCodeUtils.generateVerifyCode(4);System.out.println(s);//写入图片FileOutputStream os=new FileOutputStream(new File("D:\\Study\\java\\practical-projects\\spring-boot\\ems-jsp\\aa.png"));VerifyCodeUtils.outputImage(200,80,os,s);}
}
接下来编写Controller层的代码
@Controller
@RequestMapping("user")
public class UserController {/*** 用来生成验证码操作*/@RequestMapping("generateImageCode")public void generateImageCode(HttpSession httpSession, HttpServletResponse response) throws IOException {//1.生成随机字符串String code=VerifyCodeUtils.generateVerifyCode(4);//2.保存随机字符串在session中httpSession.setAttribute("code",code);//3.将随机字符串生成图片//4.通过response响应的图片response.setContentType("image/png");ServletOutputStream os=response.getOutputStream();VerifyCodeUtils.outputImage(220,80,os,code);}
}
前台代码修改
<tr><td valign="middle" align="right">验证码:<img id="num" src="${pageContext.request.contextPath}/user/generateImageCode" /><a href="javascript:;" onclick="document.getElementById('num').src = '${pageContext.request.contextPath}/user/generateImageCode?'+(new Date()).getTime()">换一张</a></td><td valign="middle" align="left"><input type="text" class="inputgri" name="code" /></td></tr>
实现用户注册
用户注册功能实现:
1.根据用户输入验证码比较session中验证码是否一致
2.如果一致完成注册,如果不一致直接返回错误
3.完成注册向数据库中保存当前的用户信息
a.保存信息之前判断当前用户名是否存在 如果存在直接返回错误
b.如果当前用户名不存在保存用户信息 保存用户信息给密码进行加密处理
构建实体类
public class User {private Integer id;private String username;private String realname;private String password;private Boolean gender;}//get和set方法略写
构建Controller
/*** 用户注册功能*/@RequestMapping("register")public String register(User user, String code,HttpSession session) throws UnsupportedEncodingException {log.debug("接收到验证码: {}",code);log.debug("用户名:{}, 真实姓名:{}, 密码:{}, 性别:{}",user.getUsername(),user.getRealname(),user.getPassword(),user.getGender());try {//1.比较验证是否一致String sessionCode = session.getAttribute("code").toString();if (!sessionCode.equalsIgnoreCase(code)) throw new RuntimeException("验证码输入错误!");//2.注册用户userService.register(user);} catch (RuntimeException e) {e.printStackTrace();return "redirect:/regist.jsp?msg="+ URLEncoder.encode(e.getMessage(),"UTF-8");}return "redirect:/login.jsp";}
构建Mapper
public interface UserMapper {//根据用户名查询用户User findByUserName(String username);//注册用户void save(User user);
}
mapper配置文件
<?xml version="1.0" encoding="UTF-8"?><!DOCTYPE mapperPUBLIC "-//mybatis.org//DTD Mapper 3.0//EN""http://mybatis.org/dtd/mybatis-3-mapper.dtd">
<mapper namespace="com.demo.mapper.UserMapper"><!--根据用户名查询用户--><select id="findByUserName" parameterType="String" resultType="User">select id,username,realname,password,gender from `user`where username = #{username}</select><!--注册用户--><insert id="save" parameterType="User" useGeneratedKeys="true" keyProperty="id">insert into `user` values(#{id},#{username},#{realname},#{password},#{gender})</insert></mapper>
构建Service业务层代码
@Service
@Transactional
public class UserService {@Resourceprivate UserMapper userMapper;public void register(User user) {//1.根据用户查询数据库是否存在改用户名User userDB = userMapper.findByUserName(user.getUsername());if (!ObjectUtils.isEmpty(userDB)) throw new RuntimeException("用户名已存在!");//2.进行注册之前给明文加密String passwordSecret = DigestUtils.md5DigestAsHex(user.getPassword().getBytes(StandardCharsets.UTF_8));user.setPassword(passwordSecret);userMapper.save(user);}
}
前台代码
<%@page contentType="text/html; UTF-8" isELIgnored="false" pageEncoding="UTF-8" %>
<!DOCTYPE html PUBLIC "-//W3C//DTD HTML 4.01 Transitional//EN" "http://www.w3.org/TR/html4/loose.dtd">
<html><head><title>regist</title><meta http-equiv="Content-Type" content="text/html; charset=UTF-8"><link rel="stylesheet" type="text/css" href="css/style.css" /></head><body><div id="wrap"><div id="top_content"><div id="header"><div id="rightheader"><p>2009/11/20<br /></p></div><div id="topheader"><h1 id="title"><a href="#">main</a></h1></div><div id="navigation"></div></div><div id="content"><p id="whereami"></p><h1>注册 ---> ${param.msg}</h1><form action="${pageContext.request.contextPath}/user/register" method="post"><table cellpadding="0" cellspacing="0" border="0"class="form_table"><tr><td valign="middle" align="right">用户名:</td><td valign="middle" align="left"><input type="text" class="inputgri" name="username" /></td></tr><tr><td valign="middle" align="right">真实姓名:</td><td valign="middle" align="left"><input type="text" class="inputgri" name="realname" /></td></tr><tr><td valign="middle" align="right">密码:</td><td valign="middle" align="left"><input type="password" class="inputgri" name="password" /></td></tr><tr><td valign="middle" align="right">性别:</td><td valign="middle" align="left">男<input type="radio" class="inputgri" name="gender" value="1" checked="checked"/>女<input type="radio" class="inputgri" name="gender" value="0"/></td></tr><tr><td valign="middle" align="right">验证码:<img id="num" src="${pageContext.request.contextPath}/user/generateImageCode" /><a href="javascript:;" onclick="document.getElementById('num').src = '${pageContext.request.contextPath}/user/generateImageCode?'+(new Date()).getTime()">换一张</a></td><td valign="middle" align="left"><input type="text" class="inputgri" name="code" /></td></tr></table><p><input type="submit" class="button" value="Submit »" /><input type="button" class="button" onclick="location.href='${pageContext.request.contextPath}/login.jsp'" value="Login »" /></p></form></div></div><div id="footer"><div id="footer_bg">ABC@126.com</div></div></div></body>
</html>用户登录功能
具体的原理
用户登录功能实现:
1.根据用户输入用户名去数据库中查询是否存在改用户名
2.如果存在,判断密码是否一致 如果不存在,用户名输入错误
3.判断密码根据数据库加密密码与对接收密码进行md5加密之后比较
md5: 只要内容相同 多次计算md5 结果一定是一致
4.保存用户登录标记到Session中
Controller
/*** 用户登录功能*/@RequestMapping("login")public String login(String username,String password,HttpSession session) throws UnsupportedEncodingException {log.debug("接收到用户名:{}, 接收到密码:{}",username,password);try {//1.执行登录业务逻辑User user = userService.login(username,password);//2.登录成功,保存用户登录标记session.setAttribute("user",user);} catch (Exception e) {e.printStackTrace();return "redirect:/login.jsp?msg="+URLEncoder.encode(e.getMessage(),"UTF-8");}return "redirect:/employee/list";}
Service业务逻辑层
public User login(String username, String password) {//1.根据用户输入的用户名查询数据是否存在User user=userMapper.findByUserName(username);//2.判断对象是否存在if (ObjectUtils.isEmpty(user)) throw new RuntimeException("用户名输入错误!");//3.判断密码的正确性String digestPassword = DigestUtils.md5DigestAsHex(user.getPassword().getBytes(StandardCharsets.UTF_8));if (user.getPassword().equals(digestPassword)) throw new RuntimeException("密码输入错误!!!");return user;}
员工列表实现
具体的逻辑
员工列表:
1.在数据库中查询所有员工信息
2.在页面中进行展示
实体类
public class Employee {private Integer id;private String name;private Date birthday;private Double salary;private Boolean gender;}
controller
@Controller
@RequestMapping("/employee")
public class EmployeeController {@Resourceprivate EmployeeService employeeService;/*** 员工列表** @return*/@RequestMapping("list")public String listEmployee(HttpServletRequest request, Model model) {//1.获取员工列表List<Employee> employees = employeeService.list();//request.setAttribute("employees",employees);model.addAttribute("employees", employees);return "emplist";}
}
Mapper
public interface EmployeeMapper {//查询员工信息列表List<Employee> list();
}
<!--员工列表--><select id="list" resultType="Employee">select id,name,birthday,salary,gender from `employee`</select>
Service
@Service
public class EmployeeService {@ResourceEmployeeMapper employeeMapper;public List<Employee> list(){return employeeMapper.list();}}
员工信息增删查改
员工增加信息
1.在员工controller中开发一个添加方法2.接收员工信息3.将员工信息保存到数据库4.跳转到员工列表展示数据
controller
/*** 员工增加信息*/@RequestMapping("add")public String addEmployee(Employee employee) {log.debug("员工名称: {}", employee.getName());log.debug("员工工资: {}", employee.getSalary());log.debug("员工生日: {}", employee.getBirthday());log.debug("员工性别: {}", employee.getGender());//1.保存员工信息employeeService.add(employee);return "redirect:/employee/list";//跳转到列表}
Mapper
public interface EmployeeMapper {//查询员工信息列表List<Employee> list();//添加员工信息void add(Employee employee);
}<!--添加员工信息--><insert id="add" parameterType="Employee" useGeneratedKeys="true" keyProperty="id">insert into `employee` values(#{id},#{name},#{birthday},#{salary},#{gender})</insert>
Service
public void add(Employee employee) {employeeMapper.add(employee);}
员工修改信息
更新操作示意图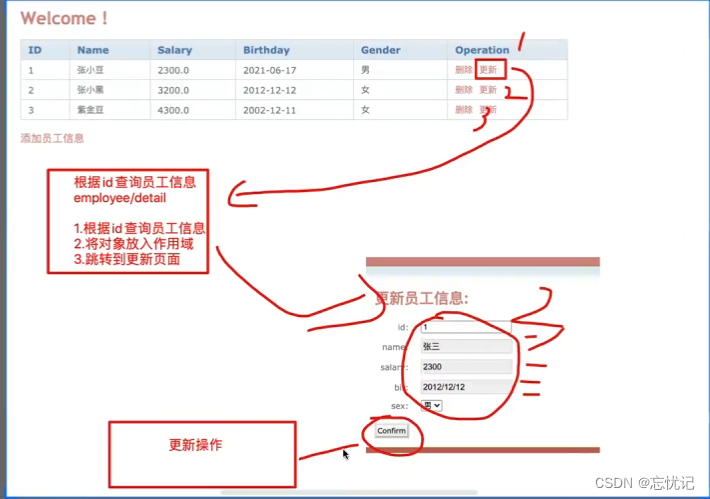
更新员工:
上半步 数据回显:
1.点击更新链接传递当前更新员工id到controller
2.在controller中根据id查询员工信息
3.将查询到的员工信息保存到作用域
4.跳转到更新页面展示修改员工信息
Controller
@RequestMapping("detail")public String detailEmployee(Integer id,Model model){log.debug("接收id: {}", id);//1.根据id查询一个员工Employee employee = employeeService.idByEmployee(id);//2.存入作用域request session applicationmodel.addAttribute("employee", employee);return "updateEmp";//跳转页面}
Service
//根据id查询员工信息public Employee idByEmployee(Integer id) {return employeeMapper.idByEmployee( id);}
/*** 根据id查询员工信息*/@RequestMapping("detail")public String detailEmployee(Integer id,Model model){log.debug("接收id: {}", id);//1.根据id查询一个员工Employee employee = employeeService.idByEmployee(id);//2.存入作用域request session applicationmodel.addAttribute("employee", employee);return "updateEmp";//跳转页面}
Mapper
EmployeeMapper文件
Employee idByEmployee(Integer id);xml文件
<!--根据id查询一个员工信息--><select id="idByEmployee" parameterType="Integer" resultType="Employee">select id,name,birthday,salary,gender from `employee`where id = #{id}</select>
下半步:
1.获取更新之后员工信息
2.更新数据库
Controller
/*** 更新员工信息** @return*/@RequestMapping("update")public String updateEmployee(Employee employee) {log.debug("员工id: {}", employee.getId());log.debug("员工名称: {}", employee.getName());log.debug("员工工资: {}", employee.getSalary());log.debug("员工生日: {}", employee.getBirthday());log.debug("员工性别: {}", employee.getGender());//1.更新员工信息employeeService.update(employee);//2.跳转到员工列表return "redirect:/employee/list";}
Service
public void update(Employee employee) {employeeMapper.update(employee);}
Mapper
EmployeeMapper类文件
void update(Employee employee);
xml文件
<!--更新员工信息--><update id="update" parameterType="Employee">update `employee` set name=#{name},birthday=#{birthday},salary=#{salary},gender=#{gender}where id = #{id}</update>
删除员工信息
具体思路:
1.点击删除根据id去数据库中删除指定员工信息
2.删除成功之后跳转到列表页面
Controller
/*** 根据id删除员工信息* @return*/@RequestMapping("/delete")public String deleteEmployee(Integer id){log.debug("删除的id: {}",id);//1.根据id删除员工信息employeeService.delete(id);//2.跳转到列表页面return "redirect:/employee/list";}
Service
public void delete(Integer id) {employeeMapper.delete(id);}
Mapper
EmployeeMapper类
void delete(Integer id);
xml文件
<!--根据id删除员工信息--><delete id="delete" parameterType="Integer">delete from `employee` where id=#{id}</delete>