HarmonyOS NEXT Push接入
接入HarmonyOS NEXT Push 推送功能,相比于 Android 真的是简单太多。不再需要适配接入各个厂家的推送 SDK,真是舒服。
1.开通推送服务与配置Client ID
1.1 创建应用获取Client ID
按照官方文档来就可以了:https://developer.huawei.com/consumer/cn/doc/harmonyos-guides-V5/push-config-setting-V5
1.2 配置Client ID
在项目模块级别下的src/main/module.json5(例如entry/src/main/module.json5)中,新增metadata并配置client_id,如下所示:
"module": {"name": "entry","type": "xxx","description": "xxxx","mainElement": "xxxx","deviceTypes": [],"pages": "xxxx","abilities": [],// 配置如下信息"metadata": [ {"name": "client_id",// 配置为步骤1中获取的Client ID"value": "xxxxxx"  }]
}
2.获取 push token 并上传
import { pushService } from '@kit.PushKit';
import { hilog } from '@kit.PerformanceAnalysisKit';
import { BusinessError } from '@kit.BasicServicesKit';
import { UIAbility, AbilityConstant, Want } from '@kit.AbilityKit';export default class EntryAbility extends UIAbility {async onCreate(want: Want, launchParam: AbilityConstant.LaunchParam): Promise<void> {// 获取Push Tokentry {const pushToken: string = await pushService.getToken();hilog.info(0x0000, 'testTag', 'Succeeded in getting push token: %{public}s', pushToken);} catch (err) {let e: BusinessError = err as BusinessError;hilog.error(0x0000, 'testTag', 'Failed to get push token: %{public}d %{public}s', e.code, e.message);}// 上报Push Token 到服务器uploadPushToken()}
}
3. AAID
上传 push token 时,可以使用 AAID 当作 识别设备的唯一标识,即类是 Android 中的 deviceId 使用。i按照官方文档说明:
AAID(Anonymous Application Identifier):应用匿名标识符,标识运行在移动智能终端设备上的应用实例,只有该应用实例才能访问该标识符,它只存在于应用的安装期,总长度32位。与无法重置的设备级硬件ID相比,AAID具有更好的隐私权属性。
AAID具有以下特性:
匿名化、无隐私风险:AAID和已有的任何标识符都不关联,并且每个应用只能访问自己的AAID。
同一个设备上,同一个开发者的多个应用,AAID取值不同。
同一个设备上,不同开发者的应用,AAID取值不同。
不同设备上,同一个开发者的应用,AAID取值不同。
不同设备上,不同开发者的应用,AAID取值不同。
场景介绍
AAID会在包括但不限于下述场景中发生变化:
应用卸载重装。
应用调用删除AAID接口。
用户恢复出厂设置。
用户清除应用数据。
获取 AAID :
import { AbilityConstant, UIAbility, Want } from '@kit.AbilityKit';
import { AAID } from '@kit.PushKit';
import { BusinessError } from '@kit.BasicServicesKit';
import { hilog } from '@kit.PerformanceAnalysisKit';export default class EntryAbility extends UIAbility {// 入参want与launchParam并未使用,为初始化项目时自带参数async onCreate(want: Want, launchParam: AbilityConstant.LaunchParam): Promise<void> {// 获取AAIDtry {const aaid: string = await AAID.getAAID();hilog.info(0x0000, 'testTag', 'Succeeded in getting AAID.');} catch (err) {let e: BusinessError = err as BusinessError;hilog.error(0x0000, 'testTag', 'Failed to get AAID: %{public}d %{public}s', e.code, e.message);}}
}
4. 唤醒应用
后端在推送消息的时候,数据结构:
// Request URL
POST https://push-api.cloud.huawei.com/v3/[projectId]/messages:send// Request Header
Content-Type: application/json
Authorization: Bearer eyJr*****OiIx---****.eyJh*****iJodHR--***.QRod*****4Gp---****
push-type: 0// Request Body
{"payload": {"notification": {"category": "MARKETING","title": "普通通知标题","body": "普通通知内容","clickAction": {"actionType": 0,"data": {"testKey": "testValue"}}}},"target": {"token": ["IQAAAA**********4Tw"]},"pushOptions": {"testMessage": true}
}
我们主要关注 clickAction 这个结构:
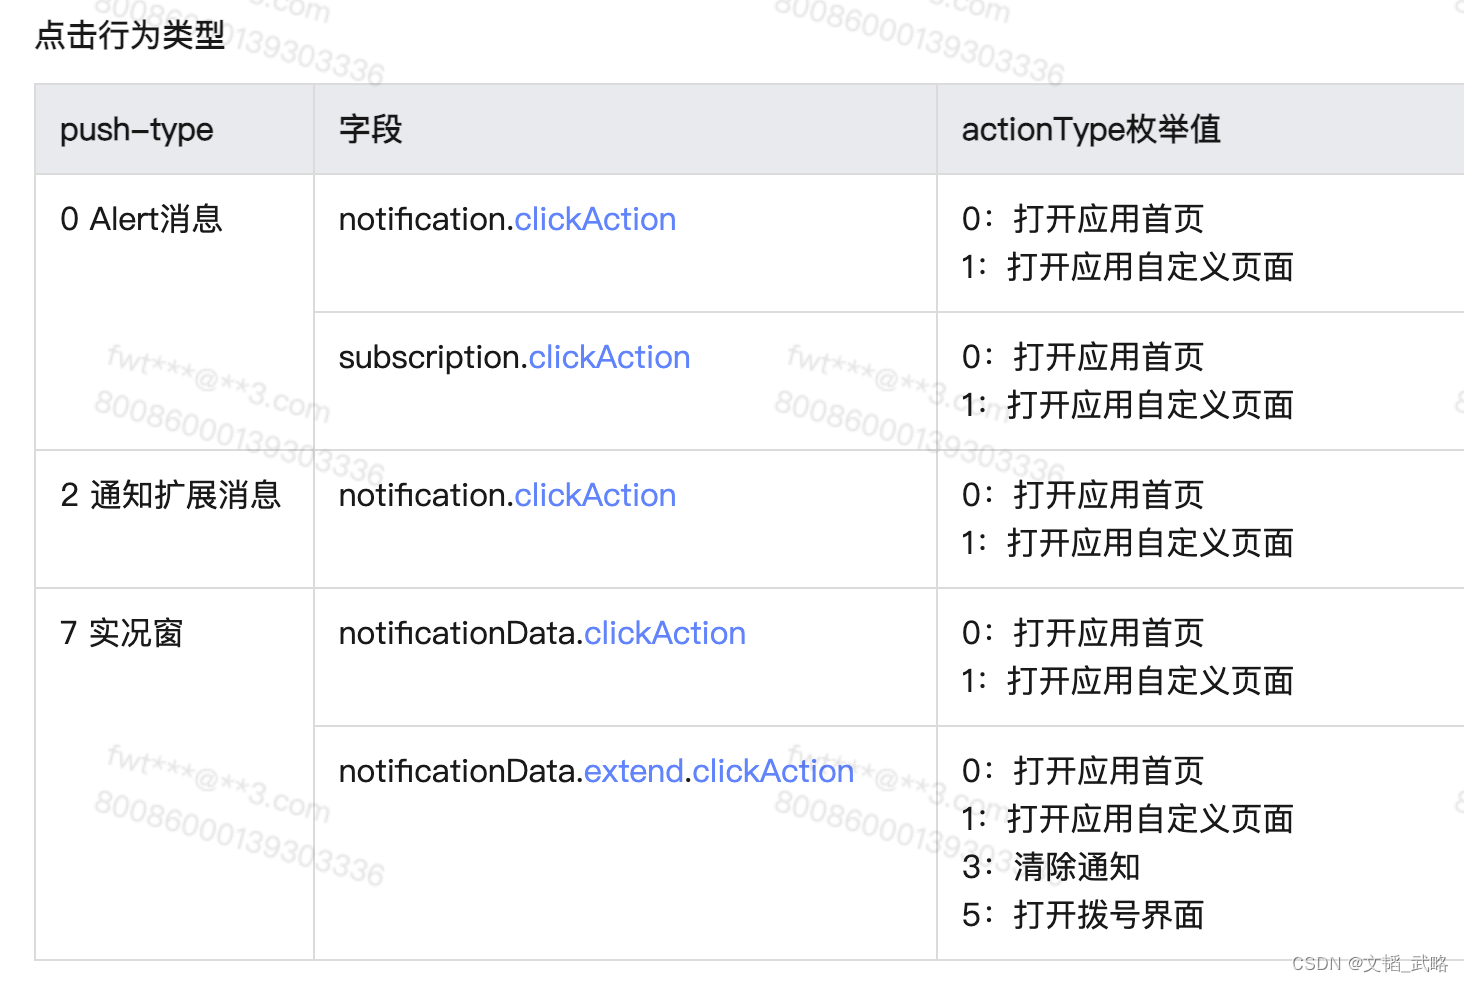
actionType:点击消息的动作,在后端push-type: 0 即表示 Aler消息时:
0:打开应用首页
1:打开应用自定义页面
当然还有其他类型,如下:

但是一般我们只关注 push-type: 0 的情况即可。
详情请参见ClickAction。
4.1 通知权限申请
判断是否获得通知权限:
notificationManager.isNotificationEnabled()
如果没有,则请求通知栏权限:
private requestNotificationPermission = () => {notificationManager.isNotificationEnabled().then((data: boolean) => {console.info("isNotificationEnabled success, data: " + JSON.stringify(data));if(!data){notificationManager.requestEnableNotification().then(() => {console.info(`[ANS] requestEnableNotification success`);}).catch((err : BusinessError) => {if(1600004 == err.code){console.info(`[ANS] requestEnableNotification refused`);} else {console.error(`[ANS] requestEnableNotification failed, code is ${err.code}, message is ${err.message}`);}});}}).catch((err : BusinessError) => {console.error(`isNotificationEnabled fail: ${JSON.stringify(err)}`);});}
4.2 跳转到应用
后端推送消息配置 “actionType”: 0,点击通知栏消息后,即可拉起应用
4.2 跳转到指定页面
后端推送消息配置 “actionType”: 1。
这个时候就有两种指定页面的方式:
方式1: 指定 action
方式2:指定 uri
4.2.1 Action 跳转到指定页面
需要在module.json5 中配置 abilibies:
"abilities": [{"name": "MainAbility","launchType": "singleton","srcEntry": "./ets/abilities/MainAbility.ets","description": "$string:MainAbility_desc","icon": "$media:icon","label": "$string:MainAbility_label","exported": true,"startWindowIcon": "$media:icon","startWindowBackground": "$color:startWindowBackgroundColor","skills": [{"entities": ["entity.system.home"],"actions": ["action.system.home",],}, {"actions": ["https://www.huawei.com/test"]}]},
我配置的 action 是:
{"actions": ["https://www.huawei.com/test"]}
细心的你可能会发现这个ability 上面还有一个配置:
{"entities": ["entity.system.home"],"actions": ["action.system.home",],}
千万别动,这个是指定启动的 Ability 的配置,如果你指定的 Abiblity 不是启动页的 Ability ,则没有这个问题。

4.2.2 uri 跳转到指定页面
"abilities": [{"name": "MainAbility","launchType": "singleton","srcEntry": "./ets/abilities/MainAbility.ets","description": "$string:MainAbility_desc","icon": "$media:icon","label": "$string:MainAbility_label","exported": true,"startWindowIcon": "$media:icon","startWindowBackground": "$color:startWindowBackgroundColor","skills": [{"actions": ["",],"uris": [{"scheme": "https","host": "www.huawei.com","path": "test"},]}]},
记住 actions 里的内容必须是 “” 空的,不然会去适配 action。

4.3 参数解析
拉起应用后,肯定少不了参数的解析和传递。
{"payload": {"notification": {"category": "MARKETING","title": "普通通知标题","body": "普通通知内容","clickAction": {"actionType": 0,"data": {"testKey": "testValue"}}}},"target": {"token": ["IQAAAA**********4Tw"]},"pushOptions": {"testMessage": true}
}
这里的 “data”: {“testKey”: “testValue”} 就是我们需要解析的参数。
解析参数在两个地方需要处理,
情况1:应用未启动,走 UIAbility 的 onCreate(want: Want)
情况1:应用启动了,在前台或后台,走 UIAbility 的 onNewWant(want: Want)
而这两个方法都有一个参数 want: Want 。我们的参数也就在这个参数里面了。
4.3.1 onNewWant
onNewWant() 就比较简单了,直接解析参数后,掉用 router 到指定页面即可:
onNewWant(want: Want): void {if (want?.uri != null && want.uri.length > 0) {router.pushUrl({url: want.parameters?.['page'] as string,params: want.parameters})}// 获取消息中传递的data数据hilog.info(0x0000, 'testTag', 'onNewWant --> Succeeded in getting message data: %{public}s', JSON.stringify(want.parameters));}
可以看到,我这里把需要跳转到页面的 page 路径传递过来了,这样就方便多了。
4.3.2 onCreate()
onCreate 处理起来就会比较麻烦,因为涉及到参数的传递。
在 onCreate 解析参数
localStorage = new LocalStorage();async onCreate(want: Want): Promise<void> {// 获取消息中传递的data数据if (want?.uri != null && want.uri.length > 0) {let routePage = want.parameters?.['page'] as string;let routePageParam = want.parameters as Record<string, object>this.localStorage.clear()this.localStorage.setOrCreate('page', routePage)this.localStorage.setOrCreate('params', routePageParam)hilog.info(0x0000, 'testTag', 'onCreate --> page: ', ', page: ' + this.routePage);}
因为是应用未启动,所以会走 onWindowStageCeate(),假设我们的启动页是 ‘pages/MainPage
onWindowStageCreate(windowStage: window.WindowStage): void {windowStage.loadContent('pages/MainPage', this.localStorage);}
在 loadContent 方法中,把我们的 localStorage 传递过去,剩下的参数其他页面自己去解析了。
4.4 启动页解析 LocalStorage 参数
关于LocalStorage的知识点可以看这里
let storage = LocalStorage.getShared()
@Entry(storage)
@Component
struct MainPage {@State notificationState: string = ''private clickBackTimeRecord: number = 0;@LocalStorageProp('page') page: string = ''@LocalStorageProp('params') params: Record<string, object> = {}
}
差不多就这么多,如果指定唤起的 UIAbility 不是 main Ability 的话,稍微有点不一样,不过也是大同小异了。
5. Notification 测试
有时候我们不方便用华为后台推送测试的话,可以自己发送通知到通知栏,也是一样的,甚至更方便。因为华为推送后台,如果是指定启动应用内页面的话,action 和 uri 都是无法发送参数的。但是你硬是要用 uri 拼接参数传递过来,然后自己再解析 uri 中的参数,也不是不行,就是太麻烦了。
那么自己发送通知到通知栏就方便多了,还可以传递 data 参数。上代码:
private publishNotification() {// 通过WantAgentInfo的operationType设置动作类型let wantAgentInfo: wantAgent.WantAgentInfo = {wants: [{deviceId: '',bundleName: 'com.huawei.demo',abilityName: 'MainAbility',action: '', // "https://www.huawei.com/test",entities: [],uri: "https://www.huawei.com/test", parameters: {page: 'pages/ClickActionInnerPage',id: '123456'}}],operationType: wantAgent.OperationType.START_ABILITY,requestCode: 0,wantAgentFlags:[wantAgent.WantAgentFlags.CONSTANT_FLAG]};// 创建WantAgentwantAgent.getWantAgent(wantAgentInfo, (err: BusinessError, data: WantAgent) => {if (err) {console.error(`Failed to get want agent. Code is ${err.code}, message is ${err.message}`);return;}console.info('Succeeded in getting want agent.');let notificationRequest: notificationManager.NotificationRequest = {id: 1,content: {notificationContentType: notificationManager.ContentType.NOTIFICATION_CONTENT_BASIC_TEXT, // 普通文本类型通知normal: {title: '我是标题党',text: 'HarmonyOS 论坛中有研发人员求助,反馈通知没有没有声音,因此在真机上验证了一下,果不其然,没有通知的提示音',additionalText:'通知的附加内容',}},notificationSlotType: notificationManager.SlotType.SOCIAL_COMMUNICATION,wantAgent: data,};notificationManager.publish(notificationRequest, (err: BusinessError) => {if (err) {console.error(`Failed to publish notification. Code is ${err.code}, message is ${err.message}`);return;}console.info('Succeeded in publishing notification.');});});}
同样,跟之前说的一样, 如果使用 uri 指定跳转页面的话,action 要是空, bundleName 和 abilityName 必须要填对,也就是我们的包名和指定需要启动的 UIAbility 。也就是上面我说过的,不一定是要 MainUIAbility作为启动的Ability 的,是可以指定的哦。
希望对你有帮助。
