安卓应用开发学习:通过腾讯地图SDK实现定位功能
一、引言
这几天有些忙,耽误了写日志,但我的学习始终没有落下,有空我就会研究《 Android App 开发进阶与项目实战》一书中定位导航方面的内容。在我的手机上先后实现了“获取经纬度及地理位置描述信息”和“获取导航卫星信息”功能后,这两天,我又参照这书中的内容,实现了通过腾讯地图的Android定位SDK实现定位的功能,并有所扩展。书文以记之。
二、腾讯位置服务平台创建应用
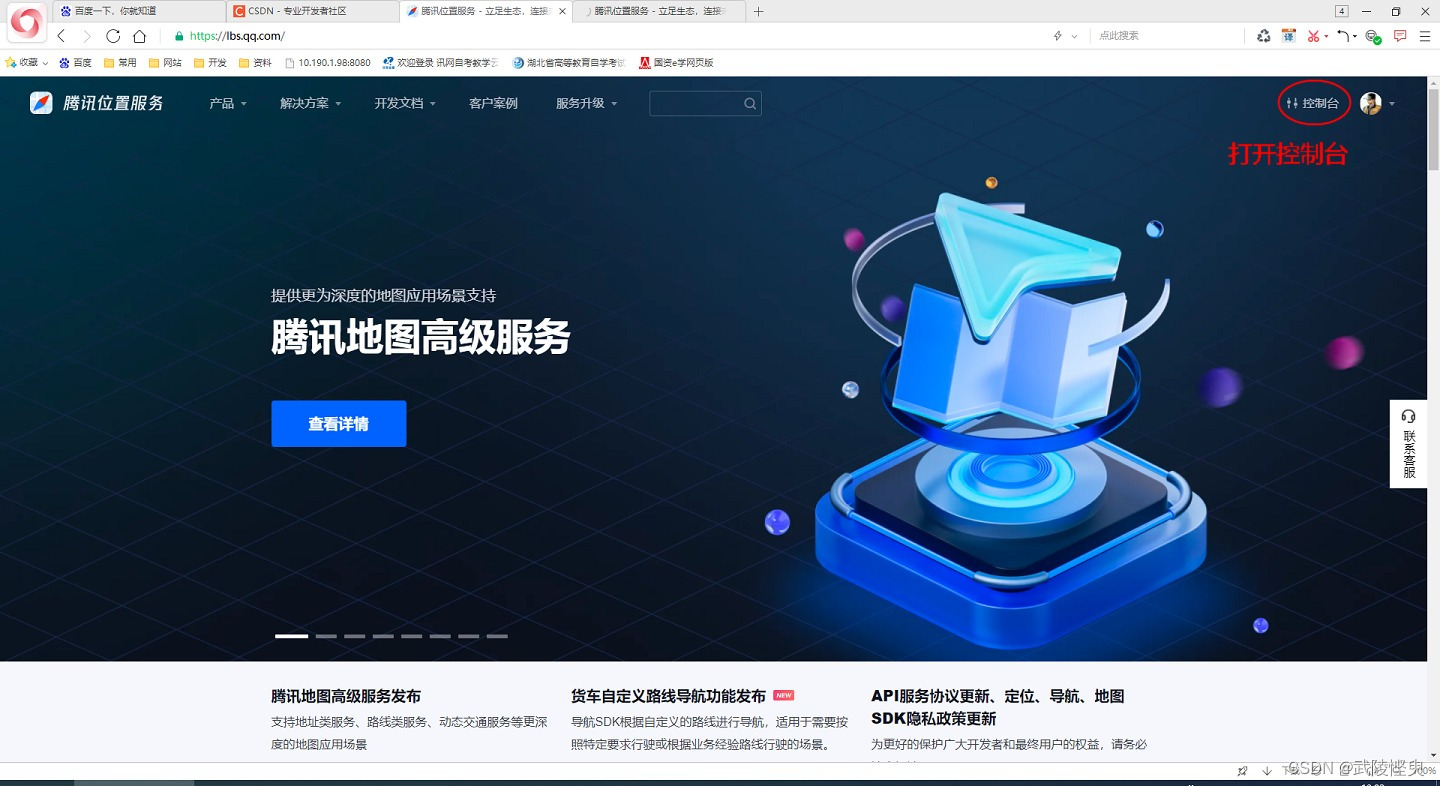
要使用腾讯地图的位置服务,首先要到腾讯位置服务平台(https://lbs.qq.com/)注册一个用户,登录后进入控制台,在应用管理下创建自己的应用,然后添加Key。具体步骤见以下截图:
1.登录打开控制台
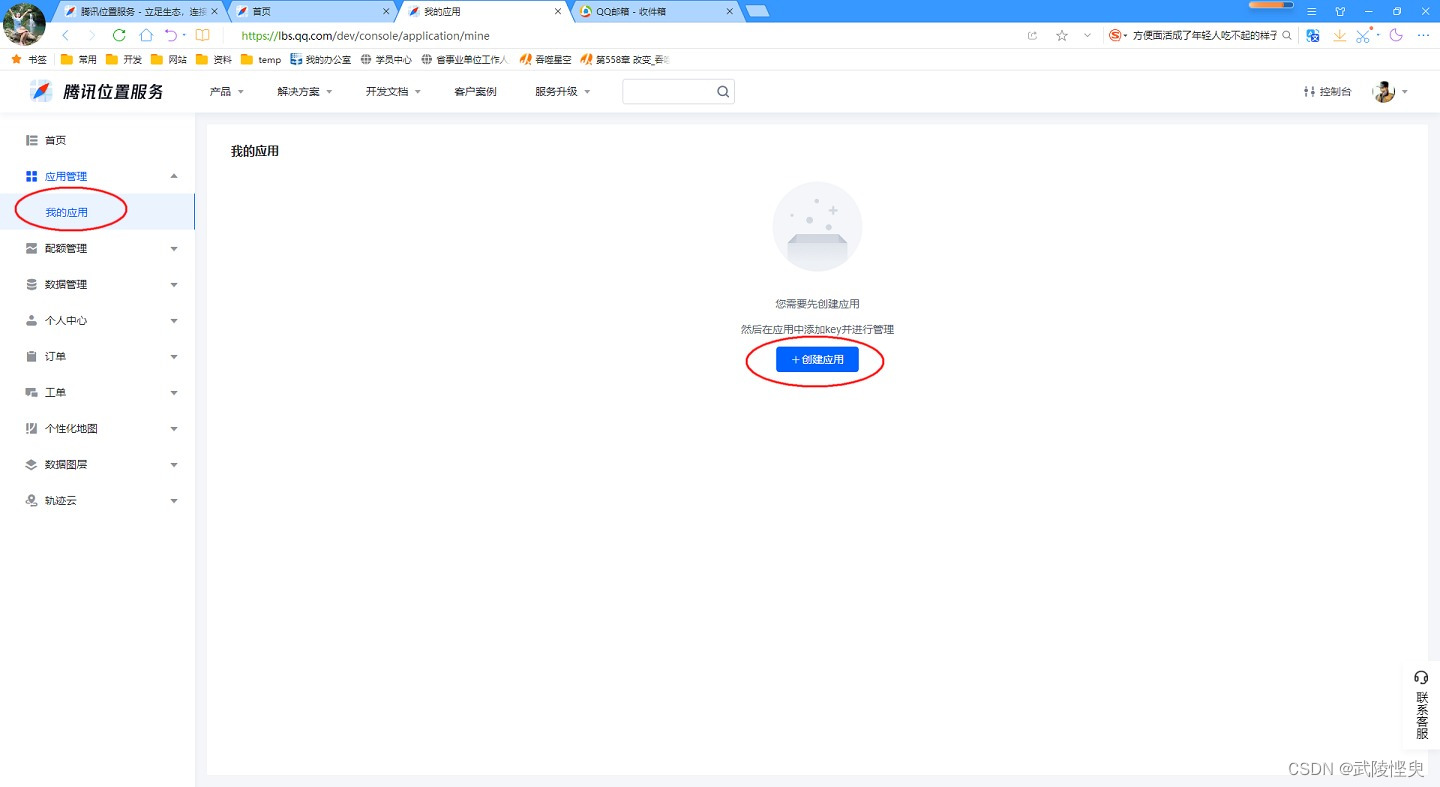
2.找到应用管理->我的应用,点击“创建应用”按钮。
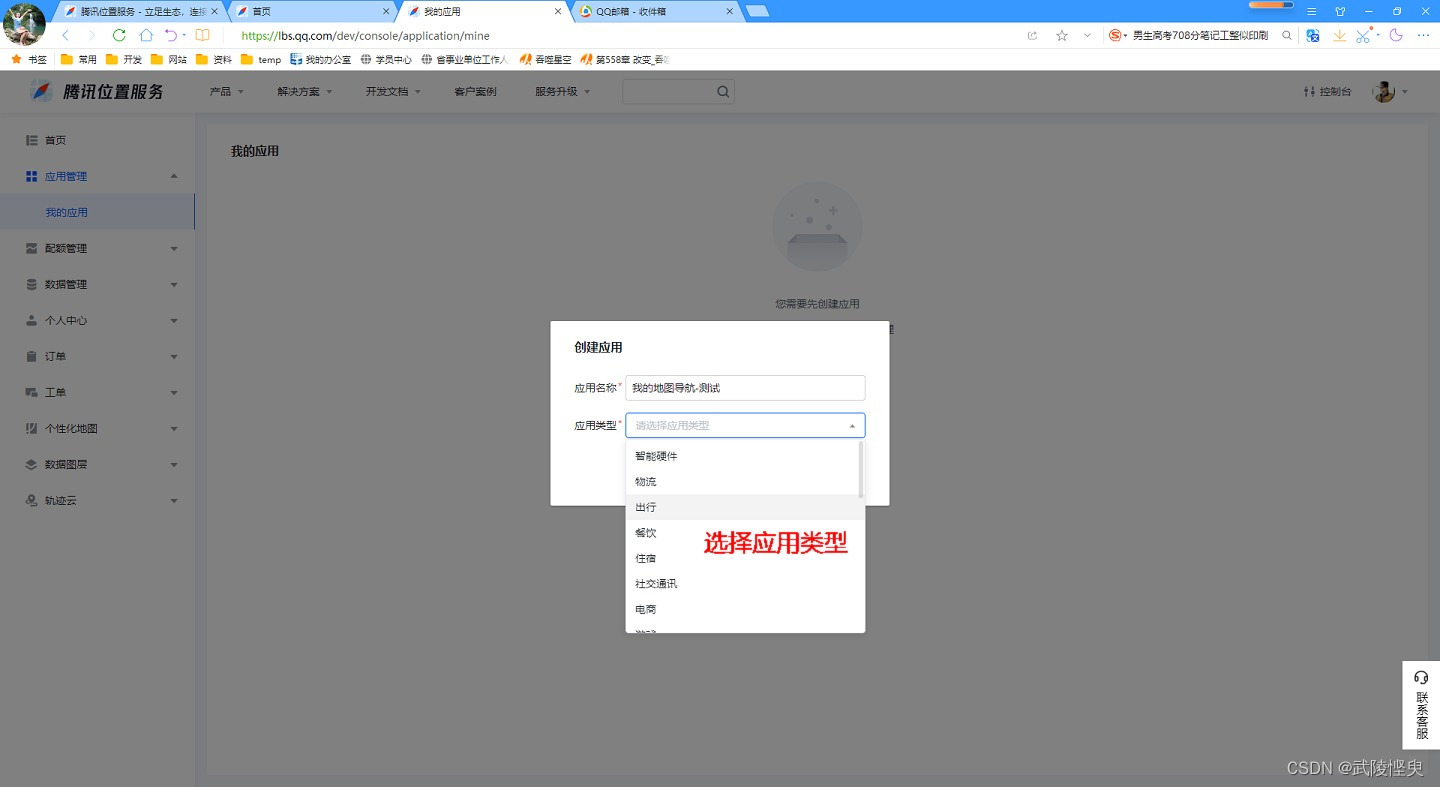
3.输入应用的名称,并选择应用类型,确认后生成应用。
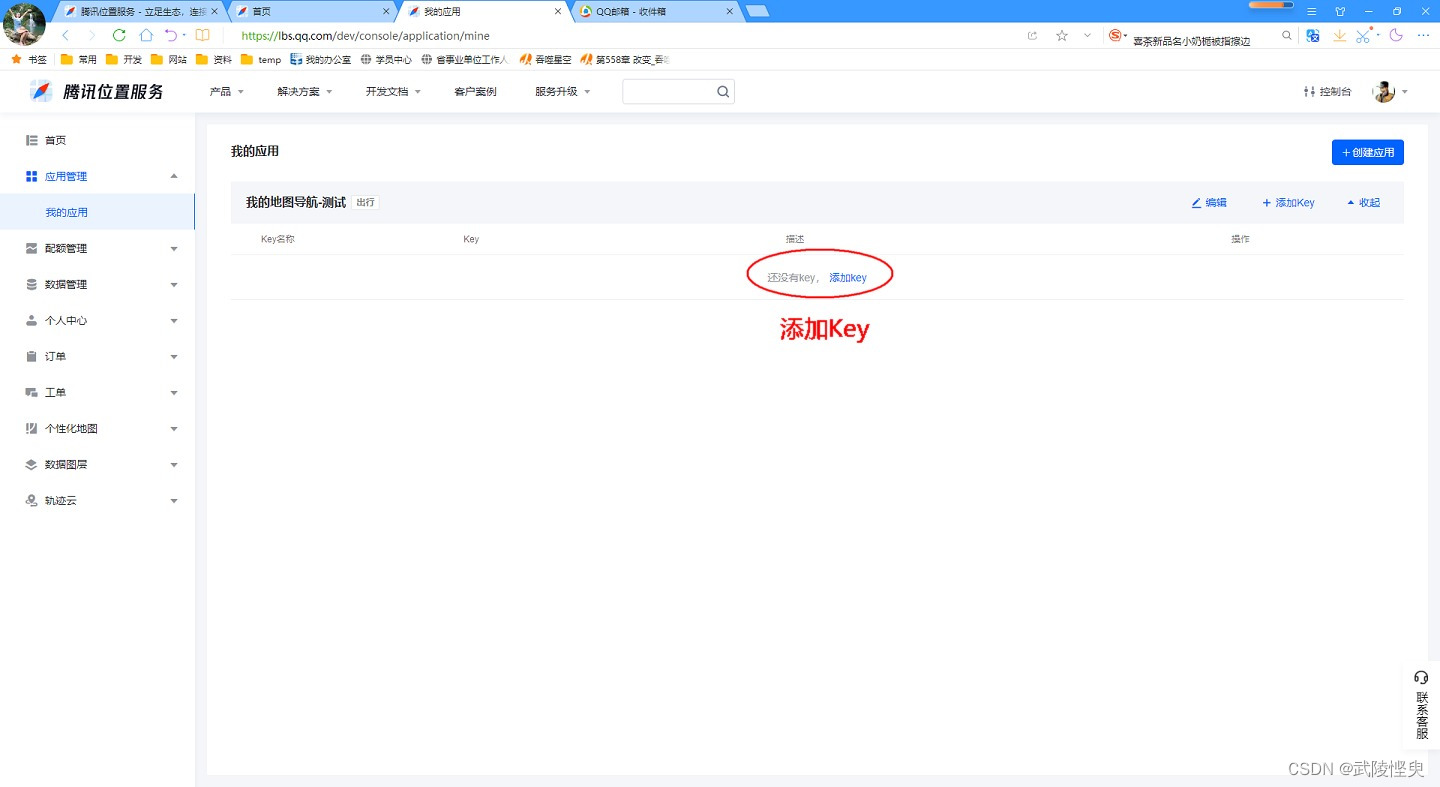
4.回到我的应用页面,点击“添加Key”。
5.输入Key名称、描述,勾选“SDK"和”导航SDK“,并在下方的文本框中输入你在Android Studio中要创建应用的包名。

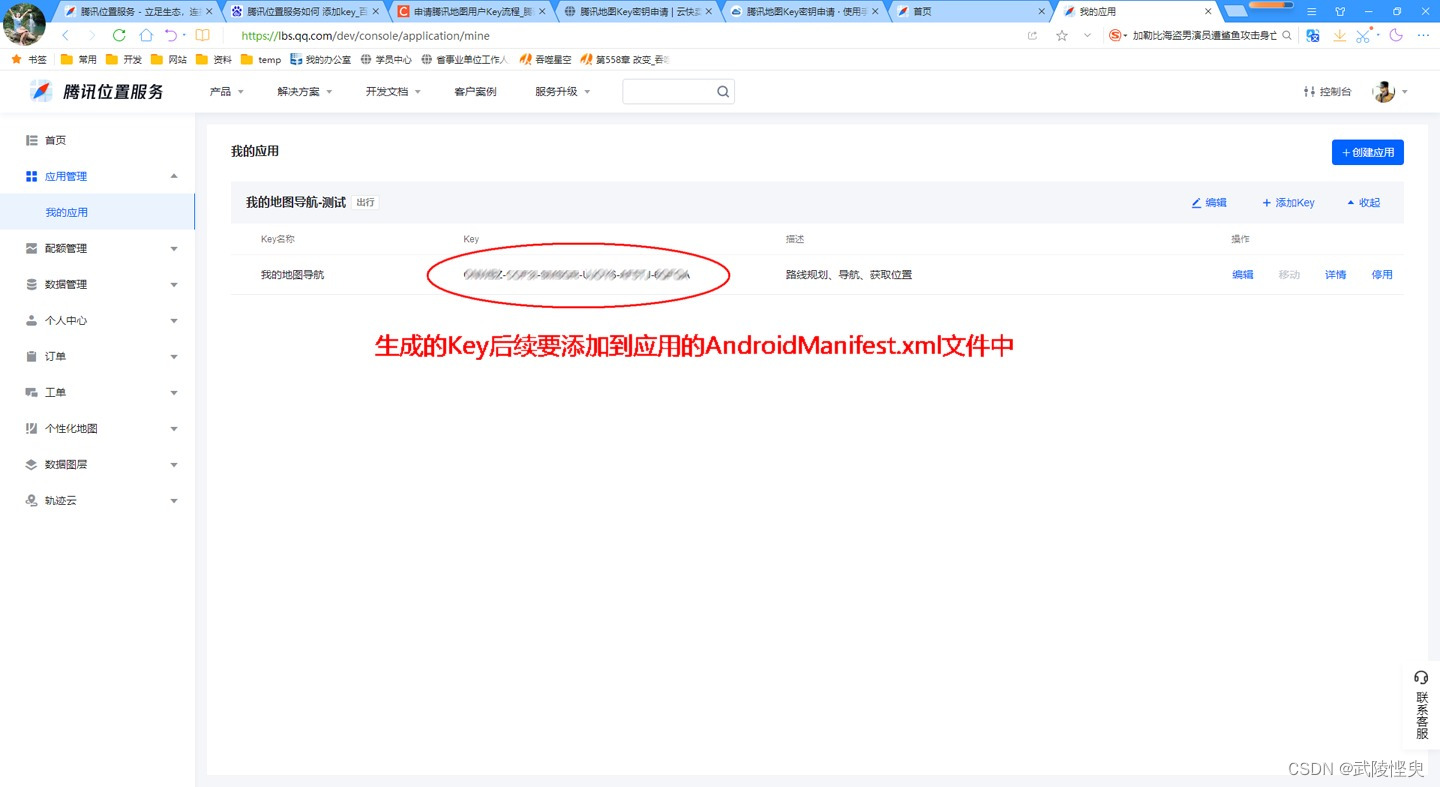
6.完成,生成的Key在Android Studio中集成腾旭地图时要用到。
三、集成腾讯地图
完成上面的操作后,在Android Studio中要对需要使用腾讯位置服务的应用进行设置才能使用腾讯地图的SDK。
1.打开已创建好的Module下的build.gradle文件,在文的依赖中添加腾讯地图组件。
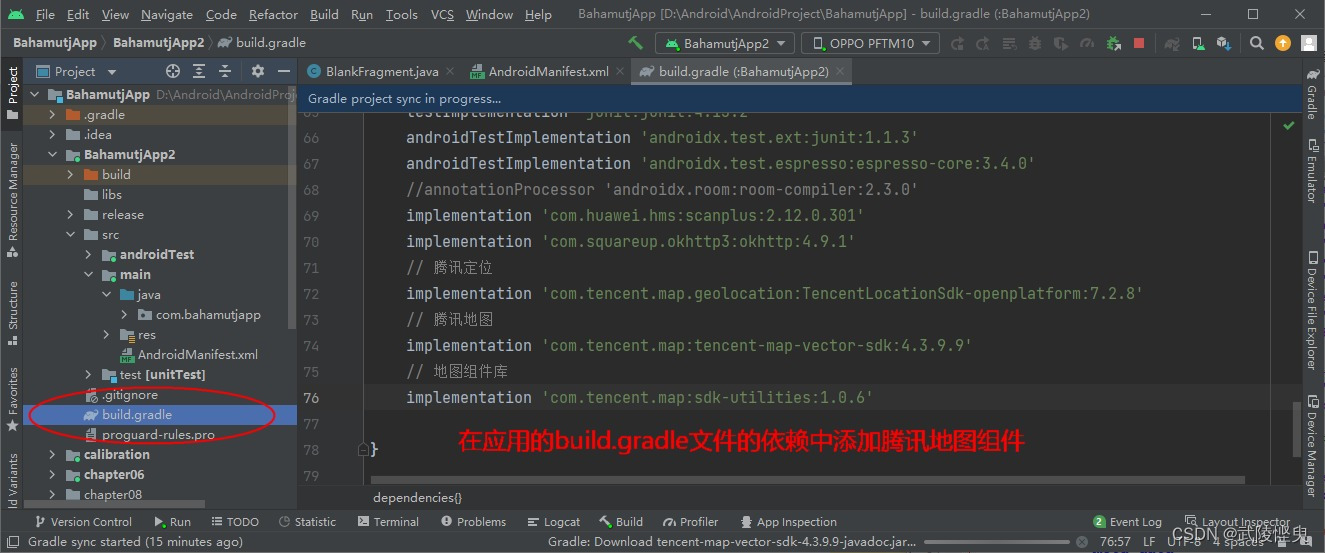
// 腾讯定位
implementation 'com.tencent.map.geolocation:TencentLocationSdk-openplatform:7.2.8'
// 腾讯地图
implementation 'com.tencent.map:tencent-map-vector-sdk:4.3.9.9'
// 地图组件库
implementation 'com.tencent.map:sdk-utilities:1.0.6'
上述组件的版本并不是最新的,我是照着 《 Android App 开发进阶与项目实战》上输入的,组件的最新版本请到官网查询。
2.在Module的AndroidManifest.xml文件中添加权限配置。
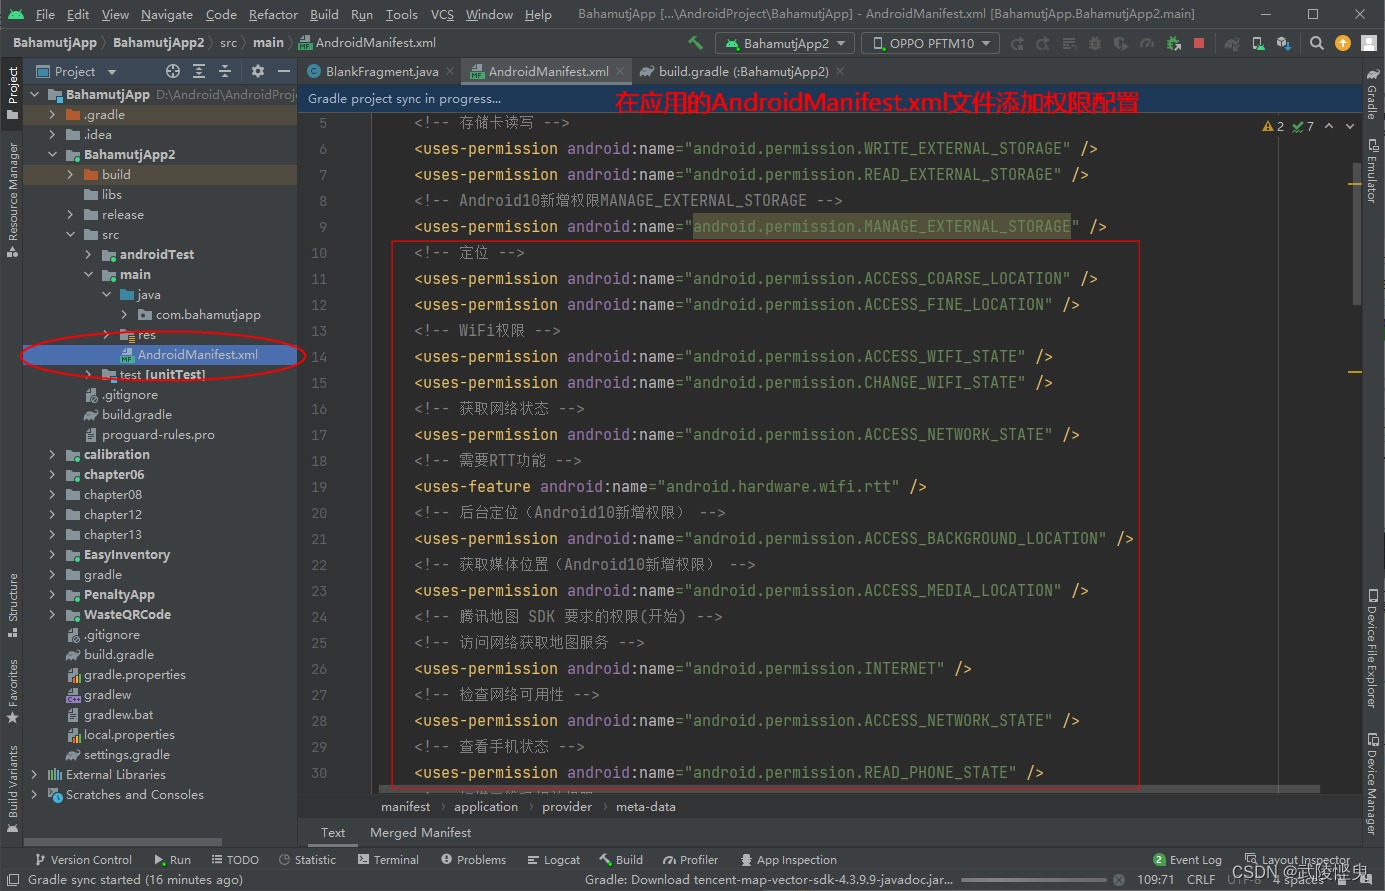
我添加的权限是参考了 《 Android App 开发进阶与项目实战》中的内容,官网给的添加权限(见下方)和我添加的有些不同,但我这边能正常定位,说明有些权限应该是可由可无的。
<!-- 通过GPS得到精确位置 -->
<uses-permission android:name="android.permission.ACCESS_FINE_LOCATION"/>
<!-- 通过网络得到粗略位置 -->
<uses-permission android:name="android.permission.ACCESS_COARSE_LOCATION"/>
<!-- 访问网络,某些位置信息需要从网络服务器获取 -->
<uses-permission android:name="android.permission.INTERNET"/>
<!-- 访问WiFi状态,需要WiFi信息用于网络定位 -->
<uses-permission android:name="android.permission.ACCESS_WIFI_STATE"/>
<!-- 修改WiFi状态,发起WiFi扫描, 需要WiFi信息用于网络定位 -->
<uses-permission android:name="android.permission.CHANGE_WIFI_STATE"/>
<!-- 访问网络状态, 检测网络的可用性,需要网络运营商相关信息用于网络定位 -->
<uses-permission android:name="android.permission.ACCESS_NETWORK_STATE"/>
<!-- 访问网络的变化, 需要某些信息用于网络定位 -->
<uses-permission android:name="android.permission.CHANGE_NETWORK_STATE"/>
<!-- 蓝牙扫描权限 -->
<uses-permission android:name="android.permission.BLUETOOTH"/>
<uses-permission android:name="android.permission.BLUETOOTH_ADMIN"/>
<!-- 前台service权限 -->
<uses-permission android:name="android.permission.FOREGROUND_SERVICE"/>
<!-- 后台定位权限 -->
<uses-permission android:name="android.permission.ACCESS_BACKGROUND_LOCATION"/>
<!-- A-GPS辅助定位权限,方便GPS快速准确定位 -->
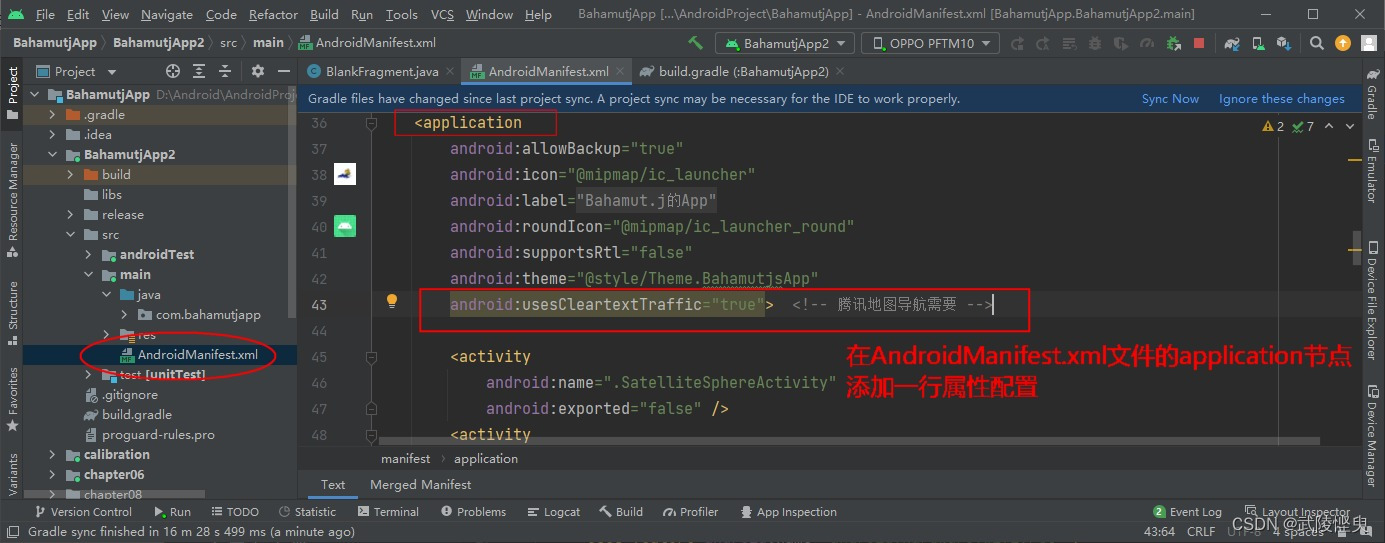
<uses-permission android:name="android.permission.ACCESS_LOCATION_EXTRA_COMMANDS"/>3. 在AndroidManifest.xml文件的application节点中添加一行属性配置:
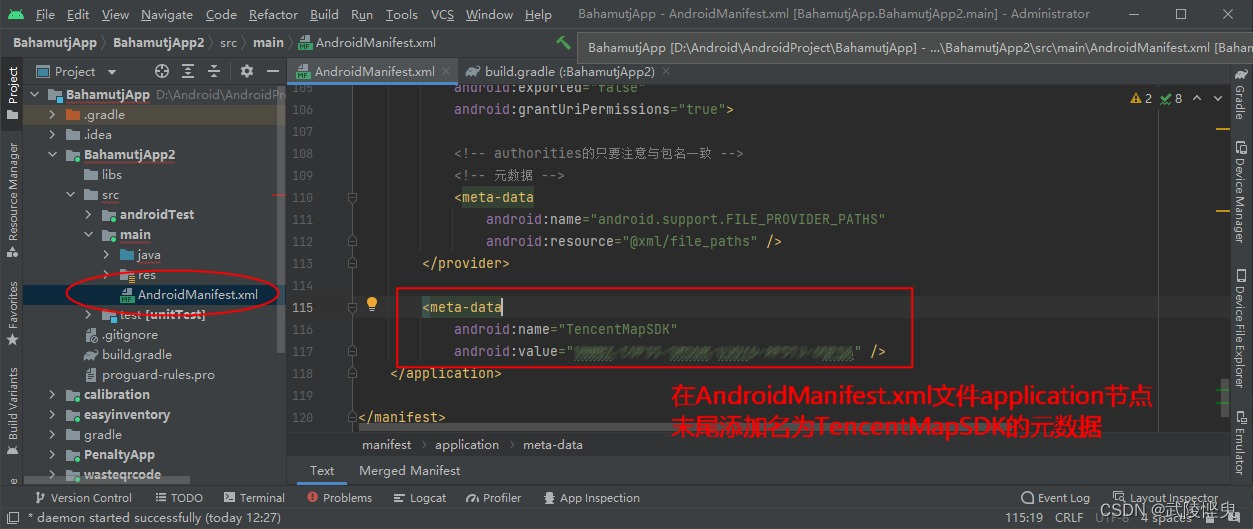
android:usesCleartextTraffic="true"4.最后,在AndroidManifest.xml文件的application节点末尾添加名为TencentMapSDK的元数据,之前在官网平台上生成的Key就填在这里。
以上就是我的设置步骤,全部是参考《 Android App 开发进阶与项目实战》中的内容,与官网的步骤有所区别(官网设置连接),但我的应用实现腾讯地图定位没有遇到问题。
四、功能实现
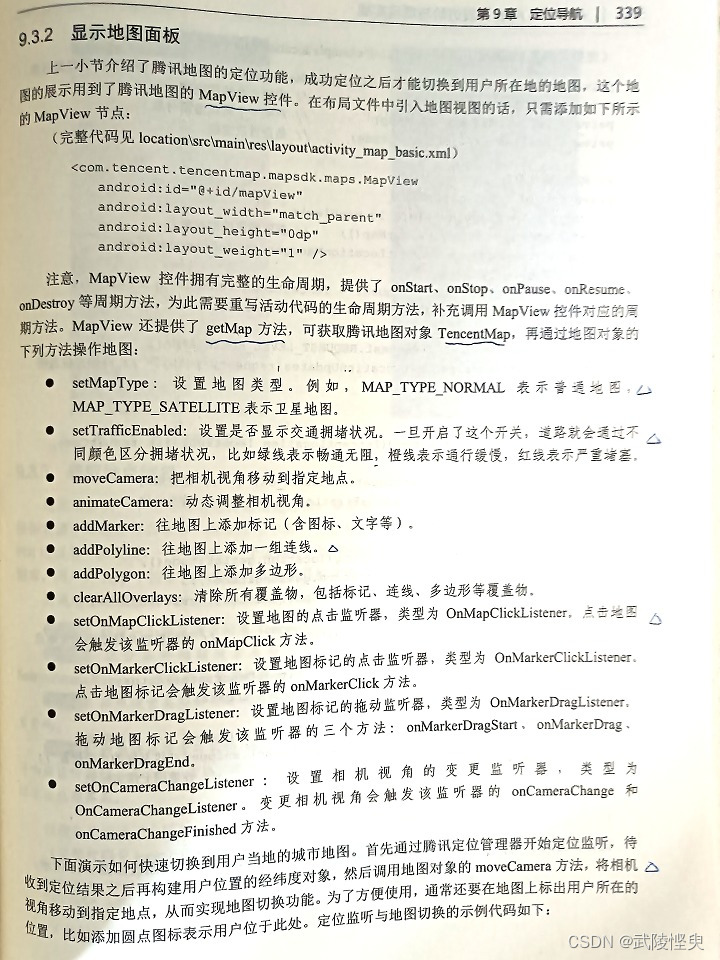
我是参照《 Android App 开发进阶与项目实战》书中9.3.2 显示地图面板 的内容,创建的Activity可以在腾讯地图上显示手机所在的位置,并能在普通地图和卫星地图之间切换,还可以显示交通情况。另外,可以通过手势操作移动地图和缩放地图。其功能与微信中共享位置功能差不多。
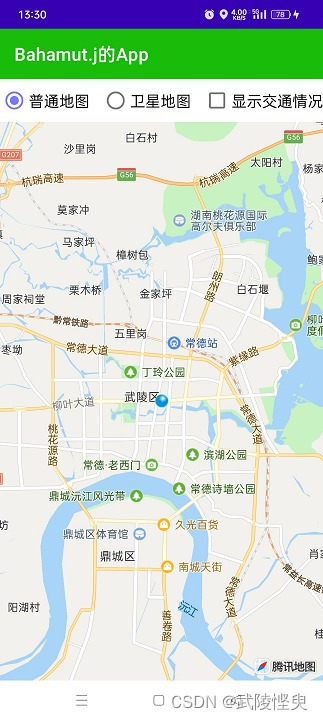
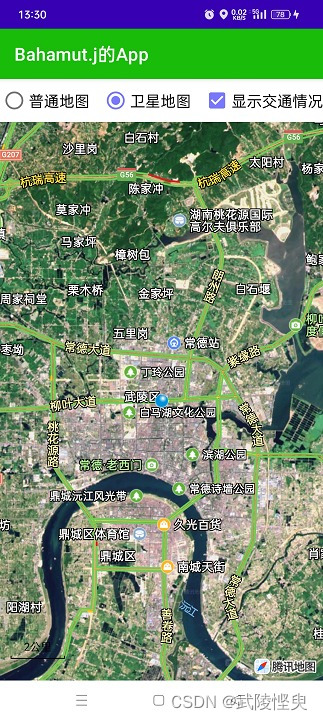
(普通地图模式) (卫星地图+显示交通情况模式)
对书中的源码研究后,我决定再扩展一下,增加SDK自带的指南针图标,自己自定义的放大按钮、缩小按钮、回到手机所在位置按钮,另外还自定义一个显示地图中心图标且显示中心经纬度的功能。最终效果如下:
1. 普通地图模式
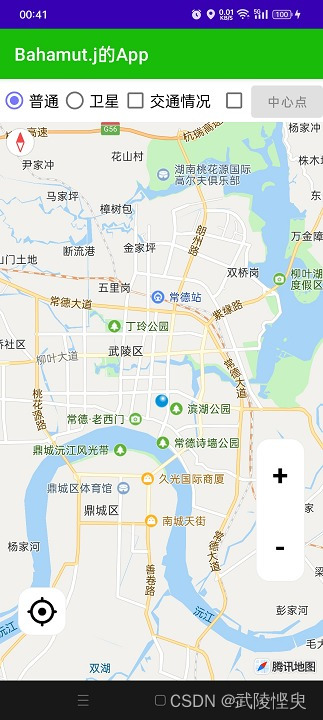
这是照搬的书中的源码,点击“普通”单选按钮,将地图类型设置为TencentMap.MAP_TYPE_NORMAL。进入地图后默认也是这个类型。关键代码:
private TencentMap mTencentMap; // 声明一个腾讯地图对象
private MapView mMapView; // 声明一个地图视图对象// onCreate方法中初始化
mMapView = findViewById(R.id.mapView);
mTencentMap = mMapView.getMap(); // 获取腾讯地图对象// 点击“普通地图”单选按钮后,执行以下语句
mTencentMap.setMapType(TencentMap.MAP_TYPE_NORMAL); // 设置普通地图
2.卫星地图模式
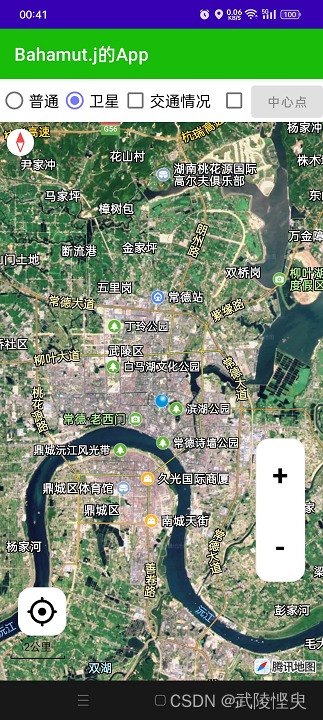
通过点击“卫星”单选按钮触发。关键代码:
// 点击“卫星地图”单选按钮后,执行以下语句
mTencentMap.setMapType(TencentMap.MAP_TYPE_SATELLITE); // 设置卫星地图
3. 显示交通情况
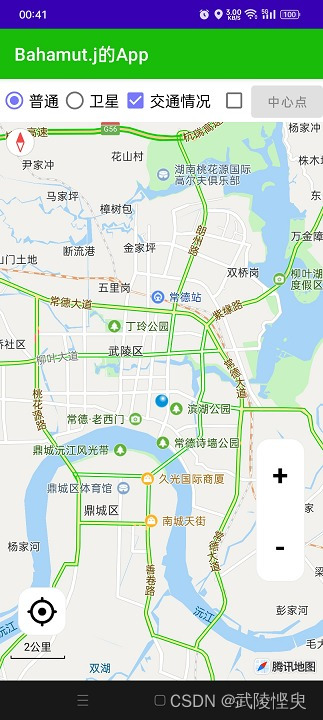
通过点击“交通情况”复选按钮触发,关键代码:
// 点击“交通情况”复选按钮触发
mTencentMap.setTrafficEnabled(isChecked); // 是否显示交通拥堵状况
4. 显示/隐藏中心点标记
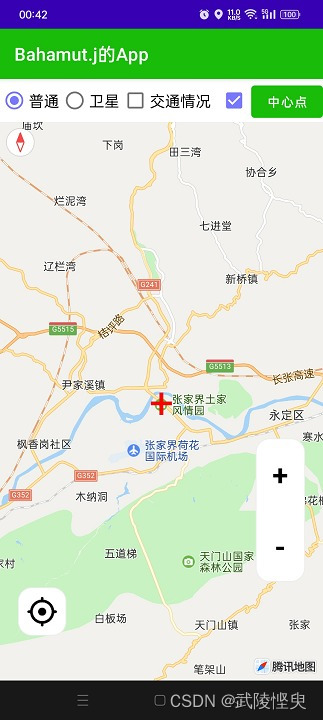
这是我自己添加的功能,红色十字图标是一个TextView组件,这个组件与腾讯地图组件MapView都放在一个RelativeLayout布局中,MapView充满整个布局,TextView放在RelativeLayout中心位置。在onCreate方法初始化时,将这个TextView组件隐藏,在勾选了复选框后,才显示,另外“中心点”按钮,也与这个TextView联动,在TextView组件显示时“中心点”按钮可用,在TextView组件隐藏时“中心点”按钮不可用。
关键代码:
<RelativeLayoutandroid:layout_width="match_parent"android:layout_height="0dp"android:layout_weight="1" ><com.tencent.tencentmap.mapsdk.maps.MapViewandroid:id="@+id/mapView"android:layout_width="match_parent"android:layout_height="fill_parent" /><TextViewandroid:id="@+id/tv_centerPoint"android:layout_width="wrap_content"android:layout_height="wrap_content"android:layout_gravity="center"android:gravity="center"android:layout_centerInParent="true"android:textSize="48sp"android:textColor="@color/red"android:text="+" /></RelativeLayout>private Button btn_getCenter; // 获取中心点按钮
private TextView tv_centerPoint; // 中心点标记// 点“中心点”按钮左侧的复选框后,显示
tv_centerPoint.setVisibility(View.VISIBLE); // 显示
btn_getCenter.setEnabled(true); // 可用// 取消“中心点”按钮左侧的复选框后,隐藏
tv_centerPoint.setVisibility(View.INVISIBLE); // 隐藏
btn_getCenter.setEnabled(false); // 不可用5. 获取中心点位置

在“中心点”按钮左侧的复选框勾选的情况下,点击“中心点”按钮,会显示中心点标识,且获取地图中心点经纬度,并显示在界面中。关键代码如下:
CameraPosition cameraPosition = mTencentMap.getCameraPosition();
mCenterLatLng = cameraPosition.target;
Toast.makeText(this, "中心点坐标:" + mCenterLatLng.latitude + ";" + mCenterLatLng.longitude, Toast.LENGTH_LONG).show();
6. 放大/缩小地图
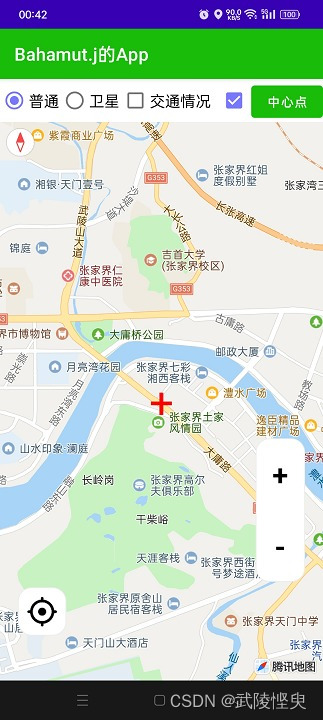
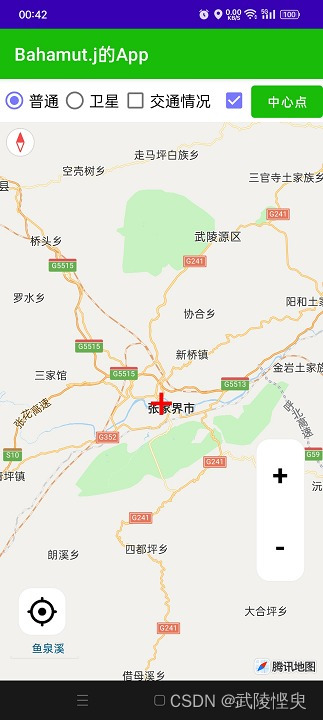
(点击放大按钮效果) (点击缩小按钮效果)
放大和缩小按钮时参考了其它地图软件上的效果,我自己用带圆角样式的LinearLayout布局包裹了两个TextView组件实现的。这个LinearLayout布局也是放在前面说到的RelativeLayout布局中。LinearLayout布局位于地图组件的右下方向。两个TextView组件设置了OnClick监听器,点击后执行放大和缩小地图操作。关键代码:
<RelativeLayoutandroid:layout_width="match_parent"android:layout_height="0dp"android:layout_weight="1" ><com.tencent.tencentmap.mapsdk.maps.MapViewandroid:id="@+id/mapView"android:layout_width="match_parent"android:layout_height="fill_parent" /><LinearLayoutandroid:layout_width="55dp"android:layout_height="wrap_content"android:layout_above="@+id/mapView"android:layout_alignEnd="@+id/mapView"android:layout_alignBottom="@+id/mapView"android:layout_marginEnd="20dp"android:layout_marginBottom="110dp"android:background="@drawable/radius_border_15"android:orientation="vertical"><TextViewandroid:id="@+id/tv_enlarge"android:layout_width="50dp"android:layout_height="50dp"android:layout_gravity="center_horizontal"android:layout_marginTop="15dp"android:layout_marginBottom="15dp"android:gravity="center"android:text="+"android:textColor="@color/black"android:textSize="32sp"android:textStyle="bold" /><TextViewandroid:id="@+id/tv_narrow"android:layout_width="50dp"android:layout_height="50dp"android:layout_gravity="center_horizontal"android:layout_marginTop="15dp"android:layout_marginBottom="15dp"android:gravity="center"android:text="-"android:textColor="@color/black"android:textSize="32sp"android:textStyle="bold" /></LinearLayout></RelativeLayout>// 点击放大按钮后执行
mTencentMap.moveCamera(CameraUpdateFactory.zoomIn()); // 放大一级
// 点击缩小按钮后执行
mTencentMap.moveCamera(CameraUpdateFactory.zoomOut()); // 缩小一级7. 回到手机定位处
在地图中通过手指拖动地图,使手机定位脱离地图中心点后,通过点击“回到手机处”按钮就可以将地图的中心点重新设置为手机定位处,从而让地图中心点快速回到定位处。
这个图标是我从手机的百度地图上截图后,通过PS处理后得到的,保存为PNG格式后,放在项目的res/drawable-xhdpi文件夹下。在xml文件中这个图标放在ImageButton组件中,这个组件外套了一个带圆角的LinearLayout布局。LinearLayout布局放在RelativeLayout布局中,设置在mapView组件的左下方。

关键代码:
<RelativeLayoutandroid:layout_width="match_parent"android:layout_height="0dp"android:layout_weight="1" ><com.tencent.tencentmap.mapsdk.maps.MapViewandroid:id="@+id/mapView"android:layout_width="match_parent"android:layout_height="fill_parent" /><LinearLayoutandroid:layout_width="wrap_content"android:layout_height="wrap_content"android:layout_alignStart="@+id/mapView"android:layout_alignBottom="@+id/mapView"android:background="@drawable/radius_border_15"android:layout_marginStart="20dp"android:layout_marginBottom="50dp"android:orientation="horizontal"><ImageButtonandroid:id="@+id/img_btn_myPlace"android:layout_width="54dp"android:layout_height="54dp"android:backgroundTint="@color/white"android:src="@drawable/ic_my_place"tools:ignore="ContentDescription" /></LinearLayout></RelativeLayout>// 点击“中心点”按钮后,执行
CameraPosition cameraPosition = mTencentMap.getCameraPosition();
mCenterLatLng = cameraPosition.target;
Toast.makeText(this, "中心点坐标:" + mCenterLatLng.latitude + ";" + mCenterLatLng.longitude, Toast.LENGTH_LONG).show();8.添加指南针
这是腾讯地图自带的组件,只需要在onCreate方法中添加几行代码就可以:
mTencentMap = mMapView.getMap(); // 获取腾讯地图对象// 在上面的语句获取到地图对象后,添加以下两行代码
UiSettings mysetting = mTencentMap.getUiSettings();
mysetting.setCompassEnabled(true);  // 开启指南针
五、代码展示
最后上完整的代码,希望对大家有用:
MapBasicActivity.Java文件
import androidx.appcompat.app.AppCompatActivity;import android.os.Bundle;
import android.util.Log;
import android.view.View;
import android.widget.Button;
import android.widget.CheckBox;
import android.widget.RadioGroup;
import android.widget.TextView;
import android.widget.Toast;import com.tencent.map.geolocation.TencentLocation;
import com.tencent.map.geolocation.TencentLocationListener;
import com.tencent.map.geolocation.TencentLocationManager;
import com.tencent.map.geolocation.TencentLocationRequest;
import com.tencent.tencentmap.mapsdk.maps.CameraUpdate;
import com.tencent.tencentmap.mapsdk.maps.CameraUpdateFactory;
import com.tencent.tencentmap.mapsdk.maps.MapView;
import com.tencent.tencentmap.mapsdk.maps.TencentMap;
import com.tencent.tencentmap.mapsdk.maps.UiSettings;
import com.tencent.tencentmap.mapsdk.maps.model.BitmapDescriptor;
import com.tencent.tencentmap.mapsdk.maps.model.BitmapDescriptorFactory;
import com.tencent.tencentmap.mapsdk.maps.model.CameraPosition;
import com.tencent.tencentmap.mapsdk.maps.model.LatLng;
import com.tencent.tencentmap.mapsdk.maps.model.MarkerOptions;public class MapBasicActivity extends AppCompatActivity implements TencentLocationListener, View.OnClickListener {private final static String TAG = "MapBasicActivity";private TencentLocationManager mLocationManager; // 声明一个腾讯定位管理器对象private MapView mMapView; // 声明一个地图视图对象private TencentMap mTencentMap; // 声明一个腾讯地图对象private boolean isFirstLoc = true; // 是否首次定位private Button btn_getCenter;  // 获取中心点按钮private TextView tv_centerPoint; // 中心点标记private LatLng mMyLatLng, mCenterLatLng;  // 我的位置, 地图中心位置@Overrideprotected void onCreate(Bundle savedInstanceState) {super.onCreate(savedInstanceState);setContentView(R.layout.activity_map_basic);initLocation(); // 初始化定位服务initView(); // 初始化视图}// 初始化视图private void initView() {tv_centerPoint = findViewById(R.id.tv_centerPoint);tv_centerPoint.setVisibility(View.INVISIBLE);btn_getCenter = findViewById(R.id.btn_getCenter);btn_getCenter.setEnabled(false);RadioGroup rg_type = findViewById(R.id.rg_type);rg_type.setOnCheckedChangeListener((group, checkedId) -> {if (checkedId == R.id.rb_common) {mTencentMap.setMapType(TencentMap.MAP_TYPE_NORMAL); // 设置普通地图} else if (checkedId == R.id.rb_satellite) {mTencentMap.setMapType(TencentMap.MAP_TYPE_SATELLITE); // 设置卫星地图}});CheckBox ck_traffic = findViewById(R.id.ck_traffic);ck_traffic.setOnCheckedChangeListener((buttonView, isChecked) -> {mTencentMap.setTrafficEnabled(isChecked); // 是否显示交通拥堵状况});CheckBox ck_centerPoint = findViewById(R.id.ck_centerPoint);ck_centerPoint.setOnCheckedChangeListener((buttonView, isChecked) -> {if (isChecked) {tv_centerPoint.setVisibility(View.VISIBLE);btn_getCenter.setEnabled(true);} else {tv_centerPoint.setVisibility(View.INVISIBLE);btn_getCenter.setEnabled(false);}});// 设置按钮监听器findViewById(R.id.tv_enlarge).setOnClickListener(this);  // 放大地图findViewById(R.id.tv_narrow).setOnClickListener(this);  // 缩小地图findViewById(R.id.img_btn_myPlace).setOnClickListener(this);  // 回到我的位置findViewById(R.id.btn_getCenter).setOnClickListener(this);  // 获取中心点btn_getCenter.setOnClickListener(this);  // 获取中心点}// 初始化定位服务private void initLocation() {mMapView = findViewById(R.id.mapView);mTencentMap = mMapView.getMap(); // 获取腾讯地图对象UiSettings mysetting = mTencentMap.getUiSettings();mysetting.setCompassEnabled(true);  // 开启指南针mLocationManager = TencentLocationManager.getInstance(this);// 创建腾讯定位请求对象TencentLocationRequest request = TencentLocationRequest.create();request.setInterval(30000).setAllowGPS(true);request.setRequestLevel(TencentLocationRequest.REQUEST_LEVEL_ADMIN_AREA);mLocationManager.requestLocationUpdates(request, this); // 开始定位监听}@Overridepublic void onLocationChanged(TencentLocation location, int resultCode, String resultDesc) {if (resultCode == TencentLocation.ERROR_OK) { // 定位成功if (location != null && isFirstLoc) { // 首次定位isFirstLoc = false;// 创建一个经纬度对象mMyLatLng = new LatLng(location.getLatitude(), location.getLongitude());CameraUpdate update = CameraUpdateFactory.newLatLngZoom(mMyLatLng, 12);mTencentMap.moveCamera(update); // 把相机视角移动到指定地点// 从指定图片中获取位图描述BitmapDescriptor bitmapDesc = BitmapDescriptorFactory.fromResource(R.drawable.icon_locate);MarkerOptions ooMarker = new MarkerOptions(mMyLatLng).draggable(false) // 不可拖动.visible(true).icon(bitmapDesc).snippet("这是您的当前位置");mTencentMap.addMarker(ooMarker); // 往地图添加标记}} else { // 定位失败Log.d(TAG, "定位失败,错误代码为"+resultCode+",错误描述为"+resultDesc);}}@Overridepublic void onStatusUpdate(String s, int i, String s1) {}// 绑定生命周期@Overrideprotected void onStart() {super.onStart();mMapView.onStart();}@Overrideprotected void onStop() {super.onStop();mMapView.onStop();}@Overridepublic void onPause() {super.onPause();mMapView.onPause();}@Overridepublic void onResume() {super.onResume();mMapView.onResume();}@Overrideprotected void onDestroy() {super.onDestroy();mLocationManager.removeUpdates(this); // 移除定位监听mMapView.onDestroy();}@Overridepublic void onClick(View v) {if (v.getId() == R.id.tv_enlarge) {  // 放大地图mTencentMap.moveCamera(CameraUpdateFactory.zoomIn()); // 放大一级} else if (v.getId() == R.id.tv_narrow) {  // 缩小地图mTencentMap.moveCamera(CameraUpdateFactory.zoomOut()); // 缩小一级} else if (v.getId() == R.id.img_btn_myPlace) {  // 回到我的位置CameraUpdate update = CameraUpdateFactory.newLatLng(mMyLatLng);mTencentMap.moveCamera(update); // 把相机视角移动到指定地点} else if (v.getId() == R.id.btn_getCenter) {  // 获取中心点坐标CameraPosition cameraPosition = mTencentMap.getCameraPosition();mCenterLatLng = cameraPosition.target;Toast.makeText(this, "中心点坐标:" + mCenterLatLng.latitude + ";" + mCenterLatLng.longitude, Toast.LENGTH_LONG).show();}}
}
activity_map_basic.xml文件
<?xml version="1.0" encoding="utf-8"?>
<LinearLayout xmlns:android="http://schemas.android.com/apk/res/android"xmlns:tools="http://schemas.android.com/tools"android:layout_width="match_parent"android:layout_height="match_parent"android:orientation="vertical"tools:context=".MapBasicActivity"><RadioGroupandroid:id="@+id/rg_type"android:layout_width="match_parent"android:layout_height="wrap_content"android:orientation="horizontal" ><RadioButtonandroid:id="@+id/rb_common"android:layout_width="0dp"android:layout_height="wrap_content"android:layout_weight="1"android:checked="true"android:text="普通"android:textColor="@color/black"android:textSize="17sp" /><RadioButtonandroid:id="@+id/rb_satellite"android:layout_width="0dp"android:layout_height="wrap_content"android:layout_weight="1"android:checked="false"android:text="卫星"android:textColor="@color/black"android:textSize="17sp" /><CheckBoxandroid:id="@+id/ck_traffic"android:layout_width="wrap_content"android:layout_height="wrap_content"android:checked="false"android:text="交通情况"android:textColor="@color/black"android:textSize="17sp" /><CheckBoxandroid:id="@+id/ck_centerPoint"android:layout_width="35dp"android:layout_height="wrap_content"android:layout_marginStart="10dp"android:checked="false"android:text=""android:textColor="@color/black"android:textSize="17sp" /><Buttonandroid:id="@+id/btn_getCenter"android:layout_width="80dp"android:layout_height="wrap_content"android:text="中心点"/></RadioGroup><RelativeLayoutandroid:layout_width="match_parent"android:layout_height="0dp"android:layout_weight="1" ><com.tencent.tencentmap.mapsdk.maps.MapViewandroid:id="@+id/mapView"android:layout_width="match_parent"android:layout_height="fill_parent" /><LinearLayoutandroid:layout_width="55dp"android:layout_height="wrap_content"android:layout_above="@+id/mapView"android:layout_alignEnd="@+id/mapView"android:layout_alignBottom="@+id/mapView"android:layout_marginEnd="20dp"android:layout_marginBottom="110dp"android:background="@drawable/radius_border_15"android:orientation="vertical"><TextViewandroid:id="@+id/tv_enlarge"android:layout_width="50dp"android:layout_height="50dp"android:layout_gravity="center_horizontal"android:layout_marginTop="15dp"android:layout_marginBottom="15dp"android:gravity="center"android:text="+"android:textColor="@color/black"android:textSize="32sp"android:textStyle="bold" /><TextViewandroid:id="@+id/tv_narrow"android:layout_width="50dp"android:layout_height="50dp"android:layout_gravity="center_horizontal"android:layout_marginTop="15dp"android:layout_marginBottom="15dp"android:gravity="center"android:text="-"android:textColor="@color/black"android:textSize="32sp"android:textStyle="bold" /></LinearLayout><LinearLayoutandroid:layout_width="wrap_content"android:layout_height="wrap_content"android:layout_alignStart="@+id/mapView"android:layout_alignBottom="@+id/mapView"android:background="@drawable/radius_border_15"android:layout_marginStart="20dp"android:layout_marginBottom="50dp"android:orientation="horizontal"><ImageButtonandroid:id="@+id/img_btn_myPlace"android:layout_width="54dp"android:layout_height="54dp"android:backgroundTint="@color/white"android:src="@drawable/ic_my_place"tools:ignore="ContentDescription" /></LinearLayout><TextViewandroid:id="@+id/tv_centerPoint"android:layout_width="wrap_content"android:layout_height="wrap_content"android:layout_gravity="center"android:gravity="center"android:layout_centerInParent="true"android:textSize="48sp"android:textColor="@color/red"android:text="+" /></RelativeLayout></LinearLayout>