SeetaFaceEngine安装和测试
一.介绍
必须安装好opencv。
SeetaFace人脸识别引擎包括了搭建一套全自动人脸识别系统所需的三个核心模块,
即:人脸检测模块SeetaFace Detection、面部特征点定位模块SeetaFace Alignment以及人脸特征提取与比对模块 SeetaFace Identification。
主要功能:
1.人脸检测模块(SeetaFace Detection): 采用了一种结合传统人造特征与多层感知机(MLP)的级联结构,在FDDB上达到了84.4%的召回率(100个误检时),并可在单个i7 CPU上实时处理VGA分辨率的图像。
2.面部特征点定位模块(SeetaFace Alignment): 通过级联多个深度模型(栈式自编码网络)来回归5个关键特征点(两眼中心、鼻尖和两个嘴角)的位置,在AFLW数据库上达到state-of-the-art的精度,定位速度在单个i7 CPU上超过200fps。
3.人脸识别模块(SeetaFace Identification): 采用一个9层的卷积神经网络(CNN)来提取人脸特征,在LFW数据库上达到97.1%的精度(注:采用SeetaFace人脸检测和SeetaFace面部特征点定位作为前端进行全自动识别的情况下),特征提取速度为每图120ms(在单个i7 CPU上)。
二.前提
ubuntu14.04
opencv3.1.0
三.下载解压和安装cmake3.1
(1)下载解压
https://github.com/seetaface/SeetaFaceEngine
下载好后,解压到用户目录
unzip SeetaFaceEngine.zip #注意自己的版本(2)安装升级cmake3.1
cmake --version #如果版本低于3.1,需要升级。14.04的是2.8
apt-get autoremove cmake  #卸载低版本cmake
cd /usr
wget https://cmake.org/files/v3.1/cmake-3.1.3-Linux-i386.tar.gz
tar zxvf cmake-3.1.3-Linux-i386.tar.gz  #解压自己下的版本
ln -s /usr/cmake-3.1.3-Linux-i386/bin/* /usr/bin/  #创建链接

cmake --version#查看升级是否成功
四.编译和测试
1.编译测试FaceDetection
mkdir build #在FaceDetection目录中
cd build
cmake ..
make -j${npoc}
cd ..


#若无问题,进入到测试
./build/facedet_test imagefilePath ./model/seeta_fd_frontal_V1.0.bin  #imagefilePath是640*480图片的路径
如果提示:段错误(核心已转储)
解决办法:1.查看路径有无问题。2.重启。
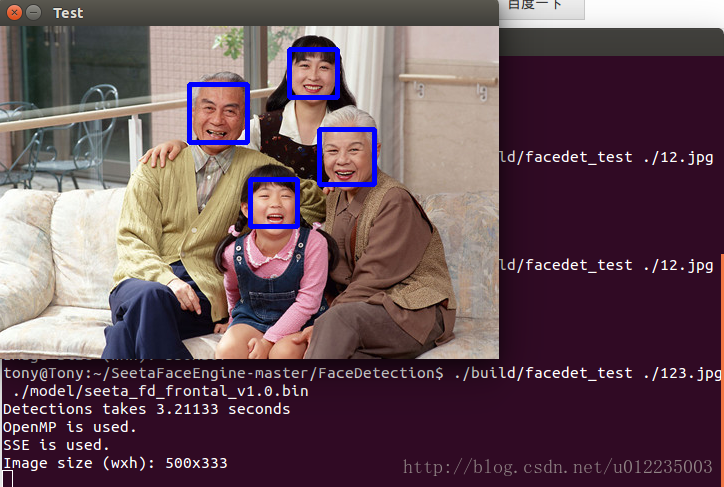
效果
2.编译测试FaceAlignment
mkdir build编译之前,将FaceDetection中的/include/face_detection.h和/build/libseeta_facedet_lib.so
拷贝到/FaceAlignment/build文件夹下。
然后在FaceAlignment>src>test中face_alignment_test.cpp中
int main(int argc, char** argv)
{
// Initialize face detection model
seeta::FaceDetection detector("./build/seeta_fd_frontal_v1.0.bin"); //修改路径
//修改成这个路径,把seeta_fd_frontal_v1.0.bin放到build中。原版是基于windows的。
detector.SetMinFaceSize(40);
detector.SetScoreThresh(2.f);
detector.SetImagePyramidScaleFactor(0.8f);
detector.SetWindowStep(4, 4);
保存退出。
shell
cd build
cmake ..
make
如果一切正常,
先要拷贝/FaceDetection/build文件夹下的seeta_fd_frontal_v1.0.bin文件到FaceAlignment的build中。
shell
cd ..
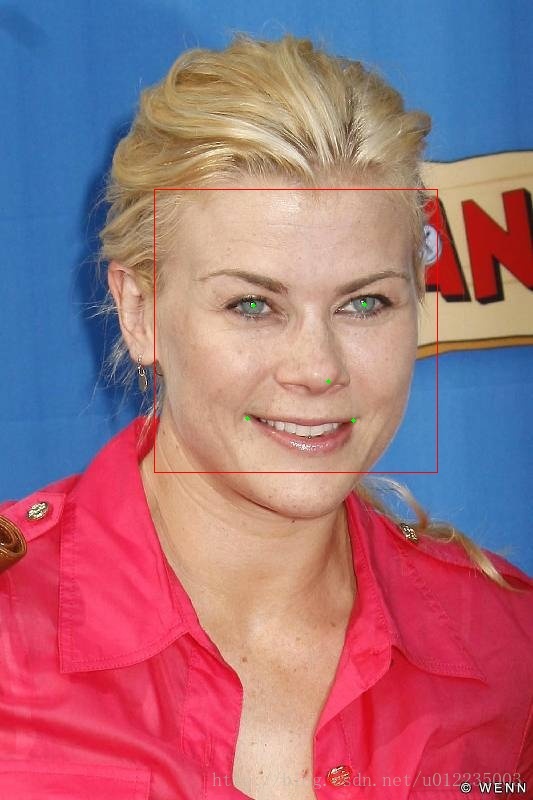
./build/fa_test运行效果,可以提取出特征值。
3.编译测试FaceIndentification
shell
mkdir build(1)添加文件
将libseeta_facedet_lib.so(/FaceDetection/build),libseeta_fa_lib.so(FaceAlignment/build),
seeta_fd_frontal_v1.0.bin(/FaceDetection/model),seeta_fa_v1.1.bin(FaceAlignment/model),添加到FaceIndentification/build中
将face_alignment.h(FaceAlignment/include),face_detection.h(/FaceDetection/include)添加到FaceIndentification/include中
(2)修改文件
打开FaceIdentification/src/test/CMakeLists.txt将文件替换成如下内容
aux_source_directory (. SRC_LIST)
link_directories(${PROJECT_BINARY_DIR})
message(${SRC_LIST})
# add external libraries
find_package(OpenCV REQUIRED)
include_directories(${seeta_facedet_lib_INCLUDE_DIRS} ${seeta_fa_lib_INCLUDE_DIRS})
list(APPEND seeta_fi_lib_required_libs ${OpenCV_LIBS} seeta_facedet_lib seeta_fa_lib)
enable_testing ()
foreach (f ${SRC_LIST})
  string(REGEX REPLACE "[.]cpp" ".bin" BIN ${f})
  add_executable(${BIN} ${f})
  #target_link_libraries(${BIN} viplnet ${OpenCV_LIBS} seeta_facede_lib seeta_fa_lib)
  target_link_libraries(${BIN} viplnet ${seeta_fi_lib_required_libs})
endforeach ()
在 FaceIdentification/src/test/test_face_recognizer.cpp文件中添加如下内容头文件
#include <opencv2/opencv.hpp>
#include <opencv2/highgui/highgui.hpp>
#include <opencv2/imgproc/imgproc.hpp>
在 FaceIdentification/src/test/test_face_verification.cpp文件中添加如下内容头文件
#include <opencv2/opencv.hpp>
#include <opencv2/highgui/highgui.hpp>
#include <opencv2/imgproc/imgproc.hpp>
解压 FaceIdentification/model/seeta_fr_v1.0.part1.rar
 sudo apt-get install unrar
unrar seeta_fr_v1.0.part1.rar
(3)编译
mkdir build
cd build
cmake ..
make  #如出错,请检查文件添加好
(4)运行
./build/src/test/test_face_recognizer.bin #3个单元测试函数
./build/src/test/test_face_verification.bin #比较两个图像相似度
效果:检测的是FaceIdentification/data/test_face_recognizer/images/compare_im下的图片相似度
0.680086