https://developer.mozilla.org/en-US/docs/Web/CSS/Reference#Selectors
在css3规范中,定义了以下几种类型的selector:
- Basic selector
- type selector: elementname
- class selector: .classname
- ID selector: #idName
- universal selector: * ns|* *|*
- attribute selector [attr=value]
- Combinators
- adjacent sibling selectors A+B
- General sibling selectors A~B
- Child selectors A>B
- Descendant Selectors A B
- Pseudo-elements
- Pseudo-classes
对于外部链接标识为蓝色;
a[href^="http://"] {
color: blue;
}
[attr~=special]{} 实际上 类选择器就是这种属性选择器的特例 .special = [class~="special"]
则选中所有class属性中包含了special并且以空格分割(或者在首位上),比如<a class="special"> <a class="one special">都将被选中
[attr=value]{}表示包含一个值为value的属性的元素,实际上id选择器就是这种属性选择器的特例 #value = [id="value"]
对于内部链接标识为红色
a[href^="/internal"] {
color: red;
}
[lang |=en]这个将选中 <p lang="en"> <p lang="en-us"> <p lang="en-au">,一般用的很少
对于以.pdf结尾的href链接,其背景将增加一个pdf.png来标识这是一个pdf文件
a[href$=".pdf"] {
background:url('/images/pdf.png') no-repeat 0 2px;
}
对于src属性中包含thumb的img元素,则更改border属性
img[src*="thumb"]{
borader: 5px solid;
}
再比如a[href*="lady.xx.com"]{color: purple}所有女性频道都以purple作为文字颜色
- pseudo classes:(:active,:any,:checked,:default,:dir(),:disabled,:empty,:enabled,:first,:first-child,:first-of-type,:fullscreen,:focus,:hover,:indeterminate,:in-range,:invalid,:lang(),:last-child,:last-of-type,:left,:link,:not(),:nth-child(),nth-last-child(),:nth-last-of-type(),:nth-of-type(),:only-child,:only-of-type,:optional,:out-of-range,:read-only,:read-write,:required,:right,:root,:scope,:targe,:valid,:visited,::first-letter,::first-line)

li:nth-child(an+b) 比如3n+2则每隔3个就会被选择,而第一个被选中的是第2个li
div:nth-of-type(odd)所有奇数的div被选择(无论是否其前后有无非div元素干扰)
div:nth-last-of-type(2) :从最后一个div来计算,其倒数第2个div将被选择
p:only-of-type { 只有一个p元素情况下,这个p元素就将被选择
}
:root 指示根元素,这个必html有更多的specifity,除此外实际上和html 元素选择器是一样的;
:target: href{
background: blue;
color: white;
}
中所指示的元素,也就是说当点击后将会target到对应的元素,这个pseudo就选择这个target元素
:empty{ 所有没有任何东西在里面的元素都将被选中;
}
div:empty{}所有空的div元素将被选中;
div:not(:empty){} 所有非空的div元素被选择;
div:not([id="s1"])所有除了id为s1以外的所有div元素将被选择
ipnut[type="submit"]所有type属性为submit的input元素都被选择
:enabled 被使能的元素;
input[type="text"]:enabled{}所有被enabled的text input元素
:disabled 被disable的元素;
input[type="radio"]:checked + label { 被选中状态的radio及其对应label字体放大
font-size: 22px;font-weight: bold;
}
.intro::first-line{}在.intro这个类中,第一行将被选中
.intro::first-letter{ 注意.intro段落中的首字母被设置为float,并且设置相关marging,padding
float:left;
margin: 10px 10px;
padding: 5px 10px;
background: #e0e0e0;
font-size: 100px;
line-height: 1;
}
<div>
    <h2>标题</h2>
    <p>段落1(h2+p/h2~p) </p>
    <p>段落2(h2~p)</p>
</div>
上面的例子中,h2+p选中前面为h2的p元素,h2~p则选中前面有一个h2的p元素(但是没有必要是直接紧邻!!)
- pseudo elements(::after, ::before,,::selection,::backdrop)
::before可以在一个特定元素前增加content。例如,在一个blockquote内容前增加一个左双引号或者在一个特定的段落前“添加”一个image
::after可以在一个特定元素后面增加content.比如,在一个blockquote后面增加右双引号。或者更多的,::after pseudo element用于实现clearfix的功能,也就是在一个元素内容后面增加一个empty space但是却无需额外增加任何html markup来实现clear floats
Pseudo Elements vs Pseudo Selectors
之所以我们把::before/::after称之为pseduo elements(而不是selector)是因为他们本身并不会选择到任何存在于page的dom中的"real" element。而像前面提到过的first-letter,first-line他们本身是选择到dom中的首字母,首行,所以我们称它为pseduo-class
Pseduo class和一般的class有相同的specificity
li:first-line {}  /* specificity = 0,0,1,1 */
li.red  {}        /* specificity = 0,0,1,1 */
::after/::before详解
::after是一个pseduo element,使用它允许你通过css向一个page中插入content(同时不需要::after本身存在于html中!)虽然最终的::after定义的内容本身不在DOM中,但是它却就像普通元素一样显示在html页面中,就像下图所示:
CSS:
div::after {
  content: "hi";
}
HTML:
<div>
  <!-- Rest of stuff inside the div:该div的其他任何内容!hi将被叠加在这个content的后面! -->
  hi
</div>
::before和::after是完全一样的,唯一的区别仅仅是:它将在content之前插入::before定义的内容。你可能在以下几种场景选择使用:
你希望generated content位置上放在element content之前;
::after content也确实在source-order上是靠后面的,所以::after在自然stack时将被放在::before的上面
content的值可以是:
- string:注意特殊的字符需要特别被编码成为一个unicode entity
Special Characters
| " | " | " | quotation mark | u+0022 ISOnum | p:before { content:"\0022"; } | alert("\42") |
| & | & | & | ampersand | u+0026 ISOnum | p:before { content:"\0026"; } | alert("\46") |
| < | < | < | less-than sign | u+003C ISOnum | p:before { content:"\003c"; } | alert("\74"); |
| > | > | > | greater-than sign | u+003E ISOnum | p:before { content:"\003e"; } | alert("\76"); |
https://css-tricks.com/snippets/html/glyphs/
http://inamidst.com/stuff/unidata/
- image
content: url(/path/to/image.jpg); the image is inserted at it's exact dimentions and can not be resized.
- nothing: 对于clearfix非常有用
- counter: content: counter(li);
注意你不能插入HTML,比如: content: "<h1>nope</h1>"
使用before/after pseudo element通过一个element来实现多重背景或者边框的案例
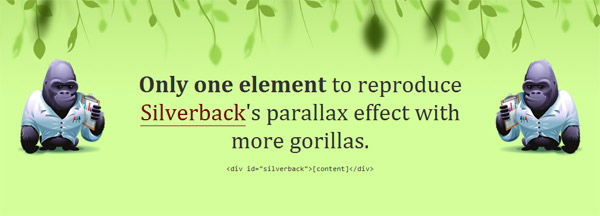
为了实现上面的目标,我们可以把pseudo-element pushed behind the content layer and pinned to the desired points of the HTML element using absolute positioning.

pseudo elements本身不含任何content,他们被absolutely positioned.这意味着他们可以被拉伸并且放到任何“parent" element中而不用影响parent的content.这可以通过使用top,right,bottom,left,width和height属性来实现。
上面的多背景样例:元素本身有其background image并且可以设置任何希望的padding.通过relatively positioning the element,parent element就将成为当对pseudo-elements做absolute 定位时的reference point.而改变z-index的值就将允许调整随在前谁在后。
#silverback {
  position: relative;
  z-index: 1;
  min-width: 200px;
  min-height: 200px;
  padding: 120px 200px 50px;
  background: #d3ff99 url(vines-back.png) -10% 0 repeat-x;
}
#silverback:before,
#silverback:after {
  position: absolute;
  z-index: -1;
  top: 0;
  left: 0;
  right: 0;
  bottom: 0;
  padding-top: 100px;
}
#silverback:before {
  content: url(gorilla-1.png);
  padding-left: 3%;
  text-align: left;
  background: transparent url(vines-mid.png) 300% 0 repeat-x;
}

#silverback:after {
  content: url(gorilla-2.png);
  padding-right: 3%;
  text-align: right;
  background: transparent url(vines-front.png) 70% 0 repeat-x;
}
两个pseudo-elements都被绝对定位并且固定在元素的两边,z-index设置为-1意味着pseudo-elments将被放到content layer的后面。这种情况下,pseudo-elements将在element的background的上方,而在元素内容本身的下层,所以元素仍然可以被选择。
http://nicolasgallagher.com/multiple-backgrounds-and-borders-with-css2/
<div id="silverback"> <strong>Only one element</strong> to reproduce <a href="http://silverbackapp.com/">Silverback</a>'s parallax effect with more gorillas. <pre><code><div id="silverback">[content]</div></code></pre> </div>