2019独角兽企业重金招聘Python工程师标准>>> 
In the previous step, we saw how a controller and a template worked together to convert a static HTML page into a dynamic view. This is a very common pattern in Single-Page Applications in general (and Angular applications in particular):
- Instead of creating a static HTML page on the server, the client-side code "takes over" and interacts dynamically with the view, updating it instantly to reflect changes in model data or state, usually as a result of user interaction (we'll see an example shortly instep 5).
The template (the part of the view containing the bindings and presentation logic) acts as a blueprint for how our data should be organized and presented to the user. The controller provides the context in which the bindings are evaluated and applies behavior and logic to our template.
There are still a couple of areas we can do better:
- What if we want to reuse the same functionality in a different part of our application ?
We would need to duplicate the whole template (including the controller). This is error-prone and hurts maintainability. -
The scope, that glues our controller and template together into a dynamic view, is not isolated from other parts of the page. What this means is that a random, unrelated change in a different part of the page (e.g. a property-name conflict) could have unexpected and hard-to-debug side effects on our view.
(OK, this might not be a real concern in our minimal example, but it is a valid concern for bigger, real-world applications.)
Workspace Reset Instructions ➤
The most important changes are listed below. You can see the full diff on GitHub.
Components to the rescue!
Since this combination (template + controller) is such a common and recurring pattern, Angular provides an easy and concise way to combine them together into reusable and isolated entities, known as components. Additionally, Angular will create a so called isolate scope for each instance of our component, which means no prototypal inheritance and no risk of our component affecting other parts of the application or vice versa.
Since this is an introductory tutorial, we are not going to dive deep into all features provided by Angular components. You can read more about components and their usage patterns in the Components section of the Developer Guide.
In fact, one could think of components as an opinionated and stripped-down version of their more complex and verbose (but powerful) siblings, directives, which are Angular's way of teaching HTML new tricks. You can read all about them in the Directivessection of the Developer Guide.
(Note: Directives are an advanced topic, so you might want to postpone studying them, until you have mastered the basics.)
To create a component, we use the .component() method of an Angular module. We must provide the name of the component and the Component Definition Object (CDO for short).
Remember that (since components are also directives) the name of the component is in camelCase (e.g. myAwesomeComponent), but we will use kebab-case (e.g. my-awesome-component) when referring to it in our HTML. (See here for a description of different case styles.)
In its simplest form, the CDO will just contain a template and a controller. (We can actually omit the controller and Angular will create a dummy controller for us. This is useful for simple "presentational" components, that don't attach any behavior to the template.)
Let's see an example:
angular.
  module('myApp').
  component('greetUser', {
    template: 'Hello, {{$ctrl.user}}!',
    controller: function GreetUserController() {
      this.user = 'world';
    }
  });
Now, every time we include <greet-user></greet-user> in our view, Angular will expand it into a DOM sub-tree constructed using the provided template and managed by an instance of the specified controller.
But wait, where did that $ctrl come from and what does it refer to ?
For reasons already mentioned (and for other reasons that are out of the scope of this tutorial), it is considered a good practice to avoid using the scope directly. We can (and should) use our controller instance; i.e. assign our data and methods on properties of our controller (the "this" inside the controller constructor), instead of directly to the scope.
From the template, we can refer to our controller instance using an alias. This way, the context of evaluation for our expressions is even more clear. By default, components use $ctrl as the controller alias, but we can override it, should the need arise.
There are more options available, so make sure you check out the API Reference, before using .component() in your own applications.
Using Components
Now that we know how to create components, let's refactor the HTML page to make use of our newly acquired skill.
app/index.html:
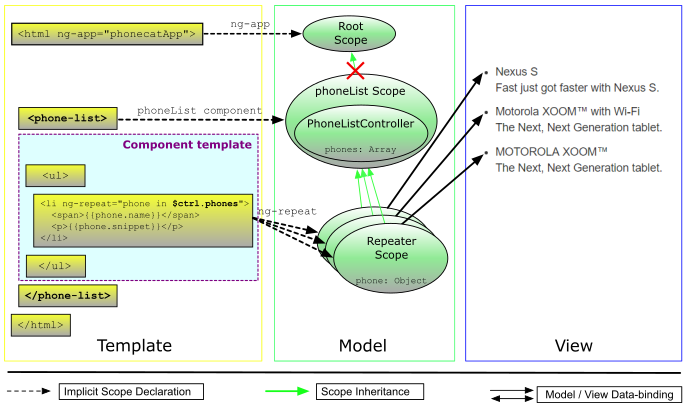
<html ng-app="phonecatApp">
<head>
  ...
  <script src="bower_components/angular/angular.js"></script>
  <script src="app.js"></script>
  <script src="phone-list.component.js"></script>
</head>
<body>

  <!-- Use a custom component to render a list of phones -->
  <phone-list></phone-list>

</body>
</html>app/app.js:
// Define the `phonecatApp` module
angular.module('phonecatApp', []);app/phone-list.component.js:
// Register `phoneList` component, along with its associated controller and template
angular.
  module('phonecatApp').
  component('phoneList', {
    template:
        '<ul>' +
          '<li ng-repeat="phone in $ctrl.phones">' +
            '<span>{{phone.name}}</span>' +
            '<p>{{phone.snippet}}</p>' +
          '</li>' +
        '</ul>',
    controller: function PhoneListController() {
      this.phones = [
        {
          name: 'Nexus S',
          snippet: 'Fast just got faster with Nexus S.'
        }, {
          name: 'Motorola XOOM™ with Wi-Fi',
          snippet: 'The Next, Next Generation tablet.'
        }, {
          name: 'MOTOROLA XOOM™',
          snippet: 'The Next, Next Generation tablet.'
        }
      ];
    }
  });
Voilà! The resulting output should look the same, but let's see what we have gained:
- Our phone list is reusable. Just drop
<phone-list></phone-list>anywhere in the page to get a list of phones. - Our main view (
index.html) is cleaner and more declarative. Just by looking at it, we know there is a list of phones. We are not bothered with implementation details. - Our component is isolated and safe from "external influences". Likewise, we don't have to worry, that we might accidentally break something in some other part of the application. What happens inside our component, stays inside our component.
- It's easier to test our component in isolation.
A note on file naming:
It is a good practice to distinguish different types of entities by suffix. In this tutorial, we are using the .component suffix for components, so the definition of a someComponent component would be in a file named some-component.component.js.
Testing
Although we have combined our controller with a template into a component, we still can (and should) unit test the controller separately, since this is where our application logic and data reside.
In order to retrieve and instantiate a component's controller, Angular provides the $componentController service.
The $controller service that we used in the previous step can only instantiate controllers that were registered by name, using the .controller() method. We could have registered our component controller this way, too, if we wanted to. Instead, we chose to define it inline — inside the CDO — to keep things localized, but either way works equally well.
app/phone-list.component.spec.js:
describe('phoneList', function() {

  // Load the module that contains the `phoneList` component before each test
  beforeEach(module('phonecatApp'));

  // Test the controller
  describe('PhoneListController', function() {

    it('should create a `phones` model with 3 phones', inject(function($componentController) {
      var ctrl = $componentController('phoneList');

      expect(ctrl.phones.length).toBe(3);
    }));

  });

});
The test retrieves the controller associated with the phoneList component, instantiates it and verifies that the phones array property on it contains three records. Note that the data is now on the controller instance itself, not on a scope.
Running Tests
Same as before, execute npm test to run the tests and then watch the files for changes.
Experiments
-
Try the experiments from the previous step, this time on the
phoneListcomponent. -
Add a couple more phone lists on the page, by just adding more
<phone-list></phone-list>elements inindex.html. Now add another binding to thephoneListcomponent's template:template: '<p>Total number of phones: {{$ctrl.phones.length}}</p>' + '<ul>' + ...Reload the page and watch the new "feature" propagate to all phone lists. In real-world applications, where the phone lists could appear on several different pages, being able to change or add something in one place (e.g. a component's template) and have that change propagate throughout the application, is a big win.
Summary
You have learned how to organize your application and presentation logic into isolated, reusable components. Let's go to step 4 to learn how to organize our code in directories and files, so it remains easy to locate as our application grows.