深度学习目标跟踪相关细节-毕设
DeepSORT
算法流程
-
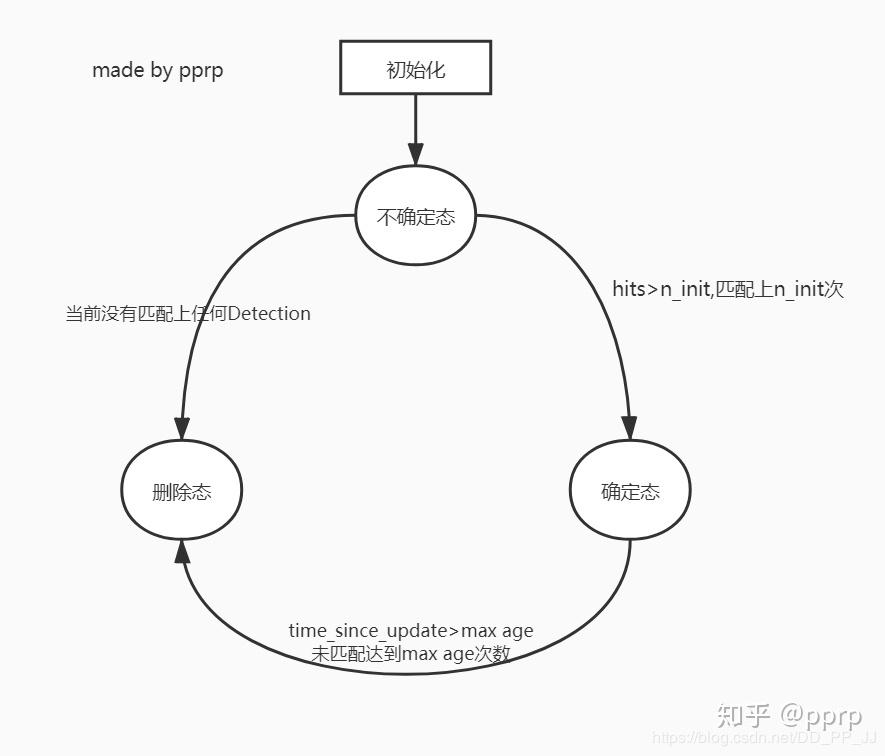
设置了不确定态、确定态、删除态,用于匹配(转换关系如上图)
- 不确定态:说明新轨迹刚出现的一段时间
- 确定态:确定是轨迹的时间
- 删除态:轨迹已经丢失的状态
毕设项目演示地址: 链接
毕业项目设计代做项目方向涵盖:
目标检测、语义分割、深度估计、超分辨率、3D目标检测、CNN、模型压缩、人脸对齐、超分辨、去噪、强化学习、行为识别、OpenCV、场景文本识别、去雨、机器学习、风格迁移、视频目标检测、去模糊、显著性检测、剪枝、活体检测、人脸关键点检测、3D目标跟踪、视频修复、人脸表情识别、时序动作检测、图像检索、异常检测等
-
增加了级联匹配和IOU匹配
-
级联匹配只针对确定态轨迹和检测结果
解决遮挡问题(只利用了图像特征,并结合了马氏距离避免远距离匹配)——需要解决误匹配问题 -
IOU匹配针对其他所有情况:不确定态轨迹、匹配失败轨迹、匹配失败检测结果
根据相对位置进行二次匹配,避免同一个人发生了一定的动作变化,导致级联匹配没有匹配到(因为级联只使用图像特征,而此时图像变化很大)——为了解决漏匹配问题
-
两次匹配,可以认为该匹配的都已经匹配成功,此时再进行相关状态的修改
-
DeepSORT的上级函数是状态更新函数:
- 根据检测结果对轨迹进行匹配(这就是deepsort做的)
- 根据匹配结果进行相关的状态更新——和扶梯思路一致
- 匹配成功的更新各状态:添加图像feature,更新kalman参数什么的,还有不确定态什么的。
- 匹配失败的进行删除或者新增轨迹
#  tracker.py
"整个匹配流程:级联+IOU匹配。最终返回匹配成功、不成功的结果"
def _match(self, detections):
    def gated_metric(racks, dets, track_indices, detection_indices):
        """
        基于外观信息和马氏距离,计算卡尔曼滤波预测的tracks和当前时刻检测到的detections的代价矩阵
        """
        features = np.array([dets[i].feature for i in detection_indices])
        targets = np.array([tracks[i].track_id for i in track_indices]
	# 基于外观信息,计算tracks和detections的余弦距离代价矩阵
        cost_matrix = self.metric.distance(features, targets)
	# 基于马氏距离,过滤掉代价矩阵中一些不合适的项 (将其设置为一个较大的值)
        cost_matrix = linear_assignment.gate_cost_matrix(self.kf, cost_matrix, tracks,
                      dets, track_indices, detection_indices) """这个函数中会把马氏距离很大的位置置为inf"""
        return cost_matrix

    """1. 区分开confirmed tracks和unconfirmed tracks"""
    confirmed_tracks = [i for i, t in enumerate(self.tracks) if t.is_confirmed()]
    unconfirmed_tracks = [i for i, t in enumerate(self.tracks) if not t.is_confirmed()]

    """2. 对confirmd tracks进行级联匹配"""
    matches_a, unmatched_tracks_a, unmatched_detections = \
        linear_assignment.matching_cascade(
            gated_metric, self.metric.matching_threshold, self.max_age,
            self.tracks, detections, confirmed_tracks)

    """3. 对级联匹配中未匹配的tracks和unconfirmed tracks中time_since_update为1的tracks进行IOU匹配"""
    iou_track_candidates = unconfirmed_tracks + [k for k in unmatched_tracks_a if
                                                 self.tracks[k].time_since_update == 1]
    unmatched_tracks_a = [k for k in unmatched_tracks_a if
                          self.tracks[k].time_since_update != 1]
    matches_b, unmatched_tracks_b, unmatched_detections = \
        linear_assignment.min_cost_matching(
            iou_matching.iou_cost, self.max_iou_distance, self.tracks,
            detections, iou_track_candidates, unmatched_detections)

    # 整合所有的匹配对和未匹配的tracks
    matches = matches_a + matches_b
    unmatched_tracks = list(set(unmatched_tracks_a + unmatched_tracks_b))

    return matches, unmatched_tracks, unmatched_detections
级联匹配
用于解决遮挡问题
- 让未匹配的检测结果和各级轨迹进行匹配(即便越高,说明轨迹越久没有被匹配)——体现了优先为刚刚跟踪成功的轨迹进行匹配。
- 匹配使用了马氏距离和reid结合的代价矩阵
级联的思想
为了解决遮挡问题,就必须使检测结果与过往长时间没有跟踪到的轨迹进行匹配,而级联匹配就是解决了这个问题。
会为每一个轨迹添加一个状态来记录其已经有多少帧没有被跟踪到。
1首先将检测结果与最近跟踪到的轨迹进行匹配–>会得到没有匹配成功的检测框
2未匹配成功的检测框再与更长时间没有跟踪成功的轨迹进行匹配…
3直到所有检测框都完成匹配或者超出了最大级联深度(深度越大,则允许轨迹长时间跟踪丢失)
def matching_cascade(
        distance_metric, max_distance, cascade_depth, tracks, detections,
        track_indices=None, detection_indices=None):
    .............
    # cascade depth = max age 默认为70
    for level in range(cascade_depth): # level越大,说明往回查的时间越久
        if len(unmatched_detections) == 0:  # 没有检测框需要匹配时,直接提前退出
            break

        track_indices_l = [
            k for k in track_indices
            if tracks[k].time_since_update == 1 + level
        ] # 找出当前level存在的所有的轨迹,并根据这些轨迹来匹配检测结果
        if len(track_indices_l) == 0:  # 如果当前level不存在轨迹,就遍历下一个level
            continue

        # 2. 级联匹配核心内容就是这个函数
        matches_l, _, unmatched_detections = \ # 使用reid+马氏距离进行KM匹配
            min_cost_matching(  # max_distance=0.2
                distance_metric, max_distance, tracks, detections,
                track_indices_l, unmatched_detections)
        matches += matches_l
    unmatched_tracks = list(set(track_indices) - set(k for k, _ in matches))
    return matches, unmatched_tracks, unmatched_detections
KM匹配具体实现
流程就是:
计算代价矩阵
KM匹配
根据匹配结果获得匹配成功、未成功的检测及轨迹。
def min_cost_matching(
        distance_metric, max_distance, tracks, detections, track_indices=None,
        detection_indices=None):
    if track_indices is None:
        track_indices = np.arange(len(tracks))
    if detection_indices is None:
        detection_indices = np.arange(len(detections))

    if len(detection_indices) == 0 or len(track_indices) == 0:
        return [], track_indices, detection_indices  # Nothing to match.
    # -----------------------------------------
    # Gated_distance——>
    #       1. cosine distance
    #       2. 马氏距离
    # 得到代价矩阵
    # -----------------------------------------
    # iou_cost——>
    #       仅仅计算track和detection之间的iou距离
    # -----------------------------------------
    """1. 计算代价矩阵"""
    cost_matrix = distance_metric(
        tracks, detections, track_indices, detection_indices)
    # -----------------------------------------
    # gated_distance中设置距离中最高上限,
    # 这里最远距离实际是在deep sort类中的max_dist参数设置的
    # 默认max_dist=0.2, 距离越小越好
    # -----------------------------------------
    # iou_cost情况下,max_distance的设置对应tracker中的max_iou_distance,
    # 默认值为max_iou_distance=0.7
    # 注意结果是1-iou,所以越小越好
    # -----------------------------------------
    cost_matrix[cost_matrix > max_distance] = max_distance + 1e-5

    """2. 匈牙利算法或者KM算法"""
    row_indices, col_indices = linear_assignment(cost_matrix)

    matches, unmatched_tracks, unmatched_detections = [], [], []

    # 这几个for循环用于对匹配结果进行筛选,得到匹配和未匹配的结果
    for col, detection_idx in enumerate(detection_indices):
        if col not in col_indices:
            unmatched_detections.append(detection_idx)

    for row, track_idx in enumerate(track_indices):
        if row not in row_indices:
            unmatched_tracks.append(track_idx)
	"""3. 对匹配成功的对,再次判断其距离,如果距离过大就标记为匹配失败"""
    for row, col in zip(row_indices, col_indices):
        track_idx = track_indices[row]
        detection_idx = detection_indices[col]
        if cost_matrix[row, col] > max_distance:
            unmatched_tracks.append(track_idx)
            unmatched_detections.append(detection_idx)
        else:
            matches.append((track_idx, detection_idx))
    # 得到匹配,未匹配轨迹,未匹配检测
    return matches, unmatched_tracks, unmatched_detections
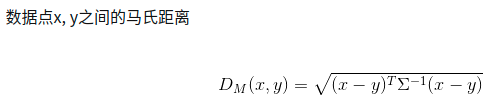
马氏距离与reid的结合
KM匹配代价矩阵的计算:reid与马氏距离结合,值是reid余弦距离,马氏距离用于将一些位置距离很远的目标距离设为inf,防止其进行匹配。
虽然设置为了inf,但KM依然会存在匹配结果,因此在匹配完成之后,必须对匹配成功的对再次进行距离判断,将距离很大的仍然标记为匹配失败——和扶梯项目中改掉的那个bug一模一样。
马氏距离是预测结果与测量结果之间的距离,具体作用就是,根据位置信息来区分一些图像特征相似的目标(例子如下):
代价矩阵中的距离是Track和Detection之间的表观相似度,假如一个轨迹要去匹配两个表观特征非常相似的Detection,这样就很容易出错,但是这个时候分别让两个Detection计算与这个轨迹的马氏距离,并使用一个阈值gating_threshold进行限制,所以就可以将马氏距离较远的那个Detection区分开,可以降低错误的匹配。
def gate_cost_matrix(
        kf, cost_matrix, tracks, detections, track_indices, detection_indices,
        gated_cost=INFTY_COST, only_position=False):
    # 根据通过卡尔曼滤波获得的状态分布,使成本矩阵中的不可行条目无效。
    """就是让位置距离差别很大的直接不采用匹配(具体实现就是将其距离设为inf)"""
    gating_dim = 2 if only_position else 4
    gating_threshold = kalman_filter.chi2inv95[gating_dim]  # 9.4877

    measurements = np.asarray([detections[i].to_xyah()
                               for i in detection_indices])

    for row, track_idx in enumerate(track_indices):
        track = tracks[track_idx]
        gating_distance = kf.gating_distance(
            track.mean, track.covariance, measurements, only_position)
        cost_matrix[row, gating_distance >
                    gating_threshold] = gated_cost  """马氏距离很大的目标代价直接设置为inf"""

    return cost_matrix
相关问题
如何解决遮挡问题?
参考级联匹配一节,级联匹配就是用来解决遮挡问题的。
- 使用ReID提取每个轨迹点的外观特征
当前第N帧的检测结果和前面100帧的轨迹点外观特征计算余弦距离,取最小的距离作为当前检测结果和该轨迹的外观相似度。
由于是取前100帧轨迹点的最小距离,基本该轨迹中间丢失了几个轨迹点,当该目标重新出现时依然可以和他准确匹配成功,自动解决了遮挡问题。
马氏距离
马氏距离(Mahalanobis Distance)是一种距离的度量,可以看作是欧氏距离的一种修正,修正了欧式距离中各个维度尺度不一致且相关的问题。
参考链接:马氏距离(Mahalanobis Distance)
参考链接
DeepSORT的细节
目标跟踪初探(DeepSORT)——比较简单,适合快速复习
Deep SORT多目标跟踪算法代码解析(上)——有一个代码仓库,直接添加了注释,分别查看细节(建议仔细看这个)
https://gitee.com/xn1997/deep-sort-self.git——上述链接的仓库,个人加了一部分注释,用于查看跟踪流程(建议用工作机打开,有对重要的几个函数打了断点,也可以直接看程序内注释了解)