【阅读和学习代码】VoxelNet
文章目录
- 将点特征 转换为 voxel 特征
- 稀疏张量 到 稠密张量,反向索引
- 参考博客
将点特征 转换为 voxel 特征
https://github.com/skyhehe123/VoxelNet-pytorch/blob/master/data/kitti.py
【Python】np.unique() 介绍与使用
self.T : # maxiumum number of points per voxel
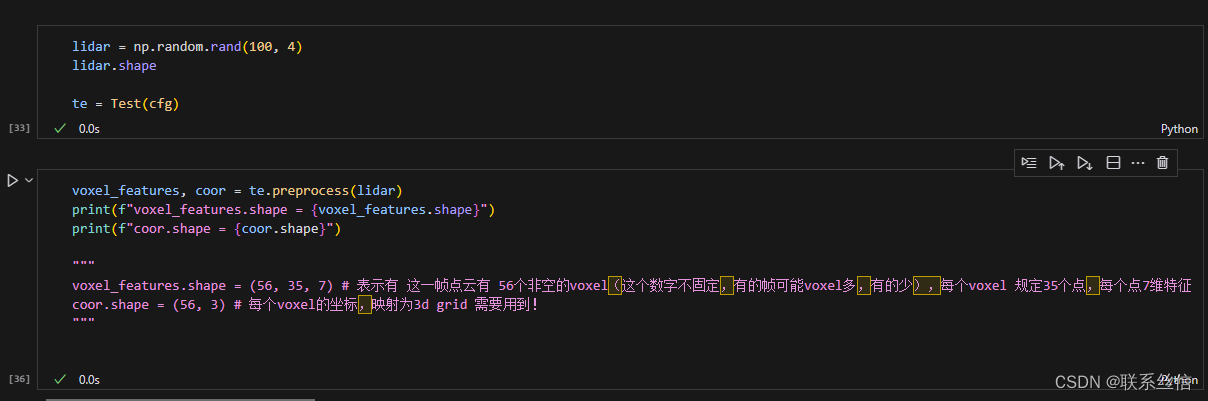
def preprocess(self, lidar):# shuffling the pointsnp.random.shuffle(lidar)voxel_coords = ((lidar[:, :3] - np.array([self.xrange[0], self.yrange[0], self.zrange[0]])) / (self.vw, self.vh, self.vd)).astype(np.int32)# convert to (D, H, W)voxel_coords = voxel_coords[:,[2,1,0]]voxel_coords, inv_ind, voxel_counts = np.unique(voxel_coords, axis=0, \return_inverse=True, return_counts=True)voxel_features = []for i in range(len(voxel_coords)):voxel = np.zeros((self.T, 7), dtype=np.float32)pts = lidar[inv_ind == i] # 落到同一个voxel上的 点if voxel_counts[i] > self.T:pts = pts[:self.T, :]voxel_counts[i] = self.T# augment the pointsvoxel[:pts.shape[0], :] = np.concatenate((pts, pts[:, :3] - np.mean(pts[:, :3], 0)), axis=1)voxel_features.append(voxel)return np.array(voxel_features), voxel_coords
输入,输出解释
稀疏张量 到 稠密张量,反向索引
https://github.com/skyhehe123/VoxelNet-pytorch/blob/master/voxelnet.py
和 chatgpt一起学习的代码:
import torch.nn as nn
import torch.nn.functional as F
import torch
from torch.autograd import Variable
from config import config as cfg# conv2d + bn + relu
class Conv2d(nn.Module):def __init__(self,in_channels,out_channels,k,s,p, activation=True, batch_norm=True):super(Conv2d, self).__init__()self.conv = nn.Conv2d(in_channels,out_channels,kernel_size=k,stride=s,padding=p)if batch_norm:self.bn = nn.BatchNorm2d(out_channels)else:self.bn = Noneself.activation = activationdef forward(self,x):x = self.conv(x)if self.bn is not None:x=self.bn(x)if self.activation:return F.relu(x,inplace=True)else:return x# conv3d + bn + relu
class Conv3d(nn.Module):def __init__(self, in_channels, out_channels, k, s, p, batch_norm=True):super(Conv3d, self).__init__()self.conv = nn.Conv3d(in_channels, out_channels, kernel_size=k, stride=s, padding=p)if batch_norm:self.bn = nn.BatchNorm3d(out_channels)else:self.bn = Nonedef forward(self, x):x = self.conv(x)if self.bn is not None:x = self.bn(x)return F.relu(x, inplace=True)# Fully Connected Network
class FCN(nn.Module):def __init__(self,cin,cout):super(FCN, self).__init__()self.cout = coutself.linear = nn.Linear(cin, cout)self.bn = nn.BatchNorm1d(cout)def forward(self,x):# KK is the stacked k across batchkk, t, _ = x.shapex = self.linear(x.view(kk*t,-1))x = F.relu(self.bn(x))return x.view(kk,t,-1)# Voxel Feature Encoding layer
class VFE(nn.Module):def __init__(self,cin,cout):super(VFE, self).__init__()assert cout % 2 == 0self.units = cout // 2self.fcn = FCN(cin,self.units)def forward(self, x, mask): # x: [N, T, C] : # N:一个batch voxel 的数量,不固定# point-wise feauturepwf = self.fcn(x)#locally aggregated featurelaf = torch.max(pwf,1)[0].unsqueeze(1).repeat(1,cfg.T,1) # laf:[N, T, cout // 2]# point-wise concat featurepwcf = torch.cat((pwf,laf),dim=2)# apply maskmask = mask.unsqueeze(2).repeat(1, 1, self.units * 2) # mask作用: 一个voxel T=35 个点,不够T个点则用0填充,但在计算时 不考虑这些0pwcf = pwcf * mask.float()return pwcf # [N, T, Cout]# Stacked Voxel Feature Encoding
class SVFE(nn.Module):def __init__(self):super(SVFE, self).__init__()self.vfe_1 = VFE(7,32)self.vfe_2 = VFE(32,128)self.fcn = FCN(128,128)def forward(self, x):mask = torch.ne(torch.max(x,2)[0], 0)x = self.vfe_1(x, mask)x = self.vfe_2(x, mask)x = self.fcn(x)# element-wise max poolingx = torch.max(x,1)[0]return x # Convolutional Middle Layer
class CML(nn.Module):def __init__(self):super(CML, self).__init__()self.conv3d_1 = Conv3d(128, 64, 3, s=(2, 1, 1), p=(1, 1, 1))self.conv3d_2 = Conv3d(64, 64, 3, s=(1, 1, 1), p=(0, 1, 1))self.conv3d_3 = Conv3d(64, 64, 3, s=(2, 1, 1), p=(1, 1, 1))def forward(self, x): x = self.conv3d_1(x)x = self.conv3d_2(x)x = self.conv3d_3(x)return x# # Region Proposal Network
# class RPN(nn.Module):
#     def __init__(self):
#         super(RPN, self).__init__()
#         self.block_1 = [Conv2d(128, 128, 3, 2, 1)]
#         self.block_1 += [Conv2d(128, 128, 3, 1, 1) for _ in range(3)]
#         self.block_1 = nn.Sequential(*self.block_1)#         self.block_2 = [Conv2d(128, 128, 3, 2, 1)]
#         self.block_2 += [Conv2d(128, 128, 3, 1, 1) for _ in range(5)]
#         self.block_2 = nn.Sequential(*self.block_2)#         self.block_3 = [Conv2d(128, 256, 3, 2, 1)]
#         self.block_3 += [nn.Conv2d(256, 256, 3, 1, 1) for _ in range(5)]
#         self.block_3 = nn.Sequential(*self.block_3)#         self.deconv_1 = nn.Sequential(nn.ConvTranspose2d(256, 256, 4, 4, 0),nn.BatchNorm2d(256))
#         self.deconv_2 = nn.Sequential(nn.ConvTranspose2d(128, 256, 2, 2, 0),nn.BatchNorm2d(256))
#         self.deconv_3 = nn.Sequential(nn.ConvTranspose2d(128, 256, 1, 1, 0),nn.BatchNorm2d(256))#         self.score_head = Conv2d(768, cfg.anchors_per_position, 1, 1, 0, activation=False, batch_norm=False)
#         self.reg_head = Conv2d(768, 7 * cfg.anchors_per_position, 1, 1, 0, activation=False, batch_norm=False)#     def forward(self,x):
#         x = self.block_1(x)
#         x_skip_1 = x
#         x = self.block_2(x)
#         x_skip_2 = x
#         x = self.block_3(x)
#         x_0 = self.deconv_1(x)
#         x_1 = self.deconv_2(x_skip_2)
#         x_2 = self.deconv_3(x_skip_1)
#         x = torch.cat((x_0,x_1,x_2),1)
#         return self.score_head(x),self.reg_head(x)class VoxelNet(nn.Module):def __init__(self):super(VoxelNet, self).__init__()self.svfe = SVFE()self.cml = CML()# self.rpn = RPN()def voxel_indexing(self, sparse_features, coords): # sparse_features:[N, C]: # N: 一个batch voxel的数量,不固定dim = sparse_features.shape[-1]dense_feature = Variable(torch.zeros(dim, cfg.N, cfg.D, cfg.H, cfg.W).cuda()) # cfg.N = batch"""这段代码的操作可以通过一个for循环来实现,但是需要注意,使用for循环的效率通常会比使用向量化操作低。下面是一个可能的实现:for i in range(len(coords)):dense_feature[:, coords[i,0], coords[i,1], coords[i,2], coords[i,3]] = sparse_features[i]这个for循环遍历coords的每一行(即每一个坐标),然后在dense_feature中找到对应的位置,将sparse_features中的对应元素赋给这个位置。这与原始代码的操作是一样的。但是,需要注意的是,这种方法的效率通常会比使用向量化操作低,特别是当处理大量数据时。在实际的代码中,我们通常会优先使用向量化操作,因为它们可以利用现代硬件的并行计算能力,从而大大提高计算效率这是一种常见的将稀疏张量转换为密集张量的方法。在稀疏张量中,只存储非零元素和它们的位置,而在密集张量中,所有元素都被存储。
这段代码就是在将 sparse_features 中的元素放入 dense_feature 的对应位置,从而将稀疏表示转换为密集表示。"""dense_feature[:, coords[:,0], coords[:,1], coords[:,2], coords[:,3]]= sparse_features# dense_feature:[C, B, D, H, W]return dense_feature.transpose(0, 1) # dense_feature:[B, C, D, H, W] # 这样就转换为稠密张量了 def forward(self, voxel_features, voxel_coords): # voxel_features:[N, T, C] # N:一个batch voxel的数量,每个voxel 35个点,每个点 C维# voxel_coords:[N, 4] , [batch_id, x, y, z]# feature learning networkvwfs = self.svfe(voxel_features)print(f"vwfs.shape = {vwfs.shape}") # [N, C]vwfs = self.voxel_indexing(vwfs,voxel_coords) # index 反向索引print(f"voxel_indexing ==> vwfs.shape = {vwfs.shape}") # # convolutional middle network# cml_out = self.cml(vwfs)# region proposal network# merge the depth and feature dim into one, output probability score map and regression map# psm,rm = self.rpn(cml_out.view(cfg.N,-1,cfg.H, cfg.W))# return psm, rmif __name__ == '__main__':model = VoxelNet()voxel_features = torch.rand(100, 35, 7)voxel_coords = torch.randint(low=0, high=10, size=(100, 4))model(voxel_features, voxel_coords)
参考博客
VoxelNet End-to-End Learning for Point Cloud Based 3D Object Detection 论文学习
VoxelNet:基于点云的端到端 3D 物体检测网络