【Linux服务器Java环境搭建】09 在CentOS系统中安装和配置clickhouse数据库
一、安装环境
CentOS7
二、官网安装参考文档
官网安装参考文档
不同系统请参考如下建议
- 从RPM软件包安装:
建议在CentOS、RedHat和所有其他基于rpm的Linux发行版上使用官方预编译的rpm软件包 - 从DEB软件包安装:
建议在Debian或Ubuntu上使用官方预编译的deb软件包
三、安装步骤
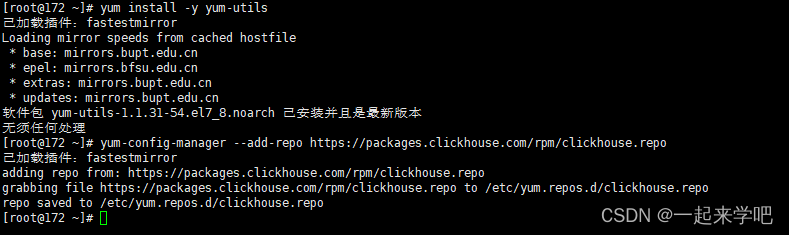
1. 设置clickhouse仓库
执行如下命令,设置clickhouse官方仓库
[root@172 ~]# yum install -y yum-utils
[root@172 ~]# yum-config-manager --add-repo https://packages.clickhouse.com/rpm/clickhouse.repo
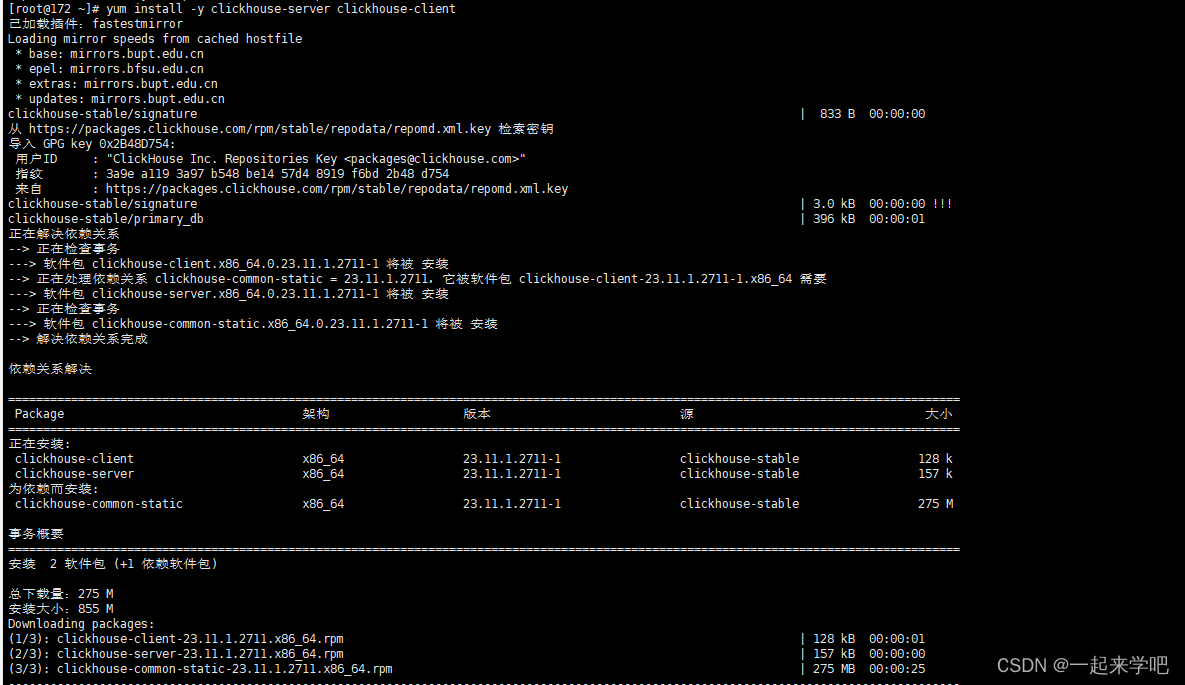
2. 安装clickhouse服务和客户端
[root@172 ~]# yum install -y clickhouse-server clickhouse-client

3. 启动clickhouse服务
如下为clickhouse相关命令
| 命令 | 说明 |
|---|---|
| systemctl status clickhouse-server | 查看服务状态 |
| systemctl start clickhouse-server | 启动服务 |
| systemctl stop clickhouse-server | 停止服务 |
| systemctl enable clickhouse-server | 设置服务为自启动 |
| systemctl disable clickhouse-server | 禁用服务为自启动 |
未启动状态

启动之后的状态

4、通过clickhouse-client连接clickhouse数据库
clickhouse-client # or "clickhouse-client --password" if you set up a password.

四 查看clickhouse配置文件以及设置密码
注意:默认账号为default ,密码为空
1. 查看配置文件
[root@172 /]# cat /etc/clickhouse-server/config.xml
内容较多,只截取部分
<!--display_name>production</display_name--><!-- Port for HTTP API. See also 'https_port' for secure connections.This interface is also used by ODBC and JDBC drivers (DataGrip, Dbeaver, ...)and by most of web interfaces (embedded UI, Grafana, Redash, ...).--><http_port>8123</http_port><!-- Port for interaction by native protocol with:- clickhouse-client and other native ClickHouse tools (clickhouse-benchmark, clickhouse-copier);- clickhouse-server with other clickhouse-servers for distributed query processing;- ClickHouse drivers and applications supporting native protocol(this protocol is also informally called as "the TCP protocol");See also 'tcp_port_secure' for secure connections.--><tcp_port>9000</tcp_port><!-- Compatibility with MySQL protocol.ClickHouse will pretend to be MySQL for applications connecting to this port.--><mysql_port>9004</mysql_port><!-- Compatibility with PostgreSQL protocol.ClickHouse will pretend to be PostgreSQL for applications connecting to this port.--><postgresql_port>9005</postgresql_port><!-- HTTP API with TLS (HTTPS).You have to configure certificate to enable this interface.See the openSSL section below.--><!-- <https_port>8443</https_port> --><!-- Native interface with TLS.You have to configure certificate to enable this interface.See the openSSL section below.--><!-- <tcp_port_secure>9440</tcp_port_secure> --><!-- Native interface wrapped with PROXYv1 protocolPROXYv1 header sent for every connection.ClickHouse will extract information about proxy-forwarded client address from the header.--><!-- <tcp_with_proxy_port>9011</tcp_with_proxy_port> --><!-- Port for communication between replicas. Used for data exchange.It provides low-level data access between servers.This port should not be accessible from untrusted networks.See also 'interserver_http_credentials'.Data transferred over connections to this port should not go through untrusted networks.See also 'interserver_https_port'.--><interserver_http_port>9009</interserver_http_port>
2. 设置密码
[root@172 /]# vim /etc/clickhouse-server/users.xml
如下为具体内容,请注意password部分
<?xml version="1.0"?>
<clickhouse><!-- See also the files in users.d directory where the settings can be overridden. --><!-- Profiles of settings. --><profiles><!-- Default settings. --><default><!-- Maximum memory usage for processing single query, in bytes. --><max_memory_usage>10000000000</max_memory_usage><!-- How to choose between replicas during distributed query processing.random - choose random replica from set of replicas with minimum number of errorsnearest_hostname - from set of replicas with minimum number of errors, choose replicawith minimum number of different symbols between replica's hostname and local hostname(Hamming distance).in_order - first live replica is chosen in specified order.first_or_random - if first replica one has higher number of errors, pick a random one from replicas with minimum number of errors.--><load_balancing>random</load_balancing></default><!-- Profile that allows only read queries. --><readonly><readonly>1</readonly></readonly></profiles><!-- Users and ACL. --><users><!-- If user name was not specified, 'default' user is used. --><default><!-- See also the files in users.d directory where the password can be overridden.Password could be specified in plaintext or in SHA256 (in hex format).If you want to specify password in plaintext (not recommended), place it in 'password' element.Example: <password>qwerty</password>.Password could be empty.If you want to specify SHA256, place it in 'password_sha256_hex' element.Example: <password_sha256_hex>65e84be33532fb784c48129675f9eff3a682b27168c0ea744b2cf58ee02337c5</password_sha256_hex>Restrictions of SHA256: impossibility to connect to ClickHouse using MySQL JS client (as of July 2019).If you want to specify double SHA1, place it in 'password_double_sha1_hex' element.Example: <password_double_sha1_hex>e395796d6546b1b65db9d665cd43f0e858dd4303</password_double_sha1_hex>If you want to specify a previously defined LDAP server (see 'ldap_servers' in the main config) for authentication,place its name in 'server' element inside 'ldap' element.Example: <ldap><server>my_ldap_server</server></ldap>If you want to authenticate the user via Kerberos (assuming Kerberos is enabled, see 'kerberos' in the main config),place 'kerberos' element instead of 'password' (and similar) elements.The name part of the canonical principal name of the initiator must match the user name for authentication to succeed.You can also place 'realm' element inside 'kerberos' element to further restrict authentication to only those requestswhose initiator's realm matches it.Example: <kerberos />Example: <kerberos><realm>EXAMPLE.COM</realm></kerberos>How to generate decent password:Execute: PASSWORD=$(base64 < /dev/urandom | head -c8); echo "$PASSWORD"; echo -n "$PASSWORD" | sha256sum | tr -d '-'In first line will be password and in second - corresponding SHA256.How to generate double SHA1:Execute: PASSWORD=$(base64 < /dev/urandom | head -c8); echo "$PASSWORD"; echo -n "$PASSWORD" | sha1sum | tr -d '-' | xxd -r -p | sha1sum | tr -d '-'In first line will be password and in second - corresponding double SHA1.--><password>设置自己的密码</password><!-- List of networks with open access.To open access from everywhere, specify:<ip>::/0</ip>To open access only from localhost, specify:<ip>::1</ip><ip>127.0.0.1</ip>Each element of list has one of the following forms:<ip> IP-address or network mask. Examples: 213.180.204.3 or 10.0.0.1/8 or 10.0.0.1/255.255.255.02a02:6b8::3 or 2a02:6b8::3/64 or 2a02:6b8::3/ffff:ffff:ffff:ffff::.<host> Hostname. Example: server01.yandex.ru.To check access, DNS query is performed, and all received addresses compared to peer address.<host_regexp> Regular expression for host names. Example, ^server\d\d-\d\d-\d\.yandex\.ru$To check access, DNS PTR query is performed for peer address and then regexp is applied.Then, for result of PTR query, another DNS query is performed and all received addresses compared to peer address.Strongly recommended that regexp is ends with $All results of DNS requests are cached till server restart.--><networks><ip>::/0</ip></networks><!-- Settings profile for user. --><profile>default</profile><!-- Quota for user. --><quota>default</quota><!-- User can create other users and grant rights to them. --><!-- <access_management>1</access_management> --></default></users><!-- Quotas. --><quotas><!-- Name of quota. --><default><!-- Limits for time interval. You could specify many intervals with different limits. --><interval><!-- Length of interval. --><duration>3600</duration><!-- No limits. Just calculate resource usage for time interval. --><queries>0</queries><errors>0</errors><result_rows>0</result_rows><read_rows>0</read_rows><execution_time>0</execution_time></interval></default></quotas>
</clickhouse>
五、监听8123端口的服务
[root@172 /]# netstat -tulpn | grep 8123
这将显示正在监听8123端口的服务,以及它的进程ID(PID)

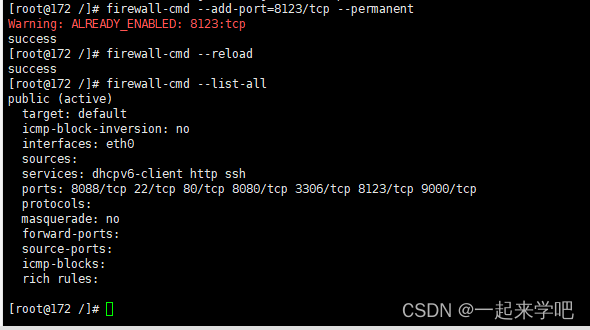
六、开放8123端口号
- 设置开放的端口号
[root@172 /]# firewall-cmd --add-port=8123/tcp --permanent
- 重启防火墙
[root@172 /]# firewall-cmd --reload
- 查看当前已开放的端口号
[root@172 /]# firewall-cmd --list-all
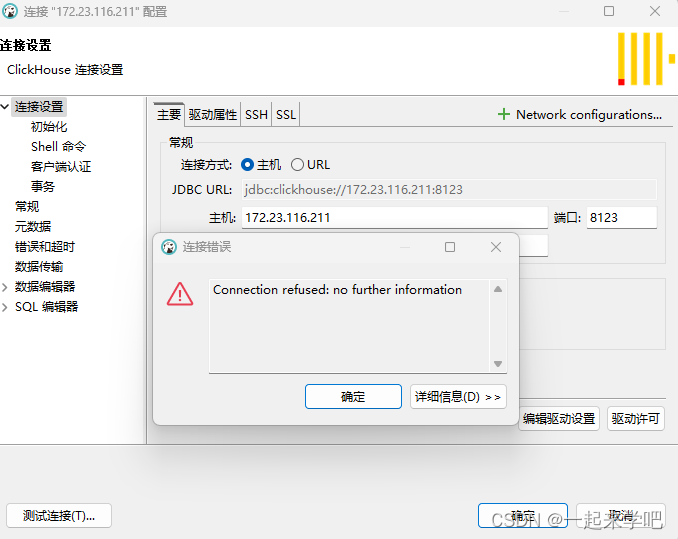
七、通过数据库管理工具链接测试
1、连接测试报错如下
Connection refused: no further information
2、解决方案
出现如上问题的原因是因为配置文件中,对于远程连接IP的设置的原因
通过如下命令查看配置文件
[root@172 clickhouse-server]# cat config.xml
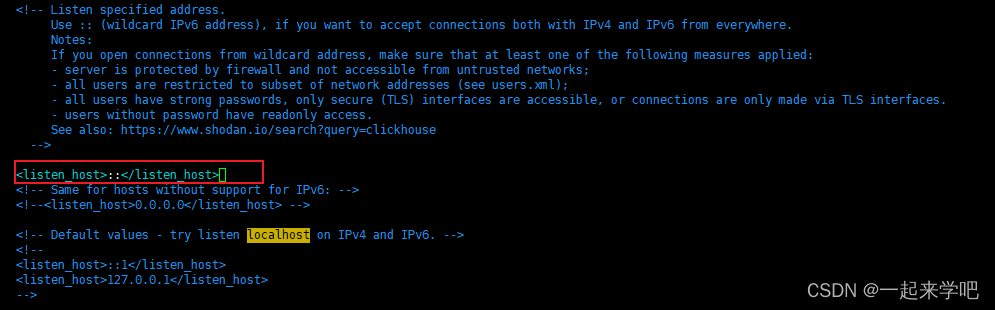
如下为默认配置信息,注意<!-- <listen_host>::</listen_host> -->
<!-- Listen specified address.Use :: (wildcard IPv6 address), if you want to accept connections both with IPv4 and IPv6 from everywhere.Notes:If you open connections from wildcard address, make sure that at least one of the following measures applied:- server is protected by firewall and not accessible from untrusted networks;- all users are restricted to subset of network addresses (see users.xml);- all users have strong passwords, only secure (TLS) interfaces are accessible, or connections are only made via TLS interfaces.- users without password have readonly access.See also: https://www.shodan.io/search?query=clickhouse--><!-- <listen_host>::</listen_host> --><!-- Same for hosts without support for IPv6: --><!-- <listen_host>0.0.0.0</listen_host> --><!-- Default values - try listen localhost on IPv4 and IPv6. --><!--<listen_host>::1</listen_host><listen_host>127.0.0.1</listen_host>-->
解决方案:
把注释去掉,修改完成后如下<listen_host>::</listen_host>
通过如下命令修改配置文件,目录为[root@172 /]# cd /etc/clickhouse-server
[root@172 clickhouse-server]# vim config.xml
修改完成后,保存并退出,再次测试,成功连接
