数据结构——单向链表和双向链表的实现(C语言版)
目录
前言
1. 链表
1.1 链表的概念及结构
1.2 链表的分类
2. 单链表接口实现
2.1 数据结构设计与接口函数声明
2.2 创建结点,打印,查找
2.3 尾插,头插,尾删,头删
2.4 插入或删除
2.4.1在指定位置后
2.4.2在指定位置前
2.5 销毁链表
3. 双向带头循环链表
3.1 数据结构设计与接口函数声明
3.2 初始化,销毁,打印,动态创建结点
3.3 尾插,头插,尾删,头删
3.4 查找,插入和删除
4.链表和顺序表的区别
5. 源代码
5.1 单链表
(1)SList.h
(2)SList.c
(3)SLtest.c
5.2 双向链表
(1)Linked LIst.h
(2)Linked List.c
(3)Ltest.c
总结
前言
这篇文章关于链表的介绍,还有单向链表和双向链表的C语言实现,内容干货满满,建议边看边上手敲代码!
1. 链表
1.1 链表的概念及结构
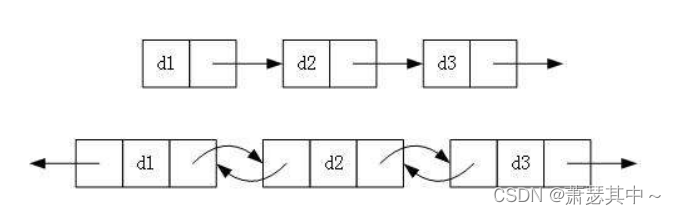
概念:链表是一种物理存储结构上非连续、非顺序的存储结构,数据元素的逻辑顺序是通过链表中的指针链接次序实现的 。
如下图所示:

注意:
- 从上图可看出,链式结构逻辑上是连续的,但在物理上不一定连续的,地址存放分布不均。
- 现实中的节点一般都是从堆上申请出来的。
- 从堆上申请的空间,是按照一定策略来分配的,两次申请的空间可能连续,也可能不连续。
1.2 链表的分类
实际中链表有这三种分法,单向或者双向,带头或不带头,循环或者非循环。
- 单向或双向
- 带头或者不带头

- 循环或者非循环

虽然有这么多的链表结构,但是我们实际中最常用还是两种结构:
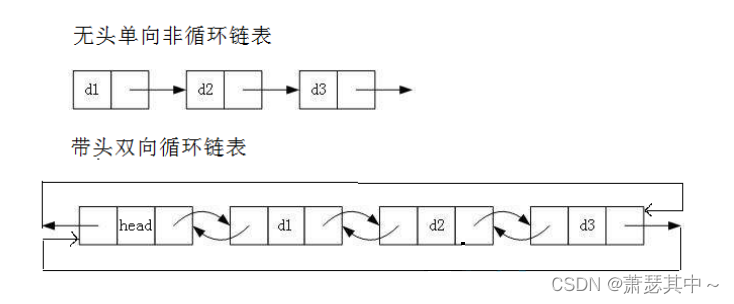
- 无头单向非循环链表:结构简单,一般不会单独用来存数据。实际中更多是作为其他数据结构的子结构,如哈希桶、图的邻接表等等。
- 带头双向循环链表:结构最复杂,一般用在单独存储数据。实际中使用的链表数据结构,都是带头双向循环链表。另外这个结构虽然结构复杂,但是使用代码实现以后会发现结构会带来很多优势,实现反而简单了。
2. 单链表接口实现
在实现接口时,需要创建三个文件,分别是SList.h,SList.c和SLtest.c这三个文件,第一个是写入单链表数据结构设计和接口函数声明来串联三个文件,第二个是完成各个接口函数内部代码实现,第三个是来测试各个接口功能情况。
2.1 数据结构设计与接口函数声明
单链表结构体中有存储一个数据的变量,但与顺序表的不同之处,是使用指针联系着下一个结点,所以在创建个相同结构体的指针next。单链表只需要知道头结点的结构体指针就可以进行各种接口的实现,所以不用创建一个初始化接口,创建一个结构体指针就可以。
typedef int SLTDataType;typedef struct SListNode
{SLTDataType data;struct SListNode* next;
}SLTNode;//动态申请一个结点
SLTNode* BuyListNode(SLTDataType x);
//单链表打印
void SListPrint(SLTNode* phead);
//单链表尾插
void SListPushBack(SLTNode** pphead, SLTDataType x);
//单链表头插
void SListPushFront(SLTNode** pphead, SLTDataType x);
//单链表尾删
void SListPopBack(SLTNode** pphead);
//单链表头删
void SListPopFront(SLTNode** pphead);
//单链表查找
SLTNode* SListFind(SLTNode* phead, SLTDataType x);
//在pos位置之前去插入一个节点
void SListInsert(SLTNode** pphead, SLTNode* pos, SLTDataType x);
// 在pos位置后面插入
void SListInsertAfter(SLTNode* pos, SLTDataType x);
//删除pos位置的节点
void SListErase(SLTNode** pphead, SLTNode* pos);
//删除pos位置后一个节点
void SListEraseAfter(SLTNode** pphead, SLTNode* pos);
//单链表销毁
void SListDestory(SLTNode** pphead);
2.2 创建结点,打印,查找
创建新结点是为了后面接口实现做准备。
SLTNode* BuyListNode(SLTDataType x)
{   //动态申请新结点SLTNode* newnode = (SLTNode*)malloc(sizeof(SLTNode));if (newnode == NULL){   //可能开辟内存失败,加上判断,增强代码的健壮性printf("malloc fail\n");exit(-1);}newnode->data = x;newnode->next = NULL;return newnode;
}
打印链表中的内容,用的是while循环,判断条件是cur指针不为空。
void SListPrint(SLTNode* phead)
{SLTNode* cur = phead;while (cur != NULL){printf("%d->", cur->data);cur = cur->next;}printf("NULL\n");
}
assert是断言,判断phead是否为空结点,用while循环遍历整个链表。
SListNode* SListFind(SLTNode* phead, SLTDataType x)
{assert(phead);SLTNode* cur = phead;while (cur){if (cur->data == x){return cur;}else{cur = cur->next;}}return NULL;
}
2.3 尾插,头插,尾删,头删
因为只需要知道指向头结点的指针变量,就可以进行操作,但是第一次我们创建的头结点为空指针,尾插的时候如果传入一级指针在尾插函数内部修改头节点的值,无法影响头结点,因为尾插函数内的头结点的一份临时拷贝,即形参,改变形参的值是无法影响实参的值,所以要传入二级指针,通过指针变量的指针修改一级指针的值。故之后关于头结点的删除或者插入,都需要传二级指针,这是链表实现中较难理解的点。
void SListPushBack(SLTNode** pphead, SLTDataType x)
{assert(pphead);SLTNode* newnode = BuyListNode(x);//头结点为空时,直接赋值if (*pphead == NULL){*pphead = newnode;}else{//找到尾节点SLTNode* tail = *pphead;while (tail->next != NULL){tail = tail->next;}tail->next = newnode;}
}
我们写一个测试函数,测试一下尾插函数的功能。之后的测试函数,只写全局函数Test,不展示main函数的部分。
#include "SLinked list.h"void TestSlist1()
{SLTNode* plist = NULL;SListPushBack(&plist, 1);SListPushBack(&plist, 2);SListPushBack(&plist, 3);SListPushBack(&plist, 4);SListPrint(plist);
}int main()
{TestSlist1();return 0;
}
输出结果:

头插较为简单,只需要创建一个新结点,新结点的next指针指向头结点,再把头结点指向新结点。
void SListPushFront(SLTNode** pphead, SLTDataType x)
{assert(pphead);SLTNode* newnode = BuyListNode(x);newnode->next = *pphead;*pphead = newnode;
}
再写一个测试函数:
void TestSlist2()
{SLTNode* plist = NULL;SListPushFront(&plist, 1);SListPushFront(&plist, 2);SListPushFront(&plist, 3);SListPushFront(&plist, 4);SListPrint(plist);
}
输出的结果:

尾删要分情况,分为链表内有一个节点还是两个结点及以上。如果链表内只有一个结点直接释放头结点,并将其置为空指针,如果是两个节点及以上,需要找到尾结点的位置,用while循环遍历链表,新建一个tail指针,当tail的next指针为空时,便找到尾结点,然后进行释放操作。
void SListPopBack(SLTNode** pphead)
{assert(pphead);assert(*pphead != NULL);if ((*pphead)->next == NULL){//1. 一个节点free(*pphead);*pphead = NULL;}else{	//2. 两个及以上的节点SLTNode* tail = *pphead;while (tail->next->next){tail = tail->next;}free(tail->next);tail->next = NULL;}
}
在之前Test1函数上稍加改动:
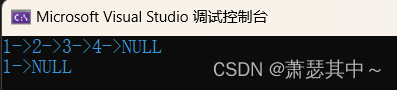
void TestSlist1()
{SLTNode* plist = NULL;SListPushBack(&plist, 1);SListPushBack(&plist, 2);SListPushBack(&plist, 3);SListPushBack(&plist, 4);SListPrint(plist);SListPopBack(&plist);SListPopBack(&plist);SListPopBack(&plist);SListPrint(plist);
}
输出的结果:
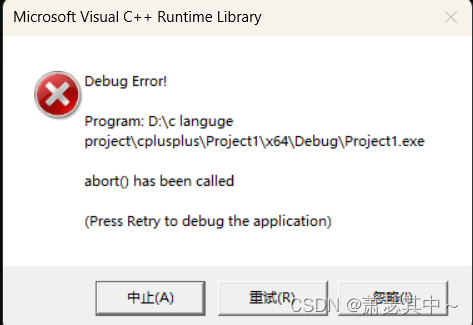
但是如果你调用尾删次数超过链表存储数据个数,就会报错。所以调用尾删函数需注意。
头删函数只需在创建一个next指针,并赋值为头结点的下一个结点,释放头结点,再赋值。
void SListPopFront(SLTNode** pphead)
{assert(pphead);assert(*pphead != NULL);SLTNode* next = (*pphead)->next;free(*pphead);*pphead = next;
}
同理,这次在Test2函数上进行改动即可。
void TestSlist2()
{SLTNode* plist = NULL;SListPushFront(&plist, 1);SListPushFront(&plist, 2);SListPushFront(&plist, 3);SListPushFront(&plist, 4);SListPrint(plist);SListPopFront(&plist);SListPopFront(&plist);SListPopFront(&plist);SListPopFront(&plist);SListPrint(plist);
}
输出的结果:

2.4 插入或删除
一般是在指定位置后插入或删除,这是因为单链表的结点只有下一个结点的地址,如果想要在指定位置之前插入,需要从头结点开始遍历,消耗时间。
2.4.1在指定位置后
插入操作:
// 在pos位置后面插入,这个更适合单链表
void SListInsertAfter(SLTNode* pos, SLTDataType x)
{assert(pos);SLTNode* newnode = BuyListNode(x);if (newnode == NULL){return;}newnode->next = pos->next;pos->next = newnode;
}
删除操作:
void SListEraseAfter(SLTNode** pphead, SLTNode* pos)
{assert(pphead);assert(pos->next);SLTNode* next = pos->next;pos->next = next->next;free(next);
}
写个测试函数,先通过查找函数,获得想要结点的地址,再修改。
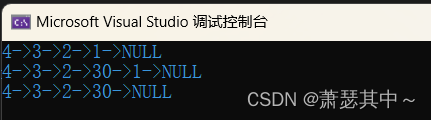
void TestSlist3()
{SLTNode* plist = NULL;SListPushFront(&plist, 1);SListPushFront(&plist, 2);SListPushFront(&plist, 3);SListPushFront(&plist, 4);SListPrint(plist);SLTNode* pos = SListFind(plist, 2);if (pos){SListInsertAfter(pos, 30);}SListPrint(plist);pos = SListFind(plist, 30);if (pos){SListEraseAfter(&plist, pos);}SListPrint(plist);
}
输出的结果:
2.4.2在指定位置前
在进行插入操作之前,应该先判断该位置是否为头结点,如果是头结点,直接头插;如果不是,需要遍历链表找到该位置结点的前一个节点,再插入。
void SListInsert(SLTNode** pphead, SLTNode* pos, SLTDataType x)
{assert(pphead);SLTNode* newnode = BuyListNode(x);if (*pphead == pos){newnode->next = *pphead;*pphead = newnode;}else{// 找到pos的前一个位置SLTNode* posPrev = *pphead;while (posPrev->next != pos){posPrev = posPrev->next;}posPrev->next = newnode;newnode->next = pos;}
}
删除也是一样,需要区分该位置是否为头结点,不是的话需要先找到该位置前一个节点,再删除。
void SListErase(SLTNode** pphead, SLTNode* pos)
{assert(pphead);assert(pos);//删除头节点if (*pphead == pos){*pphead = pos->next;free(pos);//要不要把pos置为空指针呢pos = NULL;}else{	//找前一个节点SLTNode* posPrev = *pphead;while (posPrev->next != pos){posPrev = posPrev->next;}//开始删除posPrev->next = pos->next;free(pos);pos = NULL;}
}
再写一个测试函数,与前一个测试函数类似。
void TestSlist4()
{SLTNode* plist = NULL;SListPushFront(&plist, 1);SListPushFront(&plist, 2);SListPushFront(&plist, 3);SListPushFront(&plist, 4);SListPrint(plist);SLTNode* pos = SListFind(plist, 2);if (pos){SListInsert(&plist, pos, 30);}SListPrint(plist);pos = SListFind(plist, 1);if (pos){SListErase(&plist, pos);}SListPrint(plist);
}
输出的结果:

2.5 销毁链表
销毁链表需要遍历整个链表,因为链表上的每一个结点都是动态开辟出来的。
void SListDestory(SLTNode** pphead)
{assert(pphead);SLTNode* cur = *pphead;while (cur){SLTNode* next = cur->next;free(cur); cur = next;}*pphead = NULL;
}
3. 双向带头循环链表
开始之前,需要先创建三个文件List.h ,List.c和Ltest.c这三个文件。
- Linked List.h文件包含所有用到的头文件,还有数据结构的设计和各种接口函数声明。
- Linked List.c文件完成所有接口函数的实现。
- Ltest.c主要代码是测试函数,来测试接口函数功能是否达标。
3.1 数据结构设计与接口函数声明
双向链表的数据结构中,不只有指向下一个结点的指针,还有指向上一个结点的指针。
typedef int LTDataType;typedef struct ListNode
{LTDataType data;struct ListNode* next;struct ListNode* prev;
}LTNode;//创建返回链表的头结点
LTNode* ListInit();
//双向链表的销毁
void ListDestroy(LTNode* phead);
//双向链表打印
void ListPrint(LTNode* phead);
//双向链表尾插
void ListPushBack(LTNode* phead, LTDataType x);
//双向链表头插
void ListPopBack(LTNode* phead);
//双向链表尾删
void ListPushFront(LTNode* phead, LTDataType x);
//双向链表头删
void ListPopFront(LTNode* phead);
//双向链表查找
LTNode* ListFind(LTNode* phead, LTDataType x);
//双向链表在pos的前面进行插入
void ListInsert(LTNode* pos, LTDataType x);
//双向链表删除pos位置的结点
void ListErase(LTNode* pos);
3.2 初始化,销毁,打印,动态创建结点
初始化的时候不是都只为空,需要创建一个哨兵位结点,不存储有效数据,并且next和prev都需要指向头结点,函数返回类型是LTNode*这样子就不需要传入二级指针。
LTNode* ListInit()
{LTNode* phead = (LTNode*)malloc(sizeof(LTNode));if (phead == NULL){exit(1);}phead->next = phead;phead->prev = phead;return phead;
}
销毁操作跟单链表相同,需要逐个释放,最后头结点也得释放,但是不需要将头结点置为空指针,因为传入的是一级指针,此时销毁函数内的是形参,改变形参无法影响实参。
void ListDestroy(LTNode* phead)
{assert(phead);LTNode* cur = phead->next;while (cur != phead){LTNode* next = cur->next;free(cur);cur = next;}free(phead);
}
打印函数使用while循环遍历链表即可。
void ListPrint(LTNode* phead)
{assert(phead);LTNode* cur = phead->next;while (cur != phead){printf("%d ", cur->data);cur = cur->next;}printf("\n");
}
动态创建一个新结点用处很大。注意next和prev都要置为空指针。
LTNode* BuyListNode(LTDataType x)
{LTNode* ptr = (LTNode*)malloc(sizeof(LTNode));if (ptr != NULL){LTNode* newnode = ptr;newnode->data = x;newnode->next = NULL;newnode->prev = NULL;return newnode;}exit(1);
}
3.3 尾插,头插,尾删,头删
尾插不需要查找,只需要通过prev指针就能定位到。
void ListPushBack(LTNode* phead, LTDataType x)
{assert(phead);LTNode* tail = phead->prev;LTNode* newnode = BuyListNode(x);newnode->data = x;//改变结点连接关系tail->next = newnode;newnode->prev = tail;newnode->next = phead;phead->prev = newnode;
}
头插操作如下,改变结点之间的指向问题。
void ListPushFront(LTNode* phead, LTDataType x)
{assert(phead);LTNode* newnode = BuyListNode(x);LTNode* next = phead->next;phead->next = newnode;newnode->prev = phead;newnode->next = next;next->prev = newnode;
}
尾删需要注意不能删除到哨兵位,通过断言头结点的下一个结点不能指向本身。
void ListPopBack(LTNode* phead)
{assert(phead);assert(phead->next != phead);LTNode* tail = phead->prev;LTNode* tailPrev = tail->prev;free(tail);tailPrev->next = phead;phead->prev = tailPrev;
}
头删的断言跟尾删一样,接下来就是释放并改变结点的指向。
void ListPopFront(LTNode* phead)
{assert(phead);assert(phead->next != phead);LTNode* next = phead->next;LTNode* nextNext = next->next;phead->next = nextNext;nextNext->prev = phead;free(next);
}
3.4 查找,插入和删除
查找函数跟单链表查找函数类似,遍历链表。
LTNode* ListFind(LTNode* phead, LTDataType x)
{assert(phead);LTNode* cur = phead->next;while (cur != phead){if (cur->data == x)return cur;cur = cur->next;}printf("\n");
}
插入函数因为双链表结构的复杂性,反而变得十分简单,不需要遍历链表。
//pos位置之前插入
void ListInsert(LTNode* pos, LTDataType x)
{assert(pos);LTNode* posPrev = pos->prev;LTNode* newnode = BuyListNode(x);//posPrev newnode posposPrev->next = newnode;newnode->prev = posPrev;newnode->next = pos;pos->prev = newnode;
}
删除函数也是,注意可通过新创建几个变量区分pos位置的前一个结点和后一个结点,方便操作。
//删除pos位置
void ListErase(LTNode* pos)
{assert(pos);// posPrev  pos  posNextLTNode* posPrev = pos->prev;LTNode* posNext = pos->next;posPrev->next = posNext;posNext->prev = posPrev;free(pos);pos = NULL;
}
写个测试函数:
void TestList2()
{LTNode* plist = ListInit();ListPushFront(plist, 1);ListPushFront(plist, 2);ListPushFront(plist, 3);ListPushFront(plist, 4);ListPrint(plist);LTNode* pos = ListFind(plist, 3);if (pos){ListInsert(pos, 30);}ListPrint(plist);pos = ListFind(plist, 2);if (pos){ListErase(pos);}ListPrint(plist);ListDestroy(plist);plist = NULL;
}
输出的结果:

4.链表和顺序表的区别
| 不同点 | 顺序表 | 链表 |
| 存储空间上 | 物理上一定连续 | 逻辑上连续,物理上不一定连续 |
| 随机访问 | 支持O(1) | 不支持 :O(N) |
| 任意位置插入或删除元素 | 可能需要搬移元素,效率低O(N) | 只需要修改指针指向 |
| 插入 | 动态顺序表,空间不够需要扩容 | 没有容量的概念 |
| 应用场景 | 元素高效存储+频繁访问 | 任意位置插入和删除频繁 |
| 缓存利用率 | 高 | 低 |
5. 源代码
5.1 单链表
(1)SList.h
#pragma once#include <stdio.h>
#include <stdlib.h>
#include <assert.h>
#include <string.h>typedef int SLTDataType;typedef struct SListNode
{SLTDataType data;struct SListNode* next;
}SLTNode;//动态申请一个结点
SLTNode* BuyListNode(SLTDataType x);
//单链表打印
void SListPrint(SLTNode* phead);
//单链表尾插
void SListPushBack(SLTNode** pphead, SLTDataType x);
//单链表头插
void SListPushFront(SLTNode** pphead, SLTDataType x);
//单链表尾删
void SListPopBack(SLTNode** pphead);
//单链表头删
void SListPopFront(SLTNode** pphead);
//单链表查找
SLTNode* SListFind(SLTNode* phead, SLTDataType x);
//在pos位置之前去插入一个节点
void SListInsert(SLTNode** pphead, SLTNode* pos, SLTDataType x);
// 在pos位置后面插入
void SListInsertAfter(SLTNode* pos, SLTDataType x);
//删除pos位置的节点
void SListErase(SLTNode** pphead, SLTNode* pos);
//删除pos位置后一个节点
void SListEraseAfter(SLTNode** pphead, SLTNode* pos);
//单链表销毁
void SListDestory(SLTNode** pphead);
(2)SList.c
#include "SLinked list.h"SLTNode* BuyListNode(SLTDataType x)
{//动态申请新结点SLTNode* newnode = (SLTNode*)malloc(sizeof(SLTNode));if (newnode == NULL){//可能开辟内存失败,加上判断,增强代码的健壮性printf("malloc fail\n");exit(-1);}newnode->data = x;newnode->next = NULL;return newnode;
}void SListPrint(SLTNode* phead)
{SLTNode* cur = phead;while (cur != NULL){printf("%d->", cur->data);cur = cur->next;}printf("NULL\n");
}SLTNode* SListFind(SLTNode* phead, SLTDataType x)
{assert(phead);SLTNode* cur = phead;while (cur){if (cur->data == x){return cur;}else{cur = cur->next;}}return NULL;
}void SListPushBack(SLTNode** pphead, SLTDataType x)
{assert(pphead);SLTNode* newnode = BuyListNode(x);if (*pphead == NULL){*pphead = newnode;}else{//找到尾节点SLTNode* tail = *pphead;while (tail->next != NULL){tail = tail->next;}tail->next = newnode;}
}void SListPushFront(SLTNode** pphead, SLTDataType x)
{assert(pphead);SLTNode* newnode = BuyListNode(x);newnode->next = *pphead;*pphead = newnode;
}void SListPopBack(SLTNode** pphead)
{assert(pphead);assert(*pphead != NULL);if ((*pphead)->next == NULL){//1. 一个节点free(*pphead);*pphead = NULL;}else{	//2. 两个及以上的节点SLTNode* tail = *pphead;while (tail->next->next){tail = tail->next;}free(tail->next);tail->next = NULL;}
}void SListPopFront(SLTNode** pphead)
{assert(pphead);assert(*pphead != NULL);SLTNode* next = (*pphead)->next;free(*pphead);*pphead = next;
}// 在pos位置后面插入,这个更适合单链表
void SListInsertAfter(SLTNode* pos, SLTDataType x)
{assert(pos);SLTNode* newnode = BuyListNode(x);if (newnode == NULL){return;}newnode->next = pos->next;pos->next = newnode;
}void SListInsert(SLTNode** pphead, SLTNode* pos, SLTDataType x)
{assert(pphead);SLTNode* newnode = BuyListNode(x);if (*pphead == pos){newnode->next = *pphead;*pphead = newnode;}else{// 找到pos的前一个位置SLTNode* posPrev = *pphead;while (posPrev->next != pos){posPrev = posPrev->next;}posPrev->next = newnode;newnode->next = pos;}
}void SListErase(SLTNode** pphead, SLTNode* pos)
{assert(pphead);assert(pos);//删除头节点if (*pphead == pos){*pphead = pos->next;free(pos);//要不要把pos置为空指针呢pos = NULL;}else{	//找前一个节点SLTNode* posPrev = *pphead;while (posPrev->next != pos){posPrev = posPrev->next;}//开始删除posPrev->next = pos->next;free(pos);pos = NULL;}
}void SListEraseAfter(SLTNode** pphead, SLTNode* pos)
{assert(pphead);assert(pos->next);SLTNode* next = pos->next;pos->next = next->next;free(next);
}
(3)SLtest.c
#include "SLinked list.h"void TestSlist1()
{SLTNode* plist = NULL;SListPushBack(&plist, 1);SListPushBack(&plist, 2);SListPushBack(&plist, 3);SListPushBack(&plist, 4);SListPrint(plist);SListPopBack(&plist);SListPopBack(&plist);SListPopBack(&plist);SListPrint(plist);
}void TestSlist2()
{SLTNode* plist = NULL;SListPushFront(&plist, 1);SListPushFront(&plist, 2);SListPushFront(&plist, 3);SListPushFront(&plist, 4);SListPrint(plist);SListPopFront(&plist);SListPopFront(&plist);SListPopFront(&plist);SListPopFront(&plist);SListPrint(plist);
}void TestSlist3()
{SLTNode* plist = NULL;SListPushFront(&plist, 1);SListPushFront(&plist, 2);SListPushFront(&plist, 3);SListPushFront(&plist, 4);SListPrint(plist);SLTNode* pos = SListFind(plist, 2);if (pos){SListInsertAfter(pos, 30);}SListPrint(plist);pos = SListFind(plist, 30);if (pos){SListEraseAfter(&plist, pos);}SListPrint(plist);
}void TestSlist4()
{SLTNode* plist = NULL;SListPushFront(&plist, 1);SListPushFront(&plist, 2);SListPushFront(&plist, 3);SListPushFront(&plist, 4);SListPrint(plist);SLTNode* pos = SListFind(plist, 2);if (pos){SListInsert(&plist, pos, 30);}SListPrint(plist);pos = SListFind(plist, 1);if (pos){SListErase(&plist, pos);}SListPrint(plist);
}int main()
{//TestSlist1();//TestSlist2();//TestSlist3();TestSlist4();return 0;
}
5.2 双向链表
(1)Linked LIst.h
#pragma once
#include <stdio.h>
#include <stdlib.h>
#include <assert.h>typedef int LTDataType;typedef struct ListNode
{LTDataType data;struct ListNode* next;struct ListNode* prev;
}LTNode;//创建返回链表的头结点
LTNode* ListInit();
//双向链表的销毁
void ListDestroy(LTNode* phead);
//双向链表打印
void ListPrint(LTNode* phead);
//双向链表尾插
void ListPushBack(LTNode* phead, LTDataType x);
//双向链表头插
void ListPopBack(LTNode* phead);
//双向链表尾删
void ListPushFront(LTNode* phead, LTDataType x);
//双向链表头删
void ListPopFront(LTNode* phead);
//双向链表查找
LTNode* ListFind(LTNode* phead, LTDataType x);
//双向链表在pos的前面进行插入
void ListInsert(LTNode* pos, LTDataType x);
//双向链表删除pos位置的结点
void ListErase(LTNode* pos);
(2)Linked List.c
#include "Linked List.h"LTNode* ListInit()
{LTNode* phead = (LTNode*)malloc(sizeof(LTNode));if (phead == NULL){exit(1);}phead->next = phead;phead->prev = phead;return phead;
}LTNode* BuyListNode(LTDataType x)
{LTNode* ptr = (LTNode*)malloc(sizeof(LTNode));if (ptr != NULL){LTNode* newnode = ptr;newnode->data = x;newnode->next = NULL;newnode->prev = NULL;return newnode;}exit(1);
}void ListPrint(LTNode* phead)
{assert(phead);LTNode* cur = phead->next;while (cur != phead){printf("%d ", cur->data);cur = cur->next;}printf("\n");
}void ListPushBack(LTNode* phead, LTDataType x)
{assert(phead);LTNode* tail = phead->prev;LTNode* newnode = BuyListNode(x);newnode->data = x;//改变结点连接关系tail->next = newnode;newnode->prev = tail;newnode->next = phead;phead->prev = newnode;
}void ListPopBack(LTNode* phead)
{assert(phead);assert(phead->next != phead);LTNode* tail = phead->prev;LTNode* tailPrev = tail->prev;free(tail);tailPrev->next = phead;phead->prev = tailPrev;
}void ListPushFront(LTNode* phead, LTDataType x)
{assert(phead);LTNode* newnode = BuyListNode(x);LTNode* next = phead->next;phead->next = newnode;newnode->prev = phead;newnode->next = next;next->prev = newnode;
}void ListPopFront(LTNode* phead)
{assert(phead);assert(phead->next != phead);LTNode* next = phead->next;LTNode* nextNext = next->next;phead->next = nextNext;nextNext->prev = phead;free(next);
}LTNode* ListFind(LTNode* phead, LTDataType x)
{assert(phead);LTNode* cur = phead->next;while (cur != phead){if (cur->data == x)return cur;cur = cur->next;}printf("\n");
}//pos位置之前插入
void ListInsert(LTNode* pos, LTDataType x)
{assert(pos);LTNode* posPrev = pos->prev;LTNode* newnode = BuyListNode(x);//posPrev newnode posposPrev->next = newnode;newnode->prev = posPrev;newnode->next = pos;pos->prev = newnode;
}//删除pos位置
void ListErase(LTNode* pos)
{assert(pos);// posPrev  pos  posNextLTNode* posPrev = pos->prev;LTNode* posNext = pos->next;posPrev->next = posNext;posNext->prev = posPrev;free(pos);pos = NULL;
}void ListDestroy(LTNode* phead)
{assert(phead);LTNode* cur = phead->next;while (cur != phead){LTNode* next = cur->next;free(cur);cur = next;}free(phead);
}
(3)Ltest.c
测试函数也可以自行封装几个,参照单链表的测试函数。
#include "Linked List.h"void TestList1()
{LTNode* plist = ListInit();ListPushBack(plist, 1);ListPushBack(plist, 2);ListPushBack(plist, 3);ListPushBack(plist, 4);ListPrint(plist);ListPopBack(plist);ListPopBack(plist);ListPrint(plist);}void TestList2()
{LTNode* plist = ListInit();ListPushFront(plist, 1);ListPushFront(plist, 2);ListPushFront(plist, 3);ListPushFront(plist, 4);ListPrint(plist);LTNode* pos = ListFind(plist, 3);if (pos){ListInsert(pos, 30);}ListPrint(plist);pos = ListFind(plist, 2);if (pos){ListErase(pos);}ListPrint(plist);ListDestroy(plist);plist = NULL;
}int main()
{//TestList1();TestList2();return 0;
}
总结
通过这篇文章,相信你已经对链表这个数据结构有了一定的了解,可以开始刷一些链表的OJ题目。如果只是看了一遍,建议上手敲敲代码,实践出真知。
创作不易,希望这篇文章能给你带来启发和帮助,如果喜欢这篇文章,请留下你的三连哦,你的支持的我最大的动力!!!