Three.js蒙皮骨骼变化原理 | 逆推蒙皮网格的世界位置
文章目录
- 关于蒙皮的GPU计算:
- 源码解析
- 转换成CPU可执行的代码:
- 法线部分
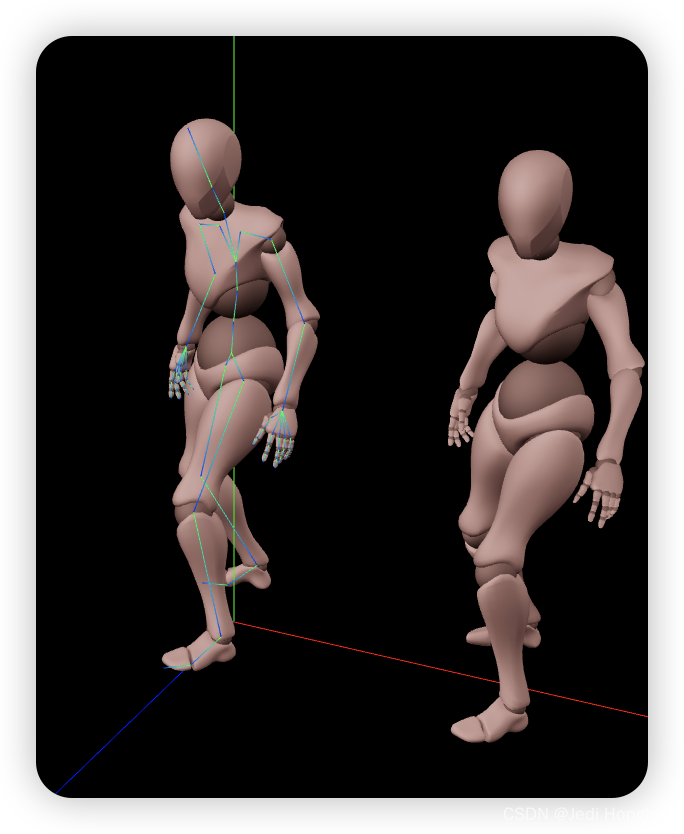
蒙皮骨骼的变化是在GPU中进行的 , 所以像获取静态物体一样获取geometry.position是不行的
查看当前版本(r160)的shader
关于蒙皮的GPU计算:
uniform mat4 bindMatrix;uniform mat4 bindMatrixInverse;uniform highp sampler2D boneTexture;mat4 getBoneMatrix( const in float i ) {int size = textureSize( boneTexture, 0 ).x;int j = int( i ) * 4;int x = j % size;int y = j / size;vec4 v1 = texelFetch( boneTexture, ivec2( x, y ), 0 );vec4 v2 = texelFetch( boneTexture, ivec2( x + 1, y ), 0 );vec4 v3 = texelFetch( boneTexture, ivec2( x + 2, y ), 0 );vec4 v4 = texelFetch( boneTexture, ivec2( x + 3, y ), 0 );return mat4( v1, v2, v3, v4 );}------------------------mat4 boneMatX = getBoneMatrix( skinIndex.x );mat4 boneMatY = getBoneMatrix( skinIndex.y );mat4 boneMatZ = getBoneMatrix( skinIndex.z );mat4 boneMatW = getBoneMatrix( skinIndex.w );------------------------vec4 skinVertex = bindMatrix * vec4( transformed, 1.0 );vec4 skinned = vec4( 0.0 );skinned += boneMatX * skinVertex * skinWeight.x;skinned += boneMatY * skinVertex * skinWeight.y;skinned += boneMatZ * skinVertex * skinWeight.z;skinned += boneMatW * skinVertex * skinWeight.w;transformed = ( bindMatrixInverse * skinned ).xyz;-----------法线相关-------------mat4 skinMatrix = mat4( 0.0 );skinMatrix += skinWeight.x * boneMatX;skinMatrix += skinWeight.y * boneMatY;skinMatrix += skinWeight.z * boneMatZ;skinMatrix += skinWeight.w * boneMatW;skinMatrix = bindMatrixInverse * skinMatrix * bindMatrix;objectNormal = vec4( skinMatrix * vec4( objectNormal, 0.0 ) ).xyz;#ifdef USE_TANGENTobjectTangent = vec4( skinMatrix * vec4( objectTangent, 0.0 ) ).xyz;#endif其中需要留意的boneTexture是自动创建的 (如果没提供的话) 按照没使用的情况来算(也没用过) 会自动调用computeBoneTexture
if ( skeleton.boneTexture === null ) skeleton.computeBoneTexture();p_uniforms.setValue( _gl, 'boneTexture', skeleton.boneTexture, textures );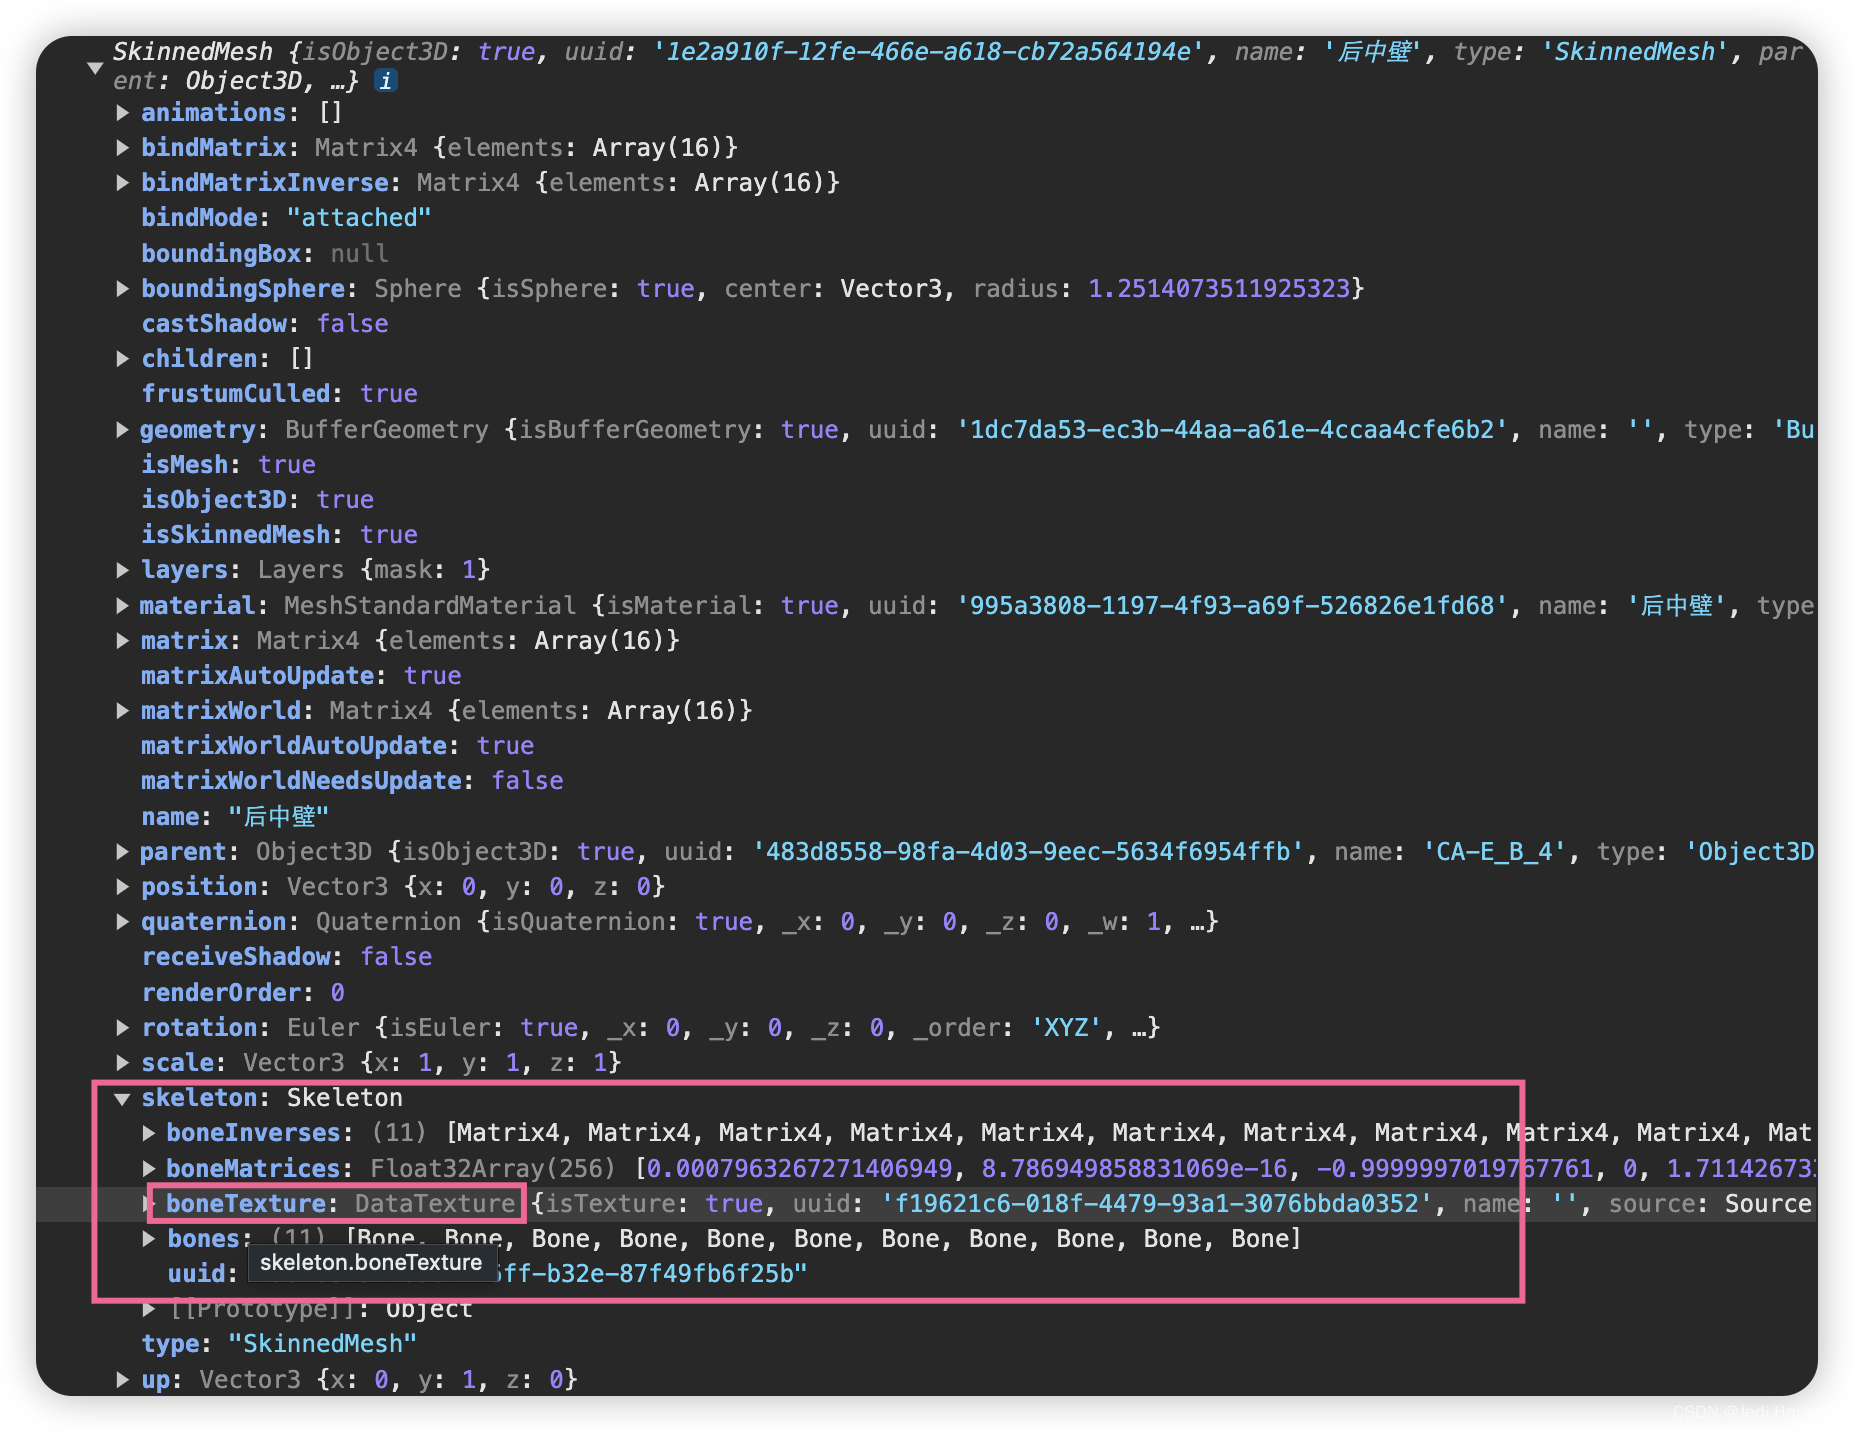
computeBoneTexture() {// layout (1 matrix = 4 pixels)// RGBA RGBA RGBA RGBA (=> column1, column2, column3, column4)// with 8x8 pixel texture max 16 bones * 4 pixels = (8 * 8)// 16x16 pixel texture max 64 bones * 4 pixels = (16 * 16)// 32x32 pixel texture max 256 bones * 4 pixels = (32 * 32)// 64x64 pixel texture max 1024 bones * 4 pixels = (64 * 64)let size = Math.sqrt( this.bones.length * 4 ); // 4 pixels needed for 1 matrixsize = Math.ceil( size / 4 ) * 4;size = Math.max( size, 4 );const boneMatrices = new Float32Array( size * size * 4 ); // 4 floats per RGBA pixelboneMatrices.set( this.boneMatrices ); // copy current valuesconst boneTexture = new DataTexture( boneMatrices, size, size, RGBAFormat, FloatType );boneTexture.needsUpdate = true;this.boneMatrices = boneMatrices;this.boneTexture = boneTexture;return this;}
源码解析
three.js将bone的信息保存在boneTexture上
每个bone的矩阵信息保存在4个像素上 每一个像素存储rgba 4个数据 4个像素加一起就是16个数据 也就是4维矩阵的数据
Skeleton.js update方法
每次更新更新boneMatrices数据,也就是boneTexture的数据,shader中通过这张纹理获取每个点的变化,然后应用到transformed上,也是因此 点的位置CPU获取不到无法获取box3模型以及射线检测等工作。不过使用本章的代码可以获取当前的世界位置,只不过应该会很卡顿,因为便利了模型的所有点,这也是为什么蒙皮骨骼要在GPU中工作。
for ( let i = 0, il = bones.length; i < il; i ++ ) {// compute the offset between the current and the original transformconst matrix = bones[ i ] ? bones[ i ].matrixWorld : _identityMatrix;_offsetMatrix.multiplyMatrices( matrix, boneInverses[ i ] );_offsetMatrix.toArray( boneMatrices, i * 16 );}if ( boneTexture !== null ) {boneTexture.needsUpdate = true;}
转换成CPU可执行的代码:
获取 boneTexture
boneTexture 是自动创建的 但是不是立刻 所以加载完模型是没有的 要获取要在下一帧 渲染过一次后
boneTexture
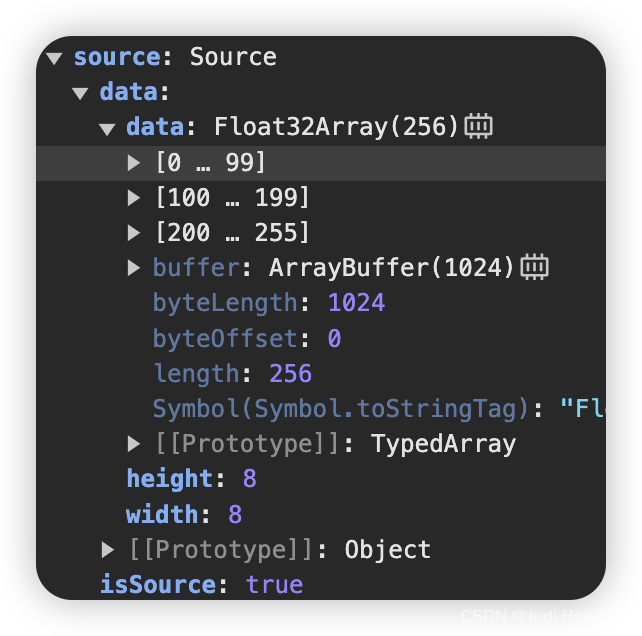
shader中的textureFetch读取数据 在CPU中可通过texture.source.data.data获取
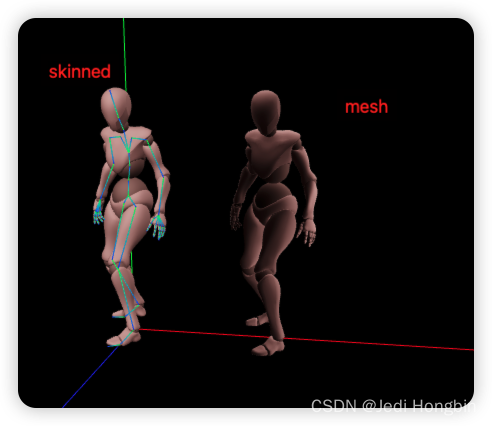
实现效果,右侧为生成的mesh。发现法线数据没有正确设置 接下来设置法线
当前已经获取到位置的代码:
const SkinnedMeshArr = this.helper.scene.getObjectsByProperty("type","SkinnedMesh") as THREE.SkinnedMesh[];const group = new THREE.Group();group.position.z -= 3;group.position.x -= 3;this.helper.add(group);requestAnimationFrame(() => {SkinnedMeshArr.forEach((skinnedMesh) => {const cloneTarget = new THREE.Mesh(skinnedMesh.geometry.clone(),skinnedMesh.material && !Array.isArray(skinnedMesh.material)? skinnedMesh.material.clone(): undefined);const position = skinnedMesh.geometry.getAttribute("position");const cloneTargetPosition =cloneTarget.geometry.getAttribute("position");const skinIndex =skinnedMesh.geometry.getAttribute("skinIndex");const skinWeight =skinnedMesh.geometry.getAttribute("skinWeight");const boneTexture = skinnedMesh.skeleton.boneTexture;console.log(skinnedMesh ,skinnedMesh.morphTargetInfluences);for (let i = 0; i < position.count; i++) {const i3 = i * 3;const i4 = i * 4;const coord = new THREE.Vector4(position.array[i3],position.array[i3 + 1],position.array[i3 + 2],1);const boneMatX = this.getBoneMatrix(boneTexture!,skinIndex.array[i4]);const boneMatY = this.getBoneMatrix(boneTexture!,skinIndex.array[i4 + 1]);const boneMatZ = this.getBoneMatrix(boneTexture!,skinIndex.array[i4 + 2]);const boneMatW = this.getBoneMatrix(boneTexture!,skinIndex.array[i4 + 3]);const skinVertex = coord.applyMatrix4(skinnedMesh.bindMatrix);const skinned = new THREE.Vector4();skinned.addVectors(skinned,skinVertex.clone().applyMatrix4(boneMatX).multiplyScalar(skinWeight.array[i4]));skinned.addVectors(skinned,skinVertex.clone().applyMatrix4(boneMatY).multiplyScalar(skinWeight.array[i4 + 1]));skinned.addVectors(skinned,skinVertex.clone().applyMatrix4(boneMatZ).multiplyScalar(skinWeight.array[i4 + 2]));skinned.addVectors(skinned,skinVertex.clone().applyMatrix4(boneMatW).multiplyScalar(skinWeight.array[i4 + 3]));// transformed = ( bindMatrixInverse * skinned ).xyz;const transformed = skinned.applyMatrix4(skinnedMesh.bindMatrixInverse);cloneTargetPosition.setXYZ(i,transformed.x,transformed.y,transformed.z);}skinnedMesh.updateMatrix();skinnedMesh.updateMatrixWorld(true);cloneTarget.applyMatrix4(skinnedMesh.matrix);skinnedMesh.parent.add(cloneTarget);cloneTarget.position.x += 3;// skinnedMesh.visible = false;// group.add(cloneTarget);});});getBoneMatrix(boneTexture: THREE.DataTexture, index: number) {// 可以简化成这一行// return new THREE.Matrix4().fromArray(boneTexture!.source.data.data,index * 16);//下面是模拟shder的计算const size = boneTexture!.source.data.width;const j = index * 4;const x = j % size;// glsl float 转换 int 小数被丢弃 向下取整const y = Math.floor(j / size);const v1 = this.texelFetch(boneTexture, x, y, size);const v2 = this.texelFetch(boneTexture, x + 1, y, size);const v3 = this.texelFetch(boneTexture, x + 2, y, size);const v4 = this.texelFetch(boneTexture, x + 3, y, size);return new THREE.Matrix4().fromArray([...v1, ...v2, ...v3, ...v4]);}texelFetch(boneTexture: THREE.DataTexture,x: number,y: number,size: number) {const row = 4;const column = size * 4;return [boneTexture.source.data.data[x * row + y * column],boneTexture.source.data.data[x * row + y * column + 1],boneTexture.source.data.data[x * row + y * column + 2],boneTexture.source.data.data[x * row + y * column + 3],];}法线部分
shader的实现
mat4 skinMatrix = mat4( 0.0 );skinMatrix += skinWeight.x * boneMatX;skinMatrix += skinWeight.y * boneMatY;skinMatrix += skinWeight.z * boneMatZ;skinMatrix += skinWeight.w * boneMatW;skinMatrix = bindMatrixInverse * skinMatrix * bindMatrix;objectNormal = vec4( skinMatrix * vec4( objectNormal, 0.0 ) ).xyz;#ifdef USE_TANGENTobjectTangent = vec4( skinMatrix * vec4( objectTangent, 0.0 ) ).xyz;#endif
CPU模拟
// 法线
// objectNormal = vec4( skinMatrix * vec4( objectNormal, 0.0 ) ).xyz;
const skinMatrix = new THREE.Matrix4();
boneMatX.multiplyScalar(skinWeight.array[i4]);
this.MatrixAdd(skinMatrix, boneMatX);
boneMatY.multiplyScalar(skinWeight.array[i4 + 1]);
this.MatrixAdd(skinMatrix, boneMatY);
boneMatZ.multiplyScalar(skinWeight.array[i4 + 2]);
this.MatrixAdd(skinMatrix, boneMatZ);
boneMatW.multiplyScalar(skinWeight.array[i4 + 3]);
this.MatrixAdd(skinMatrix, boneMatW);
const m4 = new THREE.Matrix4().multiply(skinnedMesh.bindMatrixInverse).multiply(skinMatrix).multiply(skinnedMesh.bindMatrix);
const normal = new THREE.Vector3(cloneTargetNormal.array[i3],cloneTargetNormal.array[i3 + 1],cloneTargetNormal.array[i3 + 2]
);
const objectNormal = normal.applyMatrix4(m4);
cloneTargetNormal.array[i3] = objectNormal.x;
cloneTargetNormal.array[i3 + 1] = objectNormal.y;
cloneTargetNormal.array[i3 + 2] = objectNormal.z;MatrixAdd(m1: THREE.Matrix4, m2: THREE.Matrix4) {for (let index = 0; index < 16; index++) {m1.elements[index] += m2.elements[index];}return m1;
}
👌