【Touchinput 】指定输入方法类型(11)
原
每个文本字段都需要某种类型的文本输入,例如电子邮件地址,电话号码或纯文本。因此,为应用程序中的每个文本字段指定输入类型非常重要,以便系统显示相应的软输入方法(例如屏幕上的键盘)。
除了使用输入法提供的按钮类型之外,还应指定输入方法是否提供拼写建议,大写新句子以及用动作按钮(如“完成”或“ 下一步”)替换回车按钮等行为。本课介绍如何指定这些特征。
指定键盘类型
您应该始终通过向元素添加android:inputType属性来为文本字段声明输入方法<EditText>。
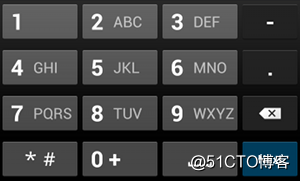
图1的phone输入类型。
例如,如果您希望输入电话号码的输入法,请使用以下"phone"值:
<EditText
    android:id="@+id/phone"
    android:layout_width="fill_parent"
    android:layout_height="wrap_content"
    android:hint="@string/phone_hint"
    android:inputType="phone" />
或者,如果文本字段是密码,请使用该"textPassword"值,以便文本字段隐藏用户的输入: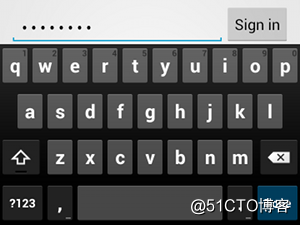
图2.该textPassword输入类型。
<EditText
    android:id="@+id/password"
    android:hint="@string/password_hint"
    android:inputType="textPassword"
    ... />
有几个可能的值记录在 android:inputType属性中,并且可以组合一些值来指定输入法外观和其他行为。
启用拼写建议和其他行为
该android:inputType属性允许您为输入方法指定各种行为。最重要的是,如果您的文本字段用于基本文本输入(如用于文本消息),则应该使用该"textAutoCorrect"值启用自动拼写校正 。
您可以将不同的行为和输入法样式与该android:inputType属性组合在一起 。例如,下面介绍如何创建一个文本字段来大写句子的第一个单词,并自动更正拼写错误:
<EditText
    android:id="@+id/message"
    android:layout_width="wrap_content"
    android:layout_height="wrap_content"
    android:inputType=
        "textCapSentences|textAutoCorrect"
    ... />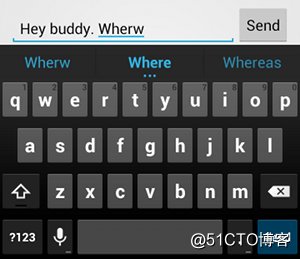
图3.添加textAutoCorrect 提供了拼写错误的自动纠正。
指定输入法操作
大多数软输入方法在适合当前文本字段的底部角落处提供用户操作按钮。默认情况下,除非您的文本字段允许使用多行文本(例如with ),否则系统会将此按钮用于Next或 Done操作 android:inputType="textMultiLine",在这种情况下,操作按钮是回车符。但是,您可以指定可能更适合您的文本字段的其他操作,例如“ 发送”或“ 去”。
要指定键盘操作按钮,请使用android:imeOptions 具有操作值(例如"actionSend"或) 的属性"actionSearch"。例如:
<EditText
    android:id="@+id/search"
    android:layout_width="fill_parent"
    android:layout_height="wrap_content"
    android:hint="@string/search_hint"
    android:inputType="text"
    android:imeOptions="actionSend" />
图4.发布按钮在您声明时出现 android:imeOptions="actionSend"。
然后,您可以通过TextView.OnEditorActionListener为EditText 元素定义一个按钮来监听操作按钮 。在您的侦听器中,响应EditorInfo类中定义的相应IME操作ID ,例如 IME_ACTION_SEND。例如:
EditText editText = (EditText) findViewById(R.id.search);
editText.setOnEditorActionListener(new OnEditorActionListener() {
    @Override
    public boolean onEditorAction(TextView v, int actionId, KeyEvent event) {
        boolean handled = false;
        if (actionId == EditorInfo.IME_ACTION_SEND) {
            sendMessage();
            handled = true;
        }
        return handled;
    }
});
提供自动完成的建议
如果您想在用户输入时向用户提供建议,则可以使用EditText被调用的子类AutoCompleteTextView。要实现自动完成,您必须指定一个Adapter提供文本建议。有几种适配器可用,具体取决于数据来自何处,例如来自数据库或阵列。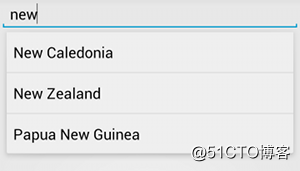
图5.AutoCompleteTextView带有文本建议的 示例
以下过程描述如何设置一个AutoCompleteTextView从数组中提供建议的方法,使用ArrayAdapter:
添加AutoCompleteTextView到您的布局。以下是仅包含文本字段的布局:
<?xml version="1.0" encoding="utf-8"?>
<AutoCompleteTextView xmlns:android="http://schemas.android.com/apk/res/android"
    android:id="@+id/autocomplete_country"
    android:layout_width="fill_parent"
    android:layout_height="wrap_content" />
定义包含所有文本建议的数组。例如,下面是一个在XML资源文件(res/values/strings.xml)中定义的国家名称数组
<?xml version="1.0" encoding="utf-8"?>
<resources>
    <string-array name="countries_array">
        <item>Afghanistan</item>
        <item>Albania</item>
        <item>Algeria</item>
        <item>American Samoa</item>
        <item>Andorra</item>
        <item>Angola</item>
        <item>Anguilla</item>
        <item>Antarctica</item>
        ...
    </string-array>
</resources>
在你的Activity或者Fragment,使用下面的代码来指定提供建议的适配器:
// Get a reference to the AutoCompleteTextView in the layout
AutoCompleteTextView textView = (AutoCompleteTextView) findViewById(R.id.autocomplete_country);
// Get the string array
String[] countries = getResources().getStringArray(R.array.countries_array);
// Create the adapter and set it to the AutoCompleteTextView
ArrayAdapter<String> adapter =
        new ArrayAdapter<String>(this, android.R.layout.simple_list_item_1, countries);
textView.setAdapter(adapter);
这里,ArrayAdapter初始化一个新countries_array字符串,将字符串数组中的每个项绑定到 布局TextView中存在的项simple_list_item_1(这是Android提供的布局,为列表中的文本提供标准外观)。
AutoCompleteTextView通过调用 将适配器分配给setAdapter()。
Lastest Update:2018.04.25联系我
QQ:94297366
微信打赏:https://pan.baidu.com/s/1dSBXk3eFZu3mAMkw3xu9KQ
公众号推荐:

转载于:https://blog.51cto.com/4789781/2125387