第一个 Angular 项目 - 动态页面
第一个 Angular 项目 - 动态页面
使用的所有技巧都在下面的笔记里:
-
[Angular 基础] - 数据绑定(databinding)
-
[Angular 基础] - 指令(directives)
以上为静态页面,即不涉及到跨组件交流的内容
以下涉及到组件内的沟通,从这开始数据就“活”了
-
[Angular 基础] - 自定义事件 & 自定义属性
-
[Angular 基础] - 视图封装 & 局部引用 & 父子组件中内容传递
-
[Angular 基础] - 生命周期函数
静态页面的实现在这里:第一个 Angular 项目 - 静态页面
这篇笔记结合新学的绑定知识,盘活数据
拟态路由
Angular 有对 routing 的 built-in 支持,鉴于这里暂时还没有学到 routing,所以这里用的是拟态的方式去实现。这里的需求是 3 个点:
-
导航栏有一个对所处的页面进行高亮
-
切换到
recipe页面只显示 recipe 的内容 -
切换到
shopping-list页面只显示 shopping list 相关的内容
接下来对功能的实现进行分析:
-
需要在 header 的 VM 层中保存一个变量,这个变量名用以动态修改
ngClass,并在所处的页面添加active这一 class 名 -
header 的 VM 层需要使用
@Output这个指令去创建一个 EventEmitter,传输的对象为当前所处的页面 -
app 的 V 层和 VM 层需要动态接受从子组件传来的事件,并且动态渲染对应页面的内容
动态渲染的部分可以用
ngIf或是ngSwitch实现
分析完了后就可以开始实现了
header
header V 层
这里的修改相对比较简单,主要是 ngClass 的修改,绑定 click 事件这两个,这部分的内容都可以在 [Angular 基础] - 指令(directives) 中查看,修改如下:
<ul class="nav navbar-nav"><li [ngClass]="{ active: activeTab === 'recipe' }"><a href="#" (click)="onClickTab('recipe')">Recipes</a></li><li [ngClass]="{ active: activeTab === 'shopping-list' }"><a href="#" (click)="onClickTab('shopping-list')">Shopping List</a></li>
</ul>
header VM 层
这里主要修改的部分就是:
- 新建一个变量保存 activeTab
- 新建一个 EventEmitter 向父组件传输当前的 activeTab
- 新建一个 clickHandler 去实现上面两个操作
具体代码如下:
export class HeaderComponent {@Output() activeTabChanged = new EventEmitter<string>();activeTab: string = 'recipe';onClickTab(activeTab: string) {this.activeTab = activeTab;this.activeTabChanged.emit(activeTab);}
}
EventEmitter 部分的实现可以查看这篇笔记:[Angular 基础] - 自定义事件 & 自定义属性
app 路由修改
app 路由 V 层修改
V 层的修改相对比较简单,主要是需要将 EventEmitter 绑定一下,并且实现一下条件控制,我这里用 ngSwitch 实现:
<app-header (activeTabChanged)="onTabChange($event)"></app-header><div class="container"><div class="row"><div class="col-md-12"><div [ngSwitch]="activeTab"><app-recipes *ngSwitchCase="'recipe'"></app-recipes><app-shopping-list *ngSwitchCase="'shopping-list'"></app-shopping-list></div></div></div>
</div>
app 路由 VM 层修改
VM 层实现的功能也差不多,新建一个变量保存 activeTab,随后实现对应的 onTabChange 去修改 activeTab,实现如下:
export class AppComponent {title = 'recipe-book';activeTab = 'recipe';onTabChange($event: string) {this.activeTab = $event;}
}
最后实现的效果如下:

recipe-list 清理
recipe-list 部分要清理的比较多:
-
将单独的 recipe 从 recipe-list 传到 recipe-item 中
刚开始写的时候还没有涉及到组件之间的沟通,因此子组件无法获取父组件的数据
现在父子组件已经可以沟通了,那么还是要遵从一下 SRP 的
-
点击列表中的 recipe,右侧能够显示出 recipe 的具体信息
这部分就像 wireframe 中的设定一样:

传递 recipe 到子组件
recipe-list V 层清理
<a href="#" class="list-group-item clearfix" *ngFor="let recipe of recipes"><app-recipe-item [recipe]="recipe"></app-recipe-item>
</a>
这里原本的内容,包括渲染名称、描述、图片都会移到 recipe-item 中去
recipe-item V 层修改
这里主要就是接受之前在 recipe-list V 层的模板
<div class="pull-left"><h4 class="list-group-item-heading">{{ recipe.name }}</h4><p class="list-group-item-text">{{ recipe.description }}</p>
</div>
<span class="pull-right"><img[src]="recipe.imagePath"[alt]="recipe.name"class="image-responsive"style="max-height: 50px"/>
</span>
recipe-item VM 层修改
这里通过 @Input 去接受父组件传来的数据以完成动态渲染,代码如下:
export class RecipeItemComponent {@Input() recipe: Recipe;
}
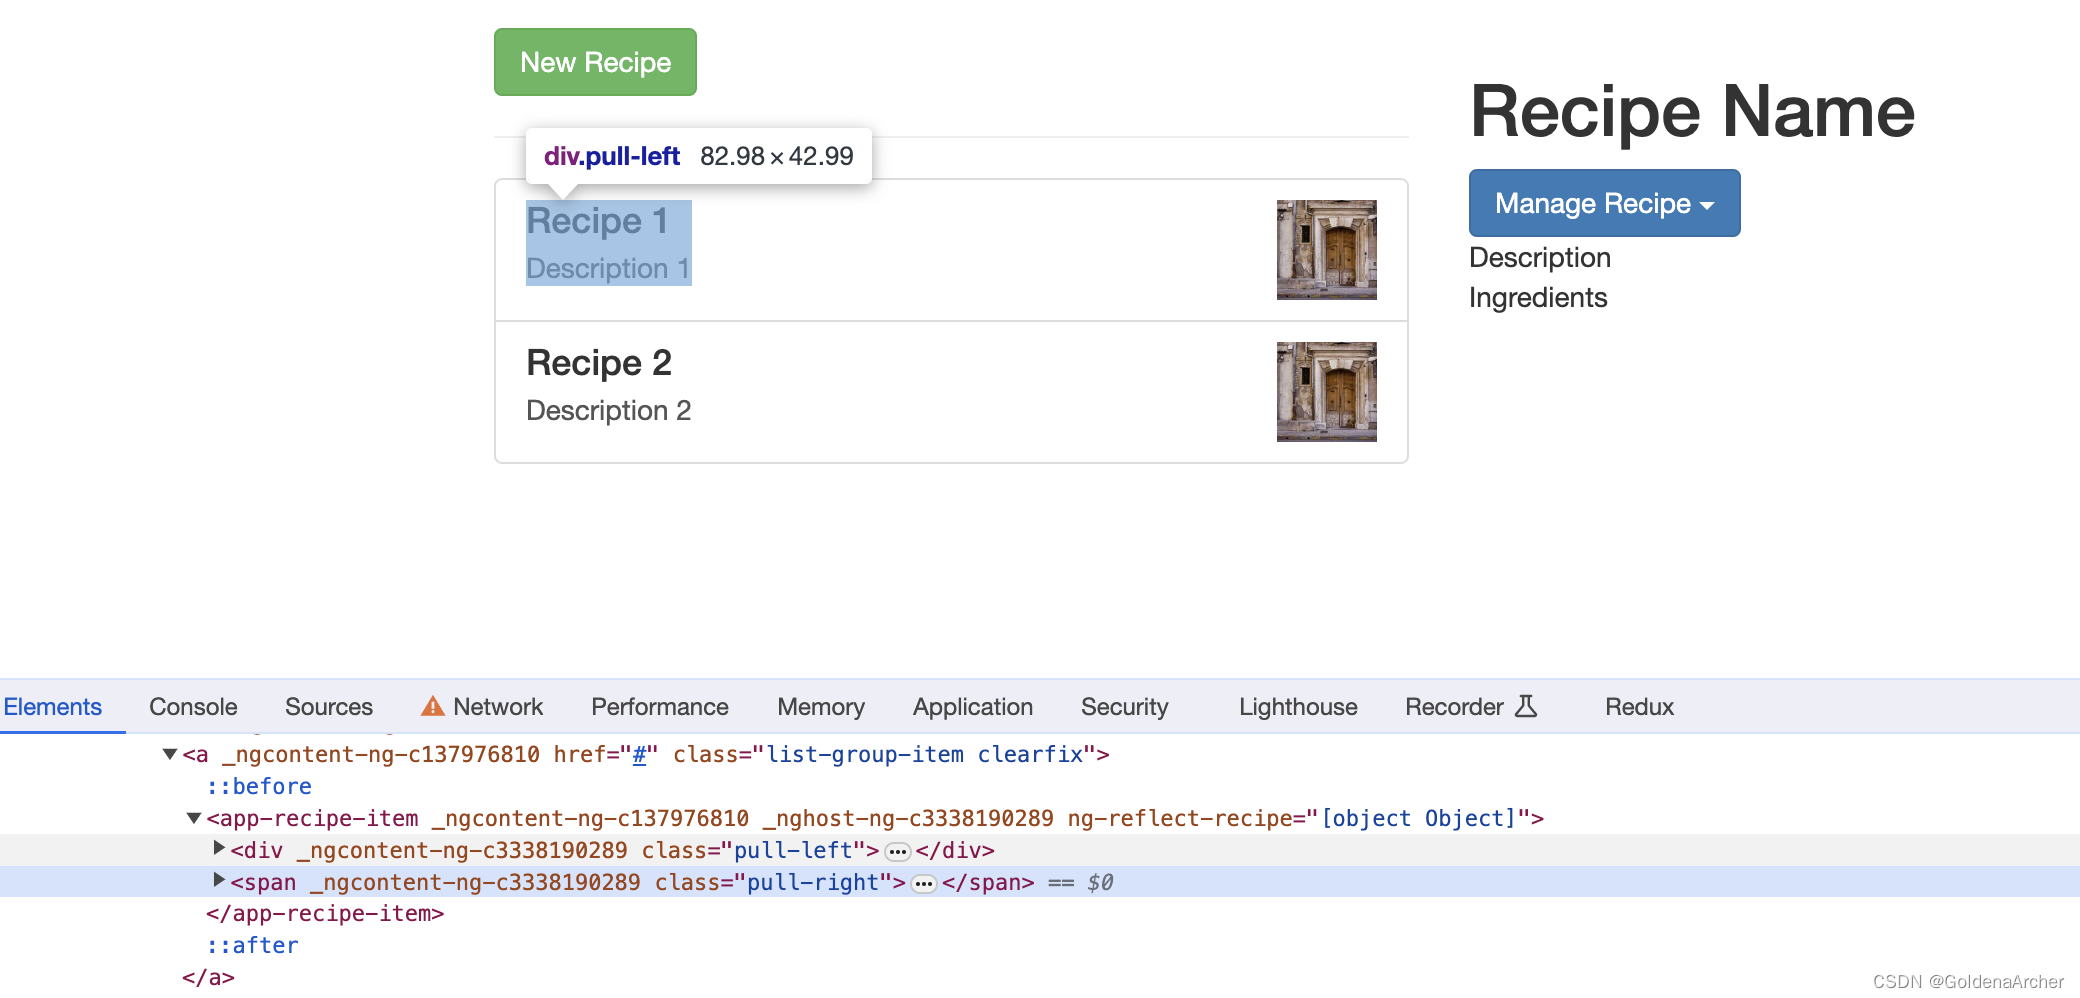
这里看到样式没有任何的变化,不过 recipe 的渲染部分是由 recipe-item 完成的:
选择当前展示 recipe
这部分的实现其实和 navigation 的实现差不多,逻辑也基本一样。
看一下目前的项目结构:
❯ tree src/app/
src/app/
├── recipes
│   ├── recipe-detail
│   ├── recipe-list
│   │   ├── recipe-item
只不过这里处理 Output 的是 recipe-list,接受子组件传来的参数是 recipe,并且 recipe 需要将传过来的数据再传递到 recipe-detail 进行展示
⚠️:我这里偷了个懒,直接从 recipe-list 开始往上走。原本的写法应该是所有的东西都放在 recipe-item 里,然后一个个 emit event,因为 Angular 默认情况下是阻止 event propagation 的,所以只能手动一个个往上送(bubbling)
recipe-list V 层添加点击事件
<ahref="#"class="list-group-item clearfix"*ngFor="let recipe of recipes"[ngClass]="{ active: recipe === selectedRecipe }"(click)="onSelectRecipe(recipe)"
><app-recipe-item [recipe]="recipe"></app-recipe-item>
</a>
这里的 a 标签完全是可以丢到 app-recipe-item 去实现的,不过事件一旦传到了 app-recipe-item,就新创建了一个父子之间的沟通,所以需要从 app-recipe-item 再向上 propagate 一个事件,所以这里偷懒了
recipe-list VM 层添加选择事件
这里是对 onSelectRecipe 进行的处理,这里本身也是一个事件的中转站,它需要向 recipes 这一层去发送事件,使得当前被选中的对象可以传到 recipe-detail 中被展示:
export class RecipeListComponent {selectedRecipe: Recipe = this.recipes[0];@Output() activeRecipeChanged = new EventEmitter<Recipe>();ngOnInit() {this.activeRecipeChanged.emit(this.recipes[0]);}onSelectRecipe(recipe: Recipe) {this.selectedRecipe = recipe;this.activeRecipeChanged.emit(recipe);}
}
💡:我这里是用了 ngOnInit 在组件渲染时自动旋转数组中第一个对象,这个根据业务条件设置,也可以不选择这种做法。
recipe V 层添加绑定事件
这里除了新增事件绑定之外,还需要将绑定的对象传到 recipe-detail 中去,主要修改如下:
<div class="row"><div class="col-md-5"><app-recipe-list(activeRecipeChanged)="onRecipeChange($event)"></app-recipe-list></div><div class="col-md-7"><app-recipe-detail[activeRecipe]="activeRecipe"*ngIf="activeRecipe; else noActiveRecipe"></app-recipe-detail><ng-template #noActiveRecipe><p>Please create and select a recipe to view the detailed information</p></ng-template></div>
</div>
这里使用了 ngIf 进行条件控制,预防的是一个边界条件,也就是当数组为空时,recipes[0] 会是一个 undefined,这样会影响 recipe-detail 的后续操作
recipe VM 层添加接受修改数据
VM 层变动不大,主要是接受传递的事件,然后保存传上来的 recipe 即可:
export class RecipesComponent {activeRecipe: Recipe;onRecipeChange($event: Recipe) {this.activeRecipe = $event;}
}
recipe-detail
这里主要就是用 @Input 接受一下传来的数据,在 V 层渲染出来即可,变动比较少,代码就都贴下面了,V 层除了变量名基本没有变动:
export class RecipeDetailComponent {@Input() activeRecipe: Recipe;
}
<div class="row"><div class="col-xs-12"><imgsrc="{{ activeRecipe.imagePath }}"alt=" {{ activeRecipe.name }} "class="img-responsive"/></div>
</div>
<div class="row"><div class="col-xs-12"><h1>{{ activeRecipe.name }}</h1></div>
</div>
<div class="row"><div class="col-xs-12"><div class="btn-group"><button type="button" class="btn btn-primary dropdown-toggle">Manage Recipe <span class="caret"></span></button><ul class="dropdown-menu"><li><a href="#">To Shopping List</a></li><li><a href="#">Edit Recipe</a></li><li><a href="#">Delete Recipe</a></li></ul></div></div>
</div>
<div class="row"><div class="col-xs-12">{{ activeRecipe.description }}</div>
</div>
<div class="row"><div class="col-xs-12">Ingredients</div>
</div>
最后效果如下:

⚠️:后来发现图片的路径没放进去,HTML 部分更新了,但是动图没更新
shopping-list
这里的应用主要是 local reference 和 @ViewChild,wireframe 中看到有两个输入:

所以这里两种方式都会用上
导入 FormsModule
不导入 FormsModule 所有的实现都会以默认的 HTML 实现,这里的 button 类型是 submit,也就是说会触发一个提交的 action,一般情况下会导致页面重新刷新
导入 FormsModule 会让 Angular 接收所有传来的参数,并且让 Angular 癌性决定后面的操作
shopping-list V 层修改
这里主要修改的部分就是在两个 input 中加入了 local reference,并且在 submit 的 button 那里绑定了点击时间,并且将 nameInput 作为 reference 传了过去
<div class="row"><div class="col-xs-12"><form><div class="row"><div class="col-sm-5 form-group"><label for="name">Name</label><input type="text" id="name" class="form-control" #nameInput /></div><div class="col-sm-2 form-group"><label for="amount">Amount</label><input type="number" id="amount" class="form-control" #amountInput /></div></div><div class="row"><div class="col-xs-12"><div class="btn-toolbar"><buttonclass="btn btn-success mr-2"type="submit"(click)="onAddIngredient(nameInput)">Add</button><button class="btn btn-danger mr-2" type="button">Delete</button><button class="btn btn-primary" type="button">Edit</button></div></div></div></form></div>
</div>
shopping-list VM 层修改
这里比较简单,使用 @ViewChild 绑定当前 V 层的 local reference,并且接受点击事件传来的 #nameInput,最后按照老规矩,创建一个 EventEmitter 让父组件监听:
export class ShoppingEditComponent {@ViewChild('amountInput', { static: true })amountInput: ElementRef;@Output() ingredientAdded = new EventEmitter<Ingredient>();onAddIngredient(nameInput: HTMLInputElement) {this.ingredientAdded.emit({name: nameInput.value,amount: this.amountInput.nativeElement.value,});}
}
shopping-cart 接受子组件传来的参数
这里也比较简单,就放在一起写了
<div class="row"><div class="col-xs-10"><app-shopping-edit(ingredientAdded)="onAddIngredient($event)"></app-shopping-edit><hr /><ul class="list-group"><aclass="list-group-item"style="cursor: pointer"*ngFor="let ingredient of ingredients">{{ ingredient.name }} ({{ ingredient.amount }})</a></ul></div>
</div>
import { Component } from '@angular/core';
import { Ingredient } from '../shared/ingredient.model';@Component({selector: 'app-shopping-list',templateUrl: './shopping-list.component.html',styleUrl: './shopping-list.component.css',
})
export class ShoppingListComponent {ingredients: Ingredient[] = [new Ingredient('Apples', 5),new Ingredient('Tomatoes', 10),];onAddIngredient(ingredient: Ingredient) {this.ingredients.push(ingredient);}
}
最后完成效果如下:

至此一个功能大抵完成的动态页面就写完了